
Subscribe to Our Youtube Channel
Related Manuals for SMART Board 800ixe-MP


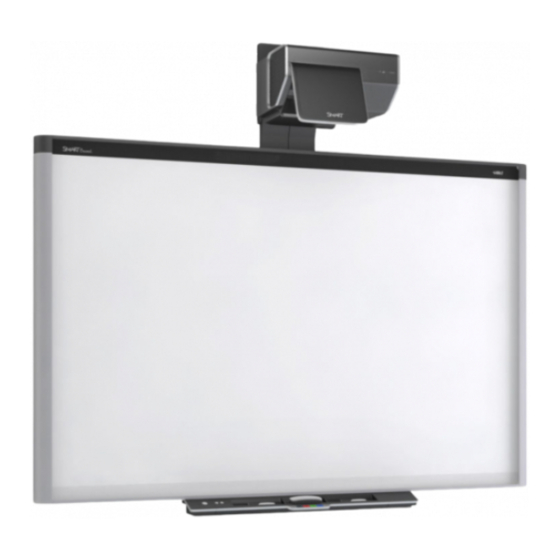
Summary of Contents for SMART Board 800ixe-MP
- Page 1 SMART Board™ 800ixe-MP Interactive whiteboard system with appliance Configuration and user’s guide...
- Page 2 © 2011 SMART Technologies ULC. All rights reserved. No part of this publication may be reproduced, transmitted, transcribed, stored in a retrieval system or translated into any language in any form by any means without the prior written consent of SMART Technologies ULC. Information in this manual is subject to change without notice and does not represent a commitment on the part of SMART.
-
Page 3: Important Information
Failure to follow the installation instructions shipped with your SMART product could result in personal injury and damage to the product. To reduce the risk of fire or electric shock, do not expose the SMART product to rain or moisture. - Page 4 Do not place the unit in hot locations, such as near heating equipment. Doing so could cause a malfunction and shorten the life of the projector. Avoid setting up and using the SMART product in an area with excessive levels of dust, humidity and smoke.
- Page 5 Do not allow liquids or commercial solvents of any kind to flow into the projector. When transporting your SMART product, repack it with as much of the original packaging as possible. This packaging was designed with optimal shock and vibration protection.
- Page 6 Make sure an electrical socket is near your SMART product and remains easily accessible during use. Using your SMART product near a TV or radio could cause interference to the images or sound. If this happens, move the TV or radio away from the projector.
-
Page 7: Environmental Requirements
I M P O R T A N T I N F O R M A T I O N Environmental requirements Before you install your SMART Board 800ixe-MP interactive whiteboard system with appliance, review the following environmental requirements. Environmental... -
Page 9: Table Of Contents
Important information Safety warnings, cautions and important information Environmental requirements Chapter 1: About your interactive whiteboard system Features of the SMART Board interactive whiteboard system with appliance Included accessories Optional accessories Chapter 2: Installing your interactive whiteboard system Choosing a location... - Page 10 C O N T E N T S Focusing and adjusting the projector image Replacing the projector lamp Chapter 7: Troubleshooting your interactive whiteboard system Resetting the appliance Correcting image alignment issues Diagnosing issues using the interactive whiteboard system indicators and controls Resolving network communication issues Resolving audio issues Resolving video issues...
-
Page 11: Chapter 1: About Your Interactive Whiteboard System
Other optional accessories Your SMART Board 800ixe-MP interactive whiteboard system with appliance combines a wall- mounted, ultra-short-throw SMART UX60 projector with an appliance and a SMART Board 800 series interactive whiteboard. This chapter describes the features of your interactive whiteboard and provides information about... -
Page 12: Features Of The Smart Board Interactive Whiteboard System With Appliance
If you accidentally clear your notes, you can restore them. SMART Board 800 series interactive whiteboard Your SMART Board 800 series interactive whiteboard, featuring SMART’s proprietary DViT™ (Digital Vision Touch) technology, is the most intuitive touch sensitive front projection interactive whiteboard in the world. -
Page 13: Smart Ux60 Projector
The features of the projector system include: A wall-mounted, high-offset SMART UX60 projector engine that uses single chip DLP® technology by Texas Instruments™, providing BrilliantColor™ performance, High Contrast, and Gamma 2.1 correction with Bright Classroom, Dark Classroom, sRGB, User and SMART Presentation modes 16:10 aspect ratio 2000 ANSI Lumens (typical) PAL, PAL-N, PAL-M, SECAM, NTSC, NTSC 4.43, SDTV (480i/p and 576i/p), HDTV (720p... -
Page 14: Appliance Control Panel (Acp)
Two projector padlock loops Mounting hardware for solid masonry or framed wall installations Templates and instructions for positioning the system safely Your SMART UX60 projector connection panel supports the following connectors: 3-pin mini-DIN connector 4-pin powered mini-DIN connector and 7-pin mini-DIN connector S-video input and associated dual-channel audio input (two RCA jacks) HDMI™... -
Page 15: Included Accessories
The following accessories are included with your SMART Board 800ixe-MP interactive whiteboard system with appliance. Remote control The remote control enables you to control the system and set up your SMART UX60 projector. Use the remote control to access menu options, system information and input selection options. -
Page 16: Optional Accessories
Ensure that Autoplay is enabled on your computer before you connect the auto-launch cable. See the SMART Support website (smarttech.com/support) for additional information. If you are using a laptop that doesn’t have the SMART Meeting Pro software installed, connect the laptop to the interactive whiteboard using the auto-launch cable. The SMART Meeting Pro icon appears in the notification area on your laptop once you connect your SMART GoWire auto-launch... -
Page 17: Chapter 2: Installing Your Interactive Whiteboard System
Installing your audio system Routing the cables Use the cable connection label on the back of your SMART Board 800 series interactive whiteboard as a quick reference when you cable your SMART Board 800ixe-MP interactive whiteboard system with appliance. See the included documents for instructions on how to install your product and use the mounting template. -
Page 18: Choosing A Location
For best presentation alignment, mount your interactive whiteboard system in a location that’s central to your audience’s viewing direction. For mobile or adjustable installation options, contact your authorized SMART reseller (smarttech.com/where). W A R N I N G Your interactive whiteboard weighs approximately 61 lb. -
Page 19: Choosing A Height
C H A P T E R 2 Installing your interactive whiteboard system Choosing a height SMART includes a mounting template with each interactive whiteboard system. If you lose this template, contact your authorized SMART reseller (smarttech.com/where). Using this template ensures that you can do the following: Mount the projector at a safe height for head space clearance, while maintaining enough space for airflow and installation access above the unit. -
Page 20: Installing Your Audio System
SMART GoWire auto-launch cable to laptop (if you’re using a laptop) Locking the pen tray to your interactive whiteboard To learn how to lock the pen tray to your interactive whiteboard, see the SMART Board X800 Series Interactive Whiteboard User’s Guide (smarttech.com/kb/144817). -
Page 21: Chapter 3: Starting Your Interactive Whiteboard System
It explains how to use the Configuration settings menu to access and change settings for your interactive whiteboard system components, the web browser and SMART Meeting Pro application. It also provides information on calibrating and orienting your interactive whiteboard. -
Page 22: Configuration Settings
N O T E The system requires this password to access the system configuration page. To set a new password 1. Press System on the SMART Business Toolbar, and then select Settings. The configuration settings menu appears. 2. Click the Administration tab. -
Page 23: Configuration Settings Menu
Description General Change the default mode for the SMART Meeting Pro application and select the default file format for saved files. Change your power settings, for instance, the amount of time you want your system to remain idle before it enters sleep mode. - Page 24 All import file names require an XML extension. Select Reset Settings to change every configuration setting, excluding your administrator password, back to its default value. About View hardware information and find out how to contact SMART Support and register your product online.
-
Page 25: Calibrating Your Interactive Whiteboard
Starting your interactive whiteboard system Calibrating your interactive whiteboard The first time you connect your SMART Board interactive whiteboard, you must calibrate it. This process ensures that the cameras accurately track your finger and the pens on the interactive surface. -
Page 26: Updating Your Firmware
C H A P T E R 3 Starting your interactive whiteboard system To orient your interactive whiteboard 1. Press the Orientation button on the pen tray. N O T E If you have the Configuration Settings menu open (see Configuration settings on page 12), you can orient your interactive whiteboard through the Tools tab, and then press Orient. -
Page 27: Chapter 4: Using Your Interactive Whiteboard System
Using your projector This section explains how to use your projector and its included remote control. Using your remote control The SMART UX60 projector remote control enables you to access on-screen projector menus and change projector settings. Installing the remote control battery Follow this procedure to use the remote control for the first time or to replace the remote control battery. - Page 28 C H A P T E R 4 Using your interactive whiteboard system W A R N I N G Reduce the risk associated with a leaking battery in the projector’s remote control by following these practices: Use only the specified type of coin-cell battery. Orient the battery’s positive (+) and negative (–) terminals according to the markings on the remote control.
- Page 29 C H A P T E R 4 Using your interactive whiteboard system Using the remote control buttons The projector remote control enables you to access on-screen menus and change projector settings. Press the Power button on the ACP and select the Standby button or press the Power button twice on the remote control to put the projector into Standby mode.
- Page 30 ACP is not meant to substitute for the remote control. Setting Notes Image Adjustment menu Display Mode Indicates the projector’s display output The default is SMART Presentation. (SMART Presentation, Bright Room, Dark Room, sRGB and User). Brightness Adjusts projector brightness from 0 to The default is 50.
- Page 31 C H A P T E R 4 Using your interactive whiteboard system Setting Notes Sharpness Adjusts the projected image’s This setting applies to S-video and sharpness from 0 to 31. composite video inputs only. Tint Adjusts the image color balance of red This setting applies to S-video and and green from 0 to 100.
- Page 32 C H A P T E R 4 Using your interactive whiteboard system Setting Notes Default menu Auto Signal Detect Enables or disables signal searching of Select On to have the projector input connectors. continuously switch inputs until it finds an active video source.
- Page 33 (SMART, Capture User Startup projector lamp is starting and an image Screen or Preview Startup Screen). isn’t displayed. SMART displays the default SMART logo on a blue background. Capture User Startup Screen closes the on-screen display menu and captures the entire projected interactive whiteboard image.
- Page 34 C H A P T E R 4 Using your interactive whiteboard system Setting Notes Network menu Status Displays the current network status (Connected, Disconnected or Off). Password E-mails the network password to the e- See Web page management on page Reminder mail recipient.
- Page 35 C H A P T E R 4 Using your interactive whiteboard system Setting Notes Language menu Language Selects language preference. Projector menu support is available in English (default), Chinese (Simplified), Chinese (Traditional), Czech, Danish, Dutch, Finnish, French, German, Greek, Italian, Japanese, Korean, Norwegian, Polish, Portuguese (Brazil), Portuguese (Portugal), Russian, Spanish and Swedish.
-
Page 36: Focusing The Image
Using your interactive whiteboard system Focusing the image Use the focus dial located on the bottom of the SMART UX60 projector to focus the projected image. To focus and adjust the image Turn the focus dial clockwise or counterclockwise until the image is in focus. -
Page 37: Smart Ux60 Projector Connection Diagram
C H A P T E R 4 Using your interactive whiteboard system SMART UX60 projector connection diagram You can connect a variety of peripheral devices to your projector, including DVD/Blu-ray players, VCRs, document cameras, digital cameras and high-definition sources, as well as peripheral device outputs such as a secondary projector or a flat-panel display and powered speakers. -
Page 38: Using Your Interactive Whiteboard
(smarttech.com/kb/144817) for more information on using your interactive whiteboard. For additional resources, go to smarttech.com, click the flag icon to the right of the SMART logo, and then select your country and language. In the Support section of this website, you’ll find up-to-date, product-specific information, including setup instructions and specifications. -
Page 39: Using The Appliance Control Panel (Acp)
C H A P T E R 4 Using your interactive whiteboard system Using the appliance control panel (ACP) The ACP gives you control of the basic operations of your interactive whiteboard system with appliance. Press the Power button on the ACP to start the interactive whiteboard system. The button flashes green until the interactive whiteboard system is on. -
Page 40: Using The Lcd Touch Screen
C H A P T E R 4 Using your interactive whiteboard system The following diagrams and table describe the components of the ACP. Number Function USB A receptacle (for USB drives) Power button LCD touch screen Mini USB B receptacles (×2) (connect to appliance and laptop) 2.0 mm male barrel connector to appliance (DC-out) 2.5 mm male barrel connector to power supply (DC-in) 15-pin connector (connects to ACP harness cable) - Page 41 Using View Screens mode In View Screens mode, you can view and make notes on the screens of meeting participants who are running the SMART Meeting Pro application or SMART Bridgit software on their computers and who have a connected SMART interactive product. The SMART Meeting Pro application also has a multiple-display sharing feature that allows you to choose which display to view or share.
-
Page 42: Using The Rca Connector Pod
Using the RCA connector pod The RCA connector pod is an optional accessory for the SMART Board 800ixe-MP interactive whiteboard system with appliance. Purchase this item from your authorized SMART reseller (smarttech.com/where) . -
Page 43: Getting Started With Your Application
If you are using a laptop as your primary computer, the application starts after you connect your SMART GoWire cable. On the LCD touch screen, press the Laptop button, and then follow the steps to properly connect your laptop. -
Page 44: Using The Laptop Computer Harness
The SMART Meeting Pro icon appears in the notification area on your laptop once you connect your SMART GoWire cable. Click the icon to access additional tools and to configure your hardware and software settings. I M P O R T A N T Ensure that Autoplay is enabled on your computer before you connect the auto-launch cable. -
Page 45: Chapter 5: Integrating Other Devices
This chapter provides information on integrating your SMART Board 800ixe-MP interactive whiteboard system with appliance with peripheral devices. Video format compatibility SMART UX60 projectors have a native video format and various video format compatibility modes. You can change image appearances for certain formats and compatibilities. Native video format The following table lists the native VESA RGB video format for the projector. - Page 46 C H A P T E R 5 Integrating other devices Video format compatibility The following tables list the projector’s compatible VESA RGB video formats by resolution, which you can adjust by using the aspect ratio commands described in Default menu on page 22. Resolution Mode Aspect ratio...
-
Page 47: Connecting Peripheral Sources And Outputs
C H A P T E R 5 Integrating other devices HD and SD signal format compatibility The following tables list the projector’s high definition and standard definition format signal compatibility, which you can adjust by using the aspect ratio commands described in Default menu on page 22. - Page 48 To connect a laptop 1. Press the laptop button on the LCD touch screen and follow the on-screen instructions. 2. To connect a SMART GoWire auto-launch cable, see the SMART GoWire auto-launch cable installation guide (smarttech.com/kb/147790). To connect a DVD/Blu-ray player or similar device 1.
-
Page 49: Chapter 6: Maintaining Your Interactive Whiteboard System
Replacing the projector lamp Removing and replacing the projector lamp module Resetting the lamp timer This chapter includes methods for properly cleaning and preventing damage to your SMART Board 800ixe-MP interactive whiteboard system with appliance. Maintaining your interactive whiteboard For information on maintaining your interactive whiteboard, see the SMART Board X800 Series Interactive Whiteboard User’s Guide (smarttech.com/kb/144817). -
Page 50: Focusing And Adjusting The Projector Image
C H A P T E R 6 Maintaining your interactive whiteboard system Before you clean the projector, press the Power button twice on the ACP or remote control to put the system in Standby mode, and then allow the lamp to cool for at least 30 minutes. Do not spray cleaners, solvents or compressed air directly on the projector. -
Page 51: Replacing The Projector Lamp
Thoroughly clean the area around the projector, and discard any edible items placed in that area because they could be contaminated. Call your authorized SMART reseller (smarttech.com/where) for instructions. Do not attempt to replace the lamp. Replacing the lamp in a wall-mounted projector can result in a fall or injury. Use caution when climbing a ladder, and consider removing the projector from the wall-mounting bracket to replace the lamp. - Page 52 Wear protective eyewear while changing the lamp. Failure to do so can cause injuries including loss of eyesight if the lamp shatters or bursts. Use only replacement lamps approved by SMART Technologies. Contact your authorized SMART reseller (smarttech.com/where) for replacement parts.
- Page 53 C H A P T E R 6 Maintaining your interactive whiteboard system 4. Pull the lamp cover forward and remove it from the projector. Put the lamp cover in a safe place. T I P If the cover is difficult to remove, insert a flat screwdriver or small coin into the slot on the bottom of the lamp cover to gently pry the cover open.
- Page 54 C H A P T E R 6 Maintaining your interactive whiteboard system 6. Use the handle on the bottom of the lamp module to slide out the lamp and remove it from the projector. To put the new lamp module into the projector 1.
-
Page 55: Resetting The Lamp Timer
C H A P T E R 6 Maintaining your interactive whiteboard system Resetting the lamp timer After you replace the lamp, you need to access the projector service menu and reset the lamp hour counter. To prevent accidental errors, only a system administrator should perform this procedure. ... -
Page 57: Chapter 7: Troubleshooting Your Interactive Whiteboard System
Chapter 7 Troubleshooting your interactive whiteboard system Resetting the appliance Correcting image alignment issues Diagnosing issues using the interactive whiteboard system indicators and controls Interactive whiteboard indicators and controls Projector lights and status ACP lights and status Projector error states Your projector doesn’t respond to commands The “Projector Overheated”... -
Page 58: Resetting The Appliance
C H A P T E R 7 Troubleshooting your interactive whiteboard system This chapter provides basic troubleshooting information for your interactive whiteboard system. For issues not covered in this chapter, contact your authorized SMART reseller (smarttech.com/where) or consult the SMART Support website (smarttech.com/support). Resetting the appliance If your interactive whiteboard system with appliance behaves unexpectedly, doesn’t turn on, stops... -
Page 59: Diagnosing Issues Using The Interactive Whiteboard System Indicators And Controls
SMART Board X800 Series Interactive Whiteboard User’s Guide (smarttech.com/kb/144817). Projector lights and status Two indicator lights (Power and Service) are located on the bottom of the SMART UX60 projector. Specific light sequences convey information about the state of the projector, including errors. -
Page 60: Acp Lights And Status
Confirm that your power supply is on and active. At the projector, check your power cable and the ACP 4-pin powered mini-DIN connection. At the ACP, check the 11-pin connector. If nothing changes after you check your connectors and power supply, contact your authorized SMART reseller (smarttech.com/where). Solid amber The projector is receiving power but is in Standby mode. -
Page 61: Your Projector Doesn't Respond To Commands
5. Connect the power cable, and then turn on the projector. 6. If the previous steps don’t resolve the issue, disconnect the power cable, and then contact your authorized SMART reseller (smarttech.com/where). The “Fan Failure” message appears If the “Fan Failure” message appears and the projector enters Standby mode during use, one or both of the following issues is occurring: The projector is overheating internally. -
Page 62: The "Color Wheel Failure" Message Appears
2. If the lamp doesn’t illuminate, put the projector into Standby mode and wait 30 minutes for it to cool down. 3. Disconnect the power cable, and then contact your authorized SMART reseller (smarttech.com/where). The “Color Wheel Failure” message appears If the “Color Wheel Failure”... -
Page 63: The "Lamp Failure" Message Appears
4. Replace your lamp as described in Removing and replacing the projector lamp module on page 5. If the projector still doesn’t turn on or if it continues to display the lamp error message, disconnect the power cable, and then contact your authorized SMART reseller (smarttech.com/where). -
Page 64: Resolving Network Communication Issues
See Network menu on page 24 for a description of the IP address field. Enter this IP address into your browser or SNMP agent. 4. If you still don’t have network access, contact your network administrator. If your administrator is unable to resolve the issue, contact your authorized SMART reseller (smarttech.com/where). Resolving audio issues The projector doesn’t have integrated speakers, but you can connect an audio system to the audio... -
Page 65: Resolving Video Issues
C H A P T E R 7 Troubleshooting your interactive whiteboard system 6. If the previous steps don’t resolve the issue, contact your authorized SMART reseller (smarttech.com/where). Resolving video issues If your projector has a frozen image, perform the following procedure. -
Page 66: No Projected Image
2. If the image doesn’t synchronize, check the cable connections to the projector and the ACP. 3. Ensure that the image signal is compatible with the projector (see Video format compatibility on page 35). 4. If your projector still doesn’t show a source signal, contact your authorized SMART reseller (smarttech.com/where). No projected image If the projector displays no image at all, and the ACP, interactive whiteboard and projector Power lights aren’t on, perform the following procedure. -
Page 67: Unstable Or Flickering Image
C H A P T E R 7 Troubleshooting your interactive whiteboard system To resolve a partial, scrolling or incorrectly displayed image 1. Select Start > Control Panel. 2. Double-click Display. The Display Properties window appears. 3. Click the Settings tab. 4. -
Page 68: Your Image Has A Vertical Flickering Bar
C H A P T E R 7 Troubleshooting your interactive whiteboard system To resolve your unstable or flickering image 1. Adjust the Tracking setting in the on-screen display. See Image Adjustment menu on page 20. 2. Optionally, reset the projector as described in Resetting the projector on page 61 to adjust the tracking to its original value. -
Page 69: Resolving Connection Issues
Troubleshooting your interactive whiteboard system Unaligned projected image The SMART UX60 projector image can slip if the projector is moved often or installed in a location prone to vibration, such as next to a heavy door. Follow these precautions to help prevent the image from becoming misaligned: Make sure that the installation wall is plumb and square and doesn’t move or vibrate... -
Page 70: Accessing The Service Menu
C H A P T E R 7 Troubleshooting your interactive whiteboard system Accessing the service menu C A U T I O N To prevent tampering or unintentional changes, only system administrators should access the service menu. Do not share the service menu access code with casual users of your interactive whiteboard system. -
Page 71: Retrieving Your Password
C H A P T E R 7 Troubleshooting your interactive whiteboard system Retrieving your password If you forget the projector’s password, you can retrieve it by accessing the projector service menu directly from the projector or from the password settings menu on your projector’s web page (see Password settings on page 69). -
Page 72: Locating Serial Numbers
C H A P T E R 7 Troubleshooting your interactive whiteboard system Locating serial numbers For the location of the SMART Board 800 series interactive whiteboard serial number, see the SMART Board X800 Series Interactive Whiteboard User’s Guide (smarttech.com/kb/144817). The SMART UX60 projector serial number is located on the top of the projector. -
Page 73: Transporting Your Interactive Whiteboard System
Troubleshooting your interactive whiteboard system Transporting your interactive whiteboard system Save your original SMART Board interactive whiteboard packaging so that it’s available if you need to transport your interactive whiteboard system. When required, repack it with all of the original packaging. This packaging was designed to provide optimal shock and vibration protection. If you no longer have your original packaging, purchase the same packaging directly from your authorized SMART reseller (smarttech.com/where). -
Page 75: Appendix A: Remotely Managing Your Interactive Whiteboard System
System controls Simple Network Management Protocol (SNMP) This appendix includes detailed instructions on how to set up your computer or room control system to remotely manage your SMART Board 800ixe-MP interactive whiteboard system with appliance settings through an RS-232 serial interface. -
Page 76: Web Page Management
A P P E N D I X Remotely managing your interactive whiteboard system Web page management You can access advanced setup features via the projector’s web page. This web page enables you to manage the projector from a remote location using any computer connected to your intranet. ... - Page 77 A P P E N D I X Remotely managing your interactive whiteboard system Submenu setting Description Power Turns the projector on or puts it into Standby mode. Select the Power ON or Power OFF button. Volume Adjusts the projector’s volume from -20 to 20. Mute Turns the mute settings on or off.
-
Page 78: Network Settings
A P P E N D I X Remotely managing your interactive whiteboard system Network settings This menu allows you to enable or disable Dynamic Host Control Protocol (DHCP) and to set the network-related addresses and names. Submenu setting Description DHCP Turns the network’s DHCP on or off. -
Page 79: E-Mail Alerts
Submit. N O T E The projector sends an alert e-mail (SMART Alert) to your e-mail address. Press E-mail Alert Test to confirm your e-mail address by sending a test e-mail (SMART Alert-Test Mail). -
Page 80: Connecting Your Room Control System To The Acp
Serial interface settings The serial interface of the SMART UX60 projector acts as a Data Communications Equipment (DCE) device and its settings can’t be configured. You must configure your computer’s serial communication program (such as Microsoft®... -
Page 81: Projector Programming Commands
Cooling Command inventory SMART UX60 projectors respond to the commands in the tables on the following pages. To see a list of valid commands in the projector’s current power state, type ? and press ENTER. N O T E S Send a command only after the projector sends a command prompt. -
Page 82: Value-Based Command Methods
A P P E N D I X Remotely managing your interactive whiteboard system Press ENTER after typing each command. After the projector executes a command, it generates a response. To prevent buffer overrun, don’t send another command until you receive the next command prompt. -
Page 83: Power State Controls
A P P E N D I X Remotely managing your interactive whiteboard system >set brightness vga1-7 brightness vga1=58 Power state controls These commands put the projector in and out of Standby mode and request the projector’s current power state. The projector’s power state determines whether certain commands are available at that time. -
Page 84: Source Selection Controls
A P P E N D I X Remotely managing your interactive whiteboard system Source selection controls These commands switch input sources. The source type determines which commands can be accepted. Command Response Available in Standby mode get input input=[field] set input=[field] input=[field] The following table describes the source selection commands:... -
Page 85: General Source Controls
A P P E N D I X Remotely managing your interactive whiteboard system The following table describes the source selection response fields: Field Description VGA1 Switches source to the VGA 1 input connector. VGA2 Switches source to the VGA 2 input connector. Composite Switches source to the Composite video connector. -
Page 86: Additional Vga Source Controls
Standby mode or when the source is disconnected. See Value-based command methods on page 72 for setting absolute and adjustment commands. Command Command target range Response set displaymode [target] =SMART Presentation displaymode=[target] =Bright Classroom =Dark Classroom =sRGB =User... -
Page 87: Additional Composite Video Source Controls
A P P E N D I X Remotely managing your interactive whiteboard system These commands control the appearance of your VGA source. These settings are unavailable when the projector is in Standby mode or when the VGA source is disconnected. See Value-based command methods on page 72 for setting absolute and adjustment commands. -
Page 88: Network Controls
A P P E N D I X Remotely managing your interactive whiteboard system These commands inform you of the current audio output settings. Command Response get volume volume=[current volume setting] get mute mute=[current mute setting] get volumecontrol volumecontrol=[current volume control setting] get cc cc=[current closed captioning language setting] These commands control your audio output settings. -
Page 89: System Controls
A P P E N D I X Remotely managing your interactive whiteboard system These commands control your network settings. Command Command target range Response set dhcp [target] dhcp=[current] =off set ipaddr [target] =0.0.0.0 to =255.255.255.255 ipaddr=[current] set subnetmask [target] =0.0.0.0 to =255.255.255.255 subnetmask=[current] set gateway [target]... - Page 90 A P P E N D I X Remotely managing your interactive whiteboard system These commands inform you of the current system settings. These commands are available even when the projector is in Standby mode. Command Response get lamphrs lamphrs=[current lamp hours of operation] get syshrs syshrs=[current projector hours of operation] get fwverddp...
- Page 91 =0 to =99 projectorid=[value] set hposition [value] =0 to =100 hposition=[value] set vposition [value] =-5 to =5 vposition=[value] set aspectratio [target] =fill aspectratio=[target] =match =16:9 set projectionmode [target] =front projectionmode=[target] =ceiling =rear =rear ceiling set startupscreen [target] =smart startupscreen=[target] =usercapture =preview...
- Page 92 A P P E N D I X Remotely managing your interactive whiteboard system Command Command target range Response set language [target] =Chinese (Simplified) language=[target] =Chinese (Traditional) =Czech =Danish =Dutch =English =Finnish =French =German =Greek =Italian =Korean =Japanese =Norwegian =Polish =Portuguese (Brazil) =Portuguese (Portugal) =Russian...
-
Page 93: Simple Network Management Protocol (Snmp)
The VGA Out and Network settings features are off by default. Select On to activate these features. Simple Network Management Protocol (SNMP) SMART UX60 projectors support a list of SNMP commands as described in the management information base (MIB) file. You can download this file by browsing to smarttech.com/software clicking the MIB files link in the Hardware section for the SMART UX60 projector. -
Page 95: Appendix B: Hardware Environmental Compliance
When you dispose of any electrical or electronic equipment, including SMART Technologies products, we strongly encourage you to properly recycle the electronic product when it has reached end of its life. If you require further information, please contact your reseller or SMART Technologies for information on which recycling agency to contact. -
Page 96: Packaging
SMART Technologies products fall under this classification and meet the requirements for China’s EIP regulations. U.S. Consumer Product Safety Improvement Act The United States has enacted the Consumer Product Safety Improvement Act which limits the lead (Pb) content in products used by children. SMART Technologies is committed to complying with this initiative. -
Page 97: Index
Index 3.5 mm audio connectors DHCP 68, 78 68, 78 document cameras dust DVDs accessories included optional aspect ratios 35-37 audio e-mail alerts connections for EIP regulations controlling volume of 30, 67, 78 electrostatic discharge muting 19, 78 emissions resolving issues with environmental requirements eraser European Union regulations... - Page 98 I N D E X mute control 19, 78 image adjusting native video formats correcting alignment issues with network communication 28, 54, 68, 78 focusing resolving issues with important information indicator lights options input selection 67, 74 original packaging installation choosing a height choosing a location securing...
- Page 99 S-video connections 28, 37 water and fluid resistance SD signal compatibility web page management serial number WEEE directive signal loss whiteboard See interactive whiteboard SMART Board interactive See interactive whiteboard whiteboard SMART UX60 projector See projector SMTP XGA support SNMP sound See audio...
- Page 102 SMART Technologies smarttech.com/support smarttech.com/contactsupport...
Need help?
Do you have a question about the 800ixe-MP and is the answer not in the manual?
Questions and answers