Table of Contents
Advertisement
Advertisement
Table of Contents

Related Manuals for EBR 1190 SX

Summary of Contents for EBR 1190 SX
- Page 1 seat...
-
Page 2: Safety Definitions
Italic type font. Please take special notice of these items. CAUTION EBR MOTORCYCLES ARE FOR ON-ROAD USE ONLY This CAUTION indicates a potentially dangerous situation which, if motorcycle is not equipped with a spark arrestor and is not avoided, may result in minor or moderate injury. - Page 4 Please read through this manual carefully and thoroughly, and consider the NOTES emphasized by the EBR Staff. Take care of yourself and your EBR motorcycle in all the ways detailed in this manual, and the thrill of the road will stretch before you. Our goal is to delight you with your EBR ownership and riding experience, and to offer you the bike that can bring you an adventure unlike any other.
-
Page 5: Customer Service Assistance
Service or Parts area. If that proves unsuccessful, speak to the owner of the dealership or the general manager. If you cannot resolve the issue with the dealership, you can contact the EBR Customer Service Department by calling 262-642-1627, emailing info@ebr.com or writing to:... - Page 6 This owner’s manual illustrates and describes features that are standard or are available as extra cost options. Therefore, some of the equipment options shown in this publication may not be on your motorcycle. EBR reserves the right to change specifications,...
-
Page 7: Table Of Contents
CATALYTIC CONVERTERS ....33 VEHICLE IDENTIFICATION NUMBER: EBR 1190 RX/SX MODELS ..............25 OPERATION ........33 Table 1. EBR V.I.N. Breakdown: 2014 Models ....25 LABELS: EBR MODELS ..........26 GENERAL ............... 33 CONTROLS AND INDICATORS ........33 SPECIFICATIONS ......27 IGNITION/HEADLAMP KEY SWITCH ...... - Page 8 Horn Switch ............38 OPERATING RECOMMENDATIONS ..58 Headlamp High/Low Beam Switch ......38 General ..............59 Passing Lamp Switch ..........38 Operating on a dynamometer ........59 Turn Signal Switch ..........38 BREAK-IN RULES ............. 60 INSTRUMENT CLUSTER ..........39 The First 620 Miles (1000 Km) .........
- Page 9 HEADLAMP ALIGNMENT ........113 STORAGE ............... 96 HEADLAMP ADJUSTMENT ........116 Placing Motorcycle in Storage ........97 TROUBLESHOOTING ....... 118 CLEANING YOUR EBR ..........97 WINDSHIELD MAINTENANCE ........98 GENERAL ............. 118 BODY PANEL CARE ..........98 ENGINE ............... 118 Washing..............
- Page 10 OTHER LIMITATIONS ..........129 Overheats ............122 IMPORTANT: READ CAREFULLY ........ 129 WARRANTY AND MAINTENANCE ..122 2014 EBR NOISE CONTROL SYSTEM LIMITED WARRANTY ................130 KEEPING IT ALL EBR ..........123 Other Rights ............131 CALIFORNIA EVAPORATIVE EMISSION CONTROL ..124 Recommendations for Required Maintenance ....
- Page 11 YOUR WARRANTY RIGHTS AND OBLIGATIONS .... 132 MANUFACTURER’S EMISSION CONTROL SYSTEM SUPPLEMENTAL WARRANTY COVERAGE ..... 132 OWNER’S EMISSION CONTROL SYSTEM SUPPLEMENTAL WARRANTY RESPONSIBILITIES ........ 133 ERIK BUELL RACING, LLC - LIMITED WARRANTY ON EMISSION CONTROL SYSTEM ........133 REGULAR SERVICE INTERVALS ..137 TIRE REGISTRATION FORM .....
-
Page 12: Safe Operating Rules
-Never tow a trailer. Before operating your new EBR, it is your responsibility to read and follow the operating and maintenance instructions in SAFE OPERATING RULES: this manual. Follow these basic rules for your personal safety. EBR 1190 MODELS Know and respect the Rules of the Road. See RULES OF THE ROAD. - Page 13 WARNING WARNING Avoid spills. Slowly remove gasoline filler cap. Do not fill Do not remove radiator filler cap when engine is hot. The above bottom of filler neck insert, leaving air space for fuel cooling system is under pressure and hot coolant and steam expansion.
- Page 14 The EBR 1190 procedure. Operate motorcycle only at moderate speed and RX/SX is equipped with passenger accommodations. DO NOT out of traffic until you have become familiar with its operation EXCEED GVWR.
- Page 15 WARNING WARNING Do not operate motorcycle with loose, worn or damaged steering or suspension systems. Contact an EBR dealer for Avoid contact with exhaust system and wear protective repairs. Loose, worn or damaged steering or suspension clothing that completely covers legs while riding. Exhaust...
-
Page 16: Gvwr / Gawr
Be sure all equipment required by law is installed and in good tires are properly inflated, balanced and have adequate tread. operating condition. Inspect your tires regularly and see an EBR dealer for replacements. Riding with excessively worn, unbalanced or under-inflated tires can adversely affect stability and WARNING handling, which could result in death or serious injury. - Page 17 WARNING Do not pull a trailer with a motorcycle. Pulling a trailer can Consult an EBR dealer regarding any questions or problems cause tire overload, reduced braking efficiency and adversely that occur in the operation of your motorcycle. Failure to do...
-
Page 18: Rules Of The Road
RULES OF THE ROAD governed accordingly. EBR recommends that inexperienced riders complete the • When intending to turn, signal at least 100 ft (30 m) beginners Motorcycle Rider Course® sponsored by the before reaching the turning point. -
Page 19: Accessories And Cargo
Only use such items if they are designed and WARNING approved by EBR, built specifically for your motorcycle and installed properly. Additional electrical equipment can overload the motorcycle's electrical system and cause an... - Page 20 EBR motorcycles are not designed for sidecar use. Sidecar Do not use aftermarket parts which can adversely affect use with an EBR can adversely affect handling and reduce performance and handling. Removing or altering factory braking efficiency, which could result in death or serious installed parts can adversely affect performance and could injury.
- Page 21 Ignition Battery Passenger Turn Signal Headlight Clutch Lever Fuel Filler Tail/stoplight Gear Shifter Sidestand switch (under seat) Footpegs Figure 1. 1190 RX Left Side View.
- Page 22 Shock Turn Signal License Plate Front Brake Lever Front Brake Caliper Rear Brake Lever Rear Brake Caliper Figure 2. 1190 RX Right Side View.
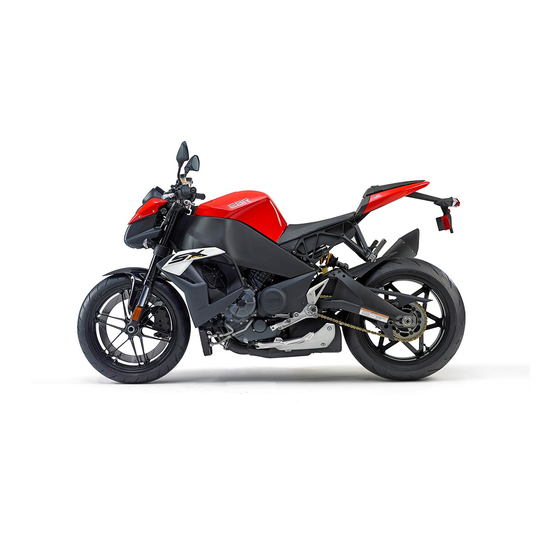
- Page 23 Ignition Battery Passenger Turn Signal Headlight Clutch Lever Fuel Filler Tail/stoplight Gear Shifter Sidestand switch (under seat) Footpegs Figure 1. 1190 SX Left Side View.
- Page 24 Shock Turn Signal License Plate Front Brake Lever Front Brake Caliper Rear Brake Lever Rear Brake Caliper Figure 2. 1190 SX Right Side View.
-
Page 25: Identification
IDENTIFICATION VEHICLE IDENTIFICATION NUMBER: EBR 1190 RX/SX MODELS 2 3 4 5 6 7 8 9 10 546 A A A G 2 _ E E 0 0001 POSITION Sequential Motorcycle Engine Check Model Plant DESCRIPTION Model Make Market Production... -
Page 26: Labels: Ebr Models
LABELS: EBR MODELS See Figure 3 for safety and maintenance labels which were on the vehicle when new. If removed, replacement labels may be purchased for your motorcycle. Refer to Table 2 for label descriptions. General Warning label Battery Warning label... -
Page 27: Specifications
SPECIFICATIONS 2014 EBR 1190 RX/SX MODELS ENGINE Item Specification Cylinders Type 72 Degree V-Twin, Liquid Cooled, four-stroke Bore 4.173 in. 106.00 mm Stroke 2.658 in. 67.50 mm Displacement 72.6 cu. in. 1191 cc Compression Ratio 13.4:1 Valve Train DOHC, four valves per cylinder... -
Page 28: Drivetrain
Drivetrain Item Specification Transmission 6-speed Clutch Hydraulic actuation Front Sprocket Compensated Final Drive Chain Table 3. Cooling System Item Specification Cooling System Liquid cooling with integrated water pump, thermostat controlled bypass Coolant Ethylene glycol, 50/50 mixture Normal Operating Temperature 140 – 220 F 60 –... -
Page 29: Sprocket Teeth
Sprocket teeth Drive Item Number of Teeth Engine Primary Clutch Front Sprocket Final Rear Sprocket Chain (Links) Table 6. Transmission Gear Ratios Gear Ratio First 2.462 Second 1.750 Third 1.381 Fourth 1.174 Fifth 1.042 Sixth .960 Table 7. -
Page 30: Tires
Tires Solo Riding Loaded GVWR Tire Type Front Pirelli Diablo Rosso Corsa Rear Pirelli Diablo Rosso Corsa Table 8. Bulb Chart Bulbs Bulbs Required WATTS AMPS Part Number Headlamps LED Assembly; replace entire assembly upon failure. Tail Stop Lamp LED Assembly; replace entire assembly upon failure. License Plate Lamp LED Assembly;... -
Page 31: Weights
Most gasoline sold is blended with alcohol and/ or ether, to create Use only EBR approved tires. See an EBR dealer. Using non- "oxygenated" blends. The type and amount of alcohol or ether approved tires can adversely affect stability, which could added to the fuel is important to consider. -
Page 32: Fuel
Reformulated or serious injury. gasoline uses additives to "oxygenate" the gas. Your motorcycle will run normally using this type of gas and EBR WARNING recommends you use it when possible, as an environmentally friendly alternative to regular unleaded gasoline. -
Page 33: Octane Ratings
Other features may be available as engine misfire. If you operate the vehicle under this accessories for your EBR motorcycle. See an EBR dealer for a condition, the exhaust will become abnormally hot, which can complete list of accessories that will fit your specific cause vehicle damage, including emission control loss. -
Page 34: Turning Motorcycle On/Off
Record your key number in the space provided at the WARNING front of this Owner’s Manual. The key number is pressed on a plastic tab that comes with the keys. The automatic-on headlamp feature provides increased visibility of the rider to other motorists. Be sure headlamp is Turning Motorcycle On/Off on at all times. -
Page 35: Parking The Motorcycle
Parking the Motorcycle Lamps can be turned on to increase the motorcycle’s visibility to other motorists while parked. See Figure 5. When the ignition switch is in the PARKING LAMP position, the running lamps, tail lamps, and instrument cluster are illuminated. The front and rear turn signals can also be activated. -
Page 36: Engine Off/Run Switch
ON. See OPERATION, Starting the Engine: EBR 1190 RX/SX See Figure 7. The throttle control grip is located on for operation procedures. the right handlebar and is operated with the right hand. Turn throttle control grip clockwise (toward the front of the vehicle) Engine OFF/RUN Switch to close the throttle and decelerate. - Page 37 Figure 7. Right Handlebar switch. Figure 6. Left Handlebar Switch.
-
Page 38: Clutch Hand Lever
The headlamp high/low beam switch is located on the left hand controls. The switch has two positions to activate the Clutch Hand Lever headlamps high or low beams. WARNING See Figure 6. Press the top of the headlamp high/low beam switch to activate the high beam. -
Page 39: Instrument Cluster
• Push the turn signal switch to the left to activate the left front and rear turn signal flashers. -Press the turn signal switch button manually to cancel the turn signal. NOTE If signaling to turn in one direction and the switch is depressed towards the opposite direction, the first signal is cancelled and the opposite side begins flashing. -
Page 40: Tachometer
CAUTION See OPERATING RECOMMENDATIONS section. Do not operate the engine above maximum safe RPM as shown under OPERATING RECOMENDATIONS. Lower the RPM by up shifting to a higher gear or reducing the amount of throttle. Failure to lower RPM may cause equipment damage. See figure 8. -
Page 41: Odometer
(Fuel Trip) that will appear EBR dealer. This indicates an event has occurred related to automatically when the fuel level drops to .7 gal (2.6 liters). - Page 42 MPG/KPG numbers for all current at start up or if it appears while running immediately stop the trips as well as the overall number. engine and see an EBR dealer. See figure 8.This displays the level of traction control selected.
-
Page 43: Selecting Functions
SELECTING FUNCTIONS • The lower button toggles the lower right user preference area and can display fuel consumption figures for the various trips as well as displaying any CONDITION messages such as SERVICE DUE, COOLANT TEMP EVENT, etc.. • The upper button opens the MENU screen. NOTE The Menu cannot be accessed at speeds above 3 MPH (5 KPH). - Page 44 • Use the center (SEL) button to change a setting. Select desired UOMs. NOTE Select EXIT to return to MENU Track Data The up and down triangles and the SEL images refer to the See Figure 10. Track data allows you to record lap times. buttons on the left edge of the case.
- Page 45 To stop recording and end the session press and hold change automatically based on ambient light. Use the center the headlight flasher button for five seconds. This will stop (SEL) button to select brightness. the session and delete the lap that is being timed. All •...
- Page 46 WARNING WARNING Traction Control is a riding tool, but final control of the vehicle Traction control does not compensate for all possible wheel is in the rider’s hands. Traction Control will not prevent slip conditions or wheelie events. Always be aware of road accidents.
- Page 47 To set the Traction Control level: Bring motorcycle to a complete stop and put transmission into neutral. Select Traction from the Menu. Read the warning message and select AGREE to move to the adjustment screen. See figure 15. Use the up and down buttons to move the desired Traction Control level up or down.
- Page 48 See Figure 10. The diagnostic screen provides information to assist in diagnosing faults and to perform service. See your EBR dealer. Exit See Figure 10. Selecting EXIT will return you to the previous screen. It may be necessary to select EXIT multiple times to return to the main screen.
-
Page 49: Gear Shift Lever
GEAR SHIFT LEVER • Release the gear shift lever after each gear change. CAUTION • The lever must return to its central position before another gear change can be made. The clutch must be fully disengaged before attempting a gear shift. - Page 50 CAUTION When difficulty of shifting gears is experienced, do not under any circumstances, attempt to force the shift. The results of such abuse will be a damaged or broken shifter mechanism. See OPERATING RECOMMENDATIONS, Shifting Gears, for more information. Figure 11. Upshift Pattern Figure 12.
-
Page 51: Adjusting Shifter Toe Peg
ADJUSTING SHIFTER TOE PEG The gear shift toe peg can be adjusted for rider preference. See Figure 13. Loosen the fastener from the toe peg. Slide toe peg to the desired position. Tighten the fastener to 48-72 in-lbs (5.4-8.1 Nm). ADJUSTING HANDLE BAR LEVERS The clutch and brake hand lever may be adjusted to the rider's preference. -
Page 52: Brakes
BRAKES WARNING Do not apply brake strongly enough to lock the wheel. A locked wheel will skid and can cause loss of vehicle control, which could result in death or serious injury. The rear brake pedal controls the rear wheel brake and is located on the motorcycle's right side. -
Page 53: Adjusting Rear Brake Toe Peg
Improper hand positioning can impair control NOTE lever operation and cause loss of vehicle control, which could result in death or serious injury. To adjust the rear brake master cylinder pushrod, see an EBR FUEL FILLER CAP Dealer WARNING... -
Page 54: Removal
flammable and highly explosive, which could result in death FUEL FILL LEVEL or serious injury. Do not fill tank above the baffle. See figure 29. CAUTION Do not spill fuel onto the motorcycle while refueling. Immediately wipe up fuel spills on your motorcycle. Fuel can cause damage to cosmetic surfaces. -
Page 55: Steering Head Lock
STEERING HEAD LOCK This motorcycle does NOT have a locking sidestand. Park the motorcycle on a level, firm surface. An unbalanced motorcycle CAUTION can fall, which could result in death or serious injury. Protect your vehicle against theft. After parking your The sidestand is located on the left side of the motorcycle and motorcycle, lock the steering head and remove ignition key swings down to support the motorcycle for parking. -
Page 56: Rider Seat
seen in this type of mirror will look smaller and farther away Lift rear of seat up and slide seat toward rear of than they actually are. bike. Use caution when judging the size or relative distance of objects seen in rear view mirrors. Always adjust the rear view mirrors to clearly reflect the area behind the motorcycle before riding. -
Page 57: Passenger Seat Removal/Fuse Access
To reinstall rider seat insure that the tabs on the seat bottom Figure 19: Reinstall seat. engage the tabs on the subframe. See figure 19. Passenger Seat Removal/Fuse Access Push down on seat and slide forward. The fuses and relays are under the passenger seat. Reinstall bolt through bottom of seat pan. -
Page 58: Operating Recommendations
• Replace seat by sliding under the strap and when it is fully in place push down on the front to engage the seat lock. See figure 21. Figure 20. Figure 21. Passenger Seat Removal. • Lift the front of the seat upward and pull toward the front of the bike. -
Page 59: General
• Never tow a trailer. EBR recommends the removal of the belly pan before running the bike on a dynamometer. CAUTION Traction control should be OFF for dynamometer use or excess exhaust heat may be generated due to power limiting Do not run the engine at extremely high RPM with clutch disengaged or transmission in neutral. -
Page 60: Break-In Rules
CAUTION accelerating or turning on wet roads can cause loss of control, which could result in death or serious injury. Do not coast for long distances with the engine off or idling. WARNING The transmission is properly lubricated only when the engine is running. -
Page 61: Pre-Riding Check List
Up to 620 mi (1000 km), vary the engine speed and WARNING avoid operating at any steady engine speed for long periods. Engine speed up to 7500 rpm in any gear is permissible. Stop the engine when refueling or servicing the fuel system. Drive slowly and avoid fast starts at wide throttle Do not smoke or allow open flame or sparks near gasoline. - Page 62 Be sure tires are properly inflated, balanced and have CAUTION adequate tread. Inspect your tires regularly and see an EBR dealer for replacements. Riding with excessively worn, Do not spill fuel on the motorcycle while refueling. unbalanced or under-inflated tires can adversely affect Immediately wipe up fuel spills on your motorcycle.
-
Page 63: Sidestand Interlock
NOTE SIDESTAND INTERLOCK EBR motorcycles feature a starter interlock. Before starting Some models are equipped with a sidestand interlock feature. the engine, all the following conditions must be met. If the sidestand is down, the transmission is in gear, and the clutch is released, the engine will stall. - Page 64 The electronic fuel injection system compensates for atmospheric and engine conditions for starting. NO “choke” or enrichener is needed. Do not twist the throttle prior to engaging the starter. See figure 22. Turn engine OFF/RUN switch to RUN. Be sure the throttle is closed. Raise the sidestand.
-
Page 65: Stopping The Engine
EBR dealer for assistance. Push the foot shift lever down to the end of its travel and release it. The transmission is now in first gear. -
Page 66: Upshift (Acceleration)
NOTES Upshift (Acceleration) GEAR CHANGE First to Second • Disengage the clutch completely before each gear Second to Third change. Third to Fourth Fourth to Fifth • Partially close the throttle so the engine will not drag Fifth to Sixth when the clutch is again engaged (clutch lever released). -
Page 67: Downshift (Deceleration)
Figure 25 Downshift (Deceleration) GEAR CHANGE Sixth to Fifth Fifth to Fourth Fourth to Third Third to Second Second to First Table 15 WARNING Figure 24 Do not downshift at speeds higher than those listed in the Downshift (Deceleration) table. Shifting to lower gears when speed is too high can cause the rear wheel to lose traction... -
Page 68: Traction Control
The traction control system on the EBR 1190RX/SX is a tool for the rider to enhance safety by helping control wheel slip NOTES on the rear wheel when excessive torque is applied for the given dynamic traction available. - Page 69 The traction control system on the EBR 1190RX/SX offers 21 reduce power naturally through the throttle twist grip to a levels of adjustability (1 through 20 and OFF).
- Page 70 The traction control system uses information from the rear traction control is being applied and will continue to flash for wheel speed sensor, as well as knowledge of the engine’s 3 seconds after the traction control is no longer being applied. operating conditions and calculated gear position to estimate wheel slip.
-
Page 71: Suggested Traction Control Levels
This adjustment should be made before the CAUTION motorcycle is ridden any distance. Your EBR dealer can assist you in setting the preload when you take delivery of your motorcycle. If the preload adjustment is correct and you have... -
Page 72: Suspension Definitions
Do not operate motorcycle with loose, worn or damaged Compression steering or suspension systems. Contact an EBR Dealer for The suspension is compressed when the wheel moves repairs. Loose, worn or damaged steering or suspension upwards. -
Page 73: Suggested Suspension Settings
SUGGESTED SUSPENSION SETTINGS ***Load Front Forks Rear Shock Preload: ** Preload: **Compression: ** Rebound: Notch ** Compression: ** Rebound: Turns IN Turns OUT from Turns OUT from (#1 is Turns OUT from Turns OUT from from maximum. maximum. lightest maximum. maximum. - Page 74 NOTES counting the turns as you go to get to desired setting. Factory setting is ¾ turn out (counterclockwise) from maximum. There are approximately 3 turns a total of range of ** All Damping adjustor settings are done by tightening adjustment.
- Page 75 Figure 26. Rear Preload Adjuster. Figure 27. Rear Compression Adjuster.
- Page 76 See Figure 44. The factory setting is 5 turns in (clockwise) from minimum setting. Use 5mm Allen wrench to turn adjusting screw to desired preload setting. There are approximately 14 turns total range of adjustment each turn is 1mm of spring preload. NOTE: Both forks should be set the same.
- Page 77 Figure 44. Front Preload Adjuster. Figure 30. Fork Rebound and Compression Adjusters.
-
Page 78: Fine Tuning Suspension
Contact an EBR dealer for repairs. • GVWR is the sum of the weight of the motorcycle,... -
Page 79: Enhanced Steering Quickness
suspension for rider weight. See OPERATING If more enhanced steering and cornering control is RECOMMENDATIONS, Suggested Suspension Settings, Table desired, reduce front preload by turning adjuster 17, as the starting point. counterclockwise one turn. Increase ride quality by reducing front and rear If additional enhanced steering and cornering control compression damping by turning adjuster counterclockwise is desired, increase rear compression damping by turning... -
Page 80: Maintenance And Lubrication
turn clockwise and rear rebound damping by turning 1/8 to Drive chain for wear or damage. 1/2 turn clockwise. Brakes, steering and throttle for responsiveness and freedom from binding. MAINTENANCE AND LUBRICATION Brake fluid level and condition. Hydraulic lines and fittings for leaks. -
Page 81: Initial Service Check
After a new motorcycle has been ridden its first 620 miles The first scheduled maintenance is at 620 miles (1000 (1000 kilometers) take it to an authorized EBR Dealer to have Kilometers). See Regular Service Intervals for a complete list an initial service performed. -
Page 82: Service Intervals And Performance
Engine oil is a major factor in the performance and service life are required to keep your new motorcycle warranty in force. The Use of other than EBR approved parts and service of the engine. Always use the proper grade of oil for the procedures may void the warranty. -
Page 83: Checking Oil Level
Refer to Table 18. EBR recommends using AMSOIL® 20W-50 fluids be changed as soon as possible. At the first opportunity, Advanced Synthetic Motorcycle oil when adding or changing see an authorized dealer to change back to 100 percent oil. If AMSOIL® is not available and addition of motor oil is AMSOIL. -
Page 84: Oil Level Cold Check
• The motorcycle should be on the sidestand when checking the oil level. • Refer to Table 18. Use only recommended oil specified. CAUTION Do not allow oil level to fall below the MINIMUM mark on the sight gage. Doing so can result in equipment damage and/or equipment malfunction. -
Page 85: Oil Level Hot Check
An accurate engine oil check can only be performed with the engine at normal operating temperature. With motorcycle on the side stand look at the oil level in the sight gauge. An indicated oil level between the lower and upper lines on the oil level sight gauge is acceptable for safe engine operation. -
Page 86: Engine Oil Change
Park the motorcycle on the sidestand while idling Idle the engine one (1) minute. Shut off the engine. Remove the oil fill plug. See figure 46. Read the oil level in the sight gauge. Below the lower line: Add oil in 3.4 fl oz (0.1 L) increments until the level is between the upper and lower lines. - Page 87 Do not switch lubricant brands indiscriminately because some See Figure 40. Remove the right oil drain plug lubricants interact chemically when mixed. Use of inferior located under the clutch cover. Wipe any accumulated debris lubricants can damage the engine. from plug and replace the aluminum washer. After all oil has drained, tilt vehicle to the right side WARNING to drain any remaining oil from the right side of the engine.
- Page 88 Figure 50. Right side drain plug. Figure 31. Oil Filter Cover. NOTE If replacing the oil filter cartridge, perform the following: Refer to Table 21 to determine if the oil filter cartridge needs to be replaced. Remove the two screws to detach the oil filter cover.
- Page 89 Oil capacity with filter change is approximately 3.3 Install both drain plugs after thoroughly draining oil. U.S. quarts (3.1 liters). Tighten left engine oil drain plug to 18 ft-lbs Oil capacity without filter change is approximately (24 Nm). 3.0 U.S. quarts (2.8 liters). Tighten right engine oil drain plug to 11 ft- lbs (15 Nm).
-
Page 90: Winter Lubrication
Start engine. Verify that low oil pressure message on vapor condenses to liquid form on the cool metal surfaces the instrument panel turns off after a few seconds when inside the engine. In freezing weather, this water will become engine speed is 1000 RPM or above. slush or ice, and if allowed to accumulate for too long, may block the oil lines and cause damage to the engine. - Page 91 Lift chain until it is tight and check chain tension by measuring the distance from the bottom of a chain link to the bottom of the chain rub block. Adjust distance to 30 mm +/- 2 mm as shown in figure 42. Measure axle adjuster positions on both sides of the swingarm to ensure they are even on each side of the swingarm.
-
Page 92: Chassis Lubrication
See an EBR Dealer for service as required. Rear swingarm pivot bearings are sealed and do not Figure 42: Adjustment Measurement require additional lubrication. Check for smooth range of movement and proper operation. See an EBR Dealer for service as required. -
Page 93: Front Fork Oil
Suspension Fluid #10 Medium fork oil at the proper mileage intervals. Refer to Table 21. If either fork leaks oil or does not seem to be working properly, see an EBR Dealer. Forks must contain equal amounts of fork oil for proper damping. - Page 94 Figure 51: Air Filter Access. Figure 52: Air filter Access.
-
Page 95: Coolant Level
side of the motorcycle. On the SX it is visible on the right side of the motorcycle from the front. COOLANT LEVEL View the expansion tank. See Figure 52. The fluid level should be at the marked level when cold. Coolant Type CAUTION To add coolant, unsnap the cap on the plastic... -
Page 96: Storage
CAUTION Proper storage is important for the trouble-free operation of your motorcycle. See below for storage recommendations or contact an EBR dealer. Improper storage procedures can lead At operating temperature, the radiator and oil cooler contain to equipment damage. hot fluids. Contact with the radiator or oil cooler can result in minor or moderate burns. -
Page 97: Placing Motorcycle In Storage
Frequently clean and wax your new Do not store motorcycle with gasoline in the tank within the EBR motorcycle to inhibit rust and corrosion. To aid in home or garage where open flames, pilot lights, sparks, or keeping your motorcycle clean, see an EBR dealer for electric motors are present. -
Page 98: Windshield Maintenance
Cleaners containing chlorine and silicone can impair brake function, which could result in death or serious injury. Windshields require special care. EBR recommends using a soft cloth and a high quality glass cleaner to clean your CAUTION windshield. -
Page 99: Washing
recommended products and techniques outlined in this Minor Scratch Removal manual to avoid damaging body panels. CAUTION Washing Use of abrasive products or powered buffing equipment will To wash follow the instructions below: cause permanent cosmetic damage to body panels. Use only recommended products and techniques outlined in this Rinse surface with water. -
Page 100: Wheel Care
To maintain the original luster and appearance of the wheels on your EBR motorcycle, clean and polish wheels as often as To aid you in cleaning the frame and swing arm, see an EBR possible to inhibit rust and corrosion. Damage from harsh dealer for cleaning supplies and touch up paint. - Page 101 If the fluid level is at or below the LOWER line, rotate the front forks to access the fluid reservoir and remove the cover, stiffener and diaphragm. Inspect the cover, stiffener and diaphragm for damage. Replace the diaphragm if necessary. Add D.O.T.
-
Page 102: Brakes
Do not overfill the clutch master cylinder reservoir. Leave and push vehicle back and forth several times to assure sufficient volume in the reservoir to accommodate the rise in proper clutch disengagement. fluid level as the clutch friction disks wear. CAUTION Carefully place the diaphragm, stiffener, and cover on the master cylinder reservoir and tighten by hand. - Page 103 AMSOIL® Series 600 racing DOT4 racing Brake Fluid or The brake system needs routine inspections and maintenance equivalent. Always take your motorcycle to an EBR Dealer for at certain levels. Refer to table 21 for more information. brake system maintenance.
-
Page 104: Tires
Keep the tires properly inflated. Check tire pressure before riding when tires are cold. WARNING Figure 39. Rear Brake Fluid Reservoir. Be sure tires are properly inflated, balanced and have adequate tread. Inspect your tires regularly and see an EBR dealer for replacements. Riding with excessively worn,... -
Page 105: Tire Replacement
Inspect at least weekly if in daily use or before demounted tire by an EBR dealer. Speed should NOT exceed each trip if used only occasionally. Refer to Table 8 for tire 50mph (80 km/h) for the first 24 hours after the repair, and pressures and sizes. - Page 106 See Figure 32. The location of tread wear indicator bars are identified by “TWI‟ markings on the tire sidewalls. When to Replace Tires New tires are needed if any of the following conditions exist: Tread wear indicator bars become visible on the tread surfaces.
-
Page 107: Shock Absorber
• Check for loose mounting hardware. Spark timing is advanced electronically as engine speed increases to suit starting, low speed and high speed See an EBR dealer for all shock absorber repairs. requirements. SPARK PLUGS/COILS IDLE SPEED Refer to Table 21. Spark plugs require inspection and... -
Page 108: Voltage Regulator
If any electrical system trouble is experienced that might be traceable to the alternator or voltage regulator, VOLTAGE REGULATOR take the motorcycle to an EBR dealer. Dealers have the necessary parts and testing equipment to perform electrical The alternator output is controlled and changed to direct service. - Page 109 Clean cable connectors and battery terminals using a wire brush or fine grit sandpaper to remove any oxidation. Use this battery only in EBR model 1190 RX/SX motorcycles. Inspect and clean the battery screws, clamps and Do not use if battery is damaged or cracked.
- Page 110 • Vehicle lamps appear dim. WARNING • Electric starter sounds weak. Do not reverse the charger connections described in the If your motorcycle will not be ridden for longer than a week following steps or the charging system of the motorcycle attach a battery charger.
- Page 111 CAUTION WARNING “Smart” lead‐acid chargers with automatic cutoff may Unplug or turn OFF battery charger before disconnecting be used for periodic charging, but will NOT work as a charger cables from battery. Disconnecting clamps with tender/maintainer and should be disconnected charger ON can cause a spark , which could result in death or immediately after charge has finished.
-
Page 112: Headlamp
If you are not riding twice a month, then you should charge the battery every few weeks. A “smart” battery EBR does not recommend jump-starting a motorcycle. Jump charger will charge the battery but will not work as a starting the battery could cause damage to the cells and lead maintenance charge. -
Page 113: Headlamp Alignment
HEADLAMP ALIGNMENT Draw a vertical line on the wall that aligns with the motorcycle when it is upright. Draw a horizontal line through the vertical line on the wall that is the same height as the center of the low beam. - Page 114 Figure 34. Low Beam Aiming.
- Page 115 Figure 35. High Beam Aiming...
-
Page 116: Headlamp Adjustment
HEADLAMP ADJUSTMENT Horizontal Adjustment To access adjusters on the SX first remove the front trim Horizontal adjusters are located on the left side of the bike pieces; see Figure 55. behind the fairing/headlamp. See figure 36. NOTE The top adjuster works on the low beam which is the top lamp. - Page 117 VERTICAL ADJUSTMENT Low beam See Figure 37. The vertical headlamp adjusters are located on the right side of the bike behind the fairing/headlamp. NOTE The top adjuster works on the low beam which is the top lamp. The lower adjuster works on the high beam which is the lower lamp.
-
Page 118: Troubleshooting
TROUBLESHOOTING GENERAL WARNING The troubleshooting section of the Owner’s Manual is a guide to diagnose problems. Study the video service manual before performing any work. Improper repair and/or maintenance could result in death or serious injury. The following checklist of possible operating troubles and their probable causes will be helpful in keeping your motorcycle in good operating condition. -
Page 119: Engine Turns Over But Does Not Start Or Starts Hard
Clutch lever not squeezed against handlebar or Inoperative fuel pump. See dealer. transmission not in neutral. Water or dirt in fuel system. See dealer. Blown fuse. Engine management system failure. See dealer. Engine Turns Over But Does Not Start or Starts Hard. Intake Manifold Leak. -
Page 120: A Spark Plug Fouls Repeatedly
Inoperative fuel injector. See dealer. Thermostat stuck closed. See dealer. Obstructed fuel tank vent valve or pinched vent Plugged or restricted radiators or coolant lines. Engine management system failure. See dealer. Airflow to radiators obstructed. Excessive Vibration Intake manifold leak. See dealer. Engine mounts loose. -
Page 121: Lubrication System
LUBRICATION SYSTEM TRANSMISSION Engine Leaks Oil from Cases or Hoses. Loose parts. Transmission Shifts Hard See dealer. Transmission shifting mechanism worn. See dealer. Imperfect seal at gaskets, washers, etc. See dealer. Transmission Jumps Out of Gear Restricted oil line or oil screen. See dealer. Worn shifter dogs in transmission. -
Page 122: Brakes Do Not Hold
See dealer. warranty valid. Brake drags. Insufficient hand lever free play. See Make an appointment with an EBR dealer for dealer. inspection and service prior to first 620 miles (1000 km). COOLING SYSTEM Bring this Owner’s manual with you when you visit... -
Page 123: Keeping It All Ebr
This is necessary in the event that the EBR These records should be transferred to each subsequent owner. Company needs to contact the owner concerning information that could affect the safe operation of this motorcycle. WARNING KEEPING IT ALL EBR... -
Page 124: California Evaporative Emission Control
CALIFORNIA EVAPORATIVE EMISSION CONTROL of design has been removed or rendered inoperative by any person. All new 2014 EBR motorcycles sold in the state of California are equipped with an evaporative emission control system. AMONG THOSE ACTS PRESUMED TO CONSTITUTE TAMPERING ARE THE ACTS LISTED BELOW. -
Page 125: Reporting Safety Defects In The United States
However, NHTSA cannot become involved in individual problems between you, your dealer, or EBR. Refer to table OWNER TRANSFER IDENTIFICATION FORM... - Page 126 EBR. New owner any EBR dealer or email the below information information is required to be on file with EBR to transfer an info@ebr.com Extended Service Plan Contract. EBR is also required by the...
-
Page 127: Limited Warranty 2014 Ebr 1190 Rx/Sx Motorcycle
The duration of this limited warranty is twenty four months, starting from the earlier of (a) the date of the initial retail purchase and delivery from an authorized EBR dealer, or (b) the second anniversary of the last day of the model year of the... -
Page 128: Owner's Obligations
Installing off-road or competition parts to enhance performance may void all of part of your new motorcycle warranty. See an EBR dealer for details. Acts of God, war, riot, insurrection, natural disasters, including but not limited to, nuclear contamination, lightning, dust storms, hail storms, ice storms, earthquakes, floods, or for other circumstances out of EBR‟s control. -
Page 129: Other Limitations
Defects or damage due to the motorcycle caused by alterations outside of EBR factory specifications. IMPORTANT: READ CAREFULLY Our dealers are independently owned and operated and may sell other products. Because of this, EBR IS NOT RESPONSIBLE FOR THE SAFETY, QUALITY, OR SUITABILITY OF ANY NON-EBR PART, ACCESSORY OR DESIGN MODIFICATION INCLUDING LABOR WHICH MAY BE SOLD AND/OR INSTALLED BY OUR DEALERS. -
Page 130: 2014 Ebr Noise Control System Limited Warranty
U.S. EBR warrants that this vehicle is designed and built so as to conform at the time of sale with applicable regulations of the U.S. Environmental Protection Agency (as tested following f-76 Drive-By test procedure) and that it is free from defects in materials and workmanship which would cause this motorcycle not to meet such U.S. -
Page 131: Other Rights
Any motorcycle on which the odometer mileage has been changed so that the mileage cannot be determined. TO THE FULLEST EXTENT ALLOWED BY LAW, EBR AND ITS DEALERS SHALL NOT BE LIABLE FOR LOSS OF USE, INCONVENIENCE, LOST TIME, COMMERCIAL LOSS OR OTHER INCIDENTAL OR CONSEQUENTIAL DAMAGES. -
Page 132: Your Warranty Rights And Obligations
YOUR WARRANTY RIGHTS AND OBLIGATIONS The U.S. Environmental Protection Agency (EPA) and Erik Buell Racing, LLC (ERIK BUELL RACING) are pleased to explain the emission control system warranty on your 2014 and later motorcycle. In California, new motor vehicles must be designed, built and equipped to meet the State’s stringent anti-smog standards. -
Page 133: Owner's Emission Control System Supplemental Warranty Responsibilities
Buell Drive, Unit C, East Troy, Wisconsin, 53120. ERIK BUELL RACING, LLC - LIMITED WARRANTY ON EMISSION CONTROL SYSTEM ERIK BUELL RACING warrants that each new 2014 and later EBR brand motorcycle, which includes as standard equipment, a headlight, taillight and stoplight, and is street legal:... - Page 134 I. COVERAGE Warranty defects shall be remedied during customary business hours at any authorized EBR motorcycle dealer located within the United States of America in compliance with the Clean Air Act and applicable regulations of the United States Environmental Protection Agency.
- Page 135 which adversely affect performance and/or use in competitive racing or related events. Inspections, replacement of parts and other services and adjustments required for required maintenance. Any motorcycle on which the odometer mileage has been changed so that actual mileage cannot be readily determined. III.
- Page 136 This warranty gives you specific legal rights, and you may also have other rights which vary from state to state. This warranty is in addition to ERIK BUELL RACING’s limited motorcycle warranty. VI. ADDITIONAL INFORMATION Any replacement part that is equivalent in performance and durability may be used in the performance of any maintenance or repairs.
-
Page 137: Regular Service Intervals
REGULAR SERVICE INTERVALS Regular lubrication and maintenance will help keep your new EBR operating at peak performance. Your EBR dealer knows how to best service your motorcycle with factory approved methods and equipment assuring you of thorough and competent workmanship. - Page 138 Regular Service Intervals MAINTENANCE SCHEDULE 6200 12,400 18,600 24,800 31,000 37,200 ITEMS PROCEDURE MILES MILES MILES MILES MILES MILES MILES NOTES SERVICED (1000 KM) (10,000 KM) (20,000 KM) (30,000 KM) (40,000 KM) (50,000 KM) (60,000 KM) Engine Oil Replace Engine Oil Filer Replace Cartridge...
- Page 139 MAINTENANCE SCHEDULE 12,400 6200 24,800 31,000 37,200 ITEMS MILES 18,600 MILES PROCEDURE MILES MILES MILES MILES MILES NOTES SERVICED (20,000 (30,000 KM) (1000 KM) (10,000 KM) (40,000 KM) (50,000 KM) (60,000 KM) Electrical switches Check Operation equipment Front Fork Replace Inspect for Leaks, Cracks,...
- Page 140 NOTES: Perform annually or at specified interval, whichever comes first. Should be performed by an authorized EBR dealer, unless you have proper tools, data and qualifications. Change D.O.T. 4 fluid and flush brake and clutch systems every 2 years. May vary with frequency of operation and riding style.
- Page 141 Table 22. Owner’s Maintenance Records SERVICE LITERATURE Visit any EBR dealer or go to ErikBuellRacing.com to purchase a service or parts manual for your motorcycle. Factory authorized manuals are the most complete and detailed source of information outside of your EBR dealer.
-
Page 142: Tire Registration Form
TIRE REGISTRATION FORM...
Need help?
Do you have a question about the 1190 SX and is the answer not in the manual?
Questions and answers