Advertisement
Advertisement
Table of Contents

Related Manuals for LeMond Revolution 250202-2


Summary of Contents for LeMond Revolution 250202-2
- Page 1 BIKE TRAINER O W N E R ’ S M A N UA L Model #: 250202-2, 250400-1...
- Page 2 America’s top cyclists. Our company founder, EVOLUTION Greg LeMond, inspired a design for a new bike trainer, and the result is truly remarkable. Greg’s story is and most physically demanding event in the world–the Tour de France. Only nine months later in April of 1987, he narrowly escaped death when he was accidentally shot in a hunting accident.
-
Page 3: Table Of Contents
TABLE OF CONTENTS SAFE USE GUIDELINES ............4 ASSEMBLY INSTRUCTIONS . -
Page 4: Safe Use Guidelines
SAFE USE GUIDELINES IMPORTANT SAFETY INSTRUCTIONS THIS SYMBOL AND/OR THE WORD “WARNING” IN BOLD INDICATE A POTENTIAL FOR PROPERTY DAMAGE OR PERSONAL INJURY. TAKE NOTE OF IMPORTANT OPER ATING, SERVICING OR MAINTENANCE INSTRUCTIONS READ ALL INSTRUCTIONS BEFORE USING THIS EXERCISE EQUIPMENT THESE GUIDELINES ARE DIRECTED TO YOU, AS THE OWNER OF THIS EXERCISE EQUIPMENT. - Page 5 Although all equipment manufactured by LeMond Revolution LLC. has been thoroughly inspected by the manufacturing facility prior to shipment, proper assembly and regular maintenance are required to ensure safety.
-
Page 6: Assembly Instructions
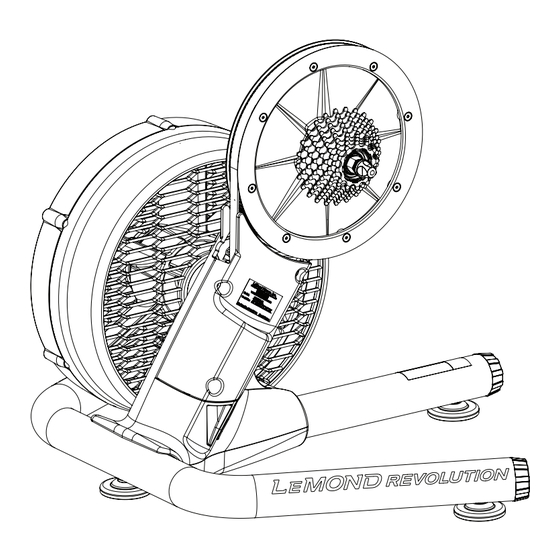
Serial Number Plate: Contains valuable informa- Drive Belt: A toothed belt is used to transfer the tion about your LeMond Revolution. pedaling force to the fan. Leveling Feet: Allows for adjustment of the Revo- Cassette: Designed to be compatible with lution to ensure a stable base. - Page 7 Your LeMond should arrive packed in 1 carton. Upon arrival fully inspect the carton for EVOLUTION damage. If damage is found please contact the delivery company and the LeMond Customer Service Department at (612) 486-5750 to report any damage. UNPACKING Remove all components and parts from the packaging and check them against the list below and Figure 1.1.
- Page 8 ASSEMBLY INSTRUCTIONS ASSEMBLY WARNING: THE BODY ASSEMBLY WEIGHS 28LBS G USE CAUTION WHEN HANDLING THE BODY ASSEMBLY AND BE SURE TO SUPPORT THE ASSEMBLY PROPERLY WHILE INSTALLING THE BASE ASSEMBLY. FAILURE TO FOLLOW THESE INSTRUCTIONS MAY RESULT IN PROPERTY DAMAGE OR INJURY. Note: Ensure that you have all the parts listed and illustrated above prior to beginning assembly.
- Page 9 ASSEMBLY INSTRUCTIONS Install the base assembly to the body assembly using the included 60mm screw and two 15mm screws removed from the shipping base. (Figure 1.2) Begin by starting the longer (60mm) screw through the center arm of the base assembly into the body assembly.
- Page 10 ASSEMBLY INSTRUCTIONS I nse rt the skewer into the body assembly from the fan side and thread the acorn nut onto the skewer on the cassette side. (Figure 1.4) Do not fully thread the acorn nut in place to allow for bike mounting.
-
Page 11: Bicycle Mounting Instructions
BICYCLE MOUNTING INSTRUCTIONS MOUNTING YOUR BICYCLE TO THE LEMOND REVOLUTION Note: The LeMond Revolution is shipped from the factory equipped with a Shimano /SRAM 8/9/10/11-Speed ® cassette adapter. If your bike is equipped with a Campagnolo derailleur, please follow the instructions on Pg. - Page 12 BICYCLE MOUNTING INSTRUCTIONS With the chain resting on the smallest sprocket and the chain stays resting on the axle, EVOLUTION press down gently on the bicycle seat and roll the bicycle forward. As the bicycle rolls forward it will drop about an inch as the dropouts seat onto the axle. (Figure 3.3) FIGURE 3.3 seated squarely in the dropouts.
- Page 13 BICYCLE MOUNTING INSTRUCTIONS . If it appears tilted repeat steps 5-7 to EVOLUTION ensure that the dropouts are seated properly on the axle. It the bike still appears tilted use the level- ing feet to adjust the bike to vertical. Lock Skewer Tighten Skewer Acorn Nut...
-
Page 14: Cassette Adaptor Installation
Torque Wrench REQUIRED PARTS Campagnolo® Cassette (10 or 11-speed) Campagnolo® Cassette Adapter [LeMond P/N: 250126-2] INSTRUCTIONS: Remove the axle skewer from the using caution to retain the spacer on the fan side. EVOLUTION Using the chain whip and the Shimano® lockring tool remove the lockring on the cassette. - Page 15 CASSETTE ADAPTER INSTALLATION Remove the cassette adapter assembly. (Figure 4.1) Hub Nut FIGURE 4.2 Before proceeding make sure that the adapter spacer is still present on the shaft in the hub recess. The adapter slides freely on the shaft and may have slid out during removal of the cassette adapter. (Figure 4.3) Adaptor Spacer...
- Page 16 CASSETTE ADAPTER INSTALLATION Install the Campagnolo® adapter onto the shaft and reinstall the 16mm hub nut. Tighten the nut to 2.5 N m (22 in-lb). (Figure 4.1) Cassette Adaptor Cassette Cassette Lockring Hub Nut FIGURE 4.1 Note: In some cases the bearing inside the adaptor will come loose during installation. If the bearing moves, be sure that the spacer between the bearings is still in place and push the bearing back into place by pressing around the outside edge of the bearing.
-
Page 17: Riding The Revolution
If your bicycle is set up properly for your body then you should not need to make any adjustments prior . If you are unsure about the setup of your bicycle please visit your local EVOLUTION bike shop prior to using it with your LeMond EVOLUTION BASIC OPERATION With your bike safely installed on the (see instructions on p.11), mount the bicycle nor-... -
Page 18: General Exercise Guidelines
GENERAL EXERCISE GUIDELINES GENERAL EXERCISE GUIDELINES SETTING A GOAL exercise program that is geared to build muscle, maintain muscle tone, increase aerobic capacity, or program. Based upon a comprehensive analysis of your personal exercise needs and interests, you should then develop (or have developed for you by a competent or trained professional) an individual- come from a lifestyle change that encourages a lifetime of physical activity. - Page 19 GENERAL EXERCISE GUIDELINES EXERCISE PRINCIPLES * The American College of Sports Medicine has developed a position paper concerning exercise programs for healthy adults and the need for guidelines. The following recommendations concern the quantity Frequency 3 to 5 days per week Intensity 50% - 85% of maximum oxygen uptake (VO2 max) Duration...
-
Page 20: Maintenance Instructions
MAINTENANCE INSTRUCTIONS MAINTENANCE INSTRUCTIONS Generally speaking, the LeMond does not require regular maintenance. However, we do EVOLUTION recommend that you maintain a regular maintenance schedule on the bicycle you are using with the . Please consult your local bike mechanic for a recommended maintenance schedule. -
Page 21: Troubleshooting
Check that the base screws are secure. (p. 8 Figure 1.2) Check that the bicycle is mounted properly following the instructions in this manual. (p. 11) If the unit still feels unstable please contact the LeMond Service Department. Excessive vibration while riding Check that the bicycle is mounted properly following the instructions in this manual. -
Page 22: Specifications
SPECIFICATIONS 18.0 in. 24.75 in. 19.5 in. PHYSICAL DIMENSIONS: SHIPPING CARTON DIMENSIONS: Length: 19.5 in (49.5 cm) Length: 28.0 in (71.2 cm) Height: 18 in (46.0 cm) Height: 23.0 in (58.4 cm) Width: 24.75 in (62.8 cm) Width: 13.5 in (34.3 cm) Weight: 33.0 lbs (15.0 kg) Weight: 43.6 lbs (19.8 kg) -
Page 23: Warranty
WARRANTY WARRANTY This is to certify that the LeMond® Revolution™ is warranted by LeMond Revolution LLC to be free of all defects in materials and workmanship. This warranty does not apply to any defect caused by negligence, misuse, accident, alteration, improper maintenance, or an “act of God. ”...
Need help?
Do you have a question about the Revolution 250202-2 and is the answer not in the manual?
Questions and answers