Table of Contents
Advertisement
Quick Links
Instruction Manual book
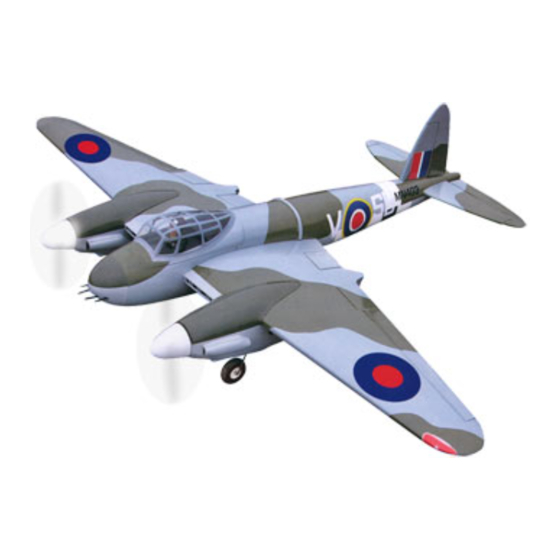
SPECIFICATION
Wingspan :
Length
Weight
Radio
Servo
Electric Motor : ( 02pcs )
Battery:
Propeller
Speed control : ( 02pcs ) : 40 A.
1,600 mm
:
1,230 mm
:
2.5 kg
:
06 channels.
:
07 servos.
3 CELLS-LI-POLY
11.1V-5000 mA.h-20 c .
:
( 02pcs )10 x 6
62.99 in.
48.43 in.
5.5 Lbs.
AXI 2814/12.
Made in Vietnam.
ITEM CODE: BH50.
Advertisement
Table of Contents

Subscribe to Our Youtube Channel
Related Manuals for Black Horse Model Mosquito MK VI


Summary of Contents for Black Horse Model Mosquito MK VI
- Page 1 Instruction Manual book ITEM CODE: BH50. SPECIFICATION Wingspan : 1,600 mm 62.99 in. Length 1,230 mm 48.43 in. Weight 2.5 kg 5.5 Lbs. Radio 06 channels. Servo 07 servos. Electric Motor : ( 02pcs ) AXI 2814/12. Battery: 3 CELLS-LI-POLY 11.1V-5000 mA.h-20 c .
- Page 2 MOSQUITO MK VI. INSTRUCTION MANUAL. This instruction manual is designed to help you build a great flying aeroplane. Please read this manual thoroughly before starting assembly of your MOSQUITO MK VI. Use the parts listing below to identify all parts. WARNING.
-
Page 3: Safety Precaution
MOSQUITO MK VI. INSTRUCTION MANUAL. Caution: this model is not a toy! SAFETY PRECAUTION. If you are a beginner to this type of powered model, please ask an experienced model flyer + This is not a toy for help and support. If you attempt to operate... - Page 4 MOSQUITO MK VI. INSTRUCTION MANUAL. INSTALLING THE AILERON - FLAP SERVO CONTROL HORN. INSTALLING THE AILERON - SERVO CONTROL HORN. 1) Install the rubber grommets and brass eyelets onto the aileron servo. C/A glue. 2) Install the metal connector onto servo arm.
- Page 5 MOSQUITO MK VI. INSTRUCTION MANUAL. 3) Install the aileron servo as same as picture. C/A glue. Remove covering. Epoxy glue. C/A glue. Bottom of left. Repeat the procedure for the other wing half.
- Page 6 MOSQUITO MK VI. INSTRUCTION MANUAL. INSTALLINGCONTROL HORN OF THE AILERON Aileron Flap Bottom side. - Using a ruler & pen to draw a straight Micro control line as below picture. connector. Bottom side 4) Attach the micro control connector to Remove the servo arms.
- Page 7 MOSQUITO MK VI. INSTRUCTION MANUAL. aileron control horn. Aileron C/A glue. INSTALLING FLAP SERVO-CONTROL HORN. Remove covering Flap Aileron control horn. Bottom side Secure...
- Page 8 MOSQUITO MK VI. INSTRUCTION MANUAL. Insert flap control horn as picture above. Flap control horn Secure Pushrod wire Flap control horn Remove covering on pre-cut slot -mounting flap control horn. C/A glue...
- Page 9 MOSQUITO MK VI. INSTRUCTION MANUAL. 3x 15mm. Aileron Secure Flap Bottom side Repeat the procedure for the other wing half. INSTALLING ELECTRIC MOTOR. See pictures below: Epoxy glue Motor mount wood:...
- Page 10 MOSQUITO MK VI. INSTRUCTION MANUAL.
- Page 11 MOSQUITO MK VI. INSTRUCTION MANUAL. INSTALLING RETRACTABLE LANDING GEAR. Remove covering...
- Page 12 MOSQUITO MK VI. INSTRUCTION MANUAL. Cut out and reomver the balsa plywood as picture to place for the retract landing gear mounts. cut here Mark point Drill a hole 1.5 mm (diameter) 3 mmx 15mm Secure...
- Page 13 MOSQUITO MK VI. INSTRUCTION MANUAL. 3 mmx 15mm ENGINE NACELLE-COWLING INTALLATION. Install the engine cowling as same as picture below. Pushrod retract Bottom side Bottom nacelle Cowling Remove covering through balsa wood on to pre-cut slot of bottom wing as picture below.
- Page 14 MOSQUITO MK VI. INSTRUCTION MANUAL. Epoxy glue Center line 3 x 15mm Center line Secure Left side INSTALLING THE BOTTOM NACELLE...
- Page 15 MOSQUITO MK VI. INSTRUCTION MANUAL. Pre-cut slot Pre-cut slot Pre-cut slot C/A glue Bottom nacelle C/A glue...
- Page 16 MOSQUITO MK VI. INSTRUCTION MANUAL. Left side Right side Mark line Mark line Left side Right side Mark line Mark line Right side Left side Right side...
- Page 17 MOSQUITO MK VI. INSTRUCTION MANUAL. C/A glue 11mm Mark point Mark point Center line...
- Page 18 MOSQUITO MK VI. INSTRUCTION MANUAL. Drill a hole with 4mm diameter. Secure Secure...
-
Page 19: Installing The Spinner
MOSQUITO MK VI. INSTRUCTION MANUAL. Top side Repeat the procedure for the other engine cowl. Another wing halft as same as process. INSTALLING THE SPINNER Install the spinner as same as picture below. 3 x 12 Top side Bottom side SERVO INSTALLATION. -
Page 20: Horizontal Stabilizer Installation
MOSQUITO MK VI. INSTRUCTION MANUAL. C/A glue HORIZONTAL STABILIZER INSTALLATION. 1) Using a modeling knife, cut away the covering from the fuselage for the stabilizer C/A glue and remove it. Remove covering 2) Draw a center line onto the horizontal stabilizer. - Page 21 MOSQUITO MK VI. INSTRUCTION MANUAL. 4) Remove the stabilizer. Using the lines you just drew as a guide, carefully remove the covering from between them using a modeling knife. When cutting through the covering to remove 5) When you are sure that everything is...
-
Page 22: Elevator Pushrod Installation
MOSQUITO MK VI. INSTRUCTION MANUAL. ELEVATOR PUSHROD INSTALLATION. Elevator pushrod install as same as pic- ture below. Remove covering on the precut-slot Elevator Elevator pushrod pushrod C/A glue Elevator Elevator control horn control horn... -
Page 23: Mounting The Tail Wheel Bracket
MOSQUITO MK VI. INSTRUCTION MANUAL. Elevator Secure pushrod Rudder pushrod MOUNTING THE TAIL WHEEL BRACKET. Bend and cut after 3 x 12mm Mark point Elevator servo... -
Page 24: Rudder Control Horn Installation
MOSQUITO MK VI. INSTRUCTION MANUAL. Secure the tail wheel bracket in place us- ing three 3mm x 12mm wood screws. Be careful not to overtighten the screws. Remark RUDDER CONTROL HORN INSTALLATION. Rudder Rudder control horn pushrod Secure Remove covering... -
Page 25: Vertical Installation
MOSQUITO MK VI. INSTRUCTION MANUAL. VERTICAL INSTALLATION. 1. Put the rudder in the fuse lage as same as picture below. Tail wheel wire 2. Mark the shape of the vertical on the left and right side of the rudder on to the hori- zontal stabilizer using a felt-tip pen. - Page 26 MOSQUITO MK VI. INSTRUCTION MANUAL. Remove covering Remove covering 4. Put the vertical stabilizer back in place. Using a triangle, check to ensure When cutting through the covering to remove that the vertical stabilizer is aligned 90 de- it, cut with only enough pressure to only cut gree to the horizontal stabilizer.
- Page 27 MOSQUITO MK VI. INSTRUCTION MANUAL. 18 mm Epoxy glue Bend 90 degree C/A glue Mark point 21mm Epoxy glue Push C/A glue . Carefully make a 90 degree bend down at the mark point which was made. Cut off the excess wire, leaving about 18mm beyond the bend.
- Page 28 MOSQUITO MK VI. INSTRUCTION MANUAL. C/A glue Check to mark sure the wing and stabi- Elevator lizer are paralell. If they are not, lightly sand pushrod the opening in the fuselage for the stabilizer Elevator until the stabilizer is paralell to the wing.
- Page 29 MOSQUITO MK VI. INSTRUCTION MANUAL. C/A glue Apply epoxy and Apply tape ATTACHMENT WING-FUSELAGE. See pictures below: RETRACT PUSHROD INSTALLATION Retract servo Apply epoxy Apply epoxy Metal conector 25mm Servo arm...
- Page 30 MOSQUITO MK VI. INSTRUCTION MANUAL. Secure wing bolt secure Retract pushrod Retract pushrod look at in side - on the top size of fuselage.
-
Page 31: Installing The Receiver And Battery
MOSQUITO MK VI. INSTRUCTION MANUAL. Retract pushrod look at - on the bottom size of wing. INSTALLING THE RECEIVER AND BATTERY. See picture below. Tie wrap. Tie wrap. Battery Receiver... - Page 32 MOSQUITO MK VI. INSTRUCTION MANUAL. Secure Fiberglass cover first wing panel. C/A glue Installing the canopy as some as picture below.
- Page 33 MOSQUITO MK VI. INSTRUCTION MANUAL. BALANCING. 1) It is critical that your airplane be bal- anced correctly. Improper balance will cause Fiberglass cover your plane to lose control and crash. THE CENTER OF GRA VITY IS LOCA TED 95MM BACK FROM THE LEADING EDGE OF THE WING.
-
Page 34: Pre-Flight Check
3) Check to be sure the control surfaces move in the correct directions. We wish you many safe and enjoyable Ailerons : 10mm up 10mm down. flights with your MOSQUITO MK VI. Elevator : 10mm up 10mm down. Rudder : 15mm right 15mm left.
Need help?
Do you have a question about the Mosquito MK VI and is the answer not in the manual?
Questions and answers