Extron electronics XTP SR HDMI User Manual
Xtp hdmi scaling receiver
Hide thumbs
Also See for XTP SR HDMI:
- User manual (51 pages) ,
- User manual (53 pages) ,
- User manual (54 pages)
Table of Contents
Advertisement
Quick Links
Download this manual
See also:
User Manual
Advertisement
Table of Contents

Related Manuals for Extron electronics XTP SR HDMI


Summary of Contents for Extron electronics XTP SR HDMI
- Page 1 User Guide XTP Extenders XTP SR HDMI XTP HDMI Scaling Receiver 68-2007-01 Rev. C 03 14...
-
Page 2: Safety Instructions
Safety Instructions Safety Instructions • English Инструкция по технике безопасности • Русский WARNING: This symbol, , when used on the product, is intended to ПРЕДУПРЕЖДЕНИЕ: Данный символ, , если указан alert the user of the presence of uninsulated dangerous voltage within the на... - Page 3 “Extron Safety and Regulatory Compliance Guide” on the Extron website. Copyright © 2014 Extron Electronics. All rights reserved. Trademarks All trademarks mentioned in this guide are the properties of their respective owners. The following registered trademarks , registered service marks...
- Page 4 Conventions Used in this Guide Notifications The following notifications are used in this guide: A warning indicates a situation that has the potential to result in death or WARNING: severe injury. ATTENTION: Attention indicates a situation that may damage or destroy the product or associated equipment.
-
Page 5: Table Of Contents
SIS Configuration and Control ............ 1 ..... 20 About this Guide ..........1 Host Device Connection ........20 About the XTP SR HDMI Scaling Receiver ..1 SIS Programming Guide ........20 Key Features ............2 Host-to-Device and Device-to-Host Communication ........... 20 Device-Initiated Message ...... - Page 6 XTP SR HDMI Scaling Receiver • Contents...
-
Page 7: Introduction
This guide provides installation, operation, control, and reference information for the XTP SR HDMI scaling receiver. In this guide, the terms "scaling receiver" and "XTP SR HDMI" are used interchangeably to refer to the XTP SR HDMI scaling receiver. About the XTP SR HDMI Scaling Receiver The Extron XTP SR HDMI receives video, audio, bidirectional RS-232 and IR, and Ethernet signals over a single twisted pair cable. -
Page 8: Key Features
The following diagram shows one way the XTP SR HDMI can be integrated in an XTP point-to-point application. The scaling receiver can also be used with an XTP matrix switcher (see the XTP matrix switcher user guide for more details on matrix applications). - Page 9 (power supply excluded). Above-the-ceiling placement conceals the scaling receiver to prevent theft, and is convenient for installing equipment when space inside the room is limited. XTP SR HDMI Scaling Receiver • Introduction...
-
Page 10: Installation
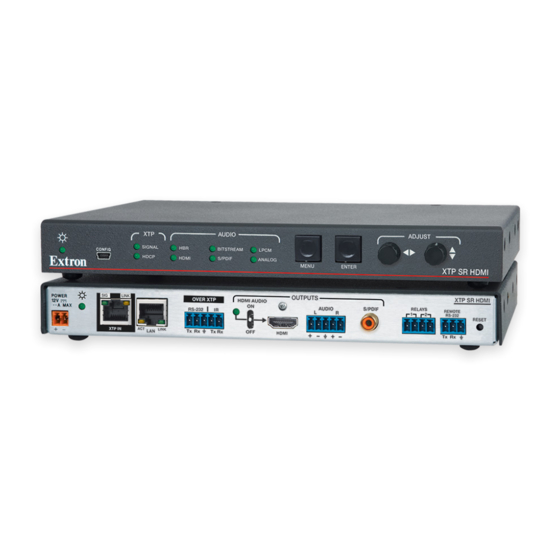
• Rear Panel Connectors • Making Connections The XTP SR HDMI can be placed on a tabletop or mounted in a rack or under a desk (see Mounting on page 43). Rear Panel Connectors LINK OVER XTP... - Page 11 Do not exceed 24 V at 1.0 A for each port. Remote RS-232 connector — Connect a host device to the 3.5 mm, 3-pole captive screw connector for serial control of the scaling receiver. XTP SR HDMI Scaling Receiver • Installation...
-
Page 12: Making Connections
Power connector and LED — Connect the external 12 V, 1.0 A power supply to the 2-pole captive screw connector. The Power LED lights to indicate the device is receiving power. NOTE: The XTP SR HDMI can also be powered remotely (see Power Connection on page 9). -
Page 13: Tp Cable Termination And Recommendations
Figure 5. TP Cable Termination Connector Supported cables The XTP SR HDMI is compatible with shielded twisted pair (F/UTP, SF/UTP, and S/FTP) and unshielded twisted pair (U/UTP) cables. ATTENTION: • Do not use Extron UTP23SF-4 Enhanced Skew-Free AV UTP cable or STP201 cable to link the XTP products. -
Page 14: Rs-232 And Ir Over Xtp Communication
The length of exposed wires is critical. • The ideal length is 3/16 inch (5 mm). • Longer bare wires can short together. Shorter wires are not as secure in the connectors and could be pulled out. • XTP SR HDMI Scaling Receiver • Installation... -
Page 15: Power Connection
Output Cord Figure 7. Power Wiring The XTP SR HDMI can be connected to a local power supply (see figure 7). WARNING: Electric shock hazard. The two power cord wires must be kept separate while the power supply is plugged in. Remove power before wiring. - Page 16 Remote power The XTP SR HDMI can be powered remotely through an XTP Power Injector or through an XTP matrix switcher. ATTENTION: XTP remote power is intended for indoor use only. No part of the network that uses XTP remote power should be routed outdoors.
-
Page 17: Operation
Operation This section contains information for front panel operation and configuration of the XTP SR HDMI and configuration through the On-Screen Display (OSD) menu. Topics in this section include: • Front Panel Features and Indicators • Rear Panel HDMI Audio Switch •... -
Page 18: Rear Panel Hdmi Audio Switch
Rear Panel HDMI Audio Switch AUDIO The XTP SR HDMI has an HDMI audio switch that mutes or unmutes the embedded audio on the HDMI output connector. The LED next to the switch lights when HDMI audio is enabled. HDMI... -
Page 19: Menu Overview
Press the Enter button to accept the new value. Press the Menu button to cancel any pending changes. To exit the OSD menu: While in the list of submenus, press the Menu button to exit the OSD menu. XTP SR HDMI Scaling Receiver • Operation... -
Page 20: Image Reset Submenu
Image Reset Submenu The Auto-Image submenu allows the execution of a one-time Auto-Image. Figure 10. Image Reset Submenu Image reset — Press the Enter button to reset shift and size settings to the default values. XTP SR HDMI Scaling Receiver • Operation... -
Page 21: Picture Controls Submenu
Brightness and contrast — Rotate the Horizontal Adjustment knob to adjust the brightness (Bright) of the image. Rotate the Vertical Adjustment knob to adjust the contrast (Cont) of the image. Detail — Rotate the adjustment knobs to adjust the detail of the image. XTP SR HDMI Scaling Receiver • Operation... -
Page 22: User Presets Submenu
Recall — Rotate the adjustment knobs to select a preset to recall saved picture control settings. Save — Rotate the adjustment knobs to select a preset to store the current picture control settings. XTP SR HDMI Scaling Receiver • Operation... -
Page 23: Input Configuration Submenu
Output format and color bit depth settings are not configurable from the OSD. To configure either setting, use the XTP System Configuration Software (see Input/Output tab on page 35). Figure 14. Output Configuration Submenu XTP SR HDMI Scaling Receiver • Operation... - Page 24 Color bit depth — Shows the color bit depth of the input signal. This is not configurable from the OSD menu. To configure this setting, use the XTP System Configuration Software (see Input/Output tab on page 35). XTP SR HDMI Scaling Receiver • Operation...
-
Page 25: Advanced Configuration Submenu
Enter buttons simultaneously for about 2 seconds or until the Power LED blinks (see Executive mode SIS commands on page 27 or XTP System Configuration Software on page 29 for remote enabling or disabling of executive mode). XTP SR HDMI Scaling Receiver • Operation... -
Page 26: Sis Configuration And Control
Use a computer running the Extron DataViewer utility or HyperTerminal, or use a control system to make serial control of the receiver possible. To connect directly to an XTP SR HDMI, connect the computer to the XTP SR HDMI through the front panel USB Config port (see on page 11) or the rear panel Remote RS-232 connector (see on page 5). -
Page 27: Error Responses
Error Responses When the XTP SR HDMI receives an SIS command and determines that it is valid, it performs the command and sends the corresponding response to the host device. If the command is determined invalid or contains invalid parameters, the receiver returns an error response to the host. -
Page 28: Symbol Definitions
23.98 Hz 24 Hz 25 Hz 29.97 Hz 30 Hz 50 Hz 59.94 Hz 60 Hz 75 Hz 640x480 800x600 852x480 1024x768 1024x852 1024x1024 1280x768 1280x800 1280x1024 1360x765 1360x768 1365x768 1366x768 1365x1024 1440x900 1400x1050 1680x1050 1600x1200 1920x1200 480p 576p 720p 1080i 1080p 2048x1080 * = default XTP SR HDMI Scaling Receiver • SIS Configuration and Control... -
Page 29: Command And Response Tables For Sis Commands
View brightness View the brightness level. X&] BRIT Brit NOTES: = Video mute = unmute (default) = mute video = mute video and sync X& = Picture adjustment = default) XTP SR HDMI Scaling Receiver • SIS Configuration and Control... - Page 30 Execute an image reset Reset shift and size settings to the default values. NOTES: X& = Picture adjustment = default) = Horizontal position or size 65535 = Vertical position or size 65535 XTP SR HDMI Scaling Receiver • SIS Configuration and Control...
-
Page 31: Output Configuration Commands
= crosshatch = colorbars = greyscale = Output scaler rate and refresh rate Output scaler rate and refresh rate on page 22 for a table of available resolutions and refresh rates. XTP SR HDMI Scaling Receiver • SIS Configuration and Control... -
Page 32: Audio Configuration Commands
= mute S/PDIF audio output = mute S/PDIF and HDMI audio outputs = mute S/PDIF and analog audio outputs = mute all audio outputs X1& = Volume = default) = User preset XTP SR HDMI Scaling Receiver • SIS Configuration and Control... -
Page 33: Advanced Configuration Commands
View relay status. NOTES: = Enable or disable = disabled or off = enabled or on = Relay = relay 1 = relay 2 = Pulse time (in 16 ms steps) 65535 XTP SR HDMI Scaling Receiver • SIS Configuration and Control... - Page 34 = HDCP status = no sink device detected = sink detected with no HDCP encryption = sink detected with HDCP encryption = Input signal status = no input = input detected XTP SR HDMI Scaling Receiver • SIS Configuration and Control...
-
Page 35: Xtp System Configuration Software
Open the executable (.exe) file from the location where it was saved. Follow the instructions that appear on the screen. By default, the installation creates a directory in the appropriate Program Files folder named “Extron Electronics\XTP System Configuration.” XTP SR HDMI Scaling Receiver • XTP System Configuration Software... -
Page 36: Using The Xtp System Configuration Software
Using the XTP System Configuration Software The XTP SR HDMI can be controlled directly from the front panel Config port or remotely from a connected XTP matrix switcher. Connections When opening the XTP System Configuration Software, the Connections screen opens first. -
Page 37: Top Menu
To access this menu, click the Tools menu. Tools Figure 21. Tools Menu NOTE: The options are not Backup and Restore Software Preference available when directly connected to the XTP SR HDMI. XTP SR HDMI Scaling Receiver • XTP System Configuration Software... -
Page 38: Update Firmware
Select file from computer connected host device. The Browse dialog box opens. Select the desired firmware file and click the button. Open Click the button after the firmware finishes updating. Close XTP SR HDMI Scaling Receiver • XTP System Configuration Software... - Page 39 This option opens the XTP System Configuration Software help file in a Web browser. From the menu, select Help Help Extron Website This option opens the Extron website in a web browser. From the menu, select Help Extron Website XTP SR HDMI Scaling Receiver • XTP System Configuration Software...
-
Page 40: Device Settings
Audio and video mute — Click the button to mute or AV Mute unmute audio and video output. NOTE: The mute buttons turn red when they are enabled. XTP SR HDMI Scaling Receiver • XTP System Configuration Software... - Page 41 Fill Follow Fill — Scales the input signal to fill the entire • video output. Follow — Maintains the signal aspect ratio, • with respect to the current output resolution. XTP SR HDMI Scaling Receiver • XTP System Configuration Software...
- Page 42 Pulse — In the desired relay panel, select a length of time from the field. Duration Click the button to pulse the relay for the time specified in the field. Pulse Duration XTP SR HDMI Scaling Receiver • XTP System Configuration Software...
- Page 43 Save Preset — Select a preset from the list of presets and click the Save Preset button. Recall Preset — Select the desired preset from the list of presets and click the Recall button. Preset XTP SR HDMI Scaling Receiver • XTP System Configuration Software...
- Page 44 Enter a value or click the arrows in the Down Horizontal Position fields (see figure 30, Vertical Position To reset all position and size settings: Click the button (see figure 30, Image Reset XTP SR HDMI Scaling Receiver • XTP System Configuration Software...
-
Page 45: Audio Tab
Volume slider — Click and drag the handle of the slider, enter a value in the Volume field, or click the arrows to adjust analog audio output volume. Volume Down XTP SR HDMI Scaling Receiver • XTP System Configuration Software... - Page 46 Mute video and sync — Click the button to Mute Video and Sync mute the active video and disable sync on the output. XTP SR HDMI Scaling Receiver • XTP System Configuration Software...
-
Page 47: Factory Reset
) to reset the receiver to factory settings £ Factory Reset (except for firmware). Reset SIS commands NOTE: This is the same as the SIS command (see ZXXX page 28). XTP SR HDMI Scaling Receiver • XTP System Configuration Software... - Page 48 S/PDIF Audio — Displays the mute status of the audio on the S/PDIF output. Analog Audio — Displays the mute status of the analog audio output. Analog Audio Volume — Displays the analog audio output volume level. XTP SR HDMI Scaling Receiver • XTP System Configuration Software...
-
Page 49: Reference Information
Updating Firmware with Firmware Loader Mounting The XTP SR HDMI can be placed on a tabletop or mounted in a rack or underneath a desk. Tabletop Mounting Attach the provided rubber feet to the bottom four corners of the enclosure. -
Page 50: Updating Firmware With Firmware Loader
Updating Firmware with Firmware Loader To upload and update firmware for the XTP SR HDMI, download the new firmware to a connected computer and upload the firmware with the Extron Firmware Loader utility. Downloading Extron Firmware Loader Software on the Extron Website Figure 33. -
Page 51: Installing Firmware Loader
The file can be downloaded from the same page as the firmware. Click the link to the right of the desired device. Download Submit any required information to start the download. Note where the file is saved. XTP SR HDMI Scaling Receiver • Reference Information... -
Page 52: Installing Firmware With Firmware Loader
Click the button to start the upload process. Begin Close Firmware Loader when the field shows , the Remaining Time 00.00.00 column shows , and the field shows Progress 100% Status completed XTP SR HDMI Scaling Receiver • Reference Information... - Page 53 Extron Electronics makes no further warranties either expressed or implied with respect to the product and its quality, performance, merchantability, or fitness for any particular use. In no event will Extron Electronics be liable for direct, indirect, or consequential damages resulting from any defect in this product even if Extron Electronics has been advised of such damage.
Need help?
Do you have a question about the XTP SR HDMI and is the answer not in the manual?
Questions and answers