Table of Contents
Advertisement
Quick Links
Advertisement
Table of Contents

Related Manuals for Electrolux en:tice EQBM60AS


Summary of Contents for Electrolux en:tice EQBM60AS
- Page 1 EQBM60AS and EQBM90AS...
-
Page 2: Table Of Contents
2 contents electrolux en:tice barbecue Congratulations Congratulations and thank you for choosing our Electrolux En:tice barbecue. We are sure you will find your new barbecue a pleasure to use. Before you use the barbecue, we recommend that you read through the entire user manual, which provides the description of the barbecue and its functions. -
Page 3: Important Safety Instructions
3 Important safety instructions Please read the user manual carefully and store in a handy warning place for later reference. Meanings of the symbols used in this manual are shown below: IF YOU SMELL GAS, do not attempt to light the barbecue. Locate the leak and re-tighten the leaking joint. Carry out the Leak Test procedure as described in warning this manual. If the leak persists, turn off the gas supply... -
Page 4: Electrolux En:tice Barbecue Eqbm90As
4 EQBM90AS description electrolux en:tice barbecue Electrolux En:tice barbecue EQBM90AS 1 Roasting hood 9 Grill 2 Temperature indicator 10 Hotplate 3 Burner controls 11 Warming racks 4 Swivel wheels with brake 12 Gas connection point 5 Swivel wheels (not illustrated) - Page 5 EQBM90AS dimensions 5 Dimensions EQBM90AS Weight 86kg 1080mm 581mm 924mm 539mm...
-
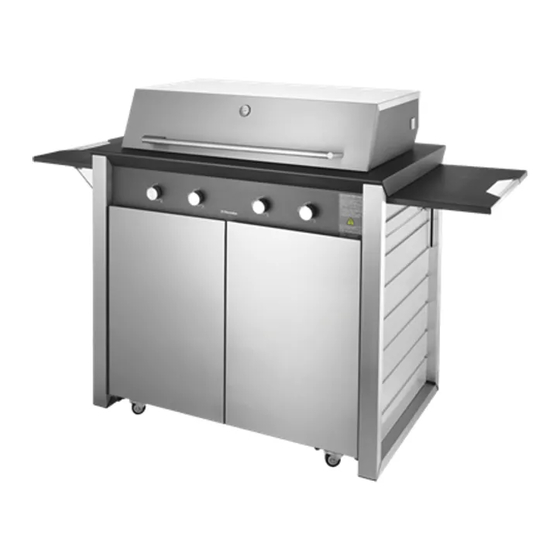
Page 6: Electrolux En:tice Barbecue Eqbm60As
6 EQBM60AS description electrolux en:tice barbecue Electrolux En:tice barbecue EQBM60AS 1 Roasting hood 9 Hotplate 2 Temperature indicator 10 Gas connection point 3 Burner controls 11 Gas hose with universal LPG connection 4 Swivel wheels with brake 12 Match holder for manual lighting (not illustrated) - Page 7 EQBM60AS dimensions 7 Dimensions EQBM60AS Weight 70kg 792mm 581mm 636mm 539mm...
-
Page 8: Barbecue Parts
8 EQBM60AS/EQBM90AS parts electrolux en:tice barbecue Electrolux En:tice barbecue parts Contents of your barbecue pack: description description Separation Base panel panel assembly Rear panel Left side panel assembly Right side Upper rear panel panel assembly Front control Left & panel... -
Page 9: Unpacking The Barbecue
9 Unpacking the barbecue caution When removing the burner box and hood assembly from the box, ensure that it is placed onto a support such as the polystyrene packaging to prevent kinking the flexible gas hose. -
Page 10: Assembling The Barbecue
10 assembling the barbecue electrolux en:tice barbecue Assembling the barbecue 1. Fit lower hinge brackets to base panel Qty 4 Type 3 screw (M5 x 12) Spring washer Flat washer Lower hinge bracket Base panel Lower hinge bracket Qty 2 Lower hinge bracket 2. Partially install screws to base panel DO NOT screw in fully... - Page 11 11 3. Fit left upper door hinge bracket Left side panel assembly Qty 2 Type 3 screw (M5 x 12) Spring washer Flat washer Qty 1 Left upper door hinge bracket Left upper door hinge bracket 4. Partially install screws to left side panel assembly DO NOT screw in fully...
- Page 12 12 assembling the barbecue electrolux en:tice barbecue 5. Fit right upper door hinge bracket Right side panel assembly Right upper door Qty 2 hinge bracket Type 3 screw (M5 x 12) Spring washer Flat washer Qty 1 Right upper door hinge bracket 6. Partially install screws to right side panel assembly DO NOT screw in fully...
- Page 13 13 7. Fit side panels to base panel Slide base panel slots under screw heads and tighten screws 4 places (2 each side) Left side panel assembly Right side panel All hinge brackets assembly this side up Base panel secured by...
- Page 14 14 assembling the barbecue electrolux en:tice barbecue 9. Fit rear panel Alight rear panel slots with screws and slide rear panel slots under screw heads and tighten screws 9 places (3 each side & 3 at bottom) Rear panel 10. Fit upper rear panel Align upper rear panel slots at side with screws...
- Page 15 15 11. F it separation panel Separation panel assembly Lower separation panel into position. Sides of These panels facing up separation panel rest on side panel and shoulders. Align holes at rear with holes in rear panel,...
- Page 16 13. F it control panel Fit the control panel in by locating the 3 tabs (EQBM60AS only has 2 tabs) at top into slots. Ensure that valve shafts locate through holes. Check the lower tabs of control panel are below the separation panel.
- Page 17 17 14. Fit doors Present the door perpendicular to the barbecue, and locate the upper and lower pins of door to support brackets. Repeat for other door. Fit matcholder chain to inside of door with clip.
- Page 18 18 assembling the barbecue electrolux en:tice barbecue 16. Fit grease collectors The collectors are already in correct location, remove from plastic bag and relocate. Slots of grease collectors to be placed over the location screws Location screws 17. Fit grills The grills are to be placed in the correct orientation to enable the grease to flow to the front grease collectors –...
- Page 19 19 18. F it hot plate The hot plate has forms underneath for location. Hot plate matches grill The rear forms lift the plate at rear to give slope for when correctly installed grease drainage. The front forms are located behind front barrier to prevent sliding forward.
-
Page 20: Gas Specifications
20 gas specifications/gas bottle safety/gas bottle installation/leak test procedure electrolux en:tice barbecue Gas specifications Gas bottle installation 1. Open both gas bottle compartment doors. For Electrolux En:tice EQBM90AS only 2. Place gas bottle into well in base ensuring bottle is stable. gas type universal LPG natural gas 3. -
Page 21: Conversion To Natural Gas
21 Conversion to Natural Gas 2. D isconnect brass adaptor and LPG hose and Preparing the unit for Natural Gas installation. regulator assembly from gas inlet connection This barbecue is supplied set up for Universal LPG and is labelled accordingly. A Natural Gas conversion kit can be 3. Connect the NG hose to the NG regulator purchased from Electrolux Spare Parts to enable conversion •... -
Page 22: Choosing A Location
22 choosing a location/installation warnings electrolux en:tice barbecue Installation warnings 7. Turndown adjustment warning When converting to natural gas the turndown setting will need to be adjusted to give a satisfactory flame • This appliance shall only be used in an above ground, on low setting. -
Page 23: Activating The Wheel Brake
23 Activating the wheel brake Operating instructions For safety, the wheel brake should be activated to Control functions prevent any movement of the barbecue. Before lighting the barbecue: There are 2 wheel brakes. -
Page 24: Using The Roasting Hood
24 using the roasting hood/using the side table electrolux en:tice barbecue Using the side table Preheating • This barbecue is fitted with high power burners. In warning most conditions it will only be necessary to preheat the ONLY USE A MINIMUM AMOUNT OF OIL AS EXCESS barbecue for 5 minutes before cooking can commence. -
Page 25: Cleaning And Care
This protects the surface when not in use. Do not clean the When the barbecue is not being used it is recommended cooking surface in a dishwasher to keep it covered. A cover is available, contact Electrolux Customer Service for details. If the barbecue is to be stored Enamel coated panels – hood inner & burner box... -
Page 26: Troubleshooting
26 cleaning and care/maintenance/troubleshooting/accessories electrolux en:tice barbecue Troubleshooting problem possible cause remedy Barbecue won’t No gas Check isolation valve light is ON Gas bottle empty – refill or change gas bottle Ignition system Check spark being not working generated when knob... -
Page 27: Warranty
APPLIANCE: ELECTROLUX BARBECUE This document sets out the terms and conditions of the product owner’s cost and risk while in transit to and from Electrolux or its ASC. warranties for Electrolux Appliances. It is an important document. 6. Proof of purchase is required before you can make a claim under Please keep it with your proof of purchase documents in a safe place this warranty. - Page 28 Do you remember the last time you opened a gift that made you say “Oh! How did you know? That’s exactly what I wanted!” That’s the kind of feeling that the designers at Electrolux seek to evoke in everyone who chooses or uses one of our products. We devote time, knowledge, and a great deal of thought to anticipating and creating the kind of appliances that our customers really need and want.