Table of Contents
Advertisement
Advertisement
Table of Contents

Related Manuals for Electrolux E44LB60ESS


Summary of Contents for Electrolux E44LB60ESS
- Page 1 44” Stainless Steel Gas Grill...
-
Page 2: Table Of Contents
Congratulations on your purchase of a new grill! We at Electrolux Home Products are very proud of our product and we are completely committed to providing you with the best service possible. Your satisfaction is our #1 priority. Please read this Use & Care Manual very carefully. It contains valuable information on how to properly maintain your new grill. -
Page 3: General Safety Instructions
- When lighting a burner, always pay close attention to what you are doing and be certain you are pushing the igniter that lights the burner you intend on using. - Always keep your face and body as far away as from the grill as possible when lighting to reduce the risk of burn. -
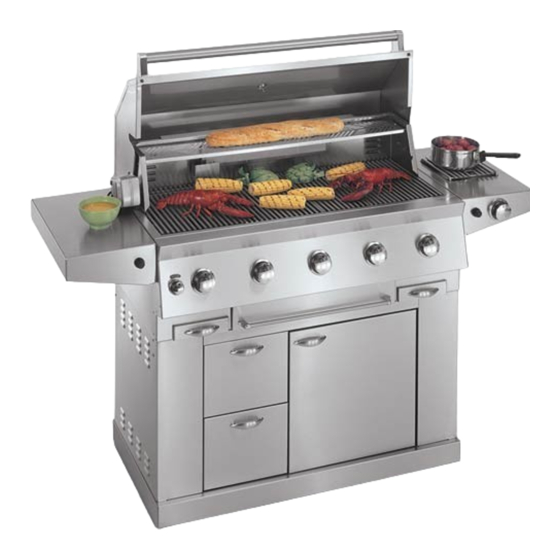
Page 4: Grill Features & Components
NOTE: Cart, side burner and side shelf are not included with the head only units. 9. Infrared back burner 10. Side burner electronic igniter 11. Cart with door and drawers 12. Drip trays 13. Side burner 14. Control knob: side burner 15. Main grill and back infrared electronic igniter... - Page 5 Grill Components List: E44 DESCRIPTION PART NUMBER BACK IR BEZEL ...RMP-122-00731 BACK IR BURNER ...WIP-122-IR2035 BACK IR ELECTRODE ...RMP-122-04CGI4 BACK IR KNOB ...RMP-122-00812 BACK IR ORIFICE LP ...RMP-122-00771 BACK IR VALVE LP ...RMP-122-00518 BACK IR WIRE ...RMP-122-00706 BOLT ...RMP-122-00626 CART BACK...WIP-192-72G444 CART BASE...WIP-192-70G445...
-
Page 6: Grill Assembly/Built-In Instructions
SIDE SHELF ATTACHMENT 1. Loosen the bolts on the side of the grill and attach the shelf by allowing the bolt heads to fall through the large opening in the bottom of the keyhole slots. -
Page 7: Side Burner Assembly
SIDE BURNER PARTS ASSEMBLY 1. Loosen the bolts on the side of the grill and attach the side burner by allowing the bolt heads to fall through the large opening in the bottom of the keyhole slots. Then slide the side burner downward until the bolts are resting against the top of the key hole slots. -
Page 8: Built-In Instructions
Keep in mind that the gas line hook-up is on the right hand side of the main built in-grill. The structure, grill and support items must be kept level throughout the installation to ensure proper operation. - Page 9 • A minimum clearance of 12” from the back of the outdoor cooking center must be maintained between the grill and any combustible construction such as wood siding of residence, 3” minimum for non-combustible construction. • The side vents on this unit can be covered for built in installations without danger of fire or without impairing the operation of the grill.
-
Page 10: Gas Requirements/Leak Testing
Conversion kits are available separately for an additional cost which will enable you to convert your grill from L.P. to N.G. or to convert your grill from N.G. to L.P. Please see your local dealer for more information. -
Page 11: Gas Installation
L.P. GAS INSTALLATION Electrolux Icon Gas Grills that are set to operate with L.P. gas come with a high capacity hose and regulator assembly. (Note: Only use the pressure regulator and hose assembly supplied with the grill or a replacement pressure regulator and hose assemblies specified by Electrolux). -
Page 12: Pre Operation Leak Testing
6. Wash off soapy solution with cold water and towel dry. Check all gas supply fittings before each use and each time the gas supply cylinder is connected to the regulator. Have a qualified service technician leak test the grill any time a part of the gas system is replaced. -
Page 13: Lighting The Grill
Keep your face as far away from the grill surface as pos- sible and pass the match extender through the spaces in the grill grates to the ports of the back crossover burner between the flavor grids. -
Page 14: Using The Grill (Rotisserie/Side Burner Usage)
5. Allow grill to cool down, wipe off any splatters or grease and clean the drip tray as needed. 6. Do not put a cover on the grill while it is still hot as it could start a fire. Keep any electrical supply cords and the fuel supply hose away... - Page 15 5 minutes. The rotisserie motor is equipped with metal gears and is capable of turning up to 20 lbs. of food. The motor is mounted on a bracket on the left side of the grill by sliding the motor over the bracket with the cord facing the back of the grill.
-
Page 16: Rotisserie Lighting
Keep your face as far away from the grill surface as possi- ble and hold a match, attached to the match extender, to the burner , then push and turn the control knob counter clockwise to the “HIGH”... -
Page 17: Care And Maintenance
The cooking grates can be cleaned immediately after cooking is completed and after turning off the grill. Wear a barbecue mitt and scrub the cooking grates with a damp cloth. If the grill is allowed to cool down, cleaning the grates will be easier if removed from the grill and cleaned with a mild detergent. -
Page 18: Troubleshooting Your Grill
SPIDER AND INSECT WARNING Spider and insects can nest in the burners of this or any other grill and cause the gas to flow from the front of the burner. This is very dangerous condition which can cause a fire to occur behind the valve panel, thereby damaging the grill and making it unsafe to operate. - Page 19 Cart door does not align properly with cart SOLUTION • Is your gas supply fully turned on? • If this is an L.P. grill is there gas in your tank ? Check your gas level. • If this is an L.P. grill, shut off gas supply, dis- connect gas line at tank, reconnect the line to the tank.
-
Page 20: Warranty
In the U.S.A., your appliance is warranted by Electrolux Home Products North America. We authorize no person to change or add to any of our obligations under this warranty. Our obligations for service and parts under this warranty must be performed by an authorized Electrolux Home Products North America qualified service technician.
Need help?
Do you have a question about the E44LB60ESS and is the answer not in the manual?
Questions and answers