Table of Contents
Advertisement
Quick Links
Download this manual
See also:
Service Manual
Advertisement
Table of Contents

Subscribe to Our Youtube Channel
Related Manuals for Phonak inspiro Premium


Summary of Contents for Phonak inspiro Premium
- Page 1 Premium User Guide...
-
Page 2: Table Of Contents
Contents 1. Welcome 2. inspiro and accessoires 3. Important inspiro figures 3.1 Operating time and charging 3.2 Operating range (FM transmission) 4. Controls 5. Getting started 5.1 Charging inspiro 5.2 Low battery alarms 5.3 Wearing inspiro 5.4 Attaching the clip to the inspiro 5.5 Attaching the lavalier to the inspiro 5.6 Wearing iLapel microphone 5.7 iLapel wearing position... - Page 3 6. Using inspiro 6.1 Talking 6.2 SoundCheck 6.3 Muting the microphone 6.4 Using inspiro with an MP3 player, TV set, GPS, computer or HiFi 6.5 Synchronizing receivers 7. Individual inspiro configuration 7.1 Setting the alarm time 7.2 Setting the preferred date format 7.3 Adjusting the settings of the LCD display 7.4 Selecting a desktop picture 7.5 Selecting your language...
- Page 4 Contents 10. DynaMic and accessories 11. Important DynaMic figures 11.1 Operating time and charging 11.2 Operating range (FM transmission) 12. Controls 13. Getting started 13.1 Charging DynaMic 13.2 Battery status indication 13.3 Vibration alarm indication 13.4 Switching ON DynaMic 14. Using DynaMic 14.1 Common use situations 14.2 Passaround microphone 14.3 Talking...
- Page 5 15.6 Setting up a MultiTalker Network when using DigiMaster loudspeaker 16. FM receivers 16.1 The MLxi 16.2 Lock MLxi push button 16.3 Identifying receivers 16.4 Other Phonak FM receivers 17. Troubleshooting 17.1 inspiro 17.2 DynaMic 18. Important notices 19. Service and warranty 20.
-
Page 6: Welcome
Soft keys, an alarm clock, different wearing options and a wealth of other details reflect Phonak’s passion for user friendliness. DynaMic, the inspiro passaround microphone, is designed to work exclusively alongside inspiro in the MultiTalker Network. - Page 7 FM systems aim to provide assistance in daily life. J www.phonak.com This is Phonak home page. Go on the product section and click on the FM systems. You can find useful information about inspiro and DynaMic as well as FM receivers.
-
Page 8: Inspiro And Accessoires
2. inspiro and accessoires inspiro is delivered with either the EasyBoom or the iLapel microphone, depending on the customer wish. All the accessories can also be ordered separately. a inspiro b Microphones: EasyBoom or iLapel c inspiro wearing options: Belt clip and lavalier cord d Audio cable e USB charging unit f Home and travel case... -
Page 9: Important Inspiro Figures
3. Important inspiro figures 3.1 Operating time and charging J Operating time when the battery is fully charged: e approx. 12 hours J Charging time for an 80% charge: e approx. 1 hour J Charging time for a 100% charge: e approx. -
Page 10: Controls
4. Controls inspiro a ON/OFF slider 01.10.2008 01:57pm b Color LCD c Soft keys Judy Smith d Keypad lock key Monitor Sync e Microphone mute key f 3.5 mm audio input g mini-USB for charging... - Page 11 h Button to attach the belt clip and the lavalier i Cable wrapper iLapel microphone j Microphone openings (do not cover!) k Wearing clip EasyBoom microphone l Microphone...
-
Page 12: Getting Started
5. Getting Started 5.1 Charging inspiro inspiro contains a re-chargeable built-in state-of-the art lithium polymer battery with fast-charge capability. A fully-discharged battery will charge to 80% in one hour and 100% in 2 hours. Select an easily accessible socket outlet and plug the charging unit into the socket outlet. - Page 13 Use only the original Phonak charging unit for insprio. The segments in the battery symbol flash during charging. The battery cannot be over-charged. If the charging unit is removed from the inspiro, the battery symbol shows the actual capacity. The battery is fully charged.
-
Page 14: Low Battery Alarms
5. Getting Started 5.2 Low battery alarms inspiro provides an automatic vibra alarm if the battery is low. J Approximately 1 hour before battery is empty: A vibrating alarm is activated. Check the message on the LCD and follow the instructions. J Approximately 15 minutes before battery is empty: If inspiro has not been charged after the first alarm, the second vibrating alarm is automatically activated before the... -
Page 15: Wearing Inspiro
5.3 Wearing inspiro inspiro can either …or around the neck be worn on the belt by using the lavalier by using the clip… (see page 16) (see page 18) -
Page 16: Attaching The Clip To The Inspiro
5. Getting Started 5.4 Attaching the clip to the inspiro “click” Attach the clip to the button on the backside of the inspiro. Make sure the clip holds securely on the inspiro. Fix the clip to the belt or trousers. Make sure the clip on the inspiro holds securely. - Page 17 The clip can also be fixed to the belt or trousers before the inspiro is attached. Make sure the clip is secured to the inspiro. To remove the clip from the inspiro, press the button on the clip and carefully remove the clip from the inspiro.
-
Page 18: Attaching The Lavalier To The Inspiro
5. Getting Started 5.5 Attaching the lavalier to the inspiro Attach the lavalier to the button... -
Page 19: Wearing Ilapel Microphone
5.6 Wearing iLapel microphone iLapel is an easy-to-use directional lapel microphone which provides excellent sound quality. You must switch OFF inspiro before changing the microphone. a) Unwind the iLapel from the inspiro. b) Fix the iLapel to your shirt and make sure the distance between the microphone and your mouth is approximately... -
Page 20: Ilapel Wearing Position
5. Getting Started 5.7 iLapel wearing position Wrong! Do not cover the two microphone openings! If you are uncertain whether the iLapel is in the correct position, activate the SoundCheck feature in inspiro. SoundCheck helps to position the iLapel correctly. -
Page 21: Wearing Easyboom Microphone
5.8 Wearing EasyBoom microphone EasyBoom is a comfortable, easy-to-use and robust boom microphone, ideal for use in classrooms. You must switch OFF inspiro before changing the microphone. - Page 22 5. Getting Started Make sure the head of the microphone is well positioned, as depicted on page 21 (A). If required you can easily bend the boom part (B). Fix the clip on your clothes as depicted and make sure the cable is not stretched between the clip and the ear, or the clip and the inspiro transmitter.
-
Page 23: Switching On Inspiro
5.9 Switching ON inspiro To switch ON, push the slider to the left until the green mark appears and the LCD is illuminated. To save power, the backlight of the inspiro LCD is switched OFF after a certain time. Press any button to activate the LCD backlight. -
Page 24: Activate The Key Pad Lock
5. Getting Started 5.10 Activate the key pad lock 01.10.2008 01:57pm It is recommended to activate the key pad lock whenever Judy Smith possible. To activate the key pad lock, go to the highest menu level as shown above and press the key showing the key symbol, then press OK. -
Page 25: Monitoring
5.11 Monitoring Monitoring is a simple and easy way to check the functionality of FM receivers. We recommend monitoring receivers every day. By pressing the Monitor soft key, the inspiro reads the information from a child’s FM receivers (one or two FM receivers). The procedure is as follows: J Hold the inspiro close to the child, at a distance of approximately 20 cm / 8 inches from the receivers. - Page 26 ON. Monitoring will only work with Phonak Dynamic FM receivers, like MLxi, MyLink+, ML9i, ML10i, ML11i, etc. and MLxi Baha. If you are not sure that your receivers are Phonak Dynamic FM receivers, ask your hearing care professional.
-
Page 27: Using Inspiro
6. Using inspiro 6.1 Talking Before you start talking to the children, make sure of the following: J the microphone is properly positioned (see page 20 and 22) J the inspiro is turned ON (see page 23) J and the microphone is active, not muted (see page 29) We also recommend activating the keypad lock. -
Page 28: Soundcheck
6. Using inspiro 6.2 SoundCheck The SoundCheck lets you verify whether the microphone is properly positioned, as well as checking the noise level in the classroom. The required procedure is as follows: J Activate the SoundCheck in the top menu level. Then follow the instructions shown on the inspiro’s LCD display. -
Page 29: Muting The Microphone
6.3 Muting the microphone The inspiro’s microphone can be muted simply by pressing the microphone key on the device. If you have forgotten to activate the microphone, inspiro will warn you with a vibrating alarm after 15 minutes. 01.10.2008 01:57pm 01.10.2008 01:57pm 01.10.2008... -
Page 30: Using Inspiro With An Mp3 Player, Tv Set, Gps, Computer Or Hifi
6. Using inspiro 6.4 Using the inspiro with an MP3 player, TV set, GPS, computer or Hifi The inspiro can be directly connected to any audio equipment via the audio input socket on the inspiro. a Plug in to the television’s headphone jack b Plug in to the audio jack AUDIO c Audio cable (standard accessory) - Page 31 Please refer to the television’s operating instructions for details. J Certain pieces of audio equipment feature a Scart or Cinch audio output. Phonak offers an optional adapter for connecting the audio cable to Scart or Cinch sockets. Scart adapter...
-
Page 32: Synchronizing Receivers
6. Using inspiro 6.5 Synchronizing receivers If you change the channel of the inspiro transmitter, you should always make sure that the channel of the receivers is synchronized to the new inspiro channel. In order to synchronize the receivers, the inspiro needs to be close to the receivers (at a distance of approximately 20 cm / 8 inches). -
Page 33: Individual Inspiro Configuration
7. Individual inspiro configuration 7.1 Setting the alarm time The inspiro includes an alarm function. As with mobile phones, an alarm time can be entered and the alarm can be either activated or deactivated. The alarm will only be displayed if the inspiro is switched on! In order to set an alarm time, proceed as follows: J Enter the Settings menu and then select Alarm. -
Page 34: Setting The Preferred Date Format
7. Individual inspiro configuration 7.2 Setting the preferred date format A choice of two date formats is available on the inspiro: DD.MM.YYYY or MM/DD/YYYY J Enter the Settings menu and then select Date & Time. J Select Date format and then press OK. J Select the required date format by using the Up or Down key. -
Page 35: Adjusting The Settings Of The Lcd Display
7.3 Adjusting the settings of the LCD display The settings of the inspiro’s LCD display are pre-set. Should you wish to change the presets, please proceed as follows: J Enter the Settings menu and then select Display. J Select the Backlight menu to increase or decrease the level of brightness of the backlight of the LCD display. -
Page 36: Selecting A Desktop Picture
7. Individual inspiro configuration 7.4 Selecting a desktop picture inspiro offers a choice of desktop pictures. One of these pictures is already active in your inspiro. If you wish to select another of the desktop pictures, then proceed as follows: J Enter the Settings menu and then select Desktop picture. -
Page 37: Selecting Your Language
7.5 Selecting your language The inspiro offers a choice of different languages. Should you wish to change the current inspiro language, then proceed as follows: J Enter the Settings menu and then select Language. J You will now see the different languages available listed on the LCD display. -
Page 38: Brief Description Of The Menu Items
8. Brief description of the menu items inspiro can be used in the following operating modes: J Standard operating mode For standard use, as well as for use by all parents and teachers who do not require any special features. J Extended operating mode For all users who require access to special FM features, such as the MultiTalker Network, etc. -
Page 39: Receiver Options
ON. A beeping sound marks the end of the check. Monitoring works only with Phonak Dynamic FM receivers. J Set beep tone Choose between the different beeping tones available to indicate when the Dynamic FM receivers are being synchronized or monitored. -
Page 40: Soundcheck
8. Brief description of the menu items 8.3 SoundCheck J This check determines the volume level of speech and of background noise. Adjust the position of the iLapel microphone until you get the best result. 8.4 Settings J Language Choose the language of the inspiro menu. J Alarm Sets the alarm time. - Page 41 J Softkeys With inspiro transmitters running firmware version 3.0 or higher, the left and right soft keys can be programmed by the user. left right soft key soft key To customize these soft keys, select “Settings” in the menu list and press “OK”. “Default”...
-
Page 42: Help
8. Brief description of the menu items J Audio input To select the special audio input setting for certain audio devices, such as the iPod nano, go into the “Audio device” sub-menu. Select “Set microphone Mute” if you want to mute the iLapel or EasyBoom microphone when an audio input signal is detected. -
Page 43: Multitalker Network
J About inspiro Shows the device’s serial number, the software version, the hardware version, the DSP setting and the menu setting (Standard/Extended). Additional features in Extended operating mode 8.6 MultiTalker Network J MultiTalker Net If a network has already been set up, you can choose to start the MultiTalker Network mode. -
Page 44: Receiver Options
8. Brief description of the menu items 8.7 Receiver options J Scan for channels Searches for an existing transmission from another transmitter, e.g. if a speaker is already using an FM transmitter at a lecture or presentation. J Identify receivers Helps to identify a receiver. -
Page 45: Changing The Application Mode
9. Changing the application mode* (‘FM’, ‘SoundField‘, ‘SoundField + FM’) With inspiro Premium transmitters running firmware version 3.0 or higher, the application mode can be changed directly on the inspiro. To change the application mode, switch inspiro ON. When the battery symbol appears, press “OK” and the left soft key (C) simultaneously (shown below), then press “OK”... -
Page 46: Dynamic And Accessories
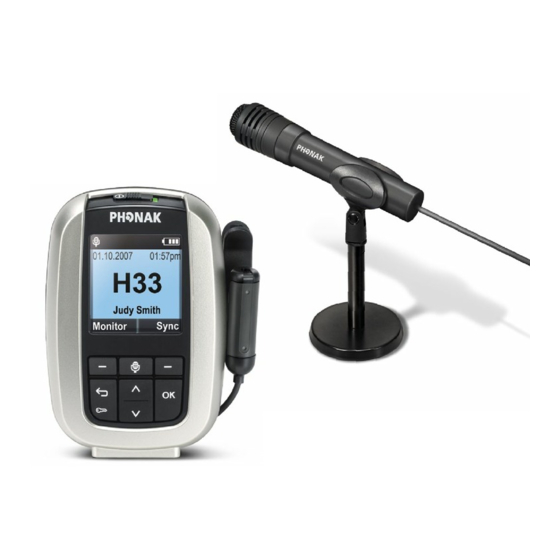
10. DynaMic and accessories DynaMic is supplied with the following accessories: J Desk stand J Clamp 3/8”, 5/8” J Colored rings (for easy microphone identification) These accessories can be ordered separately. a DynaMic microphone b Desk stand with clamp c Colored rings (red, blue, green) d Charging unit e Replacement microphone head... -
Page 47: Important Dynamic Figures
11. Important DynaMic figures General: Operates only with inspiro on the MultiTalker Network 11.1 Operating time and charging J Operating time if the battery is fully charged: e up to 10 hours J Charging time for 80% charge e approx. 1 hour J Charging time for 100% charge e approx. -
Page 48: Controls
12. Controls a Slider OFF/MUTE/ON The slider puts DynaMic in one of its three modes. b RESET button This allows DynaMic to be reset. The parameters stored are not affected by this operation. Use a pen to press the button. c Built-in vibration alarm The vibration alarm provides information on the status of the battery and operation. -
Page 49: Getting Started
A fully-discharged battery takes one hour to charge up to 80% of its full capacity and two hours for a 100% charge. Use only the original Phonak charging unit for inspiro/ DynaMic. To simultaneously charge your inspiro and DynaMic we recommend using the twin charger. -
Page 50: Battery Status Indication
13. Getting Started J During charging the LED flashes two short green pulses every 5 seconds. When charging is complete, the LED displays a static green light. We recommend fully charging DynaMic. The battery cannot be over-charged. 13.2 Battery status indication DynaMic activates an automatic vibration alarm when its battery level is low. -
Page 51: Vibration Alarm Indication
13.3 Vibration alarm indication DynaMic provides a vibration alarm if: J The battery is low J The device is out the range of the initiator inspiro in the MultiTalker Network further than 20 m / 65 feet J The microphone is muted for more than 15 minutes J There is no FM transmission –... -
Page 52: Switching On Dynamic
13. Getting Started 13.4 Switching ON DynaMic DynaMic is a passaround microphone designed for use with inspiro in the MultiTalker Network. It is not a standalone FM transmitter. To switch ON DynaMic, follow the steps below: J inspiro and DynaMic are both OFF J Switch ON inspiro: push the slider to the left until the green mark appears and the LCD is activated (see page 23). - Page 53 J Start DynaMic by pushing the slider from OFF to ON during the auto pairing time window of 8 seconds. J After the initiation is complete, the name of DynaMic appears. Press OK. DynaMic joins the MultiTalker Network as a secondary transmitter.
-
Page 54: Using Dynamic
J DynaMic situated on a child’s desk, using the supplied table stand J Holding DynaMic in the hand J Wearing the remote mic with a lavalier – not supplied by Phonak J Using a floor stand – not supplied by Phonak 14.2 Passaround microphone DynaMic can be passed from one speaker to the next. -
Page 55: Colored Rings
14.4 Colored rings With the red, blue and green rings it is possible to personalize your DynaMic for quick identification. You may use only 2 rings on one DynaMic. Do not place these rings over the grill openings of the microphone’s cap. 14.5 DynaMic DataLogging FM DynaMic automatically logs its usage times. -
Page 56: The Multitalker Network In School
15. The MultiTalker Network in school 15.1 The MultiTalker Network One or more inspiro/DynaMic transmitters can participate in a MultiTalker Network (up to ten transmitters in total). A maximum of nine additional transmitters can be used on the MultiTalker Network (MTN). J The MultiTalker Network is available in the inspiro’s Extended Operating Mode. -
Page 57: Initiating A Multitalker Network
15.2 Initiating a MultiTalker Network Initiating or setting up a MultiTalker Network should be performed in the classroom before the lesson begins. The procedure to follow is straightforward and the inspiro menu guides you through the necessary steps. See the chapter “Switching ON DynaMic”... -
Page 58: How To Use A Multitalker Network
15. Multiple talkers in one classroom 15.3 How to use a MultiTalker Network J The inspiro that has set-up (initiated) the network has first priority; all other transmitters inspiro/DynaMic that joined the network have second priority. The teacher with first priority can interrupt any teacher or student that has second priority;... -
Page 59: Practical Tips
If you switch OFF one DynaMic, it will be deleted from your participants list. The MultiTalker Network will continue with all other DynaMic and inspiro transmitters. Should you unintentionally move outside the range of the MultiTalker Network, you will be alerted by an alarm. You can then choose to either return inside the network’s operating range (i. -
Page 60: Setting Up A Multitalker Network When Using Digimaster Loudspeaker
15. Multiple talkers in one classroom J If an inspiro reverts to single teaching mode, it automatically utilises the FM channel used previously. J If the initiating inspiro alters the FM channel in MultiTalker Network mode for any reason, this new channel will automatically be sent to the other inspiro and DynaMic transmitters in the network and then activated. -
Page 61: Fm Receivers
FM transmitter, while the MLxi is an FM receiver. J The MLxi is a universal device and can be used with Phonak, as well as with nearly all other BTE brands. J In order to connect an MLxi to the hearing device, you will need an audio shoe (audio boot). -
Page 62: Lock Mlxi Push Button
16. FM receivers 16.2 Lock MLxi push button The MLxi push button can be either locked or activated. This action can be performed by either the hearing care professional or the inspiro user. J In this mode, the MLxi functions automatically. J This mode is recommended for all children. -
Page 63: Other Phonak Fm Receivers
LCD display. This feature is particularly useful in schools. 16.4 Other Phonak FM receivers inspiro/DynaMic are compatible with all Phonak FM receivers. If you have questions concerning a specific receiver, please consult your hearing care professional or visit: www.eschooldesk.com We do not recommend using the inspiro/DynaMic with FM receivers produced by other manufacturers. -
Page 64: Troubleshooting
17. Troubleshooting 17.1 inspiro Problem The inspiro cannot be switched ON. Poor speech intelligibility. Speaker’s voice is inaudible even though the inspiro is turned ON. - Page 65 Most probable cause Solution The battery is empty. Charge the inspiro for a period of at least two hours. The microphone has not been Move the microphone closer positioned properly. to the speaker’s mouth. Activate the SoundCheck feature. The microphone mute has Check the inspiro’s LCD been activated or the hearing display and press the micro-...
- Page 66 17. Troubleshooting Problem Insufficient operating range. Radio interference. A second person’s voice can also be heard. inspiro does not respond to commands.
- Page 67 Most probable cause Solution Microphone cable has not Unwind the microphone cable. been unwound. External cause: Change the FM channel. Use radio antenna or similar the ChannelFinder to locate an interfering devices nearby. unused and interference-free FM channel. Another FM user is using the Change the FM channel.
-
Page 68: Dynamic
17. Troubleshooting 17.2 DynaMic Problem The DynaMic cannot be switched ON. Poor speech intelligibility. Speaker’s voice is inaudible even though DynaMic is turned ON. - Page 69 Most probable cause Solution The battery is empty. Charge DynaMic for at least two hours. The microphone has not been Move DynaMic closer to the positioned properly. speaker’s mouth. DynaMic’s antenna or cap are Uncover DynaMic’s antenna partially covered. and cap. The colored rings are covering Move DynaMic’s colored rings the acoustic openings.
- Page 70 17. Troubleshooting Problem Radio interference. A second person’s voice can also be heard. DynaMic cannot be found during MTN setup.
- Page 71 Most probable cause Solution Radio antenna or similar Proceed as for inspiro. interfering devices are nearby. Another FM user is using the Proceed as for inspiro. same FM channel nearby. Not compatible firmware Upgrade firmware version. version.
-
Page 72: Important Notices
18. Important notices inspiro and DynaMic transmitters collect and store internal technical data. This data may be read by a hearing care professional in order to check the transmitters, as well as to support you in being able to use inspiro and DynaMic in the ideal manner. - Page 73 Do not use water or other liquids to clean inspiro or DynaMic. Use only original Phonak accessories. Use only the original Phonak charger for inspiro and DynaMic. inspiro and DynaMic should only be repaired by an authorized service center. Dropping inspiro or DynaMic can damage the transmitters.
-
Page 74: Service And Warranty
Please ask the hearing care professional, where you purchased your devices, about the terms of the local warranty. International Warranty Phonak offers you a one year limited international warranty valid starting from the date of purchase. The limited warranty covers manufacturing and material defects in the device itself, but not accessories such as batteries. -
Page 75: Declaration Of Conformity
To obtain a copy of the Declaration of conformity, please contact the manufaturer or the local Phonak representative whose address can be taken from the list on www.phonak.com (worldwide locations). This device complies with part 15 and part 95 of the FCC rules and with RSS 210 of Industry Canada. -
Page 76: Information And Explanation Of Symbols
21. Information and explanation of symbols The CE symbol is confi rmation by Phonak AG that this Phonak product meets the requi- rements of directive 93/42/EEC on medical devices and the R&TTE Directive 1999/5/EC on Radio and Telecommunication Terminal Equipment. The alert sign means that potential restrictions on its use are applicable in one or more EU Member States. - Page 77 Operating These products have been designed for trouble- conditions free operation without restrictions when used as intended, unless otherwise stated in this user guide. Transportation Temperature should not exceed limits of and storage –20°/60° Celsius at a relative air humidity conditions of 65% for extended periods during transportation and storage.
- Page 78 Personal notes...
- Page 80 Manufacturer: Phonak Communications AG Laenggasse 17 CH-3280 Murten Switzerland EU Representative: Phonak GmbH D-70736 Fellbach-Oeffi ngen Germany www.phonak.com...
Need help?
Do you have a question about the inspiro Premium and is the answer not in the manual?
Questions and answers