Phonak inspiro User Manual
Fm transmitter
Hide thumbs
Also See for inspiro:
- User manual (72 pages) ,
- User manual (2 pages) ,
- User manual (84 pages)

Related Manuals for Phonak inspiro


Summary of Contents for Phonak inspiro
- Page 1 Manufacturer: Phonak AG Laubisrütistrasse 28 CH-8712 Stäfa Switzerland www.phonak.com...
- Page 2 User Guide...
-
Page 3: Table Of Contents
Operating range (FM transmission) 5. Controls 6. Getting Started Charging inspiro Low battery alarms Wearing inspiro Attaching the clip to the inspiro Attaching the lavalier to the inspiro Wearing iLapel iLapel wearing position Switch ON inspiro Activate the key pad lock... - Page 4 7. Using inspiro Talking Muting the microphone Using the inspiro with an MP3 player, TV set, GPS, computer or Hifi Changing channel Synchronizing receivers Resetting inspiro 8. FM receivers The MicroMLxS Setup of FM receivers Switch settings on MicroMLxS Other Phonak FM receivers 9.
-
Page 5: Welcome
1. Welcome inspiro is an FM transmitter ideally suited to the needs of teachers and suitable for use in regular schools as well as special schools. The outstanding design with its large color display makes this transmitter unique. Soft keys, an alarm clock, wearing options to suit different types of clothing and a wealth of other details refl... - Page 6 Further resources To fi nd out more about the inspiro as well as about Phonak FM in general, we recommend visiting the following websites: www.phonak.com This is the Phonak homepage. Go to the Counseling and Products section and then click on FM. You can find useful information there about inspiro and FM receivers.
-
Page 7: Important Information
Do not use your inspiro in a place where it is prohibited to use electronic devices, e. g. on airplanes or in hospitals. If in doubt, please ask the person in charge. - Page 8 Do not use water or other liquids to clean the inspiro. Only use original Phonak accessories. Only use the original Phonak inspiro charger. Your inspiro may only be repaired by an authorized service center.
-
Page 9: Inspiro And Accessoires
3. inspiro and accessories inspiro is delivered with the iLapel microphone. All the accessories can also be ordered separately. inspiro iLapel microphone inspiro wearing options: Belt clip and lavalier cord Audio cable Charging unit Home and travel case... -
Page 10: Important Inspiro Fi Gures
4. Important inspiro figures Operating time and charging: ½ Operating time when the battery is fully charged: approx. 12 hours ½ Charging time for an 80% charge: approx. 1 hour ½ Charging time for a 100% charge: approx. 2 hours Operating range (FM transmission): ½... -
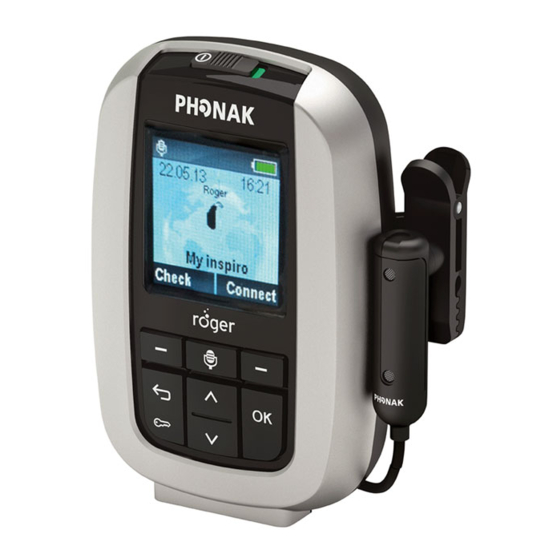
Page 11: Controls
5. Control inspiro ON / OFF slider Color LCD Soft Keys Classic FM Keypad lock key Microphone Judy Smith Channels Sync mute key Confi rmation key 3.5 mm audio input mini-USB for charging... - Page 12 Button to attach the belt clip and the lavalier cord Cable wrapper iLapel microphone Microphone openings (do not cover!) Wearing clip...
-
Page 13: Getting Started
6. Getting Started Charging inspiro The inspiro contains a re-chargeable built-in state-of-the art lithium polymer battery with fast-charge capability. A fully-discharged battery will charge to 80% in one hour and 100% in 2 hours. Select an easily accessible socket outlet and plug the charging unit into the socket outlet. - Page 14 Use only the original Phonak charging unit for the inspiro. The segments in the battery symbol flash during charging. The battery cannot be over-charged. If the charging unit is removed from the inspiro, Classic FM the segments in the battery symbol show the actual capacity.
-
Page 15: Low Battery Alarms
6. Getting Started Low battery alarms inspiro provides an automatic vibra alarm if the battery is low. ½ Approximately 1 hour before battery is empty: A vibrating alarm is activated. Check the message on the LCD and follow the instructions. -
Page 16: Wearing Inspiro
Wearing inspiro inspiro can either …or around the neck be worn on the belt by using the lavalier by using the clip… (see page 18) (see page 16) -
Page 17: Attaching The Clip To The Inspiro
6. Getting Started Attaching the clip to the inspiro “click” Attach the clip to the button on the backside of the inspiro. Make sure the clip holds securely on the inspiro. Fix the clip to the belt or trousers. Make sure the clip on the inspiro holds securely. - Page 18 The clip can also be fi xed to the belt or trousers before the inspiro is attached. Make sure the clip is secured to the inspiro. To remove the clip from the inspiro, press the button on the clip and carefully remove the clip from the inspiro.
-
Page 19: Attaching The Lavalier To The Inspiro
6. Getting Started Attaching the lavalier to the inspiro Attach the lavalier to the button. Adjust the lavalier length with the cord lock. Make sure the microphone cable is unwound. -
Page 20: Wearing Ilapel
Wearing iLapel iLapel is an easy-to-use directional lapel microphone which provides excellent sound quality. Step 1. Unwind the iLapel from the inspiro. Step 2. Fix the iLapel to your shirt and make sure the distance between the microphone and your mouth is approximately 8 inches (20 cm). -
Page 21: Ilapel Wearing Position
6. Getting Started iLapel wearing position Wrong! Do not cover the two microphone openings! -
Page 22: Switch On Inspiro
To switch ON, push the slider to the left until the green mark appears and the LCD is illuminated. To save power, the backlight of the inspiro LCD is switched OFF after a certain time. Press any button to activate the LCD backlight. -
Page 23: Activate The Key Pad Lock
6. Getting Started Activate the key pad lock Classic FM It is recommended to Judy Smith Channels Sync activate the key pad lock whenever possible. To activate the key pad lock, go to the main screen as shown on the right and press the key showing Classic FM the key symbol... -
Page 24: Using Inspiro
Before you start talking to the children, make sure of the following: ½ the microphone is properly positioned (see page 19) ½ the inspiro is turned ON (see page 21) ½ and the microphone is active, not muted (see page 24) We also recommend activating the Keypad lock (see page 22). -
Page 25: Muting The Microphone
7. Using inspiro Muting the microphone The inspiro’s microphone can be muted simply by pressing the microphone key on the device. If you have forgotten to activate the microphone, inspiro will warn you with a vibrating alarm after 15 minutes. -
Page 26: Using The Inspiro With An Mp3 Player, Tv Set, Gps, Computer Or Hifi
Using the inspiro with an MP3 player, TV set, GPS, computer or Hifi The inspiro can be directly connected to any audio equipment via the audio input socket on the inspiro. Plug in to the television’s headphone jack Plug in to the audio jack... - Page 27 7. Using inspiro ½ If the audio cable is plugged in, the audio symbol appears on the inspiro’s LCD display. ½ The microphone is automatically muted when the audio cable is plugged in. The microphone can be activated by pressing the microphone key.
-
Page 28: Changing Channel
In some cases it may be necessary to change the FM channel. ½ Change the inspiro transmitter FM channel by pressing the left soft key labelled “channels”. Use the up and down keys to scroll through the FM channel list. -
Page 29: Synchronizing Receivers
(at a distance of approxi- mately 20 cm / 8 inches). ½ Follow the instructions shown on the inspiro, if you change the inspiro channel. ½ In the top screen, you can have direct access to the synchronization feature by pressing the right soft key labelled “Sync”. -
Page 30: Resetting Inspiro
Resetting inspiro In case of a system problem, inspiro can be restarted by simultaneously pressing the left softkey, the right softkey, the keypad lock key and the confirmation key. Classic FM Judy Smith Channels Sync When these buttons are pressed, inspiro will switch itself OFF and restarts automatically. -
Page 31: Fm Receivers
8. FM receivers The MicroMLxS An FM system consists of a transmitter and FM receivers. The inspiro is an FM transmitter, while the MicroMLxS is an FM receiver. ½ The MicroMLxS is a universal device and can be used with Phonak, as well as with nearly all other BTE brands and cochlear implants. -
Page 32: Setup Of Fm Receivers
Phonak service centers. Channel synchronization inspiro can change your MyLink or MicroLink receiver channel directly “over the air” within a distance of 20 cm (8 inches). This feature ensures inspiro and the MyLink or MicroLink receivers use the same radio channel. -
Page 33: Switch Settings On Micromlxs
40 seconds later, your MyLink or MicroLink receivers automatically enter the standby mode. They switch to normal FM operation automatically, when inspiro is switched on again. Switch settings on MicroMLxS For correct MicroMLxS switch settings for use with Phonak hearing instruments, please refer to the respective hearing instrument user guide. - Page 34 MicroMLxS switch For DPAI No hearing instruments you can use the switch on MicroMLxS to toggle between FM only and FM+M. FM only FM+M...
- Page 35 8. FM receivers For DPAI Yes hearing instruments, like Phonak Exélia Art, Naída and Milo your hearing care professional can personalize the FM program structure. The FM only or FM+M program can be selected automatically (e.g. EasyFM) or manually using the program button on the hearing instrument.
-
Page 36: Other Phonak Fm Receivers
Other Phonak FM receivers The inspiro is compatible with all Phonak FM receivers. If you have questions concerning a specifi c receiver, please consult your hearing care professional or visit: www.eSchoolDesk.com We do not recommend using the inspiro with FM... -
Page 37: Troubleshooting
9. Troubleshooting Problem The inspiro cannot be switched on. Poor speech intelligibility. Speaker’s voice is inaudible even though the inspiro is turned on. - Page 38 Most probable cause Solution The battery is run down. Charge the inspiro for a period of at least two hours. inspiro has a system Reset inspiro according problem. page 29. The microphone has not Move the microphone been positioned properly.
- Page 39 9. Troubleshooting Problem Insuffi cient operating range. Radio interference. A second person’s voice can also be heard.
- Page 40 Most probable cause Solution Microphone cable has Unwind the microphone notbeen unwound. cable. External cause: radio Change the FM channel. antenna or similar interfering devices nearby. Another FM user is Change the FM channel. using the same FM channel nearby.
-
Page 41: Service And Warranty
Please ask at the point of sale for full details of this warranty. The salesperson will note the serial number of your inspiro below. It will be needed in the event of a warranty repair. Serial number inspiro:... -
Page 42: Declaration Of Conformity
11. Declaration of conformity Hereby, Phonak Communications AG, declares that the inspiro is in compliance with the essential requirements and other relevant provisions of Directive 1999/5/EC. To obtain a copy of the Declaration of conformity, please contact the local Phonak AG representative whose address can be taken from the list on the website www.phonak.com. - Page 43 11. Declaration of conformity The CE symbol is confirmation by Phonak AG that this Phonak product meets the requirements of the R&TTE Directive 1999/5/EC on Radio and Telecommunication Terminal Equipment. The alert sign means that potential restrictions on its use are applicable in one or more European countries.
- Page 44 Transport Temperature should not exceed limits and storage of –20° / 60° Celsius at a relative air conditions humidity of 65% for extended periods during transportation and storage. Air pressure between 500 and 1100 hPa is not detrimental to this device. The symbol with the crossed out disposal bin indicates that this product shall not be treated as household...
Need help?
Do you have a question about the inspiro and is the answer not in the manual?
Questions and answers