Phonak Roger BaseStation User Manual
Hide thumbs
Also See for Roger BaseStation:
- Quick start manual (13 pages) ,
- Quick setup manual (33 pages)
Table of Contents
Advertisement
Advertisement
Table of Contents

Related Manuals for Phonak Roger BaseStation


Summary of Contents for Phonak Roger BaseStation
- Page 1 Roger BaseStation User Guide...
-
Page 2: Table Of Contents
Contents Welcome System description Roger for Studio system Getting to know your Roger BaseStation In the box Roger BaseStation front panel view Roger BaseStation rear panel view Indicator light (LED status) Transmission range How to install Roger BaseStation Single rack kit mounting... - Page 3 Pairing Roger BaseStation with a Roger Touchscreen Mic Roger BaseStation range Using Roger BaseStation Input signal monitoring How to adjust Roger Earpiece volume NewNet Troubleshooting Performance Standard applied Important information 10.1 Hazard warnings 10.2 Product safety information 10.3 Other important information 10.4...
-
Page 4: Welcome
1 Welcome Congratulations on choosing the Roger BaseStation from Phonak Communications AG. Used with the Roger Earpiece, this compact transmitter uses adaptive wireless transmission to allow people to receive audio information discreetly. The Roger for Studio system delivers the features and performance demanded by professionals. -
Page 5: System Description
2 System description 2.1 Roger Earpiece communication system... -
Page 6: Getting To Know Your Roger Basestation
3 Getting to know your Roger BaseStation 3.1 Box contents Roger BaseStation Power supply Standalone feet Single Rack Mount kit Hex key Rack mounting M6 Screws Front Cardboard stencil for wall-mounting Rack mounting Torx key M8 Screws Rear Plastic anchor and screws... -
Page 7: Roger Basestation Front Panel View
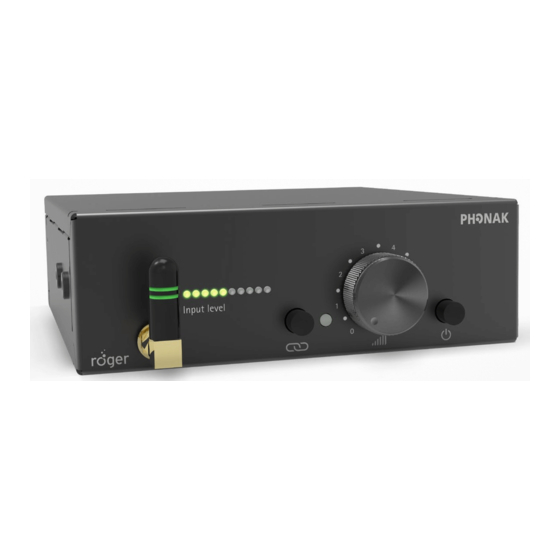
3.2 Roger BaseStation front panel view 1 On/Off button 2 Connect button 3 Connect LED Input level 4 Audio input graphical display 5 Volume control 6 Antenna 3.3 Roger BaseStation rear panel view 7 XLR & 6.3 (1/4’’) socket Roger... -
Page 8: Indicator Light (Led Status)
3.4 Indicator light (LED status) Status Means Power Off / Aus / Eteint On / Ein / Enclenché Connect Roger Earpiece connected Roger Earpiece verbunden Roger Earpiece connectée No Roger Earpiece in range Keine Roger Earpiece in Reichweite Pas de Roger Earpiece à portée Not a compatible receiver Empfänger nicht kompatibel Le récepteur n’est pas compatible... -
Page 9: Transmission Range
3.5 Transmission range The Roger BaseStation should ideally be placed in the center of the area to be covered. Walls, metallic elements and human bodies are obstacles, which might reduce the transmission range. Warning: Do not turn, unscrew or replace antenna. -
Page 10: How To Install Roger Basestation
4 How to install Roger BaseStation Roger BaseStation can be used standalone, mounted in a rack, or mounted on a wall by using the accessories included in the device packaging. 4.1 Single rack kit mounting... -
Page 11: Wall Mount
• The Roger BaseStation must be mounted so that the antenna is on the upper side of the box. • Do not turn the antenna: the Roger BaseStation off ers the best performance when the antenna is oriented as on the drawing. -
Page 12: Dual Rack Kit Mounting
4.3 Dual rack kit mounting To mount two Roger BaseStations in the same rack slot, please order the 19’’ installation kit for two Roger BaseStations separately. Screws and washers included in Roger BaseStation set... -
Page 13: Power Supply
Note: the packaging contains EU and US plugs. Other plug adapters are available as spare parts. For more information, please contact your local Phonak representative. 2) Connect the power supply to an electrical outlet,... -
Page 14: Security Slot
4.5 Security slot The Roger BaseStation includes a security slot on the back panel to secure your device from theft. The slot complies with the K & Lock® standard. -
Page 15: Getting Started
Connect the power supply to an electrical outlet, and then connect the power cable to the power supply socket located on the rear panel of the Roger BaseStation. 5.2 Connecting an audio source The Roger BaseStation has two audio input options: a balanced connection (XLR or Jack 6.3) and an unbalanced... -
Page 16: Switching On And Off
The unbalanced 3.5 jack connection supports mono or stereo connections. When using stereo plugs, the stereo signal will be transformed into a mono signal. 5.3 Switching on and off To turn the Roger BaseStation on or off , press the button on the front panel. -
Page 17: Pairing Roger Basestation With
• Connecting a Roger Earpiece is only required the fi rst time it is used. The Roger Earpiece will then remain connected with the Roger BaseStation as long as the NewNet function has not been activated (pt 6.3). • Refer to the Indicator light section for the diff erent... -
Page 18: Roger Earpiece
1) Connect on the Roger BaseStation, or 2) JoinNet on the Roger Touchscreen Mic (this can be done near to the Roger BaseStation or near to a Roger Earpiece) • Only one Roger Touchscreen Mic can be paired at a time. - Page 19 Roger BaseStaion always has priority. • As the Roger BaseStation is master of the network, if the Roger BaseStation is turned off or a Roger Touchscreen Mic moves out of range, the Roger Touchscreen Mic will stop transmitting and its light will blink.
-
Page 20: Roger Basestation Range
Note that human bodies and obstacles may reduce this distance. Warning: Do not turn, unscrew or replace the antenna. The Roger BaseStation has been tested to comply with EMC standards with the antenna provided. Replacing or altering the antenna would void this compliance. -
Page 21: Using Roger Basestation
6 Using Roger BaseStation 6.1 Input signal monitoring The input signal meter indicates the strength of the audio input signal. With an appropriate audio signal level, the red LEDs should never light up. To increase or decrease the signal, adjust the gain on the audio source directly. -
Page 22: How To Adjust Roger Earpiece Volume
6.2 How to adjust the Roger Earpiece volume To adjust the output volume of all Roger Earpieces in range of a Roger BaseStation, turn the volume control knob on the Roger BaseStation front panel. To increase the volume, turn the rotary knob clockwise. -
Page 23: Newnet
To disconnect the Roger BaseStation from any connected Roger devices, press and hold the NewNet button located on the rear panel of the Roger BaseStation for more than 7 seconds. The LED next to the NewNet button will show green for 2 seconds when the network reset is complete... -
Page 24: Troubleshooting
7 Troubleshooting I cannot switch the Roger Solutions BaseStation on The power cable is not connected, Check the power supply’s either to the Roger BaseStation connections back panel, or to an electrical outlet The input level meter does Solutions not show any activity... - Page 25 Turn the volume control rotary knob clockwise to unmute the transmitter In a network with a Roger Turn the Roger BaseStation on, or Touchscreen Mic, the Roger move the Roger Touchscreen Mic BaseStation may not be switched closer to the Roger BaseStation...
- Page 26 The transmitted audio signal Solutions is interrupted The distance between the Roger Move closer to Roger BaseStation Earpiece and Roger BaseStation or change orientation (avoid body is too large absorption) There are obstacles between you Make sure you can see the Roger...
-
Page 27: Performance
8 Performance Frequency range 2.402 GHz up to 2.480 GHz Power emission 100 mW Audio bandwidth 100 Hz - 7200 Hz Distortion -42 dB (< 0.8 % @ 1 kHz) Signal to Noise Ratio 55 dB (@ 1 kHz) Housing Dimensions (L x W x H) 132 x 132 x 44 mm (5.1”... -
Page 28: Standard Applied
9 Standards applied Electrical safety: IEC/ EN 60950-1 Radiocom 2.4 GHz: EN 300 328 EMC: EN 301.489-1,-3,-9,-17 FCC: Part 15C RSS-247... -
Page 29: Important Information
Do not use your device in areas where electronic equipment is prohibited. If in doubt, please ask the person in charge. Device should not be used on aircraft unless specifi cally permitted by fl ight personnel. Only use accessories that are approved by Phonak Communications AG. -
Page 30: Product Safety Information
Clean the device using a damp cloth. Never use household cleaning products (washing powder, soap, etc.) or alcohol to clean the device. Only supply your device using adapters supplied by Phonak Communications. When the device is not in use, turn it OFF and store it safely. -
Page 31: Other Important Information
X-ray radiation, CT or MRI scans may destroy or adversely aff ect the correct functioning of the device. Do not use excessive force when connecting your device to its diff erent cables. Protect all openings (audio input and charge) from dirt and debris. -
Page 32: Declaration Of Conformity
Directive (2014/53/EU). To obtain a copy of the Declaration of conformity, please contact the manufacturer or the local Phonak Communications AG representative whose address can be taken from the list on www.phonak-communications.com/ (worldwide locations). - Page 33 this device must accept any interference received, including interference that may cause undesired operation. The device has been tested and found to comply with the limits for a Class B digital device, pursuant to Part 15 of the FCC Rules. These limits are designed to provide reasonable protection against harmful interference in a residential installation.
- Page 34 FCC Caution: Any changes or modifi cations not expressly approved by the party responsible for compliance could void the user’s authority to operate the device. To comply with FCC RF exposure limits for general population/uncontrolled exposure, the antenna(s) used for this transmitter must be installed to provide a separation distance of at least 20 cm from all persons and must not be collocated or operating in conjunction with any other antenna or transmitter.
-
Page 35: Service And Warranty
11.2 International warranty Phonak Communications AG off ers a 2 (two) years limited international warranty, valid as of the date of purchase. This limited warranty covers manufacturing and material defects. - Page 36 Serial number: Purchase date: Local Phonak Communications AG representative:...
-
Page 37: Information And Explanation Of Symbols
12 Information and explanation of symbols The CE symbol is confi rmation by Phonak Communications AG that this product is in compliance with the essential requirements and other relevant provisions of Directive (2014/53/EU). Federal communications commission EMC and Radiocommunications compliance label. - Page 38 Important information for handling and product safety. Please read the information on the following pages before using your Phonak Communications AG device. This symbol indicates that it is important for the user to pay attention to the relevant warning notices in these user guides.
-
Page 39: Homologation References
13 Homologation references Roger BaseStation FCC ID: KWCDMBASE IC: 2262A-DMBASE... - Page 40 Manufacturer: Phonak Communications AG Laenggasse 17 CH-3280 Murten Switzerland www.phonak-communications.com...
Need help?
Do you have a question about the Roger BaseStation and is the answer not in the manual?
Questions and answers