Table of Contents
Advertisement
Quick Links
Advertisement
Table of Contents

Related Manuals for Phonak Campus SX


Summary of Contents for Phonak Campus SX
- Page 1 Connevans S S o o l l u u t t i i o o n n s s t t o o i i m m p p r r o o v v e e t t h h e e q q u u a a l l i i t t y y o o f f l l i i f f e e This product may be purchased from Connevans Limited secure online store at www.DeafEquipment.co.uk DeafEquipment.co.uk...
- Page 2 Campus SX ™ User Guide 0681...
- Page 4 Ask your hearing care professional if you have any questions. Phonak wishes you much hearing enjoyment with Campus SX. Please also check www.eSchoolDesk.com (chapter ‘How to use FM’), for additional Campus SX and MicroBoom instruction.
-
Page 5: Table Of Contents
Contents Instrument description Campus SX MicroBoom (optional) MM8 (optional) How your Campus SX works Charging Campus SX Standard charging Charging multiple batteries (optional) Getting started Wearing Campus SX Switching Campus SX on Microphone muting Changing the channel Keypad lock Connecting to a television... - Page 6 Changing the battery Using the Campus SX belt set (optional) Operating range FM receivers Principle benefits of Phonak multi-frequency receivers Switch Settings on MicroMLxS WallPilot (optional) Troubleshooting Important points Declaration of conformity Service and warranty Phonak distributors worldwide...
-
Page 7: Instrument Description
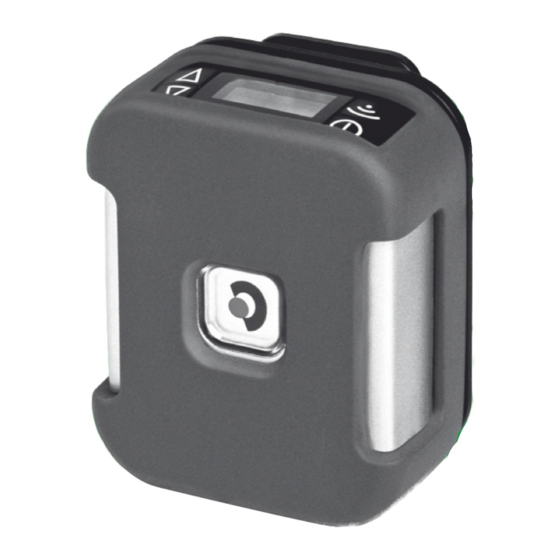
Instrument description Campus SX On / Off (long press) and Microphone muting (short press) Direct frequency synchronization Channel selection Keypad lock FM channel in use Battery status indication... - Page 8 Rubber coat Audio input socket Label for your initials Charging socker (red ring) Clip...
-
Page 9: Microboom (Optional)
Instrument description MicroBoom (optional) MicroBoom is a new miniature microphone, especially designed for use in schools and in connection with Campus SX. See details on page 19. -
Page 10: Mm8 (Optional)
MM8 (optional) Directional Omnidirectional MM8 is a very flexible miniature lapel microphone which can be used in an omnidirectional or directional mode. See details on page 18. -
Page 11: How Your Campus Sx Works
How your Campus SX works The teacher is The children are wearing wearing Campus SX hearing instruments with the MicroBoom or speech processors with or MM8 microphone. attached Phonak FM receivers. - Page 12 The Campus SX picks up the teachers voice through the MicroBoom or the MM8 microphone and instantly relays it to the children wearing Phonak FM receivers. Even in places where it is difficult to understand with hearing instruments alone and over distance, Campus SX will always provide a loud and clear speech signal.
-
Page 13: Charging Campus Sx
The battery is completely exhausted and needs to be charged immediately. Standard charging The Campus SX can be charged while switched off or while switched on, e.g. while transmitting the sound from the TV set. - Page 14 • 100% charged in 4.5 hours if the Campus SX is switched off during charging. If Campus SX is in use during charging, it is 100% charged in about 6 hours. Plug the Campus SX battery charger into an easy accessible wall power socket.
- Page 15 Charging Campus SX b) Plug the connector from the charger into the red marked charging socket underneath your Campus SX. c) The blinking battery symbol in the LCD indicates that the Campus SX is charging.
- Page 16 Meaning The three battery Campus SX is fast segments are moving charging fast (blinking) Three battery segments Campus SX is fully stay visible and the charged and the charger battery case is blinking can be detached...
-
Page 17: Charging Multiple Batteries (Optional)
Your Campus SX must be recharged after approximately 12 hours of operation. The Campus SX may produce heat while charging. If your Campus SX will not be in use for more than 2 weeks, open the battery door (see page 30). -
Page 18: Getting Started
Getting started Wearing Campus SX a) Open the clip and fix Campus SX on your belt or on your trousers. Make sure it holds safely. If not, use the optional Campus SX belt (see page 34). - Page 19 Getting started b) Attach the microphone If using the MM8 lapel microphone: Make sure the MM8 is switched to omnidirectional or directional mode . Turn the clip on the MM8 according your needs and fix it on your shirt . Make sure the distance between the microphone and your mouth is approximately 20cm/8 inches...
- Page 20 If using the MicroBoom microphone: Slightly increase the loop diameter and put it on your left or right ear . Then decrease the loop diameter by slowly pulling in the direction of the arrow until it holds safe and is comfortable to wear.
- Page 21 Getting started Then slightly adjust the MicroBoom on the ear have the microphone approximately at the level of the mouth. Fix the microphone cable with the clip your clothes. Wear MicroBoom as depicted The microphone does not need to be directly in front of the mouth! Do not bend or twist the MicroBoom.
-
Page 22: Switching Campus Sx On
Switching Campus SX on Switch the Campus SX on by pressing the on/off button for about two seconds. If the Campus SX is switched on, the channel number and the battery indication are shown in the LCD. -
Page 23: Microphone Muting
For a quick conversation with another teacher which is not meant for the children’s ears, the microphone attached to the Campus SX can easily be muted. To mute the attached microphone, the Campus SX needs to be switched on. Briefly press the on/off button (A) until the small rectangle (B) is displayed. -
Page 24: Changing The Channel
Campus SX is a multi-channel transmitter and allows changing the channels easily. Make sure that children using the Phonak FM receivers are always on the same channel. Otherwise, they cannot hear your voice. Press one of the channel selection buttons to change the channel in the transmitter. - Page 25 If the FM receivers of the child are not yet on the new frequency, • go to the child, • hold the Campus SX close to the child (Distance to the FM receivers: <1m/3 feet) and press the synchronization button on the Campus SX for one second.
-
Page 26: Keypad Lock
Keypad lock As with cell phones, Campus SX provides a keypad lock, to prevent inadvertent operation of the controls. • To lock the controls: Campus SX must be switched on to activate this feature. Simultaneously press the two buttons as depicted for about 1 second. The watchman symbol in the LCD shows that the keypad lock is activated. -
Page 27: Connecting To A Television
Connecting to a television Campus SX can directly be connected to audio equipment like televisions, CD and MP3 players, and computers with audio outputs. Plug the audio cable (standard accessory) into the headphone output of your audio equipment. Plug the other end of the audio cable into the... - Page 28 Mute the microphone which is attached to the Campus SX (see page 22). If you want to give comments to the children in parallel to the other audio input, deactivate the mute function and talk into the microphone. Since Campus SX uses the microphone cable as an antenna, unwind the microphone cable for an optimal operating range.
-
Page 29: Connecting Another Microphone
Connecting another microphone To attach another Phonak microphone to the Campus SX, proceed as follow: a) Unwind the existing microphone b) Open the clip carefully c) Remove the clip from the Campus SX... - Page 30 d) Remove the microphone e) For attaching the microphone, proceed in reverse order.
-
Page 31: Changing The Battery
Changing the battery A battery can be re-charged between 500 and 700 times. If the operating time from a fully charged battery becomes lower, the battery should be replaced by a new one. Proceed as follow: a) Unwind the Microphone b) Slightly remove the rubber coat on the side of the battery compartment or remove it completely... - Page 32 Remove the clip from the Campus SX...
- Page 33 Changing the battery d) Remove the old battery...
- Page 34 e) To insert the new battery, proceed in reverse order. Make sure the new battery is fully charged before using it the first time (see page 12).
-
Page 35: Using The Campus Sx Belt Set (Optional)
The Campus SX belt set consists of two stylish and lasting woven fabric belts with a holster to secure the Campus SX. It is the safest way to wear the Campus SX and prevents the Campus SX from falling of, even in extreme situations. -
Page 36: Operating Range
Operating range The operating range is the distance between the teacher and children using the Phonak FM receivers. • Unwind the microphone cable for optimal operating range. • The operating range is typically more than 10 meters (30 feet) inside and more than 30 meters (90 feet) outside. -
Page 37: Fm Receivers
It can be modified at Phonak service centers. • Frequency synchronization Campus SX can change the actual channel of the Phonak multi-frequency receivers directly over the air (see page 24). Changing the channel is quick and easy, for example when there are nearby FM users on the same channel. - Page 38 This function helps economize on power. Switch off the transmitter, and about 40 seconds later, your receivers automatically enter standby mode. The receivers consume practically no power in standby mode. They detect when the Campus SX switches on again and automatically resume normal operation mode.
-
Page 39: Switch Settings On Micromlxs
FM receivers Switch Settings on MicroMLxS For Phonak hearing instruments: Please refer to the user guide of your Phonak hearing instruments. For all other brands: Ask your hearing care professional about the right switch settings. -
Page 40: Wallpilot (Optional)
WallPilot (optional) The WallPilot is a remote frequency synchronizer which is placed near the door to tune the Phonak multi- frequency receivers of children entering the class room to the class room frequency. It is mainly used in schools or other places where FM is used in more than one room and children are moving from one room to another. -
Page 41: Troubleshooting
Troubleshooting Situation “E8” is displayed in the LCD while the charger is connected. “E9” is displayed in the LCD when the Campus SX is on. - Page 42 Most probable cause Remedy The battery is defective. Replace the battery (see page 30). The Campus SX needs Contact the responsible servicing. hearing care professional or the Phonak service center.
-
Page 43: Important Points
• Before using Campus SX in another country, contact your hearing care professional to make sure your radio channels are permitted in that country. • Campus SX may only be repaired at an authorized service center. - Page 44 Only use batteries delivered by Phonak. Risk of explosion if battery is replaced by an incorrect type. Dispose of used batteries according to the...
-
Page 45: Declaration Of Conformity
Directive 1999/5/EC. To obtain a copy of the Declaration of conformity, please contact the local Phonak AG representative whose address can be taken from the list of Phonak distributors worldwide. This device complies with RSS 210 of Industry Canada. - Page 46 This device may not interfere with TV reception or Federal Government radar. Warning: Changes or modifications made to this equipment not expressly approved by Phonak Inc. may void the user’s authority to operate the equipment.
-
Page 47: Service And Warranty
Please ask at the point of sale for full details of this warranty. The sales person will note the serial number of your Campus SX below. It will be needed in the event of a warranty repair. Serial number Campus SX:... -
Page 49: Phonak Distributors Worldwide
Brazil CAS Produtos Médicos, São Paulo – SP 04363-100 Canada Phonak Canada Limited Mississauga, Ontario L5S 1V9 China Phonak (Shanghai) Co. Ltd., Shanghai City 200233 Denmark Phonak Danmark A/S, Nitivej 10 2000 Frederiksberg France Phonak France SA, 69500 Bron Germany... - Page 50 Independent A complete list of Phonak distributors general agents: is available at Phonak's Internet site: www.phonak.com. Please visit us or ask your hearing care professional for information. Manufacturer: Phonak AG, Laubisrütistrasse 28 CH-8712 Stäfa, Switzerland 0681...
- Page 51 Notes...
- Page 52 Notes...
- Page 53 Your hearing care professional: www.phonak.com...
Need help?
Do you have a question about the Campus SX and is the answer not in the manual?
Questions and answers