MakerBot Replicator 2X User Manual
Experimental 3d printer
Hide thumbs
Also See for Replicator 2X:
- User manual (92 pages) ,
- Troubleshooting and maintenance (40 pages) ,
- Replacement manual (5 pages)
Table of Contents
Advertisement
Advertisement
Table of Contents
Troubleshooting

Related Manuals for MakerBot Replicator 2X


Summary of Contents for MakerBot Replicator 2X
- Page 1 ® USER MANUAL...
-
Page 3: Table Of Contents
Safety and Compliance Specifications How it Works SETUP Unpacking Your MakerBot Replicator 2X MakerBot Replicator 2X Diagrams Accessory Box Setting Up Your MakerBot Replicator 2X STARTUP LCD Keypad Leveling the Build Plate Loading MakerBot Filament Unloading MakerBot Filament Troubleshooting LCD MENUS... - Page 4 TABLE OF CONTENTS BASIC PRINTING Printing Examples Printing with Both Extruders 10 INTERMEDIATE PRINTING Print Quality Rafts Supports Troubleshooting Printing an Example ADVANCED PRINTING Print Quality Temperature Speed INTRODUCTION TO THINGIVERSE Creating an Account Navigating Thingiverse USING THE CUSTOMIZER IN THINGIVERSE Customizing a Thing FILAMENT Filament Basics...
- Page 5 NOTES...
-
Page 6: Welcome
Welcome This User Manual is designed to start your journey with the MakerBot ® Replicator ® 2X Experimental 3D Printer in the right direction. Your MakerBot Replicator 2X is optimized for ABS, a traditional thermoplastic that can be tricky and unpredictable. In order to achieve great results, you will need to experiment and tinker. -
Page 7: Safety And Compliance
Never reach inside the MakerBot Replicator 2X while it is in operation. Always allow the MakerBot Replicator 2X to cool down before reaching inside. WARNING: Do not leave the MakerBot Replicator 2X unattended during operation. -
Page 8: Specifications
CAUTION: The socket outlet must be located near the equipment and must be easily accessible CAUTION: The Replicator 2X melts plastic during printing. Plastic odors are emitted during this operation. Make sure to set up the Replicator 2X in a well-ventilated area. -
Page 9: How It Works
MakerBot Filament. Your 3D design files are translated into instructions for the MakerBot Replicator 2X and read by the machine via SD card. The MakerBot Replicator 2X then heats the MakerBot Filament and squeezes it out through a nozzle onto a heated surface to build a solid object, layer by layer. -
Page 10: Setup
When you set up your MakerBot Replicator 2X Experimental 3D Printer, remember that it was built and packaged very carefully at the MakerBot Factory. We hope you’ll take your time and be just as careful unpacking it and getting set up. -
Page 11: Unpacking Your Makerbot Replicator 2X
1c. Remove the layer of foam and the sheet of cardboard underneath. 1d. Remove the two protective foam pieces from the sides of the MakerBot Replicator 2X. Removing the MakerBot Replicator 2X from the box Open the plastic covering and firmly grasp the frame of the MakerBot Replicator 2X. -
Page 12: Makerbot Replicator 2X Diagrams
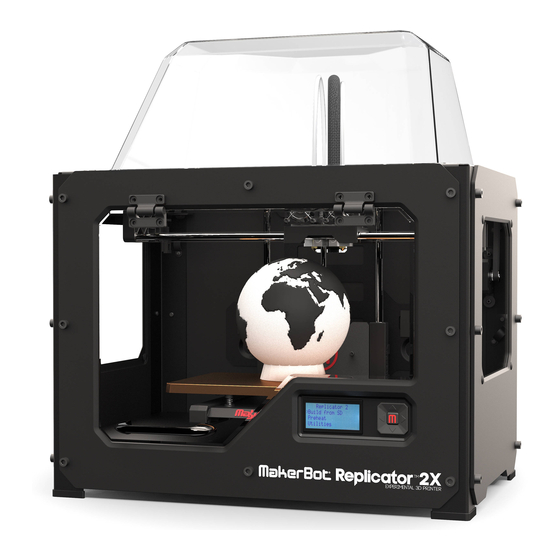
MAKERBOT REPLICATOR 2X DIAGRAMS [1] GANTRY SYSTEM [2] LCD PANEL [3] HEATED BUILD PLATE [4] BUILD PLATFORM [5] THREADED Z-AXIS ROD [6] ENCLOSURE DOOR HANDLE [7] FILAMENT GUIDE TUBES [8] EXTRUDER CABLE [9] EXTRUDERS [10] FILAMENT SPOOL [11] SPOOL HOLDERS... - Page 13 MAKERBOT REPLICATOR 2X DIAGRAMS CONTINUED [1] FAN GUARDS [2] EXTRUDER FANS [3] EXTRUDER NOZZLES [4] EXTRUDER LEVER ARMS [5] FAN BOLTS [6] CARTRIDGE HEATERS [7] THERMAL CORES [8] DRIVE BLOCKS [9] EXTRUDER CABLE MOUNT Front view of extruders [10] MOTOR CABLE CONNECTORS...
-
Page 14: Accessory Box
MakerBot ABS Filament guide tubes Spool holders Handle and bolts Filament [1 lb Spool] USB-A to USB-B MakerBot tape Kapton tape sheets Power supply and cable cable applicator SD card Hex wrenches PTFE-based grease Support card More options available at makerbot.com/store... - Page 15 CONTINUED Removing the Accessory Box 3a. Remove the two remaining protective foam pieces from the bottom of the MakerBot Replicator 2X’s box. 3b. Lift out the accessory box. This box contains the remaining items from the Accessory Box section. Freeing the Extruders 4a.
-
Page 16: Setting Up Your Makerbot Replicator 2X
SETTING UP YOUR MAKERBOT REPLICATOR 2X Installing the Enclosure Door Handle 5a. Locate the handle kit in the accessory box. The kit includes your enclosure door handle and two buttonhead bolts. 5b. Open the enclosure door. To do this, reach through the top of the MakerBot Replicator 2X, push the door outward, and raise it to a 90°... - Page 17 6b. Insert the other end of one filament guide tube into the corresponding guide tube holder on the back of the MakerBot Replicator 2X. Make sure that the end of each filament guide tube is flush with the bottom of its guide tube holder.
- Page 18 7b. Mount the spool on the left spool holder [when viewed from the back of the Replicator 2X]. Orient the spool so that it will unwind counterclockwise. Push the spool onto the spool holder until it locks. Do not...
-
Page 19: Attaching The Power Supply
MakerBot Replicator 2X. Ensure that the flat side of the connector faces down. NOTE: If at any time you need to unplug the MakerBot Replicator 2X, pull on the connector itself to release it from the power input port. Powering On the MakerBot Replicator 2X 11a. -
Page 20: Startup
Printer, the LCD panel will light up and display text. This text is the beginning of the Startup Script. The Startup Script will guide you through leveling the build plate, loading MakerBot ABS Filament, and creating your first 3D print. -
Page 21: Lcd Keypad
You can use these menus to return to the Startup Script at any time. You can view videos of the startup process on the MakerBot Replicator 2X video page at makerbot.com/support/replicator2x/videos. If you have any problems or questions, refer to the included Troubleshooting and Maintenance Guide or contact... -
Page 22: Leveling The Build Plate
MakerBot Replicator 2X. ensure that objects adhere well to the plate. NOTE: To view a video of the build plate leveling process, go to the MakerBot Replicator 2X video page at makerbot.com/support/replicator2x/videos. Adjust the Knobs as Directed When directed by the LCD screen, tighten each of the three knobs underneath the build platform approximately four turns. - Page 23 Confirm your Adjustment After the second set of adjustments, the nozzles will move to the center of the build plate. Confirm that the MakerBot Support card slides between the nozzles and plate with a moderate amount of friction. NOTE: During leveling, it is okay for the nozzle to be very slightly closer to the center of the build plate than to the rest of the plate.
-
Page 24: Loading Makerbot Filament
NOTE: To avoid filament jams, always ensure that any filament spool you mount on the Replicator 2X feeds from the bottom of the spool toward the top. Filament mounted on the right spool holder [when... - Page 25 After you feed the MakerBot ABS Filament all the way through the filament guide tube, press the M button on the LCD panel. The MakerBot Replicator 2X will start to heat the right extruder. CAUTION: Do not touch the extruders while they are heating —...
- Page 26 CONTINUED Stop Extrusion After a few moments, you should see a thin string of the MakerBot ABS Filament come out of the right extruder nozzle. The filament might curl and then straighten; this is normal. Press the M button to stop extrusion.
-
Page 27: Unloading Makerbot Filament
NOTE: If you have problems or need to load MakerBot Filament again, you can use the up and down arrows to scroll through the top-level menu on the LCD panel and use the M button to select Utilities. -
Page 28: Troubleshooting
TROUBLESHOOTING Can’t load filament? If you are having problems loading filament into one of the extruders, perform the following steps: 1. Go to the LCD panel and select Utilities > Filament Options > Unload. This option heats the extruders. 2. Set the extruder arm to the open position. 3. - Page 29 To run the script for unloading filament, go to the LCD panel and select Utilities > Filament Options > Unload. 2. Switch off the power on the MakerBot Replicator 2X and unplug the power supply. Pull on the connector to release it from the power input port.
-
Page 30: Lcd Menus
LCD Menus This chapter describes the menus and options available in the LCD panel on the MakerBot Replicator 2X. -
Page 31: Top Level Entries
2X and allows you to change settings on your • Choose the parts of the MakerBot MakerBot Replicator 2X. Replicator 2X that you want to preheat. Use the arrow buttons to navigate to “Right Tool”, “Left Tool”, or “Platform”. Use the “M” button... -
Page 32: Utilities Menu
UTILITIES MENU THE UTILITIES MENU The Utilities menu contains controls for your MakerBot Replicator 2X and scripts for processes like loading filament and leveling the build plate. Monitor Mode. This entry displays the Fig. 4.1 current temperature of your extruders and build plate. - Page 33 When toggled automatically the first time you power on the on, the LEDS in the MakerBot Replicator 2X will MakerBot Replicator 2X. The Startup Script start blinking. When toggled off, the LEDs in the walks you through the steps for leveling your MakerBot Replicator 2X will stop blinking.
-
Page 34: Info And Settings Menu
LED Color. This entry allows you to change the color of the LEDs in the frame of the MakerBot Replicator 2X. The LEDs can be set to WHITE, RED, ORANGE, PINK, GREEN, BLUE or PURPLE, or turned OFF. - Page 35 Restore Defaults. This entry restores your from blue to red when the extruders start to heat. When the MakerBot Replicator 2X MakerBot Replicator 2X to the default, reaches the target temperatures, the LED factory settings.
-
Page 36: Active Build Menu
Sleep (Cold Pause)/Resume Build. This entry allows you to pause a print for long periods of time. When you select this option, your Replicator 2X will complete any queued commands before moving the extruder away from your print and allowing the extruders and build plate to cool. - Page 37 Filament Fan. This entry allows you to set an Fig. 4. 7 active cooling fan to ON or OFF during a build. The MakerBot Replicator 2X does not include an active cooling fan. LED Color. This entry allows you to change the color of the LEDs in the frame of the MakerBot Replicator 2X.
-
Page 38: Printing From Sd
Printing from SD Your MakerBot Replicator 2X includes an installed SD card. This card contains sample objects so you can start printing immediately. This chapter will walk you through the steps to print sample objects. -
Page 39: Making A Test Object
3. To choose the chain links, press M. right extruder, the LCD panel will ask you: “How’d it go? Ready to make something?” 4. The MakerBot Replicator 2X will begin to Select “Yes” and the LCD panel will display: make your object. Once the build plate and “Awesome! We’ll go to the SD card menu... - Page 40 Make Time: 8 minutes Make Time: 42 minutes Design By: andreas, tbuser Design By: Todd Design By: CocoNut Thingiverse: 29088 Thingiverse: 25556 Thingiverse: 21773 Dual extrusion prints require two colors of MakerBot ABS filament loaded into your MakerBot Replicator 2X.
-
Page 41: Troubleshooting
The default SD card that is shipped with the SD Card your MakerBot Replicator 2X contains only If your MakerBot Replicator 2X does not files of the correct format and with names detect that there is a card in the SD slot, less than 26 characters. -
Page 42: File Types
File Types This chapter describes the different types of files you will encounter while using your MakerBot Replicator 2X. STLs, OBJs and Things are ways to store 3D models. GCode and X3G are sets of instructions for your MakerBot. -
Page 43: File Types
3D printers. When your slicing ® software turns your 3D model into a set of instructions for your MakerBot, those An OBJ is another type of 3D model file. It instructions are written in GCode. The is also used by a number of 3D modeling... - Page 44 GCode file and choose Open. For more details on printing from GCode, see Chapter 8. X3G is the compact format in which MakerWare sends instructions to your MakerBot. An earlier version of this format was called S3G. X3G files are currently generated only by MakerWare and ReplicatorG.
- Page 45 NOTES FILE TYPES...
-
Page 46: Makerware
MakerWare MakerBot MakerWare is software that prepares 3D models for printing and turns them into instructions for your MakerBot Replicator 2X. Using MakerWare, you can prepare OBJ and STL files to be printed. You can also use MakerWare to customize print settings for the objects you make on... -
Page 47: Downloading And Installing Makerware
MakerWare will display settings and options REPLICATOR 2X appropriate for the MakerBot Replicator 2X If you connect your MakerBot Replicator 2X to your computer before you start MakerWare, MakerWare will automatically detect your MakerBot Replicator 2X. The icon in the lower... -
Page 48: Exploring Makerware
EXPLORING MAKERWARE Open MakerWare and take a look around. The following buttons and menus appear: Fig. 7.2 HOME VIEW Click this button to reset MakerWare to the Click these buttons to zoom in and out. default view of the build area. You can also use the scroll wheel on your mouse to zoom in and out. - Page 49 EXPLORING MAKERWARE CONTINUED LOOK [Fig. 7.3] Click the Look button or press the L key to enter Look mode. In Look mode, you can: • Left-click and drag the mouse to rotate your view of the object. • Hold down shift, left-click, and drag the mouse to move your view of the object.
- Page 50 EXPLORING MAKERWARE CONTINUED TURN [Fig. 7.5] Click the Turn button or press the T key to enter Turn mode. In Turn mode, you can: • Left-click and drag the mouse to rotate the object around (0, 0, 0) the X,Y, and Z-axes.
- Page 51 Click this button to open the Make dialog, where you can specify print resolution and other printing options and save instructions for your MakerBot Replicator 2X to an SD card. For details on the Make dialog, see the chapters on Intermediate and Advanced Printing.
-
Page 52: Makerware Menus
MAKERWARE MENUS FILE EDIT New: Opens a new MakerWare window. Undo: Undoes the last action. Open: Opens a new object file. If a file is Redo: Redoes the last action. currently open, you will be prompted to save it first. Cut: Cuts object. - Page 53 Onboard Preferences: Allows you to change the default settings for the MakerBot Replicator 2X. For advanced users. Type of MakerBot: Allows you to specify the type of MakerBot Replicator you are using during the session. SERVICES...
-
Page 54: Shortcut Keys
SHORTCUT KEYS SELECTING AN OBJECT • To select a single object, left-click with the mouse. • To select two objects, select one object, hold down the Shift key and select the other object. Release the Shift key. • To select multiple objects, select one object by clicking with the left mouse button, hold down the Shift key, select additional objects, and release the Shift key. - Page 55 3. If Conveyor was the cause of the problem, you have to restart Conveyor. Conveyor is you should now see the Replicator 2X icon at a background service that runs as part of the lower right of the MakerWare window.
-
Page 56: Preparing To Print
Preparing to Print MakerWare allows you to open files, resize objects, create new object files, and save those files in multiple formats. This chapter will describe how to perform these tasks. -
Page 57: Downloading Files
DOWNLOADING FILES FILE FORMATS FOR MAKERWARE MakerWare can export to the following MakerWare can open the following file types: file types: • GCode • OBJ • X3G • STL • S3G • THING For details on file types, see the chapter MakerWare can save the following titled “File Types.”... -
Page 58: Importing, Moving, And Copying Objects
IMPORTING AND MOVING OBJECTS The files FlatIron.stl Woolworth.stl now ready to be opened in MakerWare. The following examples will make use of these two files. IMPORTING A FILE FROM A MODELING APPLICATION To import a file from a 3D modeling application into MakerWare: 1. - Page 59 COPYING OBJECTS 3. To prepare for the next section, move the Flatiron model to the left side of the build plate. DUPLICATING OBJECTS [Fig. 8.4] In this section, we will copy an object. Currently, you should have the Flatiron model at the left side of your build plate.
-
Page 60: Adding And Scaling Objects
ADDING AND SCALING OBJECTS ADDING AN OBJECT TO THE PLATE SCALING AN OBJECT In this section, we will add a second object In this section, we will scale our two models. to the plate. Currently, you should have the Flatiron and Currently, you should have the Flatiron Woolworth models on your plate. -
Page 61: Saving And Printing
SD card. 8. Use the arrow buttons to navigate to the file . Press the M flatiron_woolworth.x3g button to build the selected file. Your MakerBot Replicator 2X will use the toolpath you created to build your model. PREPARING TO PRINT... -
Page 62: Basic Printing
MakerWare. It will also walk you through the steps to print a dual extrusion object. This chapter assumes you have already downloaded and installed MakerBot MakerWare. If you have not installed MakerWare yet, see the chapter on Installing MakerWare. -
Page 63: Printing Examples
4. On the Thing page for the tree frog model, 10. Eject the SD card from your computer and you will see a button that says Download insert it into the SD port on your MakerBot This Thing! Click this button. Replicator 2X. Choose Build From SD from the LCD menu, and select the Tree Frog. - Page 64 PRINTING EXAMPLES CONTINUED 4. On the Thing page for the Owl statue, you will see a button that says Download This Thing! Click this button. 5. In the Downloads window, select the button Download All Files. Thingiverse will download the file OwlReDo1_fixed_sc.stl to your local computer.
-
Page 65: Printing With Both Extruders
Lotus_color1.stl to your local computer. Lotus_color2.stl 6. Start MakerWare. Ensure you have Replicator 2X selected. To do this: • Go to the MakerBots menu. • Choose Type of MakerBot. • Choose The Replicator 2X. 7. Choose the File menu. Choose Open. - Page 66 PRINTING WITH BOTH EXTRUDERS CONTINUED 10. Click on the point of an outer petal from the first layer to highlight that object. 11. Click twice on the Object button. 12. In the Object Information submenu, in the Extruder field, select an extruder to print .
- Page 67 NOTES BASIC PRINTING...
-
Page 68: Intermediate Printing
Intermediate Printing This chapter is for users who are ready to start editing print settings in MakerWare instead of accepting the default settings. It will explain when and how to use helper disks with a print, when and how to use rafts and support with a print, and how to use the print quality settings in the Make dialog in MakerWare. -
Page 69: Print Quality
[Fig 10.2] When you select a printing profile in the Make dialog, you are choosing both a layer height and a slicing profile that will work best with the selected level of resolution. For more on slicing profiles, see http://www.makerbot.com/ support/makerware/documentation/slicer/. INTERMEDIATE PRINTING... -
Page 70: Rafts
NOTE: MakerBot recommends that you include a raft for best results when printing with support. Support structures might not adhere well to the build plate without a raft. -
Page 71: Supports
Supports allow you to print overhanging parts. Because the MakerBot Replicator 2X cannot print into thin air, supports provide a base for overhanging parts of a model. You can easily remove supports after building the object. -
Page 72: Troubleshooting
• Create or edit a custom profile using the • Create or edit a custom profile using MakerBot Slicer and increase the the MakerBot Slicer and increase the “feedstockMultiplier’’ by .05 mm. The “supportMargin” setting by .1 mm. This supports might be difficult to remove... -
Page 73: Printing An Example
PRINTING AN EXAMPLE In this example, we will print the bird model shown earlier. To do this: 1. Open a browser session and go to http://www.thingiverse.com. 2. In the Search field in the upper right of the page, enter “Bird (for putting on things)”. 3. - Page 74 PRINTING AN EXAMPLE CONTINUED 8. The default size of the bird is very small. We will resize the object to increase its size. [Fig 10.11] 9. Click the Scale button twice. In the Change Dimensions menu, edit the Fig. 10.11 following settings [Fig 10.12]: Uniform scaling.
- Page 75 NOTES INTERMEDIATE PRINTING...
-
Page 76: Advanced Printing
Advanced Printing This chapter describes the advanced printing options in the MakerWare software. -
Page 77: Print Quality
If your object has a flat top, or a section with a flat top, your MakerBot Replicator 2X will print a similar set of solid layers there. This top is called a roof. The MakerBot Replicator 2X starts each new layer of an object by printing some number of outlines of that layer. - Page 78 PRINT QUALITY CONTINUED Infill. Everything that is neither shells, nor floor, nor roof is filled with an internal lattice called infill. [Fig. 11.2] Infill provides your object with an internal support structure. The number that you enter in this field defines the solidity of the printed object’s infill.
- Page 79 The preset layer heights for the MakerBot Replicator 2X range from .10 mm to .30 mm. Layers thicker than .34 mm are difficult because the extruded plastic noodle emerging from the nozzle is only .4 mm in...
-
Page 80: Temperature
TEMPERATURE TEMPERATURE [Fig. 11.4] Temperature settings for the extruders and the build plate are grouped together under the Temperature tab. Extruders. The extruders will need to be heated to approximately 230° C to melt and extrude the plastic filament at normal Fig. -
Page 81: Speed
Kapton tape even at high temperatures. SPEED SPEED [Fig. 11.5] Everyone wants their MakerBot to move faster so they can print things more quickly. Our default print speed is 80 mm/s, and if you want to print faster, you might have to adjust more settings than the extrusion speed. - Page 82 Because moving filament through the extruder at higher speeds pulls heat out of the extruder more quickly, substantial increases in speed require increases in extrusion temperatures. MakerBot does not recommend extruder speeds higher than 120 mm/s. Speed while Traveling. Traveling is when the extruder moves without extruding filament.
- Page 83 NOTES ADVANCED PRINTING...
-
Page 84: Introduction To Thingiverse
Introduction to Thingiverse Thingiverse is a website created by MakerBot. You can access the website at http://www.thingiverse.com. Thingiverse allows MakerBot users and others to share design files for 3D objects. You can download files from Thingiverse and print them on your MakerBot Replicator 2X. You can also upload your own original designs to Thingiverse for others to print. -
Page 85: Creating An Account
THINGIVERSE CREATING AN ACCOUNT [Fig. 12.1] To create a Thingiverse account, click the Join Thingiverse button at the top right of any Thingiverse page. With a Thingiverse account you can: • Access the Dashboard • Publish Things • Customize Things •... - Page 86 THINGIVERSE CONTINUED • Browse all Things by Categories like Tools, Household, and Art. • View Apps created using the Thingiverse API. Create. Allows you to publish your own Things, create objects using the Customizer, start a Collection of other users’ Things, or publish an App using the Thingiverse API.
- Page 87 THINGIVERSE CONTINUED To show that you Made a Thing: When you print something downloaded from Thingiverse, it’s good manners to show your work. • Click the “I made one!” button in the right sidebar. [Fig. 12.7] • This will take you to a new page where you can upload an image and add a description of the Thing you made.
-
Page 88: Using The Customizer In Thingiverse
Using the Customizer in Thingiverse Customizer is an application available on thingiverse.com. Customizer allows users to change the parameters of an object before downloading the STL file and printing it. Customizer allows users to make changes to an object directly from Thingiverse, using an intuitive user interface. -
Page 89: Customizing A Thing
CUSTOMIZING A THING VIEWING CUSTOMIZABLE THINGS To view a list of Things that you can customize with the Customizer application: Fig. 13. 1 1. Go to http://www.thingiverse.com. 2. On the home page, click the Explore link at the top of the page and then click Customizable Things. - Page 90 CUSTOMIZING A THING CONTINUED SAVING AND DOWNLOADING YOUR CUSTOMIZATIONS After you change one or more parameters for a customizable thing, you can save your Fig. 13. 2 customizations and download the file for printing. To do this: 1. In the Customizer page, click the Create Thing button.
- Page 91 CUSTOMIZING A THING CONTINUED EXAMPLE OF CUSTOMIZING A THING This section will walk you through the steps to customize a thing with the Customizer application, create the STL file, and download the STL file. We will customize the thing called Customizable Round Trays. To customize this thing: 1.
- Page 92 CUSTOMIZING A THING CONTINUED Tray Bottom: Specifies the thickness of the bottom of the tray, in mm. In our example, set to 2.0. Resolution: Specifies STL resolution. In our example, select Medium. [Fig. 13.3] 7. To save your changes and create an STL file you can download, click the Create Fig.
- Page 93 CUSTOMIZING A THING CONTINUED Create Thing: Click this button to begin 11. In the Thing page for your new file, click generating the STL file. [Fig. 13.4] the Download This Thing button. 9. The Creating your Customized STL dialog 12. In the Downloads dialog box, select the box will display a message telling you that appropriate file to download.
-
Page 94: Filament
Filament... -
Page 95: Filament Basics
Your MakerBot Replicator 2X Experimental 3D Printer uses ABS plastic filament, 1.75 mm in diameter, to print objects. [Fig 14.1] The Replicator 2X can also use 1.75 mm filament made from other plastics with similar properties. The filament used in 3D... -
Page 96: Abs Filament
ABS is tough and somewhat flexible. ABS becomes softer with increased temperatures, but at the extrusion temperatures used in a MakerBot it remains fairly viscous. That means that ABS melts quickly inside the extruder but doesn’t drip during travel moves. ABS can also withstand heat well enough that we use it to make the plastic components of the Replicator 2X’s extruders. -
Page 97: Pla Filament
250° C because the the filament. If you think you need to increase plastic will start to break down. the tension on the bearing, contact MakerBot Support for advice. If plastic stops extruding partway through your PLA prints, it is probably because the plastic is overheating. -
Page 98: Updating Firmware
Updating Firmware To ensure that your MakerBot Replicator 2X provides optimum performance, you must keep the firmware up to date. - Page 99 To update your firmware, follow these steps 1. Locate the USB-A to USB-B cable that came with your MakerBot Replicator 2X and use it to connect your Replicator 2X to your computer. 2. Choose “Upload Firmware” from the Fig. 15.2 MakerBots menu.
-
Page 100: Finishing Things
Finishing Things After you print an object, you can smooth it, retouch it, and paint it. This chapter will describe one method of finishing a printed object and then give a broad overview of other methods. -
Page 101: Finishing Things
FINISHING THINGS FINISHING AN OBJECT WITH PRIMER OTHER METHODS AND SANDPAPER Retouching. This method of finishing requires a matte You can fix minor imperfections in an object by: gray spray primer, lightweight painters’ • Spraying with automotive spray filler spackle, and fine grit sandpaper. •... -
Page 102: Designing For 3D Printing
Designing for 3D Printing 3D printers can make objects that more traditional manufacturing processes, like milling and injection molding, cannot, but it also comes with its own set of strengths and weaknesses. Keep these guidelines in mind when designing models intended for 3D printing to produce successful printed objects. -
Page 103: Design Guidelines
DETAIL SIZE There is no equivalent to pixel size on a File Name: Three 1:24 Windsor Chairs Fig. 17. 2 MakerBot. Layer height is used as a measure Design by: PrettySmallThings of resolution, but it only measures resolution Thingiverse: 21999 in the Z-axis. - Page 104 X and Y positioning accuracy on MINIMIZE SUPPORT MATERIAL your Replicator 2X is about .01 mm. You can build an object of any shape using That’s a number you should consider when...
- Page 105 NOTES DESIGNING FOR 3D PRINTING...
-
Page 106: Reference
Reference... -
Page 107: Glossary
DUAL EXTRUSION: A process in which two to describe the toolpath your MakerBot extruders loaded with two different colors Replicator 2X will use to 3D print an object. or kinds of plastic work together to 3D print GCode is converted to X3G before being an object. - Page 108 MAKERBOT FILAMENT: 1.75mm diameter POWER SUPPLY: The A/C power supply plastic welding rod. This is the feedstock for the MakerBot Replicator 2X. It includes a for your MakerBot Replicator 2X. MakerBot block and two plugs. Filament comes in ABS, PLA, and PVA plastics.
- Page 109 X3G file. USB CABLE: A cable that allows your computer to communicate with the MakerBot Replicator 2X in order to update firmware. .X3G: A compact format for describing the toolpath your MakerBot Replicator 2X will use to 3D print an object.
-
Page 110: Contact Us
If you ever need help resolving an issue with your MakerBot Replicator 2X, send an email to the address above to open a ticket with the MakerBot Support Team. To help us understand your problem from the start, it is very helpful to include pictures or a video as attachments on your email. -
Page 111: Warranty, Returns, And Replacement Policy
WARRANTY, RETURNS, AND REPLACEMENT POLICY MakerBot products do not carry a long-term warranty. Returns are possible only on unaffected items, within 14 days of receipt. After such time, all sales are considered final. “Unaffected” means a device has never been assembled, powered up, programmed, or otherwise changed. -
Page 112: Index
INDEX 95–96 See also loading filament designing for 3D prints 103–104 diagram object strength troubleshooting orientation accessory box 14–15 support material adding an object in MakerWare downloading advanced printing options 77–80 a customization MakerWare drive blocks location bar mount location dual extrusion 64–65 bridging duplicating objects in MakerWare... - Page 113 INDEX CONTINUED fan bolts location importing files in MakerWare fan guards location infill 78–79 filament 95–97 See also ABS; See also PLA Info and Settings Menu 34–35 diameter installing MakerWare loading 24–31 troubleshooting unloading Kapton tape diagram filament guide tubes diagram installation layer height 79–80 location...
- Page 114 INDEX CONTINUED nozzle diameter saving a file in MakerWare scaling an object in MakerWare SD card OBJ files diagram overhangs example prints exporting to models physical dimensions printing from 39, 40 software bundle troubleshooting spacers location positioning precision specifications powering on speed while extruding power supply...
- Page 115 INDEX CONTINUED tape applicator diagram unclogging temperature unloading filament of build plate unpacking of extruders USB cable diagram thermal cores location Thing files saving viewing an object in MakerWare Thingiverse creating an account customization 89–93 warping dashboard downloading files from 57, 86 example prints exploring...
- Page 116 MakerBot One MetroTech Center, 21st Floor, Brooklyn, NY support@makerbot.com makerbot.com...
Need help?
Do you have a question about the Replicator 2X and is the answer not in the manual?
Questions and answers