Xerox DOCUMATE 252 User Manual
Hide thumbs
Also See for DOCUMATE 252:
- User manual (133 pages) ,
- Service manual (59 pages) ,
- Function manual (12 pages)
Table of Contents
Advertisement
Quick Links
Advertisement
Table of Contents
Troubleshooting

Related Manuals for Xerox DOCUMATE 252


Summary of Contents for Xerox DOCUMATE 252
- Page 1 DocuMate 252 scanner user’s guide...
- Page 2 DocuMate 252 scanner user’s guide...
- Page 3 XEROX ® and the digital X ® are trademarks of Xerox Corporation in the United States and/or other countries and are used under license. DocuMate is a trademark of Xerox Corporation used under license. All other Xerox product names and product numbers mentioned in this publication are trademarks of Xerox Corporation.
-
Page 4: Table Of Contents
The Xerox DocuMate 252 Scanner ........ - Page 5 Xerox DocuMate 252 Scanner Specifications ........
-
Page 6: Welcome
Welcome Your new Xerox DocuMate 252 scanner can quickly scan single- sided or double-sided stacks of color and black-and-white documents and place their images on your computer. What’s in the Box Before proceeding, check the contents of the box. If items are missing or damaged, contact the dealer where you purchased the scanner. -
Page 7: The Xerox Documate 252 Scanner
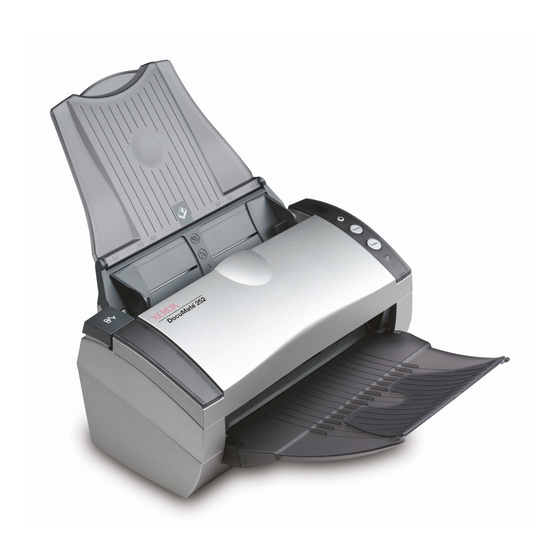
Welcome The Xerox DocuMate 252 Scanner Paper guide LED Number Destination Selector button Simplex button Duplex button Status light Output tray ADF cover release Power switch USB port Power jack Paper guide—Holds documents in place. Adjusts to fit the document width. -
Page 8: What You Need
Documentation Your scanner is delivered with the following documentation: • Quick Install Guide—abbreviated installation instructions. • DocuMate 252 Scanner User’s Guide—on the Installation CD; contains detailed installation, scanning, configuration, and maintenance information. • ScanSoft PaperPort User’s Guide—on the Installation CD;... -
Page 9: Installation
2. Carefully remove the protective foam from the ADF cover release, then press the release and open the automatic document feeder cover. ADF Cover Release 3. Carefully remove any foam particles that may have gotten inside the document feeder, and close the cover. DocuMate 252 Scanner User’s Guide... - Page 10 5. Insert the pins on each side of the output tray into the holes on the scanner. 6. Flip open the extension on the output tray so it is fully extended. 7. Proceed to “Step 2: Install the Software”. DocuMate 252 Scanner User’s Guide...
-
Page 11: Step 2: Install The Software
Make sure the CD drive’s door is completely shut. • Open Windows Explorer and double-click the icon for your CD-ROM drive. From the list of files on the CD, double-click the file named START32.EXE. 3. On the installation menu, select Install Products. DocuMate 252 Scanner User’s Guide... - Page 12 Select Register online, click OK, and then follow the registration instructions. • Select Print registration form, click OK, and then follow the instructions to complete and print the registration form. • Select Remind me in 7 days and click OK. DocuMate 252 Scanner User’s Guide...
- Page 13 13. At the Installshield Wizard Completed window, click Finish. 14. On the Welcome to the OneTouch 4.0 Setup Wizard window, click Next. 15. On the Xerox License Agreement window, read the license agreement. If you accept the terms, select I Agree, and click Next.
-
Page 14: Step 3: Connect And Power On The Scanner
Step 3: Connect and Power On the Scanner Connect the power supply and power cord, and then turn the power on. To connect your DocuMate 252 scanner: 1. Plug the power supply into the power port on the scanner. NOTE: Only use the power supply (SA60-24 made by Sino- American) included with your scanner. -
Page 15: Step 4: Connect The Usb Cable
Installation Step 4: Connect the USB Cable The DocuMate 252 scanner connects to any available USB port. Check your computer’s manual for USB port locations. NOTE: You can connect the scanner to your computer while the computer is running. You do not have to shut down your computer. - Page 16 If you removed the CD from the CD drive and want to install other software, reinsert the CD into the drive. In addition to installing the other software from the CD, you can also view and print the User Guides. DocuMate 252 Scanner User’s Guide...
-
Page 17: Register Your Scanner
Your RegID is very important because you will need it when accessing free telephone support, or checking for online updates. 4. Write down your RegID below so you will always know where to find it. RegID:_________________________________ DocuMate 252 Scanner User’s Guide... -
Page 18: Scanning
2. Load the documents with their tops into the automatic document feeder. For Simplex (one-sided) scans, load the documents face down. For Duplex (two-sided) scans, the documents can be face up or down because both sides are scanned. DocuMate 252 Scanner User’s Guide... - Page 19 Cancel Pause button button To Cancel scanning, click the Cancel button. To pause the scanning, click the Pause button. It will change to a Resume button. Click it to resume scanning. DocuMate 252 Scanner User’s Guide...
-
Page 20: Check The Scan Setting Before Scanning
See “Configuring the OneTouch Buttons” on page 20 to reset the settings. 2. Click the close boxes on the OneTouch Button Panel and the Properties window to close them. DocuMate 252 Scanner User’s Guide... -
Page 21: Scan From The Onetouch Button Panel
PDF, click here. click here. The scanner begins scanning. Then, the scanned images appear in the Destination Application, just as they would if you scanned with the Simplex or Duplex scanner buttons. DocuMate 252 Scanner User’s Guide... -
Page 22: Using The Onetouch Button Panel
Clicking the icon in either view starts the scanner scanning using the button’s settings. 4. To cycle through the nine buttons, click the arrows on the right side of the panel. Click these arrows to cycle through the 9 buttons. DocuMate 252 Scanner User’s Guide... - Page 23 Sketches, and the Destination Application to Microsoft Paint, or some other drawing program. See “Configuring the OneTouch Buttons” on page 20 to change the settings of the buttons on the OneTouch Button Panel. DocuMate 252 Scanner User’s Guide...
-
Page 24: The Initial Onetouch Settings On Your Scanner
In addition to scanning from the scanner buttons and the OneTouch Button Panel, you can scan directly from PaperPort and other software applications. See the sections “Scanning from PaperPort,” “Scanning with the Windows Image Acquisition,” and “Scanning with the ISIS Interface,” for details. DocuMate 252 Scanner User’s Guide... -
Page 25: Configuring The Onetouch Buttons
CD, scanning and converting text directly into an HTML web page, and scanning with optical character recognition (OCR) that turns a scanned image into text that you can edit. DocuMate 252 Scanner User’s Guide... - Page 26 DocuMate 252 scanner. For example, on the figure below, the option “Use Document Feeder” is selected and “grayed out” because the DocuMate 252 is an ADF scanner and always uses the document feeder, so there’s no reason for you to select it.
- Page 27 The button names indicate their file types. See “Selecting Page Format Options” on page 31 for more about the formats. Options tab—displays a window for selecting options related to the selected destination application for the scanned image. DocuMate 252 Scanner User’s Guide...
-
Page 28: Selecting New Settings For A Button
OCR (such as Text, RTF, Word, or sPDF), the text in scanned images is automatically converted to word processing text. See “Scanning with Optical Character Recognition (OCR)” on page 44 for details. 3. From the Select Configuration list, select a scan configuration. DocuMate 252 Scanner User’s Guide... -
Page 29: Setting Destination Application Properties
2. Click the Properties button. Click a Destination Application. Click the Properties button A OneTouch 4.0 Link Properties dialog box appears for the type of Destination Application you selected, and the available options are for that type of application. DocuMate 252 Scanner User’s Guide... - Page 30 2. Click OK. 3. Click OK or Apply on the OneTouch Properties window. When PaperPort opens after you finish scanning, the thumbnails of your scanned documents are on the Desktop in that folder. DocuMate 252 Scanner User’s Guide...
-
Page 31: Text Documents Properties
This could occur if you scanned a photograph with a OneTouch button set for text applications. Show message if text recognition failed—A message will appear on the screen if the OCR reader does not detect text in the image. DocuMate 252 Scanner User’s Guide... - Page 32 The boxes you select here determine the Page Format icons that appear on the OneTouch Properties window for that group of applications. 5. Click the Add button. 6. Click OK or Apply on the OneTouch Properties window. DocuMate 252 Scanner User’s Guide...
-
Page 33: Image Documents Properties
2. To add another application to the list, click the Add Application button. See the steps on page 27 to add an application to the list. 3. Click OK. 4. Click OK or Apply on the OneTouch Properties window. DocuMate 252 Scanner User’s Guide... -
Page 34: Storage Properties
Show message when ready to burn 5" CD (700MB), should be selected. You’ll see a message when it’s time to click the Burn CD button. 4. Click OK. 5. Click OK or Apply on the OneTouch Properties window. DocuMate 252 Scanner User’s Guide... -
Page 35: Email Properties
4. If you need to set or change any internet options for AOL click the Internet Options button. The Windows Internet Options Control Panel appears. See your Windows documentation and AOL user manual for the settings on the Windows Control Panel DocuMate 252 Scanner User’s Guide... -
Page 36: Selecting Page Format Options
BMP and TIFF are standard image file formats generally used if you want to do additional image processing, such as photo touch-up or color correction. Both of those file formats tend to be larger than the JPG format. DocuMate 252 Scanner User’s Guide... - Page 37 Therefore, when you scan a document with the text format selected, the text portions of the document are automatically converted to editable text. See “Scanning with Optical Character Recognition (OCR)” on page 44. DocuMate 252 Scanner User’s Guide...
- Page 38 Page Format are not affected, so you can set the text file type independently for each button. Simple Text—The .txt file format. Text with no formatting; used by the standard Microsoft Notepad application. DocuMate 252 Scanner User’s Guide...
-
Page 39: Renaming A Onetouch Button
OCR and PDF, but you can edit the names. To change the button names: 1. Open the OneTouch Properties window. 2. Using the arrows, choose the button that you want to rename. DocuMate 252 Scanner User’s Guide... -
Page 40: Selecting Options For A Button
Applications available for a button, as well as the location of the files of your scanned items. To select options: 1. Open the OneTouch Properties window and click the Options tab. Options tab 2. Click the menu arrow and choose the button for new options. DocuMate 252 Scanner User’s Guide... - Page 41 Sti Event Forwarding is for using another application’s interface for scanning. The OneTouch Event Forwarding dialog box appears so you can select which application to use to continue scanning. See “Scanning with Event Forwarding” on page 52 for details. DocuMate 252 Scanner User’s Guide...
-
Page 42: Creating A New Scan Configuration
The scan configurations are where you select the scanning resolution, brightness, mode (color, black&white, or grayscale), and a number of other settings. The Scan Configurations. The Lock Icon. Click New to create a new Scan Configuration. DocuMate 252 Scanner User’s Guide... - Page 43 Brightness and Contrast. NOTE: If you select a printer or other device in the Select Destinations list, the dialog box may have an additional Device Settings tab for setting specific options for the particular device. DocuMate 252 Scanner User’s Guide...
- Page 44 6. If you want to lock the configuration, click the lock icon to change it from a key to a lock. 7. Click the Page Settings tab to select page settings. Click to toggle between inches and centimeters. DocuMate 252 Scanner User’s Guide...
- Page 45 Skip Blank Originals—Skips pages that are completely blank. Typically you use this option when you will scan a stack of two-sided pages which have a number of blank sides. This option is only available for Duplex scanning. DocuMate 252 Scanner User’s Guide...
- Page 46 As you do, the image changes to show the effects of the new settings. 10. Click OK to save the new configuration. It will now appear in the list of Scan Configurations on the OneTouch Properties window for the appropriate Destination applications. DocuMate 252 Scanner User’s Guide...
- Page 47 Advanced—click to see additional settings for the device. The dialog that appears is specific to the device. For example, if the device is your printer, the dialog box is your printer’s setup settings. 2. Click OK or Apply. DocuMate 252 Scanner User’s Guide...
-
Page 48: Editing Or Deleting Scan Configurations
To configure before scanning: 1. Open the OneTouch Properties window. 2. Using the arrows, choose the button that you want to set to configure before scanning. DocuMate 252 Scanner User’s Guide... -
Page 49: Scanning With Optical Character Recognition (Ocr)
You can then work with the text and numbers to edit, spellcheck, change font or type size, sort, calculate, and so forth. DocuMate 252 Scanner User’s Guide... - Page 50 You must have installed the OmniPage Pro 12 software on your computer in order to use OCR with the OneTouch software and your DocuMate 252 scanner. OneTouch and OmniPage Pro 12 work together to combine scanning with OCR processing into one integrated step.
- Page 51 3. Select the Destination Application to get one of the text format file types as the page format. 4. Right-click on the page format icon to see the menu. 5. Choose OCR Options from the menu. The OCR Options window opens with the OCR tab selected. DocuMate 252 Scanner User’s Guide...
- Page 52 RE~ECT in your document. Type the character you want to use in the Reject character box. Try to choose a character that will not appear in your documents. DocuMate 252 Scanner User’s Guide...
- Page 53 To remove a font, select it and click Remove. To return the lists to their defaults, click Use Defaults. Click OK when you’re finished. 7. Click the Process tab and choose the options from the Process window. DocuMate 252 Scanner User’s Guide...
- Page 54 8. Click the Format tab and choose the options you want from the Format window. Note that as you select formats, the image changes to represent the selection so you can see, at a glance, what the layout will look like. DocuMate 252 Scanner User’s Guide...
- Page 55 This is done wherever possible with column and indent settings, but not with text boxes or frames. Text will then flow from one column to the other, which does not happen when text boxes are present. DocuMate 252 Scanner User’s Guide...
-
Page 56: Scanning With Searchable Pdf (Spdf)
2. Using the arrows, choose a button to use for the sPDF scanning. 3. Select a Destination Application that uses a text format as the page format. 4. Select sPDF as the Page Format. 5. Choose a Scan Configuration. 6. Click Apply or OK. DocuMate 252 Scanner User’s Guide... -
Page 57: Scanning With Event Forwarding
To scan with event forwarding: 1. Open the OneTouch Properties window. 2. Using the arrows, choose a button to use for the event forwarding. DocuMate 252 Scanner User’s Guide... - Page 58 A dialog box appears for you to select the application to use for scanning. 7. Select the application in the box and click OK. Now the application you selected opens and you can continue the scanning from that application’s TWAIN interface. DocuMate 252 Scanner User’s Guide...
-
Page 59: Scan And Burn To A Cd
Scan and Burn to a CD If you have a CD burner attached to your computer, you can scan directly from your DocuMate 252 scanner onto a CD. This feature is available only on computers running Windows XP. To scan and burn to a CD: 1. -
Page 60: Creating An Html Web Page From Your Scanned Documents
1. Open the OneTouch Properties window. 2. Using the arrows, choose Button 6, or any other button that has Microsoft. Explorer as one of its Destination Applications. 3. Select Microsoft Explorer as the Destination Application. DocuMate 252 Scanner User’s Guide... - Page 61 You may also want to write down the address shown in the Address bar to make sure you’ll know where to find your new HTML page later on. DocuMate 252 Scanner User’s Guide...
-
Page 62: Transferring Scanned Documents To Storage
Archive the text. 1. To scan using the buttons on the scanner, press the Destination Selector until the LED is at 7, then press the Simplex or Duplex button. DocuMate 252 Scanner User’s Guide... - Page 63 2. Using the arrows, choose Button 7, or any other button if it is set up with Transfer to Storage as one of its Destination Applications. 3. Choose a text format as the file format. DocuMate 252 Scanner User’s Guide...
- Page 64 6. Click Apply or OK. 7. Now start scanning using Button 7 (or other button you set up for archiving). When scanning is finished, the documents are saved in the text file format and in the location you specified. DocuMate 252 Scanner User’s Guide...
-
Page 65: Checking The Hardware And Setting The Lamp Power Saving
The Hardware icon If the Hardware View of the panel is open you can also right- click on the DM252 icon. The Hardware Properties dialog box appears and shows information about your Xerox 252 DocuMate scanner. DocuMate 252 Scanner User’s Guide... - Page 66 To turn the lamp on and off manually without turning off power to the scanner, click the Lamp On or Lamp Off buttons. To return the scanner to its factory settings, click Reset Device. 4. Click OK to save the changes and close the dialog box. DocuMate 252 Scanner User’s Guide...
-
Page 67: Scanning From Paperport
NOTE: When scanning, the Basic Interface or Advanced Interface opens right away (without opening PaperPort first) if the button you’re using to scan is set to Configure Before Scan, and the selected option is TWAIN. DocuMate 252 Scanner User’s Guide... -
Page 68: Scanning From The Basic Interface Or Advanced Interface
2. Click the Scan icon on the PaperPort command bar. The Folders pane (which shows folders for organizing your scanned images) is replaced by the Scan pane. Scan pane Choose Xerox DocuMate 252 from here DocuMate 252 Scanner User’s Guide... -
Page 69: Selecting Settings
Scanning from PaperPort 3. From the Scanner list, choose Xerox DocuMate 252. 4. In the “Scan what?” section, choose to scan a Document or Photograph. If you want to change the format of the scanned item’s file name or file type before you start scanning, click Settings. The default file type for documents is .pdf and the default for... - Page 70 For example, to name your scanned items Photograph, type the word Photograph in the box. From then on, each scanned item is named Photograph and is numbered sequentially, Photograph (1), Photograph (2), and so on. DocuMate 252 Scanner User’s Guide...
- Page 71 The Good Quality and Lower Quality options produce reasonably good images. To select your own option, click Custom and drag the slider. Click OK. DocuMate 252 Scanner User’s Guide...
-
Page 72: Scanning From The Basic Interface
Then just click the Scan button. 4. Adjust the brightness, contrast, and resolution until the picture is what you want. You can also change the picture type again, for example, from color to grayscale. DocuMate 252 Scanner User’s Guide... - Page 73 The page counter underneath the thumbnail name shows which page you’re viewing. • The small icon at the bottom right corner of the thumbnail image indicates the file format of the scanned item. DocuMate 252 Scanner User’s Guide...
- Page 74 To open the Help Topics window, press the F1 key or choose PaperPort Help from the Help menu. You can also refer also to the PaperPort Getting Started Guide and PaperPort User’s Guide on the CD. DocuMate 252 Scanner User’s Guide...
-
Page 75: Scanning From The Advanced Interface
Click the - (minus) sign to collapse the list. • Black&White is for letters, memos, pen and ink drawings, and other black and white material. This setting produces the smallest file size for scanned items. DocuMate 252 Scanner User’s Guide... - Page 76 Scan button. A scan progress window opens. When scanning is finished, a thumbnail of the scanned image appears on the PaperPort desktop. If you’re scanning multiple pages, they appear as PaperPort stacks. DocuMate 252 Scanner User’s Guide...
-
Page 77: Adjusting The Image With The Advanced Interface
Color Configurations. 2. Click a setting in the list of settings, or click its corresponding button on the right side of the Advanced Interface. Resolution Brightness/Contrast Color (Gamma, Saturation, and Hue) Scan Size DocuMate 252 Scanner User’s Guide... -
Page 78: Adjusting The Resolution
(dpi). The higher the resolution, the finer the details, however, higher dpi settings also take longer to scan and produce larger files sizes. Usually the higher resolution settings are used for precision work, such as photographs or fine artwork. DocuMate 252 Scanner User’s Guide... - Page 79 You can also type a number directly into the resolution setting box, or click the up and down arrows to increase or decrease the setting. The resolution settings on your DocuMate 252 scanner range from 50 dpi to 600 dpi.
-
Page 80: Adjusting The Brightness And Contrast
You can also type a number directly into the brightness or contrast setting boxes, or click the up and down arrows next to the box to increase or decrease the setting. 3. Click Reset to return the settings to their original numbers DocuMate 252 Scanner User’s Guide... -
Page 81: Adjusting Gamma, Saturation, And Color Hue
For example, if you’re scanning a photograph and want to focus on one section, adjusting the input size removes the rest of the photograph from the final scanned image. DocuMate 252 Scanner User’s Guide... - Page 82 The following figure shows an example of a manually selected area. This is the image that appears on the PaperPort desktop when scanning is finished. The Scan Info box shows the The selected scan area. size and position of the area. DocuMate 252 Scanner User’s Guide...
- Page 83 You can change the ruler units to suit the type of measurements you want. To set the ruler units: 1. Click the Preferences button. The User Preferences dialog box opens. 2. Select the ruler units you want and click OK: DocuMate 252 Scanner User’s Guide...
-
Page 84: Creating A New Advanced Interface Profile
To change or delete a profile you created: 1. Select your profile from the configuration list. 2. Make changes to the profile as needed, and then click Save. 3. If you want to delete the selected profile, click Delete. DocuMate 252 Scanner User’s Guide... -
Page 85: Scanning With The Windows Image Acquisition
2. Click the Scan icon on the PaperPort command bar. The Folders pane is replaced by the Scan pane. Scan pane 3. From the Scanner list, select WIA-XEROX DocuMate 252. 4. In the “Scan what?” section, choose to scan a Document or Photograph. - Page 86 12. Preview the image again. When you are satisfied with the image, click the Scan button. If the Single page items check box is selected on the Scan pane, the scanned item appears as a thumbnail on the PaperPort desktop. DocuMate 252 Scanner User’s Guide...
- Page 87 To select the scanner settings before you scan: 1. On the scan window, click Adjust the quality of the scanned picture. The Advanced Properties dialog box opens. DocuMate 252 Scanner User’s Guide...
- Page 88 3. Click OK. The Custom Settings button is now set to scan with the options you selected. If you want to reset the settings and start over, click Reset. DocuMate 252 Scanner User’s Guide...
-
Page 89: Scanning With The Isis Interface
ISIS is selected by right-clicking on the Configure Before Scan configuration and selecting it from the menu. Right-click on Configure Before Scan to get the menu, and choose ISIS to use the ISIS as the interface to configure before scan. DocuMate 252 Scanner User’s Guide... - Page 90 GrayScale in case you decide to scan with it instead. 4. When you’re ready to scan, replace the preview page in its original position in your document and then press Scan All. The document is scanned with the new scan settings. DocuMate 252 Scanner User’s Guide...
-
Page 91: Adjusting The Isis Scan Settings
Black and White, the contrast option does not apply. Resolution—Click the menu arrow and choose a resolution (dpi). Your DocuMate 252 scanner can scan at up to 600 dpi. Page—Click the menu arrow and choose a page size. Your DocuMate 252 scanner can scan a page up to 8.5"... - Page 92 Dither selection so you can see which one is best for scanning. Dots per inch—Click the menu arrow and choose a resolution (dpi). Your DocuMate 252 scanner can scan at up to 600 dpi. DocuMate 252 Scanner User’s Guide...
- Page 93 Scanning from PaperPort Page Size—Click the menu arrow and choose a page size. Your DocuMate 252 scanner can scan a page up to 8.5" by 14". Brightness—Drag the sliders or click the arrows to the right or left to adjust the brightness in small increments. Click the buttons Darken, Normal, or Lighten to move the slide in larger steps.
-
Page 94: Maintenance
3. Wipe the feed roller from side to side. Rotate the roller to clean its entire surface. 4. Wipe the pad from top to bottom. Be careful not to snag the swab on the springs on either side of the pad. 5. Close the cover when you’re finished. DocuMate 252 Scanner User’s Guide... -
Page 95: Clearing Paper Jams
2. Remove the jammed paper and close the cover. To reduce the number of paper jams, smooth and straighten the paper before scanning and adjust the guides to the paper size. DocuMate 252 Scanner User’s Guide... -
Page 96: Replacing The Adf Pad Assembly
Problems with documents feeding into the ADF is an indication that the pad spring may be wearing out. See the “Xerox DocuMate 252 Scanner Parts List” on page 98 for ordering information. To replace the ADF Pad assembly: 1. -
Page 97: Troubleshooting
Start the PaperPort software and click the Scan icon, and then make sure DocuMate 252 is selected as the scanner. Problem: During installation I got the error message: PaperPort Installation is not complete. What do I do? The installation procedure was not successful. -
Page 98: Status Light Troubleshooting Codes
The LED blinks back and forth between “E” and the error code number (such as 6). The red light flashes the number of times as the error code (6 in this example). The table below describes the error codes. DocuMate 252 Scanner User’s Guide... - Page 99 See the steps on page 60 to turn the lamp on and off. Re- boot your computer. If the problem persists, contact Xerox Technical Support. Paper jam See “Clearing Paper Jams” on page 90. DocuMate 252 Scanner User’s Guide...
-
Page 100: Uninstalling Your Scanner
• Windows 2000 or XP: The Add or Remove Programs window opens. Make sure the Change or Remove option is selected. 6. From the list of programs, select XEROX DocuMate 252. • Windows ME: Click the Add/Remove button. • Windows 2000 or XP: Click the Change/Remove button. -
Page 101: Step 2: Uninstalling The Paperport Software
4. A message window opens, asking if you are sure you want to remove PaperPort 9.0 from your computer. Click Yes. The PaperPort software is removed. 5. Close all open windows and restart your computer. DocuMate 252 Scanner User’s Guide... -
Page 102: Xerox Documate 252 Scanner Specifications
Maintenance Xerox DocuMate 252 Scanner Specifications Optical resolution 600 x 1200 dpi Bit depth 48-bit color (internal) Maximum item size 8.5” x 14” Minimum item size 3.5” x 2” (automatic document feeder) Scan method Automatic document feeder (ADF) ADF specifications Scanning Speed Up to 25 pages per minute. -
Page 103: Xerox Documate 252 Scanner Parts List
Maintenance Xerox DocuMate 252 Scanner Parts List Please use the following part names and numbers when ordering replacements for your scanner. Part Name Part Number Paper Guide 57-0104-000 Output Tray 57-0105-000 ADF Pad 57-0103-000 AC Power Cord 35-0071-000 Power Supply... -
Page 104: Notices
Stamps and other representatives of value, of whatever denomination, which have been or may be issued under any Act of Congress. 2. Adjusted Compensation Certificates for Veterans of the World Wars. 3. Obligations or Securities of any Foreign Government, Bank, or Corporation. DocuMate 252 Scanner User’s Guide... -
Page 105: It's Illegal In Canada
2. Obligations or securities of a government or bank. 3. Exchequer bill paper or revenue paper. 4. The public seal of Canada or of a province, or the seal of a public body or authority in Canada, or of a court of law. DocuMate 252 Scanner User’s Guide... -
Page 106: Federal Communications Commission (Fcc) For Usa
Increase the separation between the equipment and receiver. Connect the equipment into an outlet on a circuit different from that to which the receiver is connected. Consult the dealer or an experienced radio/TV technician for help. DocuMate 252 Scanner User’s Guide... -
Page 107: Energy Star For The Usa
ASK-XEROX) to determine whether this Xerox product is part of the program. If your product is not part of the Xerox program and you are managing its disposal, please note that the product may contain lead and other materials whose disposal may be regulated due to environmental considerations. -
Page 108: Index
11 file type 66 CD-ROM drive 3 flowing page 50 Color 39, 71 folder pane 63 color Font Matching 48 hue 76 Format and Page(s) 24 options 76 Color Document 24 Color Document button 86 DocuMate 252 Scanner User’s Guide... - Page 109 Reject Character 47 Resolution 39, 83, 86 Microsoft Internet Explorer 56 resolution 73 Microsoft Outlook 30 Rich Text Format 34 Moire Patterns 40 rtf file format 34 moire patterns 74 ruler units 78 monitor 3 DocuMate 252 Scanner User’s Guide...
- Page 110 Storage and CD-R/W 36 Storage Properties 29 system requirements 3 template 50 text color 49 Text Document button 86 Text Documents Properties 26 Text Editors 36 text file format 33 Text Formats 32 thumbnail 68 DocuMate 252 Scanner User’s Guide...
- Page 111 05-0612-100...
Need help?
Do you have a question about the DOCUMATE 252 and is the answer not in the manual?
Questions and answers