Table of Contents
Advertisement
Quick Links
This manual explains the functions and operation of the
printer. It also gives some troubleshooting tips as well as
PagePro Ex
general precautions to be observed when operating this printer.
To ensure the best performance and effective use of your printer, please
read this manual carefully from cover to cover. After you have read
through the manual, keep it near your printer for future reference. It
should help in solving any operational questions you may have.
Trademark acknowledgments
Color PagePro is a trademark of Minolta in Europe, Japan and Asia.
Minolta is a registered trademark of MINOLTA CO., LTD.
Fiery, the Fiery logo, and Rip-While-Print are registered trademarks of
Electronics for Imaging, Inc.
Fiery Driven, the Fiery Driven logo, Fiery WebTools, Continuous Print,
ColorWise, NetWise, and VisualCal are trademarks of Electronics for
Imaging, Inc.
Adobe, the AdobePS, and PostScript are trademarks of Adobe Systems
Incorporated or its subsidiaries and may be registered in certain juridic-
tions.
Apple, AppleTalk, ColorSync, Macintosh and TrueType are registered
trademarks of Apple Computer Inc.
Microsoft, Windows and Windows NT are registered trademarks of
Microsoft Corporation.
PANTONE and PANTONE COLOR MATCHING SYSTEM are regis-
tered trademarks of Pantone, Inc.
All other brand or product names are trademarks or registered trademarks
of their respective companies or organizations.
Please follow the instructions given in this manual when han-
dling your printer and do not touch any part of the machine
which the manual does not cover. NEVER attempt to disassem-
ble or remodel the printer.
Foreword
MINOLTA Color
i
Advertisement
Table of Contents
Troubleshooting

Related Manuals for Minolta Color PAGEPRO EX


Summary of Contents for Minolta Color PAGEPRO EX
-
Page 1: Trademark Acknowledgments
Trademark acknowledgments Color PagePro is a trademark of Minolta in Europe, Japan and Asia. Minolta is a registered trademark of MINOLTA CO., LTD. Fiery, the Fiery logo, and Rip-While-Print are registered trademarks of Electronics for Imaging, Inc. -
Page 2: Safety Information
Foreword Safety Information – The printer should be plugged into an electrical outlet that is easily accessible. – After installing the expansion memory, the network card, or the hard disk drive, be sure to replace the cover and secure it with the screws provided. - Page 3 Foreword LASER SAFETY For Users in Denmark ADVERSEL Usynlig laserstråling ved åbning, når sikkerhedsafbrydere er ude af funktion. Undgå udsættelse for stråing. Klass 1 laser produkt der opfylder IEC 825 sikkerheds Kravene. For Users in Finland and Sweden LUOKAN 1 LASERLAITE KLASS 1 LASER APPARAT VEROITUS Laitteen Käyttäminen muulla kuin tässä...
-
Page 4: User Instructions
Foreword LASER SAFETY For Users in Norway ADVERSEL Dersom apparatet brukes på annen måte enn spesifisert i denne bruksan- visning, kan brukeren utsettes for unsynlig laserstråling som overskrider grensen for laser klasse 1. Dette er en halvleder laser. Maksimal effeckt til laserdiode er 10 10 og bølgelengde er 770-810 nm. -
Page 5: Ozone Release
Foreword OZONE RELEASE For all users During printer operation, a small quantity of ozone is released. This amount is not large enough to harm anyone adversely. However, be sure the room where the machine is being used has adequate ventilation, espe- cially if you are printing a high volume of materials, or if the machine is being used continuously over a long period. - Page 6 ™ • Continuous Print enables the Color PagePro Ex to print 600 600 dpi unique pages without pausing, driving the printer at its full rated-engine speed for most print jobs. • Black Detection increases printing speed for black-only pages.
- Page 7 Foreword High speed printing • Full color 3ppm, B/W 12ppm • High performance RISC processor – NEC Vr4300/133MHz • High speed data transfer – IEEE 1284 compliant interface – Network option (Ethernet/ TokenRing) Versatile paper handling • Transparency, labels, thick paper, envelopes Compact size •...
- Page 8 Foreword Symbols and Terms This manual uses the following symbols and terms: ATTENTION This symbol indicates that a specified course of action is required to avoid causing damage or injury. Please be sure to follow the instructions in this manual exactly, whenever you see this symbol. This symbol is found at the following locations: “Changing the Oiling Roller”, “Changing the Image Transfer Roller Unit and Fusing Unit”, “Cleaning the Printer”...
-
Page 9: Table Of Contents
Contents CONTENTS Chapter 1: Installation Precautions for Use ..........1-1 Operating Environment ........1-1 Using the Printer ..........1-2 Care of Printer Supplies........1-4 Moving the Printer..........1-5 Chapter 2: Using the Printer The Printer, Parts and Supplies ......2-1 Printer .............. - Page 10 Contents Loading Plain Paper/ Recycled Paper ... 2-21 How to Set the Paper Size for Tray 1..2-24 Loading Transparencies and Labels ....2-31 How to Set the Paper Size for Tray 1..2-34 How to Set the Media type for Tray 1..2-34 How to Set the Media type for Tray 2/Tray 3........
- Page 11 Color PagePro Ex Print Options for Windows............. 4-13 Configuring PostScript Printing Options for Macintosh ............4-19 To select the Color PagePro Ex as the current printer: ......... 4-19 To print from a Macintosh application: ... 4-21 To use the Color PagePro Ex ICC printer profile:..........
- Page 12 Color wheel............ 5-11 Color and text..........5-12 Raster images and vector images ....5-13 Optimizing files for processing and printing.. 5-14 Resolution of raster images ......5-14 Scaling ............5-16 Color management on the Color PagePro Ex ..........5-17 RGB Source........... 5-18...
- Page 13 Contents Rendering styles ..........5-19 CMYK simulation ........... 5-20 Chapter 6: Fonts PostScript and TrueType fonts......6-1 Adobe Type 1 PostScript fonts ......6-1 TrueType fonts..........6-3 Chapter 7: Maintaining Your Printer Changing Cartridges........... 7-1 Changing the Toner Cartridge ......7-1 Changing the Toner Cartridge (Auto Mode) ..........
- Page 14 Contents Changing the Fusing Unit ......7-28 Changing the Image Transfer Belt Unit ..7-32 Cleaning the Printer .......... 7-40 Cleaning the Outside ........7-40 Cleaning the Inside ........7-41 Chapter 8: Troubleshooting How to Troubleshoot........... 8-1 Diagnosing Your Printer ........8-1 Problems During the Data Transfer and Print Cycle............
- Page 15 List of MENU Utilities .........B-3 Appendix C: Index ............C-1 General information End User License Agreement ....... 1 Contrat utilisateur de la licence......3 Endverbraucher-Lizenzvertrag ......5 Contratto di licenza d’uso ........7 Addresses MINOLTA-Partners in Europe ..... 9 Minolta Guarantee Certificate ......11...
- Page 16 As an NERGY TAR Partner, we have determined that this machine meets the NERGY TAR Guidelines for energy efficiency. What is an NERGY TAR Printer ? NERGY TAR Printers have a feature that allows them to automatically “go to sleep” after a period of inactivity.
- Page 17 Chapter Introduction...
-
Page 18: Precautions For Use
Precautions for Use Precautions for Use Operating Environment The operating environmental requirements of the printer are as follows. • Temperature: 10°C (50°F) to Humidity (%) 35°C (86°F) with a fluctuation of 10°C (18°F) per hour. • Humidity: 15% to 85% RH with a fluctuation of 20% per hour. -
Page 19: Using The Printer
Precautions for Use Using the Printer To ensure the optimum performance of the printer, follow the precautions listed below. • NEVER open any printer door, or turn OFF the printer during operation. • NEVER bring any magnetized object or flammable gas or liquid near the printer. - Page 20 Precautions for Use • NEVER place a vase or vessel containing water or other fluids on or near the printer as this can cause a fire or electrical shock. Should fluid or any foreign object get inside the printer, immedi- ately turn it OFF, unplug the power cord, and call your dealer.
-
Page 21: Care Of Printer Supplies
Precautions for Use Care of Printer Supplies Use the following precautions when handling the printer supplies (toner cartridge, drum cartridge, and paper). • Avoid storing the supplies in any of the following places: A place subject to direct sunlight (the drum cartridge should not be exposed to fluorescent light, either). -
Page 22: Moving The Printer
Precautions for Use Moving the Printer Observe the following precautions when moving the printer. • Since the printer weighs approximately 40kg (88-1/4 lbs.), two people are required to lift it carefully. • If you need to transport the printer over a long distance, consult your dealer. -
Page 23: Chapter 2: Using The Printer
Chapter Using the Printer... -
Page 24: The Printer, Parts And Supplies
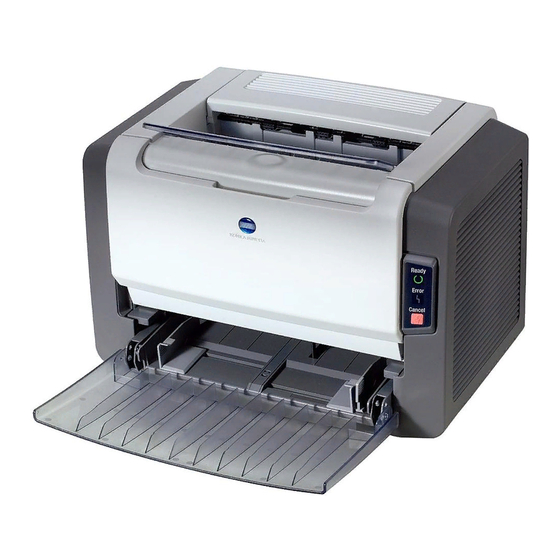
The Printer, Parts and Supplies The Printer, Parts and Supplies Printer 1. Output tray 2. Power switch 3. Front cover 4. Control panel 5. Front cover lock release lever 6. T multipurpose tray 7. Tray 2: 250 sheet second cassette 8. - Page 25 The Printer, Parts and Supplies Front cover Open the cover by pulling the lever up and swinging the door down to replenish supplies such as the toner cartridge, or to clear a paper misfeed. Control panel • Allows the operator to make various settings. •...
- Page 26 The Printer, Parts and Supplies 11. Network card panel 12. Rear cover lock release lever 13. Rear cover 15. Interface connector (parallel connector) 14. Power cord socket...
- Page 27 The Printer, Parts and Supplies 11. Network card panel Use to mount the optional network interface card. 12. Rear cover lock release lever Pull down to swing open the rear cover. 13. Rear cover Swing open to change the oiling roller assembly or clear a paper misfeed.
-
Page 28: Supplies And Units
The Printer, Parts and Supplies Supplies and Units 2. Toner cartridge 1. Waste bottle 3. Image transfer belt unit 4. Drum cartridge 5. Image transfer roller unit... - Page 29 The Printer, Parts and Supplies Waste bottle • Collects and contains unused toner. • Replace this bottle with a new one when it is full. p. 7-14 • Dispose of the old container in a plastic bag or according to local regulations.
- Page 30 The Printer, Parts and Supplies 7. Fusing unit 6. Oiling roller...
- Page 31 The Printer, Parts and Supplies Oiling roller • Oils and cleans the fusing rollers. • Replace the oiling roller with a new one when necessary. p. 7-14 • Dispose of the old roller in a plastic bag or according to local regulations.
-
Page 32: Control Panel Keys
The Printer, Parts and Supplies Control Panel Keys 1. Data indicator 2. Message display 3. Message indicator 4. Cancel key 5. Menu key 6. On Line indicator Data indicator • Data indicator ON Indicates when data received from the host computer is stored in the printer’s memory. - Page 33 The Printer, Parts and Supplies Message display • Indicates the current status of the printer. • Displays printer menus as well as the selected settings for the various functions of the printer. Message indicator • Message indicator blinking Indicates either that the printer is warming up or that an error has occurred.
- Page 34 The Printer, Parts and Supplies 7. Enter key 8. UP & DOWN keys 9. LEFT & RIGHT keys 2-11...
- Page 35 The Printer, Parts and Supplies Enter key p. 3-2 Accepts an option and advances to the next item. UP & DOWN keys p. 3-2 These two keys display the next or the previous setting for the current menu item. LEFT & RIGHT keys •...
-
Page 36: Operation And Warning Labels
The Printer, Parts and Supplies Operation and Warning Labels 1. Installing the toner cartridge 2. Changing the waste bottle, drum cartridge and oiling roller 3. Clearing paper misfeeds 4. Loading paper 5. CAUTION! Hot Parts Inside 2-13... - Page 37 The Printer, Parts and Supplies Installing the toner cartridge • Describes how to replace the toner cartridge. For details, refer to page 7-1. Changing the waste bottle, drum cartridge and oiling roller • Describes how to replace the waste bottle, drum cartridge and oiling roller.
-
Page 38: Turning The Printer On And Off
Turning the Printer ON and OFF Turning the Printer ON and OFF Turning the printer ON Press the power switch to the I (ON) position. Turning the printer OFF Press the power switch to the O (OFF) position. 2-15... - Page 39 Turning the Printer ON and OFF When the printer is On The printer is ready to print approximately 150 seconds after the power switch is turned ON. Note • If either the printer stands idle or no print commands are sent from the host computer for minutes (default value), the printer automatically enters the Power saver mode.
-
Page 40: Paper
Paper Paper Precaution • This printer is designed to print on only the following types of paper. Type Special paper Plain paper Paper Recycled weighing: J-Post (Postcard) Thick paper* feeding Trans- paper 60 to 90 g/m Letter- Enve- size: weighing: port weighing: parency... -
Page 41: Capacity
Paper Capacity Unit: sheets Special Paper Plain paper Paper Recycled weighing: J-Post (Postcard) Thick paper* feeding Trans- paper 60 to 90 g/m Letter- Enve- size: weighing: port weighing: parency Labels 16 to 24 lbs head lopes 100 148 mm 90 to 157 g/m 60 to 90 g/m sheet 4"... -
Page 42: Printable Area
Paper Printable Area • Monochrome (black and white) printing can be done on paper up to 352mm (13-3/4") in length, with the exception of four, 4mm (0.16") margins. • Color printing can be done on paper up to 293mm (11-1/2") in length, with the exception of four, 4mm (0.16") margins. - Page 43 • The Following transparencies are recommended: For color printing, Minolta CF-200 (D) or 3M CG3710 For monochrome printing, Minolta M-100 (D) or 3M PP2500 To purchase Minolta transparencies, please contact your dealer.
-
Page 44: Loading Paper
Loading Paper: Loading Plain Paper / Recycled Paper Loading Paper Loading Plain Paper / Recycled Paper Caution • Do not use the following types of paper as it may cause reduced print quality, a misfeed or a failure. Paper already used in a thermal transfer printer or ink jet printer. Paper that is too thin (under 60 g/m , 16 lbs.) or too thick (over 157 g/m... - Page 45 Loading Paper: Loading Plain Paper / Recycled Paper When loading a long stack of paper, open the paper support. Paper support Load the paper stack on the tray, print side facing up. Face up Adjust the paper guides to fit the size of the paper.
- Page 46 Loading Paper: Loading Plain Paper / Recycled Paper Note • The paper should be loaded no higher than the maximum level according to the indicator Paper guide • When paper remains in the tray, do not stack more paper on top. •...
-
Page 47: How To Set The Paper Size For Tray 1
Loading Paper: Loading Plain Paper / Recycled Paper How to Set the Paper Size for Tray 1 After loading the paper into Tray 1, set the corresponding paper size in the control panel. The default setting for the paper size of Tray 1 is A4. It is not necessary to reset the menu provided that A4 size paper has been placed in Tray 1. - Page 48 Loading Paper: Loading Plain Paper / Recycled Paper Press the Up/Down keys on Example: Changing from A4 to EXECUTIVE the control panel to select the paper size setting that corresponds to the size of the Twice paper in Tray 1. TRAY1 PAPER SIZE <LETTER/LEGAL/EXEC/ EXEC...
- Page 49 Loading Paper: Loading Plain Paper / Recycled Paper Tray 2: second cassette / Tray 3: third cassette (optional) Slide out Tray 2 (second cassette) or Tray 3 (third cassette). Tray 2 / Tray 3 Press down on the paper Paper lifting lifting plate until it locks.
- Page 50 Loading Paper: Loading Plain Paper / Recycled Paper Trailing Install the trailing edge guide edge to fit the size of the paper to guide be loaded. Letter Note • When loading legal size paper, the trailing edge guide is not used.
- Page 51 Loading Paper: Loading Plain Paper / Recycled Paper Load the paper stack into the Face down Paper cassette, print side down, separator under the paper separator and flush with the front side of the cassette. Note • The paper should be loaded no higher than the maximum on the level indi- cator.
- Page 52 Loading Paper: Loading Plain Paper / Recycled Paper Guide lock Pressing the guide lock lever, lever adjust the paper guides to fit the size of the paper. Paper guides Set the paper size indicator Paper size to the size of the paper used. indicator Note •...
- Page 53 Loading Paper: Loading Plain Paper / Recycled Paper Slide in the cassette. Note • Make sure that Tray 2 is completely loaded into the printer whenever you print from Tray 3. Printing from Tray 3 is not possible if Tray 2 is not completely loaded into the printer.
-
Page 54: Loading Transparencies And Labels
(please follow the instructions on page 2-34). • The following transparency types are recommended: For color printing, Minolta CF-200 (D) or 3M CG3710 For monochrome printing, Minolta M-100 (D) or 3M PP2500 To purchase Minolta transparencies please contact your dealer. - Page 55 Loading Paper: Loading Transparencies and Labels Tray 1: multipurpose tray Swing open Tray 1 (multipurpose tray). When loading a long stack of paper, open the paper support. Load the transparency or label sheet stack on the tray, print side up. Adjust the paper guides to fit the size of the transparency or label sheets.
- Page 56 Turn the face-side down • Load the recommended transparencies (Minolta CF-200 (D), 3M CG3710, Minolta CF-100 (D) or 3M PP2500) into the tray so that their front sides are face-side down • Do not load more than 50 sheets on the tray at one time.
-
Page 57: How To Set The Paper Size For Tray 1
Loading Paper: Loading Transparencies and Labels How to Set the Paper Size for Tray 1 After loading the paper into Tray 1, set the corresponding paper size in the control panel. For detailed instructions on setting the paper size, refer to page 2-24. How to Set the Media type for Tray 1 The default setting for this option is “PLAIN PAPER”. - Page 58 Loading Paper: Loading Transparencies and Labels Press the Up/Down keys on Example: Changing from PLAIN PAPER to TRANSPARENCY the control panel to select the Media setting that corresponds to the type of Once media in Tray 1. TRAY1 MEDIA <PLAIN PAPER/ TRANSPARENCY TRANSPARENCY/THICK PAPER>...
- Page 59 Loading Paper: Loading Transparencies and Labels Tray 2: second cassette / Tray 3: third cassette (optional) Note • Do not load labels onto Tray 2 or Tray 3. Labels can only be loaded onto Tray 1. Slide out Tray 2 (second cassette) or Tray 3 (third cassette).
- Page 60 Face down Note Face-side up • Load the recommended transparencies (Minolta CF 200-(D), 3MCG3710, Minolta CF-100 (D) or 3M PP2500) into the cassette so that their front sides are facing up...
- Page 61 Loading Paper: Loading Transparencies and Labels Note • The transparencies should be loaded no higher than the maximum level indicator. • Do not load additional transparencies on top of those remaining in the tray. • Loading the transparencies with force may cause a misfeed. •...
- Page 62 Loading Paper: Loading Transparencies and Labels Set the paper size indicator Paper size to fit the size of the indicator transparencies to be used. Note • If the paper size indicator is not reset to the corresponding size, the document may not print correctly. When you have changed the paper size, always reset the paper size indicator.
-
Page 63: How To Set The Media Type For Tray 2/Tray 3
Loading Paper: Loading Transparencies and Labels How to Set the Media type for Tray 2/Tray 3 The default setting for Tray 2/Tray 3 is “PLAIN PAPER”. Whenever transparencies are to be used with Tray 2/Tray 3, be sure to make the proper Media setting changes. - Page 64 Loading Paper: Loading Transparencies and Labels Press the Up/Down keys on Example: Changing from PLAIN PAPER to TRANSPARENCY the control panel to select the Media setting that corresponds to the type of Once media in Tray 1. TRAY2 MEDIA <PLAIN PAPER/ TRANSPARENCY TRANSPARENCY>...
-
Page 65: Loading Special Paper (Letterhead/ Envelopes/Postcards/ Thick Paper)
Loading Paper: Loading Special Paper Loading Special Paper (Letterhead/ Envelopes/ Post- cards/ Thick Paper) Caution • Do not use legal L size thick paper (the printer does not support legal size thick paper). • Do not use the following types of paper to avoid reduced print quality, a misfeed or a print failure. - Page 66 Loading Paper: Loading Special Paper Tray 1: multipurpose tray Swing open Tray 1 (multipurpose tray). To load a long stack of paper, open the paper support. Load the paper stack on the tray, print side facing up. Adjust the paper guides to fit the size of the paper.
- Page 67 Loading Paper: Loading Special Paper When printing paper, load it on the tray after smoothing any folds or wrinkles. Specify the Media setting for Tray 1. p. 2-34. Note • Do not load more than 50 sheets on the tray at one time. •...
-
Page 68: Printing
Printing Printing Paper can be fed through the printer from either Tray 1 (multi- purpose tray), Tray 2 (second cassette) or Tray 3 (third cassette). This will allow you to use the paper source that best suits your application. Turn the printer on. p. - Page 69 Printing Load the paper. Tray 1 (multipurpose tray) pp. 2-21, 2-24, 2-32, 2-34, 2-43, 2-44 Tray 2 (second cassette) / Tray 3 (third cassette) pp. 2-36, 2-36, 2-40 To print long paper, open the paper support in the output tray. Input a print command from the host computer.
- Page 70 Printing The message display will change from “PROCESSING JOB” to “PROCESSING JOB FROM TRAY XX”. The printed paper feeds out Face down onto the output tray with the image face down. After the document has finished printing, the Data indicator will turn off and “READY”...
-
Page 71: Chapter 3: Changing The Printer Settings
Chapter Changing the Printer Settings... -
Page 72: Setting The Menu Utilities
Setting the MENU Utilities Setting the MENU Utilities The MENU utilities are settings that you can change to suit your particular operating needs. Refer to Appendix B for descriptions of the various settings available through the MENU utilities. Make sure that “READY” is shown on the message READY READY... - Page 73 Setting the MENU Utilities Press the Enter key on the Example: TRAY1 PAPER SIZE control panel until the desired item is found. Twice TRAY1 PAPER SIZE Press the Up/Down keys on Example: Changing from A4 to LETTER the control panel to select the desired setting.
-
Page 74: Setting The Menu Utilities
Setting the MENU Utilities Press the Cancel key on the control panel to exit the Once MENU utilities. Check that “READY” appears READY on the message display. Make sure that the On Line indicator is lit. The procedure for setting the MENU utilities is complete. -
Page 75: Outline Of Settings For The Menu Utilities
Outline of Settings for the MENU Utilities Outline of Settings for the MENU Utilities 1. CHECK AND PRINT This option allows you to output one copy of a multi-copy-print job and check it before outputting the remaining copies. 2. PRINT PAGES FROM LIST Displays the printer’s resident pages. -
Page 76: System Setup
Outline of Settings for the MENU Utilities 3-3. RESET COLOR Select this option to reset all color settings to their factory defaults. 3-4. RESTORE DEFAULTS Select this option to reset the printer settings to their factory defaults. 3-5. RESTART PRINTER Select this option to restart the printer. - Page 77 4-5. POWER SAVER (M) Use this option to select the length of time during which there is no printer activity before the Color PagePro Ex switches to Power Saver mode. Full power mode is automatically restored when the printer receives a network print job or any button on the operation panel is pressed.
-
Page 78: Printer Setup
Outline of Settings for the MENU Utilities 5. PRINTER SETUP This settings group specifies paper and toner settings. 5-1. DEFAULT PAPER Use this option to specify the default paper size. Information pages from the menu PRINT PAGES FROM LIST (Job Log list, Configuration page, PS Fonts List, and Test page) are printed on the default paper size, either A4 or LETTER. -
Page 79: Ps Setup
Outline of Settings for the MENU Utilities 6. PS SETUP Use this settings group to specify PostScript settings for the printer. The PostScript setup menus enable you to set Postscript printing options. 6-1. PRINT TO PS ERR Use this option to specify if a portion of a print job that has been processed before encountering a PostScript error is printed. - Page 80 Outline of Settings for the MENU Utilities 7-2. PRINT LIMITS The limits you select are used by the printer to adjust high- lights, shadows, and contrasts. Select and press the Enter key to print the LIMITS PAGE which contains the highlight, shadow, and contrast chart. Note •...
- Page 81 Outline of Settings for the MENU Utilities 7-3. BLACK START Use this option to adjust the black start value. 7-4. BLACK END Use this option to adjust the black end value. 7-5. CYAN START Use this option to adjust the cyan start value. 7-6.
-
Page 82: Color Adjustment
Outline of Settings for the MENU Utilities 7-13. BEST PATCH (ROW) Use this option to adjust the color patch (row) according to the gray balance page. 7-14. BEST PATCH (COL) Use this option to adjust the color patch (column) according to the gray balance page. -
Page 83: I/O Port Setup
Outline of Settings for the MENU Utilities 8-4. PRINT COLOR TEST Select and press the Enter key to print the CURRENT COLOR TEST PAGE NEW COLOR TEST PAGE After these test pages have printed, the APPLY CHANGES message will appear. Select to save all changes. -
Page 84: Chapter 4: Printer Driver
Chapter Printer Driver Conventions The following icons are used in this manual: Indicates features for which a hard disk drive is required. Indicates instructions for users working with networked printers. -
Page 85: Configuring Postscript Printing Options For Windows 95/98
• This driver supports PostScript 3 features. Custom print options available from the drivers are described in “Color PagePro Ex Print Options for Windows” at the end of this chapter. The screen images that appear in the following sections are examples of the printer driver operating in a Windows 95-based operating environment. -
Page 86: To Configure Postscript Printing Options
, and then Start Settings click Printers 2. Click the printer icon to select it. Minolta Color PagePro Ex e menu. 3. Choose Properties from the The Printer Properties dialog box appears, with the General displayed. PostScript printing options are set from tabs in this dialog box. - Page 87 Configuring PostScript Printing Options for Windows 95/98 4. Choose the tab. Paper Use the tab to specify print job options. Paper 5. Click the button in the tab to open the More Options Paper More dialog box. Paper Options Use the dialog box to specify the type of More Paper Options media to print on.
- Page 88 Configuring PostScript Printing Options for Windows 95/98 6. Choose the tab. Device Options Output Specify the use of features relating to optional devices installed on your printer using options in this tab. Check and Print and Electronic Collation are available only on printers with a hard disk drive.
- Page 89 Configuring PostScript Printing Options for Windows 95/98 Note • The resolution setting for printer output can be changed through the Resolution list of the Device Options tab. Please note that the Resolu- tion option that is located in the Graphics tab cannot be changed. •...
- Page 90 Configuring PostScript Printing Options for Windows 95/98 8. To change a setting, select a device option in the Available area, and click . Click Options Remove 9. Choose the tab. ColorWise Use options in the ColorWise tab to specify color control settings for your print job.
- Page 91 Configuring PostScript Printing Options for Windows 95/98 10.Choose the tab. Watermarks Use options in this tab to print a watermark on the copies of a print job. Supplied watermarks can also be editing using options in this tab.
-
Page 92: Configuring Postscript Printing Options For Windows 3.1
Windows 3.1 This section describes configuring printing options for Windows 3.1 systems using the Adobe PostScript printer driver v3.1.1. from the Color PagePro Ex Printer Drivers CD-ROM. Note • This driver supports PostScript 3 features. To Configure PostScript Printing Options: 1. - Page 93 Configuring PostScript Printing Options for Windows 3.1 Note • The following resolution settings for printer output are available through the Resolution list of the Features tab. High Grade: 2400 600 dpi Normal: 1200 600 dpi Draft: 600 dpi • can be selected from the Resolution list when the memory High Grade capacity of the printer is 80 MB or more and the set-...
-
Page 94: Configuring Postscript Printing Options For Windows Nt 4.0
Start , and then click . Right-click the Settings Printers Minolta Color printer icon, and choose from the PagePro Ex Properties File menu. 2. Click the tab. Device Settings All print options, including custom print options, can be set from tabs and scroll lists in this dialog box. - Page 95 • You can also set custom print options from the Default Document Prop- erties dialog box. This dialog box contains only those options that are specific to the Color PagePro Ex printer. printer icon, and choose D 3. Right-click the...
- Page 96 Configuring PostScript Printing Options for Windows NT 4.0 Note • The resolution setting for printer output can be changed through the Resolution item under Printer Features in the Advanced tab. Please note that the Resolution item that is located under Graphic cannot be changed.
-
Page 97: Color Pagepro Ex Print Options For Windows
Color PagePro Ex Print Options for Windows The printer drivers that come with your printer have been customized to provide additional print options specific to your Color PagePro Ex printer. These options have been integrated into the driver interface. PostScript printer driver interfaces vary between Windows 95/98, Windows NT 4.0, and Windows 3.1x operating systems, the printing... - Page 98 Color PagePro Ex Print Options for Windows CMYK Simulation CMYK simulation settings can be used to SWOP-Coated/DIC/ simulate popular offset printing press stan- Euroscale/None dards. (None is the default) Select SWOP-Coated to simulate printing to a standard American offset press; Euroscale to simulate a European offset press, or DIC to simulate a standard Japanese offset press.
- Page 99 Color PagePro Ex Print Options for Windows CRD Rendering Styles Before an RGB image can be printed, the Photographic/ file’s color data must be converted to the Presentation/OHT/ printer’s CMYK color space. Color render- None ing dictionaries apply optimal gamut map- ping methods to documents that contain text, photographs and illustrations.
- Page 100 Color PagePro Ex Print Options for Windows Electronic Collation Electronic collation allows the pages of (No is the default) each copy of a print job to be printed in sequence. If chosen, a file is downloaded to the hard disk drive, stored, and printed mul- tiple times.
- Page 101 Color PagePro Ex Print Options for Windows Paper or envelope size Paper and envelope sizes supported by the printer can be specified by name. Options include: A4, A5, JIS B5, Letter, Legal, Executive, Invoice. Paper source Paper trays can be specified by name. Options include: Auto Select Tray, Tray1, Tray2, Tray3, Manual Feed.
- Page 102 Color PagePro Ex Print Options for Windows RGB Source RGB source profiles allow you to define the EFIRGB/sRGB (PC)/ color space characteristics (such as the Apple Standard/Off white point, gamma and type of phosphors) (sRGB is the default) of the image’s source. When a source is specified, the image’s RGB data can be opti-...
-
Page 103: Configuring Postscript Printing Options For Macintosh
Macintosh Once you have installed the PostScript printer driver v. 8.5.1 you can print to the Color PagePro Ex just as you would print to any other printer. Simply specify the Color PagePro Ex as the current printer by clicking on its icon in the Chooser desk accessory, then click the Set Up button to select the printer’s corresponding PPD. - Page 104 Configure to specify which optional devices have been installed on the printer. The Color PagePro Ex will remain selected as the current printer until you choose a new printer from the Chooser or the Page Setup dialog box. On the Macintosh, custom print options are specified in the Page Setup and Print dialog boxes.
-
Page 105: To Print From A Macintosh Application
Page Setup File 4. Select the from a list of available printers. Color PagePro Ex 5. Select the printing options you want from the Page Setup dialog box. PostScript and Page Attribute options can be specified from this dialog box. - Page 106 Configuring PostScript Printing Options for Macintosh Each printer specific print option is described in the following section. Note • Options selected from the Print dialog box override any duplicate set- tings specified in the Printer Setup on the printer. • The resolution setting for printer output can be changed through the drop-down list of the dialog.
-
Page 107: To Use The Color Pagepro Ex Icc Printer Profile
Configuring PostScript Printing Options for Macintosh To use the Color PagePro Ex ICC printer profile: The Color PagePro Ex Draft ICC, Color PagePro Ex Normal ICC and Color PagePro Ex HiGrade ICC printer profiles can be found in the folder which comes on the Color PagePro Ex ColorSync™... -
Page 108: Color Pagepro Ex Print Options For Macintosh
The PostScript drivers that come with your printer have been customized to provide additional print options specific to your Color PagePro Ex printer. These options have been transparently integrated into the PostScript driver interface. Color PagePro Ex PostScript print options are described in the following table. Print option Description... - Page 109 Color PagePro Ex Print Options for Macintosh CMYK Simulation CMYK simulation settings can be used to SWOP/DIC/Euroscale/ simulate popular offset printing press None standards. (None is the default Select SWOP to simulate printing to a value) standard American offset press; Euroscale to simulate a European offset press, or DIC to simulate a standard Japanese offset press.
- Page 110 Color PagePro Ex Print Options for Macintosh Electronic Collation Electronic collation allows the pages of (No is the default) each copy of a print job to be printed in sequence. If chosen, a file is downloaded to the hard disk drive, stored, and printed mul- tiple times.
- Page 111 Color PagePro Ex Print Options for Macintosh Media Type Media types supported by the printer can be specified by name. Options include: Plain Paper, Transparency, Envelope, Thick Paper. Choosing the correct media optimizes the fuser’s application of toner. Note: When Transparency paper is...
- Page 112 Color PagePro Ex Print Options for Macintosh RGB Source RGB source profiles allow you to define the EFIRGB/sRGB (PC)/ color space characteristics (such as the Apple Standard/Other/ while point, gamma and type of phosphors) of the image’s source. When a source is (sRGB is default value) specified, the image’s RGB data can be...
-
Page 113: Chapter 5: Color Management
Chapter Color Management... -
Page 114: Introduction
Introduction Introduction This chapter introduces concepts that are basic to color theory. You will encounter some of these concepts (such as hue, saturation, and brightness) when you work with color in applications; others provide useful background information. Color is a complex topic, so consider this a starting point for experimentation and further research. -
Page 115: The Properties Of Color
The Properties of Color The Properties of Color What we call “color” is really a perceptual ability unique to humans and a small number of animal species. Color theory is an attempt to systematize the properties of color perception, which by nature is relative and changeable. -
Page 116: Cie Color Model
The Properties of Color CIE color model In the 1930s, the Commission Internationale de l’Eclairage (CIE) defined a standard , a way of defining colors in color space mathematical terms, to help in the communication of color information. This color space is based on research on the nature of color perception. -
Page 117: Additive And Subtractive Color Systems
Computer monitors and scanners use the . Printing technologies, including Color additive color model PagePro Ex print devices and offset presses, use the subtractive color model Additive (RGB) color Color devices that use the additive color model make a range of colors by combining varying amounts of red, green, and blue light. -
Page 118: Print Device Gamut
The Properties of Color are cyan, magenta, and yellow; they subtractive primaries absorb red, green, and blue light, respectively. Combining any two subtractive primaries creates a new color that is relatively pure or saturated. For example, you can make red by combining magenta and yellow, which absorb green and blue light, respectively. - Page 119 The Color PagePro Ex is specially designed to perform gamut mapping at high speed with high quality results. It provides these color management features automatically, using either built-in default settings or settings that you specify for a particular print job.
-
Page 120: Controlling Printed Color
Creating successful color documents and presentations also requires an understanding of color management software as it is implemented by the Color PagePro Ex and on your desktop computer. Most of this chapter is devoted to discussing the various elements of color management that contribute to predictable color results. -
Page 121: Paper Stock And Toner
Controlling Printed Color Paper Stock and toner The paper and toner used by the print device can greatly affect printed color. For best results, use the consumables recommended by the manufacturer of your printer. Maintenance Problems such as streaking and insufficient or excessive amounts of one or more toners arise when a print device does not receive periodic maintenance. - Page 122 Controlling Printed Color Calibrating the printer using VisualCal To perform VisualCal calibration: Use the menu from the control panel in order to reset VISUALCAL the printer’s toner density and luminosity setting. For instructions, see page 3-8. To perform color adjustment: Use the menu from the control panel in COLOR ADJUSTMENT...
-
Page 123: Using Color Effectively
Using color effectively Using color effectively The ability to print in color can greatly increase the effectiveness of your message, whether you are printing a presentation or a newsletter, or proofing an ad concept that will later be printed on press. Some potential benefits of using color include: •... -
Page 124: Color Wheel
Using color effectively Color wheel A color wheel is a helpful tool for understanding the interrelation of colors. The colors on one side of the color wheel, from magenta to yellow, appear to most people to be warm colors, while those on the other side, from green to blue, appear to be cool. -
Page 125: Color And Text
Using color effectively Color and text It is not a coincidence that the overwhelming majority of text you see is printed in black toner on white paper. Text in black on white is highly legible and is not fatiguing to read for extended periods. For many color materials, using black text on a white background and confining color to graphic elements and headings is a good choice. -
Page 126: Raster Images And Vector Images
Raster images and vector images Raster images and vector images Two broad categories of artwork can be printed from a personal computer to a color printer: raster and vector images. A raster image, also referred to as a bitmap, is composed of a grid of pixels, each assigned a particular color value. -
Page 127: Optimizing Files For Processing And Printing
Optimizing files for processing and printing Optimizing files for processing and printing The following sections provide tips on how to create image files that produce the highest possible print quality while minimizing the pro- cessing time and disk space they require. Resolution of raster images While a 72 ppi raster image appears sharp on a monitor, the same image would likely appear pixelated when printed to the printer. - Page 128 Optimizing files for processing and printing In this table, the shaded area indicate that 200 ppi is typically the best trade-off between image quality and file size. However, higher resolutions (e.g., 250 to 300 ppi) may be needed for offset printing, when quality is of the utmost importance, or for images containing sharp diagonal lines.
-
Page 129: Scaling
Optimizing files for processing and printing Scaling Ideally, each raster image should be saved at the actual size it will be placed into the document and at the optimal resolution for the print device. If the image resolution is correct for the print device, there is no quality advantage to be gained by scaling an image down to a percentage of its actual size. -
Page 130: Color Management On The Color Pagepro Ex
Color management on the Color PagePro Ex Color management on the Color PagePro Ex The Color PagePro Ex uses a simple and flexible color architecture that produces excellent color results with default settings. It also allows you to customize your color results using various color controls. -
Page 131: Rgb Source
Description EFIRGB The source color space defined by this set- ting is optimal for color conversions that will be sent to a Color PagePro Ex print device. It also allows for consistent output across different operating systems. sRGB (PC) The sRGB (PC) setting specifies the source space of a generic Windows computer mon- itor. -
Page 132: Rendering Styles
The Rendering Style option is used to specify a CRD for color conversions. The following table describes the color rendering styles (CRDs) for Color PagePro Ex software and provides guidelines on when to use each one. Each color rendering style uses a different gamut mapping method, such as Photographic or Presentation, designed for a particular kind of color usage. -
Page 133: Cmyk Simulation
Reference pages of CMYK data and PANTONE colors are provided on the Color PagePro Ex Printer Drivers CD-ROM. By choosing a color from one of these pages, and... - Page 134 With the PANTONE Reference, you can quickly print a file of PANTONE color simulations, illustrated with their CMYK percent values, on the Color PagePro Ex printer. You can give the PANTONE Reference page to designers who specify PANTONE colors in their Macintosh and Windows applications.
-
Page 135: Chapter 6: Fonts
Chapter Fonts... -
Page 136: Postscript And Truetype Fonts
Note • All fonts that are pre-installed on your printer have also been included on the Color PagePro Ex Printer Drivers CD-ROM. For information on how to install these fonts on your computer, see the instructions for installing additional software in the Setup Guide. - Page 137 PostScript and TrueType fonts • GillSans, GillSans-Bold, GillSans-Italic, GillSans-BoldItalic, GillSans-Condensed, GillSans-BoldCondensed, GillSans-Light, GillSans-LightItalic, GillSans-ExtraBold • Goudy, Goudy-Bold, Goudy-Italic, Goudy-BoldItalic, Goudy- ExtraBold • Helvetica, Helvetica-Bold, Helvetica-BoldOblique, Helvetica- Condensed, Helvetica-Condensed-Bold, Helvetica-Condensed- BoldObl, Helvetica-Condensed-Oblique, Helvetica-Narrow, Helvetica-Narrow-Bold, Helvetica-Narrow-BoldOblique, Helvetica-Narrow-Oblique, Helvetica-Oblique • JoannaMT, JoannaMT-Bold, JoannaMT-Italic, JoannaMT-Bold- Italic •...
-
Page 138: Truetype Fonts
CondensedBold, Univers-CondensedBoldOblique, Univers- CondensedOblique, Univers-Extended, Univers-ExtendedObl, Univers-Light, Unviers-LightOblique, Univers-Oblique • ZapfChancery-MediumItalic • ZapfDingbats TrueType fonts The Color PagePro Ex includes 19 TrueType fonts: • Apple-Chancery • ArialMT, Arial-BoldMT, Arial-ItalicMT, Arial-BoldItalicMT • Chicago • Geneva • HoeflerText-Regular, HoeflerText-Black, HoeflerText-Italic, HoeflerText-BlackItalic, HoeflerText-Ornaments •... -
Page 139: Chapter 7: Maintaining Your Printer
Chapter Maintaining Your Printer... -
Page 140: Changing Cartridges
Changing Cartridges Changing Cartridges Changing the Toner Cartridge • There are four color toner cartridges: Black, Yellow, Magenta (Red) and Cyan (Blue). When any of the color toner cartridges run out, replace them with new ones. • When any color toner cartridge begins to run short of toner, is displayed. - Page 141 Changing Cartridges Changing the Toner Cartridge (Auto Mode) The Auto Mode automatically enables the carriage that holds the toner cartridges inside of the printer to rotate to the exact position for proper toner cartridge replacement. The printer cover must be closed when using the Auto Mode.
- Page 142 Changing Cartridges Example: Color Toner Cartridge Magenta (Red) Twice REPLACE TONER MAGENTA Press the Enter key on the control panel. Check that “REPLACING Example: Color Toner Cartridge Magenta (Red) TONER MOVING XXXXX” appears on the message REPLACING TONER display. MOVING MAGENTA You will hear the sound of the printer operating.
- Page 143 Changing Cartridges Grasp and pull down the front cover lock release lever to Front cover lock release swing open the front cover. lever Front cover Hold the handle of the used toner cartridge and pull it toward you. Handle Raise the left side of the toner cartridge first, then the right.
- Page 144 Changing Cartridges 10. Remove the new toner cartridge from its carton and holding the cartridge as shown, shake it well. Note • Never touch the roller in the Roller toner cartridge. Print quality will be reduced. Roller protective shutter 11. Make sure that the label on Toner color label the toner cartridge rack is...
- Page 145 Changing Cartridges 13. Holding the new cartridge as shown, insert the green pin on the right side of the cartridge into the green installation guide of the rack. Green pin Green installation guide...
- Page 146 Changing Cartridges 14. Insert the green pin on the left side of the cartridge into the Green pin green installation guide of the rack. Green installation guide 15. Firmly press the cartridge OK (LOCKED) NG (UNLOCKED) into the rack until it clicks into Toner cartridge lock plate place.
- Page 147 Changing Cartridges 16. Once the toner cartridge has been installed, secure the drum unit into place by applying pressure at its top where the “ ” label is Press affixed. The drum unit will lock into place when it has been correctly inserted into the printer.
- Page 148 Changing Cartridges 19. Wait until the sound of printer Example: Color Toner Cartridge Magenta (Red) operation has stopped, indicating that the printer is READY ready. “READY” will appear. Make sure that the On Line indicator is lit.
-
Page 149: Changing The Toner Cartridge (Manual Mode)
Changing Cartridges Changing the Toner Cartridge (Manual Mode) The toner cartridge dial inside of the printer allows you to manually rotate the toner cartridge rack for toner replacement. Refer to page 7-2 for instructions on how to replace toner cartridges using the Auto Mode. - Page 150 Changing Cartridges You will feel the dial tighten while turning it. This is the position for removing the cartridge. Toner cartridge Toner cartridge Cyan (Blue) rack dial rack toner cartridge Black toner cartridge Yellow toner cartridge Magenta (Red) toner cartridge <Printer side view>...
- Page 151 Changing Cartridges To confirm the rack is positioned for removing the cartridge, use the position confirmation window beside the dial. The removal position indicator will alert the user to the proper removal position. Removal position indicator: ALL GREEN Note • Before installing or removing the toner cartridge, always make sure that the rack is in the proper position.
- Page 152 Changing Cartridges Gently close the front cover. Do not slam the front cover to avoid causing damage to the printer. Make sure that the front OK (LOCKED) NG (UNLOCKED) cover is completely closed. You will hear the sound of the printer operating.
-
Page 153: Changing The Drum Cartridge, Waste Bottle And Oiling Roller
Changing Cartridges Changing the Drum Cartridge, Waste Bottle and Oiling Roller • The drum cartridge can provide up to 20,000 images of A4/let- ter-size prints. One image is equal to one cycle of the drum car- tridge. The drum cartridge operates once (one image) to provide one monochrome print. -
Page 154: Changing The Drum Cartridge
Changing Cartridges Changing the Drum Cartridge Grasp and pull down the front Front cover cover lock release lever and Front cover lock release swing open the front cover. lever Grip Drum cartridge Holding onto the grip, pull out the drum cartridge. Drum cartridge Take the new drum cartridge out of its carton. - Page 155 Changing Cartridges Note • Do not touch the drum protective shutter of the Drum protective drum cartridge. Also, never shutter touch the internal PC drum. This will reduce print quality. • If the drum cartridge will not be immediately installed in the printer, be sure to cover it with a cloth to shield it from light.
- Page 156 Changing Cartridges Note • When the drum cartridge is Drum protective correctly installed into the shutter printer, the drum protective shutter will automatically open. Be careful not to disturb or apply pressure to the shutter. Finally, insert the drum unit as far as it will go into the printer by applying pressure at its top where the “...
-
Page 157: Changing The Waste Bottle
Changing Cartridges Changing the Waste Bottle Waste bottle Remove the old waste bottle from the printer. Remove the cap from the old toner waste bottle and place it into the mouth of the old bottle to prevent spills. Make sure that the shutter of the image transfer belt unit is closed. - Page 158 Changing Cartridges Remove the new waste bottle Waste bottle from its carton. Slot Slide the waste bottle into the slot located behind the image Green label transfer belt unit on the left Waste bottle guide side of the printer. Install the new waste bottle behind the image transfer belt unit (drawn in the diagram with dash marks)
- Page 159 Changing Cartridges 11. Make sure that the hook of the Image transfer Hook belt unit waste bottle is engaged securely by the pins of the image transfer belt unit. Waste bottle 12. Gently close the front cover. Do not slam the front cover to avoid causing damage to the printer.
-
Page 160: Changing The Oiling Roller
Changing Cartridges Changing the Oiling Roller 14. Swing open the rear cover. Rear cover Fusing unit 15. Push and hold the fusing unit lock release button lock release button and slide out the fusing unit. ATTENTION • The fusing unit is hot. Be CAUTION! Hot Parts Inside label careful not to touch the area surrounding the CAUTION! - Page 161 Changing Cartridges 16. Loosen both of the oiling roller’s installation screws. 17. Holding onto the grip, take out the oiling roller. 18. Remove the new oiling roller Fusing unit from its carton. Install the new oiling roller by inserting the tabs on its front end under the edge of the fusing unit.
- Page 162 Changing Cartridges Note • Do not touch the oiling roller as its surface is covered with silicone oil. 19. Tighten both of the oiling roller’s installation screws. Gently press down on the green tab while tightening the screws of the oiling roller. Tighten the screws so that the Screws spring action of the cover is...
- Page 163 Changing Cartridges 21. Make sure that the fusing unit OK (LOCKED) lock release button is pushed up as shown. NG (UNLOCKED) 22. Close the rear cover until it clicks, locking into place. 23. Make sure that the rear cover (LOCKED) (UNLOCKED) lock release lever is pushed up as shown.
-
Page 164: Changing The Image Transfer Roller Unit And Fusing Unit
Changing Cartridges Changing the Image Transfer Roller Unit and Fusing Unit • The image transfer roller unit and fusing unit can provide up to 100,000 A4/ letter-size prints (this value will vary with the color to monochrome print ratio, image conditions, etc). •... - Page 165 Changing Cartridges Pull out the image transfer roller unit. Note Image • Do not touch the surface of the transfer image transfer roller as this roller may lead to reduced print quality. Remove the new image transfer roller unit from its carton.
- Page 166 Changing Cartridges Once the image transfer roller unit has been installed, secure the drum unit into place by applying pressure at its top where the “ ” Press label is affixed. The drum unit will lock into place when it has been correctly inserted into the printer.
-
Page 167: Changing The Fusing Unit
Changing Cartridges Changing the Fusing Unit 10. Open the rear cover. Rear cover Fusing unit 11. Push and hold the fusing unit lock release button lock release button and slide out the fusing unit. ATTENTION • The fusing unit is hot. Be CAUTION! Hot Parts Inside label careful not to touch the area surrounding the CAUTION! - Page 168 Changing Cartridges 12. Remove both screws of the fusing unit. Fusing unit Screws 13. Slide out the fusing unit in the direction shown. Remove the fusing unit from its mount. 14. Remove the new fusing unit from its carton. 15. Insert the guide of the fusing unit mount into the installation hole of the new fusing unit as shown.
- Page 169 Changing Cartridges Installation hole 16. Install the fusing unit by inserting the dowel of the Dowel mount into the fusing unit’s installation hole. 17. Secure the fusing unit with the installation screws. Installation hole Dowel 18. Turn the misfeed clearing dial of the fusing unit coun- terclockwise and make sure that the white gear shown...
- Page 170 Changing Cartridges 21. Close the rear cover. The rear cover will click when it is closed completely. 22. Make sure that the button of (LOCKED) (UNLOCKED) the rear cover lock release lever is pushed up as shown. You will hear the sound of the printer operating.
-
Page 171: Changing The Image Transfer Belt Unit
Changing Cartridges Changing the Image Transfer Belt Unit • The image transfer belt unit provides A4/letter-size prints of up to about 150,000 images. One image is equal to one cycle of the transfer belt. The image transfer belt unit operates once (one image) per monochrome print. - Page 172 Changing Cartridges Holding the grip, pull out the drum cartridge. Drum cartridge Note • Do not touch the drum Drum cartridge’s drum protective protective shutter. Also, never touch the shutter internal PC drum; to do so will reduce print quality. •...
- Page 173 Changing Cartridges Left side Right side Holding the grips, pull out the grip grip image transfer belt unit. Image transfer belt unit 5. Take the new image transfer belt unit out of its carton. Note Left side • When installing the image grip transfer belt unit, be sure to hold onto the grips.
- Page 174 Changing Cartridges The belt fixing brackets come locked like a key into both sides of the image transfer belt unit. Lock Unlock -1 Turn the belt fixing bracket on the left side of the image transfer belt unit to the position shown Belt fixing brackets to unlock the bracket.
- Page 175 Changing Cartridges Check that the connector from the image transfer belt unit is securely connected to the printer’s connector. Make sure that the shutter of the image transfer belt unit is closed. Image transfer belt unit Shutter OK (Close) NG (Open) 7-36...
- Page 176 Changing Cartridges 10. Slide the waste bottle into the Waste bottle slot located behind the image Slot transfer belt unit on the left side of the printer. (The shape Green label of the image transfer belt Waste bottle guide unit is drawn in the diagram with dash marks.) Image transfer belt unit...
- Page 177 Changing Cartridges 12. Make sure that the hook of the Image transfer Hook belt unit waste bottle is engaged securely by the pins of the image transfer belt unit. Waste bottle 13. HOLD THE GREEN Green handle HANDLE of the drum cartridge when installing it into the printer.
- Page 178 Changing Cartridges 15. APPLY PRESSURE ONLY TO THE GREEN SQUARES on the top face of the drum cartridge until it clicks into place. Drum unit Note Drum • DO NOT PRESS ON the protective drum protective shutter shutter during installation. Doing so may damage the drum cartridge.
-
Page 179: Cleaning The Printer
Cleaning the Printer Cleaning the Printer Dust, dirt, and paper debris on the outer surfaces and inside the printer can interfere with printer performance. Clean the printer regularly. Note • Before cleaning, be sure to turn OFF the power switch and unplug the power cord from the outlet. -
Page 180: Cleaning The Inside
Cleaning the Printer Cleaning the Inside Grasp and pull down the front cover lock release lever to Front cover lock release swing open the front cover. lever Front cover Note • Whenever the printer is open, drape the front cover with a cloth so that the drum cartridge is not exposed to light. - Page 181 Cleaning the Printer Using a soft cloth, wipe dirt and paper debris off the roller as shown. Roller Note Image transfer roller • Do not touch the surface of the image transfer roller as it may cause reduced print quality. Roller Return the misfeed clearing lever to the “down”...
- Page 182 Cleaning the Printer Before closing the front cover, secure the drum unit into place by applying pressure at its top where the “ ” label is affixed. The Press drum unit will lock into place when it has been correctly inserted into the printer.
-
Page 183: Chapter 8: Troubleshooting
Chapter Troubleshooting... -
Page 184: How To Troubleshoot
How to Troubleshoot How to Troubleshoot Use this section as a reference for solving routine problems before calling your technical representative. Many of these troubleshooting tips provide quick and easy remedies to some common situations. If the problems persist however, please contact your dealer. Diagnosing Your Printer Different steps of action should be taken for different trouble symptoms. - Page 185 How to Troubleshoot Improving Print Quality Typical symptoms include: • Poor print quality. • Print results are not consistent with settings. • The printer requires excessive time in order to complete the print cycle. See page 8-18.
-
Page 186: Problems During The Data Transfer And Print Cycle
Problems During the Data Transfer and Print Cycle Problems During the Data Transfer and Print Cycle Troubleshooting the Data Transfer Cycle Symptom Cause Action The printer power is The power cord is Plug the power cord not turned ON. unplugged or loose. into the printer and outlet. -
Page 187: Troubleshooting The Print Cycle
Problems During the Data Transfer and Print Cycle Troubleshooting the Print Cycle Symptom Cause Action The Data indicator The interface cable is Connect it securely. does not light up and unplugged. “Set-up Guide” the printer does not The interface cable Check the model code start a print cycle. - Page 188 Problems During the Data Transfer and Print Cycle Symptom Cause Action A paper misfeed. Possible causes Once you have identi- include: fied the cause of the • Paper does not meet problem, use the cor- specifications responding reference required. pages listed below and •...
-
Page 189: Messages
Problems During the Data Transfer and Print Cycle Messages LCD Message Description Action WARMING UP The printer is warm- Wait a few moments ing up. for the printer to warm OFFLINE Printer cannot receive Press the Enter key to data from host compu- take the printer on ter. - Page 190 Problems During the Data Transfer and Print Cycle LCD Message Description Action DRUM ALMOST The drum cartridge is The drum cartridge, USED almost ready to be waste bottle, and oil- replaced. ing roller are on the same replacement cycle. Prepare to replace them at the same time.
- Page 191 Problems During the Data Transfer and Print Cycle LCD Message Description Action PAPER JAM 1 A paper jam occurred Remove the misfed INPUT near the paper in-take sheet of paper. section. For details, p. 8-9 PAPER JAM 2 A paper jam occurred DRUM between the paper in- take and the fusing...
-
Page 192: Clearing A Paper Misfeed
Problems During the Data Transfer and Print Cycle Clearing a Paper Misfeed When a paper misfeed occurs in the printer, remove the paper according to the following procedure. ATTENTION • The fusing unit inside the rear cover can become very hot during operation. - Page 193 Problems During the Data Transfer and Print Cycle Fusing unit Push and hold the fusing unit lock release button lock release button and slide out the fusing unit. ATTENTION • The fusing unit is hot. Be CAUTION! Hot Parts Inside careful not to touch the area label surrounding the CAUTION!
- Page 194 Problems During the Data Transfer and Print Cycle Pull out the paper from the fusing unit. Lift the misfeed clearing guide of the fusing unit and pull out the paper. Misfeed clearing guide Push in the fusing unit until it locks back into position.
- Page 195 Problems During the Data Transfer and Print Cycle 10. Close the rear cover, locking it into place. 11. Make sure that the button of OK (LOCKED) NG (UNLOCKED) the lock release lever is pushed up as shown. Front cover 12. Grasp and pull down the front Front cover cover lock release lever and lock release...
- Page 196 Problems During the Data Transfer and Print Cycle 13. Lift the misfeed clearing lever. Misfeed clearing lever 14. Pull out the paper from the rear rollers. Note • Do not touch the surface of the image transfer roller. It may lead to reduced print quality.
- Page 197 Problems During the Data Transfer and Print Cycle 16. Lift the misfeed clearing guide. Misfeed clearing guide 17. Pull out the paper from the toward the top. rollers 18. Close the misfeed clearing guide. 8-14...
- Page 198 Problems During the Data Transfer and Print Cycle 19. After clearing the misfeed, secure the drum unit into place by applying pressure at its top where the “ Press ” label is affixed. The drum unit will lock into place when it has been correctly inserted into the printer.
- Page 199 Problems During the Data Transfer and Print Cycle 22. Pull out the paper misfed in Tray 1. 23. Slide out the second cassette. 24. Pull out the paper from the paper path toward you. 25. Replace the second cassette. 8-16...
- Page 200 Problems During the Data Transfer and Print Cycle 26. Slide out the third cassette (option). 27. Pull out the paper from the paper path toward you. 28. Replace the third cassette. 8-17...
-
Page 201: Improving Print Quality
Improving Print Quality Improving Print Quality Symptom Cause Action Image is too The print density set- Adjust the print density set- light ting on the host com- ting on the host computer to puter is not set the desired level. properly. - Page 202 Improving Print Quality Symptom Cause Action Image is too The print density set- Adjust the print density set- dark ting on the host com- ting on the host computer to puter is not set the desired level. properly. The toner cartridge Change the cartridges and/ may be defective.
- Page 203 Improving Print Quality Symptom Cause Action Partial void The paper being used For information regarding image does not meet size paper specifications. specifications. p. 2-17 The paper loaded in Replace the old paper with the tray is damp. fresh dry paper. p.
- Page 204 Improving Print Quality Symptom Cause Action White lines The toner cartridge Change the cartridges and/ may be defective. or the transfer belt unit. • See Toner Cartridge The drum cartridge p. 7-1 may be defective. • See Drum Cartridge The image transfer p.
- Page 205 Improving Print Quality Symptom Cause Action Blurred back- The toner cartridge Change the cartridges. ground may be defective. • See Toner Cartridge p. 7-1 The drum cartridge • See Drum Cartridge may be defective. p. 7-14 Black pages The toner cartridge Change the cartridges.
- Page 206 Improving Print Quality Symptom Cause Action The print image The paper loaded in Replace the old paper with is not fixed and the tray is damp. fresh dry paper. p. 2-21 easily smears. The paper being used Compatible types of is not compatible with paper.
- Page 207 Improving Print Quality Symptom Cause Action The printer takes The printer was in Using the POWER SAVER too long to out- Power Saver mode item of the SYSTEM put prints. when the print com- SETUP menu, increase the mand was issued. time elapse that should occur before the printer enters the Power Saver...
-
Page 208: Chapter 9: Specifications
Chapter Specifications... -
Page 209: Specifications Of Printer
Specifications of Printer Specifications of Printer Type: Desktop full color laser beam printer Printing system: Electrostatic dry powdered imaging system Exposure system: Laser diode and polygon mirror scanning Print density: 600 dpi 600 dpi (Draft Mode) 1200 dpi 600 dpi (Normal Mode) 2400 dpi 600 dpi (High Grade Mode, needs minimum 80 MB RAM) -
Page 210: Paper Types
Specifications of Printer Non-standard size (Tray 1 only): Postcard, Com10 Envelope, DL Envelope, C5 Envelope, Monarch Envelope Paper types: Plain paper 60 to 90 g/m (16 to 24 lbs.), Recycled paper 60 to 90 g/m (16 to 24" lbs.), Thick paper 90 to 157 g/m (24-1/4 to 41-3/4 lbs.), Transparencies sheet, Labels, Letterhead, Envelopes, J-Post (postcard 100... - Page 211 Specifications of Printer Paper exit system: Face down exit system (Plain Paper 250 print maximum) System speed: 77 mm/ seconds Warm-up time: Within 150 seconds (when power is sup- plied at 23°C / 73.4° F) Developing system: Fine Micro Toning system PC drum: OPC (Organic Photoconductor) PC charging system: Rotation brush charging system...
- Page 212 Specifications of Printer Host Computer OS: Windows 95, Windows 98, Windows 3.1, Windows NT Workstation 4.0, Macintosh Features: Power saving mode for Energy Star application Supply replacement: • Drum cartridge : Monochrome prints : after 20,000 sheets (when the black-to-white ratio is 5% on multi prints) Full color prints : after 5,000 sheets (when the color-to-white ratio is 20% on multi prints) •...
- Page 213 Specifications of Printer Weight: Approximately 40 kg (88-1/4 lbs.) including the drum cartridge and toner cartridge Operating environment: Temperature: 10°C (50°F) to 35°C (86°F) with a fluctuation of 10°C (18°F) per hour. Humidity: 15% to 85% RH with a fluctuation of 20% per hour.
-
Page 214: Specifications Of 250-Sheet Third Cassette Unit
Specifications of 250-sheet Third Cassette Unit Specifications of 250-sheet Third Cassette Unit Paper feeding system: 1-way system Paper types: Plain paper, recycled paper 60 - 90 g/m (16 to 24 lbs.), transparency sheet Paper size: A4, letter 8-1/2" 11", legal 8-1/2" 14" *All paper sizes are lengthwise only Paper capacity: Plain and recycled paper/250 sheets,... -
Page 215: Appendix A: Glossary
Appendix Glossary... - Page 216 Glossary Glossary The following definitions apply specifically to Minolta Color PagePro Ex Printers. Bitmap font A font in which the character images are defined by bit maps. With bitmapped fonts, a separate set of definitions is required for each point size. For example, Times 10 point and Times 12 point are considered separate fonts.
- Page 217 Glossary Factory default The settings that are programmed into a printer at the factory. The printer uses these settings unless they are replaced by user settings selected from the control panel or through application software. Font A complete set of characters and symbols in one size, typeface, and style.
- Page 218 Glossary Interface The means by which information is transferred from one part of a system to another. Refers to the format and procedure for transmitting data as well as the hardware used to enable the transmission. Interface connector The part used to connect a kind of cable for data transfer from another system.
- Page 219 Glossary Parallel cable A data cable which transfers multiple bits of information simultaneously along each of its wires from the computer to the printer. Parallel interface This term is used to describe the connection between a computer and a peripheral device such as a printer. Through this type of connection, the synchronized transfer of multi-bit data is enabled via multiple wires over a limited distance.
- Page 220 Glossary Printer driver Software that controls the various functions of the printer from the host computer. The printer driver sends data from an application in a format that the printer can accept so that the document can be printed. Print job A document that an application has processed and sent either directly to the printer or to the print queue.
- Page 221 Glossary Spooling Sending a document to a print queue rather than directly to the printer. The computer stores the print queue on the hard disk and then sends the print jobs to the printer in order to be received. Spooling frees the application that you are using for other tasks. TrueType fonts Scalable outline fonts that use a single outline for both screen display and printing.
-
Page 222: Appendix B: Quick Reference
Appendix Quick Reference... -
Page 223: Printer Menus
Printer Menus Printer Menus CHECK AND PRINT PAGES SYSTEM PRINTER RESETS PS SETUP PRINT FROM LIST SETUP SETUP PRINT CON- CLEAR LOG/ PRINT TO PS PRINTER NAME DEFAULT PAPER FIGURATION QUEUES PRINT TEST PRINT START TRAY1 PAPER FORMAT DISK COVER PAGE PAGE PAGE SIZE... - Page 224 Printer Menus NETWORK NETWORK COLOR I/O PORT PANEL VISUALCAL PROTOCOL SERVICE ADJUSTMENT SETUP LANGUAGE *1*2 *1*2 SETUP SETUP TCP/IP- ENABLE RESOLUTION RESOLUTION ETHERNET SELECT ETHERNET SERVER ETHERNET ETH. IP PRINT LIMITS BRIGHTNESS ENABLE NDS SPEED ADDRESS ETH. SUBNET ENABLE BLACK START ADJUST COLOR TOKEN RING MASK...
-
Page 225: List Of Menu Utilities
List of MENU Utilities List of MENU Utilities MENU ITEM SETTING CHECK AND [Job name] [User name] Use the arrow keys to select PRINT unprinted job and press Enter to start printing. PRINT PRINT Press Enter to print. PAGES FROM CONFIGURATION LIST PRINT TEST PAGE... - Page 226 List of MENU Utilities MENU ITEM SETTING PLAIN PAPER / PRINTER TRAY1 MEDIA SETUP TRANSPARENCY / THICK PAPER TRAY2 MEDIA PLAIN PAPER / TRANSPARENCY PLAIN PAPER / TRAY3 MEDIA TRANSPARENCY CONTINUE / STOP TONER LOW REPLACE TONER NONE / BLACK / YELLOW / MAGENTA / CYAN NO / YES PS SETUP...
- Page 227 List of MENU Utilities MENU ITEM SETTING COLOR RESOLUTION 600 600 / 1200 600 / 2400 600 ADJUSTMENT BRIGHTNESS –5 (darkest) to 5 (lightest) (0) ADJUST COLOR RED / YELLOW / GREEN / CYAN / BLUE / MAGENTA / NONE / RESET ALL PRINT COLOR TEST YES / NO I/O PORT...
- Page 228 List of MENU Utilities MENU ITEM SETTING NETWORK GATEWAY ADDRESS XXX.XXX.XXX.XXX PROTOCOL Use the arrow keys to specify the *1*2 SETUP gateway address. NO / YES ENABLE APPLETALK APPLETALK ZONE Use the arrow keys to select Zone name NO / YES ENABLE NOVELL NO / YES ETHERNET 802.3...
-
Page 229: Appendix C: Index
Appendix Index... - Page 230 Color adjustment 3-11, 5- Additive (RGB) color 5- Color and text 5-12 Adobe Type 1 Post Script Color management 5-17 fonts 6-1 Color PagePro Ex print options for Windows 4- Black toner cartridge 2-6 Brightness 5-3 Color toner cartridges 2- 6, 7-1...
- Page 231 Index Envelopes 2-20, 2-42 Level indicator 2-23, 2- 28, 2-38 Feeding system 9-1 Loading paper 2-21 Front cover 2-1 Front cover lock release Magenta (Red) toner car- lever 2-1 tridge 2-6 Fusing unit 2-8, 7-21, 7- Media type 4-17 Media type for Tray 1 2- Grips 2-1 Media type for Tray 2/ Tray 3 2-40...
- Page 232 Index Print density 9-1 PANTONE color match- Print device gamut 5-5 ing system 5-21 Print options for Macin- Paper 2-17 tosh 4-24 Paper capacity 9-2 Print options for Win- Paper misfeed 8-9 dows 4-13 Paper size for Tray 1 2- Print pages from list 3-4 24, 2-34 Printable area 2-19...
- Page 233 Index Specifications 9-1 Spectral light 5-2 Turning the printer ON Subtractive (CMY and and OFF 2-15 CMYK) color 5-4 Supplies and units 2-5 Up & down keys 2-11 System setup 3-5 Vector images 5-13 Temperature 1-1 VisualCal 3-8, 5-9 Thick paper 2-42 Voltage 8-3 Toner cartridge 1-4, 2-6, Waste bottle 2-6, 7-14...
-
Page 234: General Information
General Information... -
Page 235: End User License Agreement
(whether reg- istered or unregistered), or any other rights, franchises or licenses in respect of the Software. Title to the Software and any copy made from it is retained by Minolta or such other owners. 3. LICENSE... - Page 236 You may terminate your license at any time by destroying the Software and all your copies of it or as otherwise described in these terms. Minolta may terminate your license if you fail to comply with these terms. Upon such termination, you agree to destroy all your copies of the Software.
-
Page 237: Contrat Utilisateur De La Licence
2. Le contrat de licence Ceci est un contrat de licence et non un contrat de vente. Minolta possède ou a obtenu une licence d’autres propriétaires, des droits de reproduction dans le domaine des logiciels. A l’exception de ce qui est indiqué... - Page 238 7. Résiliation du contrat. Vous pouvez mettre un terme à votre licence à tout moment en détruisant le logiciel et toutes ses copies comme prévue dans le contrat, Minolta peut mettre fin à votre licence en cas de non respect du contrat.
-
Page 239: Endverbraucher-Lizenzvertrag
Fontprodukten befinden, oder MINOLTA besitzt die Lizenzen an den entsprechenden Urhe- berrechten anderer Inhaber. Der Lizenznehmer erwirbt keine Rechte an der Software. MINOLTA oder die genannten anderen Inhaber bleiben Inhaber der Rechte an der in der Packung enthaltenen Kopie der Software und jedweder von ihr angefertigten Kopie. Die Verantwortung für die Wahl zur Erzielung der gewünschten Ergebnisse, Installation, Benut-... - Page 240 Der Lizenznehmer kann den Lizenzvertrag jederzeit beenden, indem er sämtliche Kopien der Software vernichtet oder entsprechend anderweitiger Bestimmungen dieses Vertrages handelt. MINOLTA kann den Lizenzvertrag mit dem Lizenznehmer beenden, wenn dieser diese Bedingungen nicht einhält. In diesem Fall erklärt sich der Lizenznehmer damit einver- standen, alle Kopien der Software zu vernichten.Jedweder Versuch, eine Kopie der Software...
-
Page 241: Contratto Di Licenza D'uso
2. CONTRATTO DI LICENZA Il presente è un contratto di licenza e non un contratto di vendita. MINOLTA possiede, ovvero ha avuto la licenza da parte degli altri proprietari, i diritti di autore per il Software. - Page 242 5. GARANZIA LIMITATA MINOLTA garantisce che i mezzi su cui il Software è registrato sono privi di difetti nei materiali e nella fabbricazione secondo un normale uso. I dettagli della garanzia e le limitazioni per il Software sono descritti nella Dichiarazione di Garanzia Limitata che viene fornita insieme all’hardware.
-
Page 243: Addresses Minolta-Partners In Europe
05-41 558 511, Fax 05-41 212 681 Denmark • Minolta Danmark a/s, Valhøjs Allé 160, 2610 Rødovre 36 37 04 50 eller 36 37 04 52, e-mail: printer@minolta.dk Finland • Renatus Oy, P.O. Box 93, 02201 Espoo 09-42061, Fax 09-4206 200 France •... - Page 244 Poland • Minolta Polska sp.zo.o., Ul. Nowolipie 7A, 00-146 Warszawa 02-311-488, Fax 02-635-37-56 Portugal • Minolta Portugal Lda., Av. do Brasil 33a, 1700 Lisboa 01-79300-16, Fax 01- 7969547 Romania • Minolta Romania SRL, Soseaua Oltenitei 35-37, etaj 8, Sector 4, 712 12 Bucuresti 0330-68-35, Fax 0330-70-02 Slovakia •...
-
Page 245: Minolta Guarantee Certificate
3.1. UNIT During the Unit Guarantee Period MINOLTA will either repair or replace faulty Units falling within Clause 2.1. MINOLTA will inform the purchaser as to the choice of rem- edy within a reasonable time of inspecting the faulty Unit... - Page 246 Clause 2.2 within a reasonable time of inspecting the faulty Software 3.3 FAILURE Should MINOLTA fail to repair or replace the faulty Unit or faulty Software within the time limit specified in Clauses 3.1 and 3.2 the purchaser shall be entitled to claim a...
- Page 247 From our internet website (http://www.service.minolta.de) you can get the latest printer driver updates and answers to various questions. Minolta’s hotline (see pages 9 and 10 in chapter General Information) supports you with the solution to many prob- lems. Your technical representative will help you as well.
Need help?
Do you have a question about the Color PAGEPRO EX and is the answer not in the manual?
Questions and answers