Oce TDS100 User Manual
Océ copier
Hide thumbs
Also See for TDS100:
- Quick reference manual (18 pages) ,
- User manual (69 pages) ,
- Quick reference manual (18 pages)
Table of Contents
Advertisement
Advertisement
Table of Contents

Related Manuals for Oce TDS100


Summary of Contents for Oce TDS100
- Page 1 Océ TDS100 User manual...
- Page 2 Océ-Technologies B.V. Trademarks Products in this manual are referred to by their trade names. In most, if not all cases, these designations are claimed as trademarks or registered trademarks of their respective companies. Copyright © 2005, Océ-Technologies B.V. Venlo, The Netherlands All rights reserved.
-
Page 3: Notes For The Reader
Notes for the reader Introduction This manual helps you to use the Océ TDS100. The manual contains a description of the Océ TDS100 and guidelines to use and operate the Océ TDS100. There are also tips to increase your knowledge of the Océ TDS100 and to help you manage the workflow even better. - Page 4 User manual...
-
Page 5: Table Of Contents
The operator panel of the sheet feed, single copy configuration 19 Chapter 2 Use the Océ TDS100 Turn on and off the Océ TDS100 22 Turn on and off the optional dew preventer 24 Copy on a media roll (automatic roll feed) 25... - Page 6 Appendix B Miscellaneous 59 Reader's comment sheet 60 Addresses of local Océ organisations 62 User manual...
-
Page 7: Introduction To The Océ Tds100
Océ TDS100 User manual Chapter 1 Introduction to the Océ TDS100... -
Page 8: The Documentation Set
A short description on how to operate the Quick Paper book Océ TDS100. reference guide A complete description on how to operate User CD-ROM and maintain the Océ TDS100. manual Visit Océ on the internet at www.oce.com for more information. Note: User manual... -
Page 9: The Configurations
The configurations Introduction The Océ TDS100 is a wide format copier to copy large drawings. The Océ TDS100 is available in four different configurations. The following table displays these configurations with their functions and options. Functions and options per configuration [1] The Océ... -
Page 10: The Components
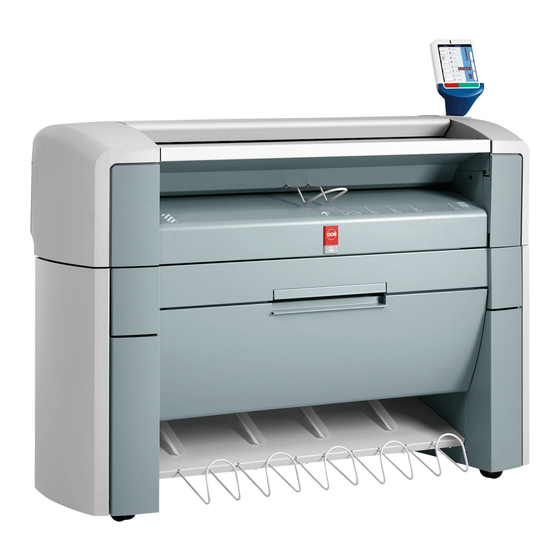
The components Introduction The following illustration displays the most complete configuration of the Océ TDS100, the automatic 2 roll feed configuration. Some options may not be available on your TDS100 due to the differences between the configurations. Illustration [1] The automatic 2 roll feed configuration of the Océ TDS100 [1] The automatic 2 roll feed configuration of the Océ... - Page 11 Middle cover Give access to the underside of the manual feed table. Some items may not be available on your Océ TDS100 due to the Note: differences between the configurations. Introduction to the Océ TDS100...
-
Page 12: The Operator Panel Of The Automatic 1 Roll And 2 Roll Feed Configuration
The operator panel of the automatic 1 roll and 2 roll feed configuration Introduction You can identify your configuration by its operator panel. The following illustration displays the operator panel of the 1 roll and 2 roll configuration. Illustration [2] The operator panel of the automatic 1 roll feed and 2 roll feed configuration 1 2 3 4 toner media jam... - Page 13 The indicators Indicator Function 'Toner' Indicate that the Océ TDS100 has run out of toner. Green light Indicate that the copier is ready. A blinking green light indicates that the copier runs a copy job. Red light Indicate that an error has occurred.
- Page 14 Function Exposure Adjust the exposure. Use the exposure setting to correct the background of the copy. You can adjust the exposure from -4 up to +4. A negative value darkens the copy, a positive value lightens the copy. 'Strip' Select the edge for the strip. Select one of the following.
- Page 15 1. When you press the stop key twice while you set up a copy job, the default values return. Start Start the copy job. Introduction to the Océ TDS100...
-
Page 16: The Operator Panel Of The Sheet Feed, Multi Copy Configuration
The operator panel of the sheet feed, multi copy configuration Introduction You can identify your configuration by its operator panel. The following illustration displays the operator panel of the multi copy configuration. Illustration [3] The operator panel of the sheet feed, multi copy configuration 1 2 3 4 toner media jam... - Page 17 The indicators Indicator Function 'Toner' Indicate that the Océ TDS100 has run out of toner. Green light Indicate that the copier is ready. A blinking green light indicates that the copier runs a copy job. Red light Indicate that an error has occurred.
- Page 18 Function 'Strip' Select a trailing strip. Select one of the following. 'Trailing' Use the adjustment key to set the trailing strip length from -100 up to +40 mm / -2.75” up to +1.75”. A positive value adds a strip, a negative value removes a strip.
-
Page 19: The Operator Panel Of The Sheet Feed, Single Copy Configuration
Illustration [4] The operator panel of the sheet feed, single copy configuration 1 2 3 4 toner media jam paper media film [4] The operator panel of the sheet feed, single copy configuration Introduction to the Océ TDS100... - Page 20 The indicators Indicator Function 'Toner' Indicate that the Océ TDS100 has run out of toner. Green light Indicate that the copier is ready. A blinking green light indicates that the copier runs a copy job. Red light Indicate that an error has occurred.
-
Page 21: Use The Océ Tds100
Océ TDS100 User manual Chapter 2 Use the Océ TDS100... -
Page 22: Turn On And Off The Océ Tds100
[5] The On / off switch at the back of the Océ TDS100 How to turn on the Océ TDS100 Set the On / off switch at the back of the Océ TDS100 to position 1. Result The green light at the operator panel illuminates and indicates that the Océ... - Page 23 How to turn off the Océ TDS100 Set the On / off switch at the back of the Océ TDS100 to position 0. Result The green light of the On / off switch is off and the green light at the operator panel is off.
-
Page 24: Turn On And Off The Optional Dew Preventer
Turn on and off the optional dew preventer Introduction You are advised to use the optional dew preventer in an extreme humid environment to improve the copy quality in this condition. Illustration [6] The On / off switch of the dew preventer [6] The On / off switch of the dew preventer How to turn on the dew preventer Set the On / off switch at the back of the dew preventer to position 1. -
Page 25: Copy On A Media Roll (Automatic Roll Feed)
Set up your copy job at the operator panel Press the green start button. Before you begin Turn on the Océ TDS100. (see ‘Turn on and off the Océ TDS100’ on page 22). Feed strongly curled originals carefully, because the Océ Attention: TDS100 pulls in the original. - Page 26 Use the 'Cut' key to select the cut method. Use the copies key to set the number of copies. Press the green start button to start the copy job. Result The Océ TDS100 runs the copy job with automatic media feed. User manual...
-
Page 27: Copy On Cut Sheet Media (Manual Sheet Feed)
Set up your copy job at the operator panel Press the green start button. Before you begin Turn on the Océ TDS100. (see ‘Turn on and off the Océ TDS100’ on page 22). Feed strongly curled originals carefully, because the Océ Attention: TDS100 pulls in the original. - Page 28 Use the copies key to set the number of copies Press the green start button to start the copy job. Not available on the single copy configuration. Note: Result The Océ TDS100 runs the copy job with manual media feed. User manual...
-
Page 29: Adjust Leading And Trailing Strips
Adjust leading and trailing strips Introduction Both originals and copies can contain a strip to file it. The Océ TDS100 allows you to handle strips as follows. Remove a strip Add a strip. You can adjust the following strips. Leading strip. - Page 30 How to add or remove a leading strip Place the original centrally and face down on the original feed table. The Océ TDS100 moves the original to the back. [10] Feed the original with leading strip centrally and face down...
- Page 31 Result The Océ TDS100 adds or removes a leading or a trailing strip. Use the Océ TDS100...
-
Page 32: Improve The Copy Quality Of Dark And Light Originals
Improve the copy quality of dark and light originals Introduction You can use the exposure setting to improve the copy quality of a dark or light original. How to correct a dark original Use the exposure key to select a value between 0 and +4 to lighten the copy. How to correct a light original Use the exposure key to select a value between 0 and -4 to darken the copy. -
Page 33: Check The Copy Quality With A Test Strip
Press the 'Cut' key to select 'Standard' Press the upper side of the adjustment key The text 'TEST' appears on the display. Press the green start button to copy a strip. Result The Océ TDS100 copies only a strip of the original. Use the Océ TDS100... -
Page 34: Straighten The Edge Of A Media Roll
Straighten the edge of a media roll Introduction You can use the 'Cut' function to make the edge of a roll straight. Before you begin Remove the original from the original feed table. How to cut the edge of a roll Use the 'Feed' key to select a roll Use the 'Cut' key to select 'Standard' Press the upper side of the adjustment key. -
Page 35: Maintain The Océ Tds100
Océ TDS100 User manual Chapter 3 Maintain the Océ TDS100... -
Page 36: Understand Message Codes
Understand message codes Introduction The Océ TDS100 displays a message code when the copier is not ready to use. The following table shows a summary of the messages codes, the possible cause and the action to take. What the message code describes... - Page 37 (see ‘Clear an original jam’ on page 41) Clear the media jam (see ‘Clear a media jam’ on page 43) The media roll is empty Replace the media roll (see ‘Replace a media roll’ on page 46) Maintain the Océ TDS100...
-
Page 38: Add Toner
Add toner Introduction The Océ TDS100 illuminates the toner low indicator when the toner level is low. When the toner low indicator illuminates, you need to do the following. Add toner Replace the waste toner bag. If you ignore the toner low indicator, the copy quality will decrease. - Page 39 Put the toner bottle in the bottle holder. Turn the bottle clockwise to fasten the bottle [14] Fasten the bottle [14] Fasten the bottle Turn the bottle in the vertical position [15] Turn the bottle [15] Turn the bottle Maintain the Océ TDS100...
- Page 40 Close the left cover and tighten the nut at the left back side. Result The toner level of the Océ TDS100 is high, the toner low indicator is off and the wasted toner bag is removed. The Océ TDS100 is ready to copy.
-
Page 41: Clear An Original Jam
How to remove a normal original Pull the original carefully with two hands toward you Check on a media jam also and clear the media jam if necessary. (see ‘Clear a media jam’ on page 43) Maintain the Océ TDS100... - Page 42 Result The original jam is cleared and the media indicator is off. The Océ TDS100 is ready to copy. User manual...
-
Page 43: Clear A Media Jam
The manual cut sheet feed is jammed The red button was used during a copy job. How to remove the media from the manual feeder Open the middle cover [18] Open the middle cover [18] Open the middle cover Maintain the Océ TDS100... - Page 44 The fuser section can be hot. Caution: The jammed media can contain loose toner. Attention: Turn off the Océ TDS100 Loosen the nut at the left back side. Open the left cover. [20] Open the left cover [20] Open the left cover...
- Page 45 Check on an original jam also and clear the original jam if necessary (see ‘Clear an original jam’ on page 41) Turn on the Océ TDS100. Result The media jam is cleared and the media indicator is off. The Océ TDS100 is ready to copy. Maintain the Océ TDS100...
-
Page 46: Replace A Media Roll
Replace a media roll Introduction The media jam indicator blinks and the message code 'E 5' displays to indicate that a media roll is empty. When you replace a media roll, you need to check or set the following before you close the roll section. The media type The roll number The media size. - Page 47 [24] Remove the roll holder Press the knob of the roll holder to remove the old media roll from the roll holder [25] Press the knob of the roll holder [25] Press the knob of the roll holder Maintain the Océ TDS100...
- Page 48 Press the knob of the roll holder and slide the roll holder into the new roll. Press the knob of the roll holder to align the new roll with the correct media size on the roll holder. Place the roll holder with the new media roll in the drawer. Make sure you put the loose end of the media roll in the correct position.
- Page 49 Remove the roll holder Press the knob of the roll holder to remove the old media roll from the roll holder [29] Press the knob of the roll holder [29] Press the knob of the roll holder Maintain the Océ TDS100...
- Page 50 Press the knob of the roll holder and slide the roll holder into the new roll. Press the knob of the roll holder to align the new roll with the correct media size on the roll holder. Place the roll holder with the new media roll in the drawer. Make sure you put the loose end of the media roll in the correct position.
-
Page 51: Clean The Transparent Plate
Make sure you do not damage the sensor at the centre of the Attention: transparent plate. How to clean the transparent plate Turn off the Océ TDS100 Pull the top cover towards you and lift the top cover to open it. [32] Open the top cover [32] Open the top cover... - Page 52 Dry the transparent plate with another lint-free cloth Clean the white plate Lower and push the top cover backwards until you hear or feel a click Turn on the Océ TDS100. Result The transparent plate is clean and the copy shows no spots.
-
Page 53: Overview And Tables
Océ TDS100 User manual Appendix C Overview and tables... -
Page 54: Default Values
The default values of the settings are active in the following situations. Turn on the Océ TDS100 Use the Océ TDS100 after sleep mode Press the red stop key twice. The default values of the settings of the sheet feed, single copy configuration... -
Page 55: Product Specifications
Product specifications Product specifications [2] The product specifications of the Océ TDS100 Feature Specification Copy process Dry indirect electrostatic Organic photo conductor Closed binary toner system Instant heating system Warm-up time None Copy speed 3 metres per minute Maximum media width 914 mm (36”) -
Page 56: Supported Original Types And Sizes
Supported original types and sizes Overview of supported original types and sizes [3] The supported original types and sizes of the Océ TDS100 Parameter Minimum value Recommended maximum value Width 210 mm (8.5”) 1000 mm (40”) Length 279 mm (10”) 3000 mm (10”) -
Page 57: Supported Media Types And Sizes
Océ systems and materials are matched for optimal quality and performance. You are therefore recommended to use only approved Océ materials in the Océ TDS100. A full list of Océ materials is suitable for use in the Océ TDS100. The list includes plain paper, transparent paper, coloured papers and different polyester films is available from your Océ... - Page 58 Overview of supported media The copy quality on the supported media can be less than on the recommended media. [6] The supported media types of the Océ TDS100. Media Supported type Remark Plain paper 100/110 g/m Transparent paper 60 g/m...
-
Page 59: Miscellaneous
Océ TDS100 User manual Appendix D Miscellaneous... -
Page 60: Reader's Comment Sheet
Reader's comment sheet Questions Have you found this manual to be accurate? O Yes O No Were you able to operate the product, after reading this manual? O Yes O No Does this manual provide sufficient background information? O Yes O No Is the format of this manual convenient in size, readability and arrangement (page layout, chapter order, etc.)? - Page 61 Comments: --------------------------------------------------------------------------------------------- --------------------------------------------------------------------------------------------- --------------------------------------------------------------------------------------------- --------------------------------------------------------------------------------------------- --------------------------------------------------------------------------------------------- --------------------------------------------------------------------------------------- Date: This reader's comment sheet is completed by: (If you prefer to remain unknown, please do fill in your occupation) Name: Occupation: Company: Phone: Address: City: Country: Please return this sheet to: Océ-Technologies B.V. For the attention of ITC User Documentation.
-
Page 62: Addresses Of Local Océ Organisations
Addresses of local Océ organisations Océ-Australia Ltd. Océ-Osterreich GmbH P.O. Box 363 Postfach 95 Ferntree Gully MDC 1233 Vienna Vic 3165 Austria Australia http://www.oce.at/ http://www.oce.com.au/ Océ-Belgium N.V./S.A. Océ-Brasil Comércio e Indústria Ltda. J. Bordetlaan 32 Av. das Nações Unidas, 11.857 1140 Brussel Brooklin Novo Belgium... - Page 63 Océ-Deutschland GmbH Océ-Hong Kong and China head Solinger Straße 5-7 office 45481 Mülheim/Ruhr 12/F 1202 The Lee Gardens Germany 33 Hysan Avenue http://www.oce.de/ Causeway Bay Hong Kong http://www.oce.com.hk/ Océ-Hungaria Kft. Océ-Ireland Ltd. 1241 Budapest 3006 Lake Drive Pf.: 237 Citywest Business Campus Hungary Saggart http://www.oce.hu/...
- Page 64 Océ-Poland Ltd. Sp.z o.o. Océ-Lima Mayer, S.A. ul. Bitwy Warszawskiej 1920 r. nr. Av. José Gomes Ferreira, 11 Piso 2 - Miraflores 02-366 Warszawa 1497-139 Algés Poland Portugal http://www.oce.com.pl Océ Singapore Pte Ltd. Océ Printing Systems (PTY) Ltd. 190 MacPherson Road P.O.Box 629 #03-00 Wisma Gulab Rivonia 2128...
- Page 65 The addresses of local Océ organisations for information about the Wide Note: Format Printing Systems and the Production Printing Systems can be different from the addresses above. Refer to the web site http://www.oce.com for the addresses you need. Miscellaneous...
- Page 66 User manual...
- Page 67 cut (method, 1 & 2 roll configuration) 12 cut length (1 & 2 roll configuration) 12 Index dark original 32 default settings 54 default values 54 add toner 38 display (1 & 2 roll configuration) 12 adjustment key (1 & 2 roll configuration) 12 display (multi copy configuration) 16 adjustment key (multi copy configuration) 16 display (single copy configuration) 19...
- Page 68 number of copies (1 & 2 roll configuration) 12 media jam 43 number of copies (multi copy configuration) 16 original jam 41 on / off switch 10 leading strip 29 operator panel 10 left cover 10 operator panel 1 & 2 roll configuration 12 light original 32 adjustment key 12 cut (method) 12...
- Page 69 red light 19 start 19 stop 19 test strip 33 toner indicator 19 toner 38 options overview 9 toner indicator (1 & 2 roll configuration) 12 original feed table 10 toner indicator (multi copy configuration) 16 original jam 41 toner indicator (single copy configuration) 19 original sizes 56 top cover 10 original types 56...
- Page 70 User manual...
Need help?
Do you have a question about the TDS100 and is the answer not in the manual?
Questions and answers