NetComm FIBRE NF1ADV User Manual
Fibre series wifi data and voip gateway
Hide thumbs
Also See for FIBRE NF1ADV:
- Quick start manual (17 pages) ,
- Setup manual (22 pages) ,
- Setup manual (7 pages)
Table of Contents
Advertisement
Quick Links
Download this manual
See also:
Setup Manual
Advertisement
Table of Contents

Related Manuals for NetComm FIBRE NF1ADV


Summary of Contents for NetComm FIBRE NF1ADV
-
Page 1: User Guide
NETCOMM FIBRE SERIES WiFi Data and VoIP Gateway NF1ADV USER GUIDE... - Page 2 Copyright©2012 NetComm Wireless Limited. All rights reserved. The information contained herein is proprietary to NetComm Limited. No part of this document may be translated, transcribed, reproduced, in any form, or by any means without prior written consent of NetComm Wireless Limited.
-
Page 3: Table Of Contents
NF1ADV Default Settings ....................................9 Safety and Product Care ................................10 Transport and Handling ....................................10 Installation and Configuration of the NF1ADV ..........................11 Placement of your NF1ADV..................................11 Connecting via an Ethernet cable ................................. 12 Connecting wirelessly ....................................12 Basic ...................................... - Page 4 DHCP ......................................... 64 Additional Product Information ..............................65 Establishing a wireless connection................................65 Troubleshooting ......................................66 Using the NF1ADV to make and receive telephone calls ..........................68 Call feature codes ......................................69 Technical Data ..................................... 71 Electrical Specifications ....................................71 Environmental Specifications / Tolerances ..............................
-
Page 5: Overview
The individual reading this manual is presumed to have a basic understanding of telecommunications terminology and concepts. Prerequisites Before continuing with the installation of your NF1ADV, please confirm that you comply with the minimum system requirements below. Computer with Windows, Macintosh, or Linux-based operating systems with a working Ethernet adapter with TCP/IP ... -
Page 6: Product Introduction
6 times faster than standard 802.11g based routers while still being compatible with 802.11g & 802.11b devices. The NF1ADV is not only a Wireless Access Point, and using a Gigabit speed WAN port and doubling as a 4-port full-duplex Ethernet Switch, connects your wired-Ethernet devices together at incredible speeds. -
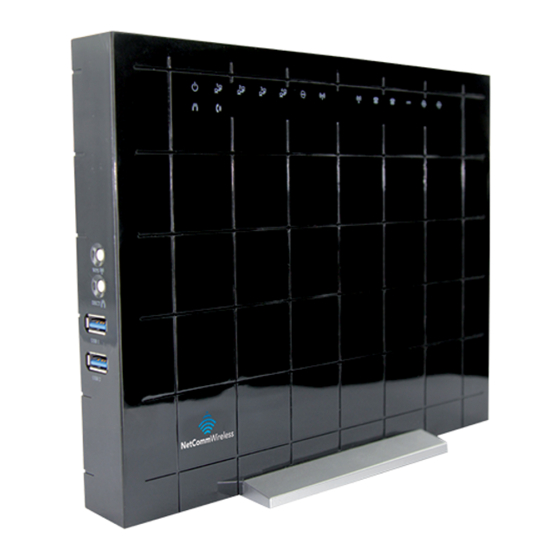
Page 7: Physical Dimensions And Indicators
LED Indicators The NF1ADV has been designed to be placed on a desktop. All of the cables exit from the rear for better organization. The display is visible on the front of the NF1ADV to provide you with information about network activity and the device status. See below for an explanation of each of the indicator lights. -
Page 8: Integrated Interfaces
Hold this button down for over 10 seconds to reset the router to factory default settings. Power The power connector designed for use with a DC 12V 2A Power Adapter. On/Off The switch that can be used to power up or down the NF1ADV. Table 3: Rear Panel Interface Connectors NF1ADV User Guide YML27... -
Page 9: Nf1Adv Default Settings
(Refer to the included wireless security card) Table 6 – WiFi Default Settings For security purposes, each NF1ADV comes with a unique SSID that varies by a 4 digit number at the end. e.g. SSID: “NetComm Wireless XXXX” NF1ADV WEB INTERFACE ACCESS... -
Page 10: Safety And Product Care
Disconnect the power line from the device before servicing. Transport and Handling When transporting the NF1ADV, it is recommended to return the product in the original packaging. This ensures the product will not be damaged. In the event the product needs to be returned, ensure it is securely packaged with appropriate padding to prevent damage during courier transport. -
Page 11: Installation And Configuration Of The Nf1Adv
If you experience difficulties connecting wirelessly between your WiFi Devices and your NF1ADV, please try the following steps: In multi-storey homes, place the NF1ADV on a floor that is as close to the centre of the home as possible. This may ... -
Page 12: Connecting Via An Ethernet Cable
Hardware installation Insert an Ethernet LAN cable from the WAN port of the NF1ADV to a LAN port on your modem/switch/hub. For VoIP functionality, connect a standard analogue telephone to one or both of the FXS ports labelled Phone 1 or Phone 2 using the RJ-11 Cable provided. -
Page 13: Basic
Basic Home The status page provides system related information and is displayed when you login to the NF1ADV console. By default, the status page will show Device Information including hardware types and on-board software, WAN Connection status, and VoIP connection status. -
Page 14: Quick Setup Configuration Wizard
Quick Setup Configuration Wizard When you log in to NF1ADV for the first time, you will be presented with the Home page as shown in the screenshot below. Under the Basic menu is the Quick Setup wizard. You can use these steps to quickly configure the main functionality of the router and get an internet connection up and running. - Page 15 Figure 9: Quick Setup – Wireless To configure the NF1ADV to use wireless, customize the SSID (wireless network name) to a name of your choice. Setting a strong wireless security level (such as WPA-PSK - AES) can prevent unauthorized access to your wireless network. Please enter the Security Key that you wish to use, or leave this field unchanged to use the default Security Key.
- Page 16 NF1ADV If you wish to use the NF1ADV for VoIP calling enter your SIP settings. You can enter your own SIP settings by selecting custom as the SIP provider or select from a number of pre-configured SIP settings for those users with accounts with MyNetFone, Engin, iiNet or iPrimus.
- Page 17 If you wish to configure the NF1ADV as a Print Server select the “Enable on-board print server” option and enter the printer name and make and model into the appropriate fields. When you have completed these settings press the Next button.
-
Page 18: Wifi
SSID (Service Set Identifier) sets the wireless network name. All wireless devices attempting SSID to connect with the router must be configured with the correct SSID to access the WLAN. If [1-32 characters] the SSID does not match, the wireless device will not be granted network access. NF1ADV User Guide YML27 www.netcommlimited.com... -
Page 19: Security
Country enforces specific regulations limiting channel range. For Australia and New Zealand channels are limited to numbers 1-13. The maximum number of wireless clients that can be connected to the NF1ADV at any one Max Clients time. The Guest SSID (Virtual Access Point) can be enabled by selecting the Enable Wireless Wireless Guest Network Guest Network checkbox. - Page 20 Select Push-Button or PIN as the means for the Access Point (the router) to connect to a Setup AP wireless client. If selecting PIN mode make a note of the current PIN. Then press the “Config AP” button. Figure 17: Wireless - WPS Settings NF1ADV User Guide YML27 www.netcommlimited.com...
-
Page 21: Configuration - Advanced Wireless Settings
Displays which sideband the access point is using for the control channel, either Upper or Control Sideband Lower. Drop-down menu specifies the following fixed rates. The maximum rate for bandwidth, 20MHz, is 130Mbps and the maximum bandwidth, 40MHz, is 802.11n Rate 270Mbps. NF1ADV User Guide YML38 www.netcommlimited.com... - Page 22 WMM data packets. WMM Automatic Power Save Delivery, a feature of that allows the router to save power. This option is enabled by default. WMM APSD Table 8: Advanced - Wireless - Advanced Settings NF1ADV User Guide YML27 www.netcommlimited.com...
-
Page 23: Mac Filter
Table 9: Wireless - MAC Filter Settings Enter the MAC address on the screen below using the following format: xx:xx:xx:xx:xx:xx Figure 20: Wireless - Add MAC Filter Press the Apply/Save button to save the MAC address to the MAC filter list. NF1ADV User Guide YML38 www.netcommlimited.com... -
Page 24: Wireless Bridge
Authorized Lists those devices with authorized access. SSID The SSID(Service Set Identifier) of your wireless network. Interface The wireless interface being used to connect to the network. Table 11: Wireless - Station Info Settings NF1ADV User Guide YML27 www.netcommlimited.com... -
Page 25: Voice
Voice This section explains how to configure the VoIP settings of the NF1ADV. SIP Basic Setting The SIP Settings page is where you enter your VOIP service settings as supplied by your VOIP service provider (VSP). If you are unsure about a specific setting or have not been supplied information for a particular field, please contact your VOIP service provider to verify if this setting is needed or not. - Page 26 To check if the VoIP service is working check your phone handset for a dial tone or navigate to Basic > Home and check that the DECT and Phone registration status is displaying “Up” in the router web interface. NF1ADV User Guide YML27...
-
Page 27: Sip Advanced
SIP Transport Protocol The protocol used to transport SIP traffic. This is almost always UDP. Enable SIP Tag Matching Select this option to enable SIP Tag Matching. Table 14: VoIP - Advanced - Service Provider NF1ADV User Guide YML38 www.netcommlimited.com... -
Page 28: Sip Debug Settings
Continue to lower the value one setting at a time, using increments of two or three. Make test calls until the echo is moderated. NF1ADV User Guide YML27 www.netcommlimited.com... -
Page 29: Dect
DECT The NF1ADV DECT settings page displays status information and allows for DECT cordless phones to be registered to the router’s on-board DECT base station. The NF1ADV can function as a DECT (Digital Enhanced Cordless Telecommunications) base station for up to 4 cordless phones for both VoIP or PSTN calling. - Page 30 If prompted set the DECT phone to handset “X” where “X” is the number of DECT handsets + 1 that are already connected to the NF1ADV DECT base station. Press the DECT button on the router for 5 seconds or press the Start Registration button in the DECT page of the NF1ADV web interface.
-
Page 31: Management
If the reset button is continuously pushed for more than 5 seconds (and not more than 12 seconds), the boot loader will erase the configuration settings saved on flash memory. NF1ADV User Guide YML38... -
Page 32: Snmp
To do this, the administrator typically runs an SNMP management station program such as MIB browser on a local host to obtain information from the SNMP agent, in this case the NF1ADV (if SNMP is enabled). An SNMP ‘community’... -
Page 33: Tr-069 Client
WAN Interface used by TR-069 The connection used to send and receive data to the ACS server. Client SNTP This interface allows you to configure the time settings of the NF1ADV. Figure 33: Management – SNTP FIELD DESCRIPTION First NTP Time Server Select the required internet time server. -
Page 34: Access Control
Use the fields illustrated in the screen below to change or create your password. Passwords must be 16 characters or less with no spaces. Click the Apply/Save button after making any changes to continue. Figure 35: Management - Access Control - Passwords NF1ADV User Guide YML27 www.netcommlimited.com... - Page 35 Save/Reboot This option saves the current configuration settings and reboots the NF1ADV router. Figure 36: Management - Save/Reboot NOTE 1: It may be necessary to reconfigure your TCP/IP settings to adjust for the new configuration. For example, if you disable the Dynamic Host Configuration Protocol (DHCP) server you will need to apply Static IP settings.
-
Page 36: Advanced Settings
Figure 38: Advanced - Layer 2 Interface - ATM Interface Settings Ethernet WAN Interface This page allows you to configure the Ethernet WAN Interface settings. Figure 39: Advanced - Layer 2 Interface - Ethernet WAN Interface NF1ADV User Guide YML27 www.netcommlimited.com... -
Page 37: Wan Service
IPv4. The protocol is embedded in ICMPv6 instead of using a separate protocol. PPP Manual Connection This field advises whether the Point to Point Protocol is Manually configured. Table 18: Advanced - WAN Service Settings NF1ADV User Guide YML38 www.netcommlimited.com... - Page 38 Use this field to configure and initiate a PPP connection manually. Enable PPP Debug Mode Enable extended PPP logging for this connection. Enable IGMP Multicast Proxy Enable IPV6 IGMP Multicast support for the WAN service. NF1ADV User Guide YML27 www.netcommlimited.com...
-
Page 39: Lan
Configure the Second IP Use this option to configure a second IP address for a second LAN interface. Enter the IP address and Address and Subnet Mask for subnet mask of the secondary LAN connection. LAN interface NF1ADV User Guide YML38 www.netcommlimited.com... -
Page 40: Ipv6 Lan Auto Configuration
In addition, radvd periodically broadcasts RA packets to the attached link to update network hosts. The router advertisement messages contain the routing prefix used on the link, the link maximum transmission unit (MTU), and the address of the responsible default router. Table 19 Advanced - IPv6 Configuration Settings: NF1ADV User Guide YML27 www.netcommlimited.com... -
Page 41: Nat
Enter the ending internal port number (when custom server is selected). When a service is connected Internal Port End this field will be completed automatically. Table 20: Advanced - NAT - Add Virtual Server Settings NF1ADV User Guide YML38 www.netcommlimited.com... -
Page 42: Port Triggering
Enter the ending open port number (when you select Custom Application). When an application is Open Port End selected the port range values are automatically entered. Open Protocol Options include TCP, UDP or TCP/UDP. NF1ADV User Guide YML27 www.netcommlimited.com... -
Page 43: Dmz Host
DMZ Host The NF1ADV will forward IP packets from the Wide Area Network (WAN) that do not belong to any of the applications configured in the Virtual Servers table to the DMZ host computer. Enter the computer’s IP address and click Apply to activate the DMZ host. To deactivate the DMZ Host function clear the IP address field and press the Save/Apply button. -
Page 44: Security
Enter the destination IP address. Destination Port (port or Enter the destination port number or port range for the filter rule. port:port) Table 21: Advanced - Security - IP Filter - Add Outgoing IP Filter Settings NF1ADV User Guide YML27 www.netcommlimited.com... - Page 45 To add an incoming IP filtering rule, click the Add button. The following screen will display. Figure 54: Advanced - Security - IP Filter - Add Incoming IP Filter Please refer to the Outgoing IP Filter table for field descriptions. Click the Apply/Save button to save and activate the filter. NF1ADV User Guide YML38 www.netcommlimited.com...
-
Page 46: Parental Control
The days of the week for which the rules apply. Start Blocking Time The time of day when the restriction starts. End blocking time The time of day when the restriction ends. Table 22: Advanced - Parental Control - Add Time Restriction Settings NF1ADV User Guide YML27 www.netcommlimited.com... - Page 47 With the URL filter, you are able to add certain websites or URLs to a safe or blocked list. This will provide you added security to ensure any website you deem unsuitable will not be able to be seen by anyone who is accessing the Internet via the NF1ADV.
-
Page 48: Quality Of Service
The queue entry configured here will be used by the classifier to place ingress packets appropriately. NOTE: Precedence level 1 relates to higher priority while precedence level 3 relates to lower priority. NF1ADV User Guide YML27 www.netcommlimited.com... - Page 49 TOS (type of service) byte. A rule consists of a class name and at least one condition. All of the specified conditions in this classification rule must be satisfied for the rule to take effect. Click the Apply/Save button to save and activate the rule. NF1ADV User Guide YML38 www.netcommlimited.com...
-
Page 50: Routing
To add a static route rule click the Add button. The following screen will be displayed. Figure 66: Advanced - Routing - Add Static Route Enter the Destination Network Address, Subnet Mask, Gateway IP Address and/or WAN Interface. Then click Apply/Save to add the entry to the routing table. NF1ADV User Guide YML27 www.netcommlimited.com... -
Page 51: Policy Routing
To configure an individual interface, select the desired RIP version and operation, and enter a check in the Enabled checkbox for that interface. Click Apply/Save to save the configuration. Figure 69: Advanced - Routing - RIP NF1ADV User Guide YML38 www.netcommlimited.com... -
Page 52: Dns
Note: The Add/Remove buttons will be displayed only if the router has been assigned an IP address from the remote server. To add a dynamic DNS service, click the Add button and the following screen will display. Figure 72: Advanced - DNS - Add Dynamic DNS Account NF1ADV User Guide YML27 www.netcommlimited.com... -
Page 53: Dsl
256 separate routers were running in parallel. The tone range is from 0 to 31 for upstream traffic and from 32 to 255 for downstream traffic. Do not change these settings unless you are directed by your Internet Service Provider. NF1ADV User Guide YML38... -
Page 54: Upnp
The Host Name and Domain name are combined to form a unique label that is mapped to the router IP address. This can be used to access the user interface of the router with a local name rather than by using the router IP address. NF1ADV User Guide YML27... -
Page 55: Print Server
Storage Service This page allows you to enable or disable the USB ports of the NF1ADV so it can be used as a mass storage server. Please see Appendix C for more details on setting up your router to work with Storage Server functionality. -
Page 56: Multicast - Igmp Configuration
IGMP provides for more efficient allocation of resources when used with online gaming and video streaming. Figure 82: Advanced - IGMP Configuration NF1ADV User Guide YML27 www.netcommlimited.com... -
Page 57: Sip Alg
Network Address and Port Translation (NAPT). SIP ALG inspects and modifies SIP traffic to allow SIP traffic to pass through the firewall. Figure 83: Advanced - SIP ALG NF1ADV User Guide YML38 www.netcommlimited.com... -
Page 58: Status
Ping Primary Domain Name Server This may not have an effect on your internet connection. Therefore if this test fails but you are still able to connect to the internet there is no need to troubleshoot this issue. NF1ADV User Guide YML27 www.netcommlimited.com... -
Page 59: Wan
Status The status of the WAN connection. IPv4 Address The current IP v4 address of the WAN connection. PPP Manual Connection This field advises if the WAN connection is configured as a PPP Manual Connection. NF1ADV User Guide YML38 www.netcommlimited.com... -
Page 60: System Log
When either Remote mode or both mode are selected you will be prompted for the system log server IP address and UDP port. Table 24: Status - Configure System Log Settings NF1ADV User Guide YML27 www.netcommlimited.com... -
Page 61: Statistics
Figure 89: Status - WAN Service INTERFACE DESCRIPTION Bytes Rx/Tx (receive/transmit) packets in bytes. Pkts Rx/Tx (receive/transmit) packets. Received/Transmitted Errs Rx/Tx (receive/transmit) packets with errors. Drops Rx/Tx (receive/transmit) packets with drops. Table 26: Status - WAN Service Settings NF1ADV User Guide YML38 www.netcommlimited.com... - Page 62 The number of Any Source Multicast (ASM) cells transmitted over the interface. In Packets Errors The number of packets with errors detected over the xTM interface. In Cell Errors The number of cells with errors detected over the xTM interface. NF1ADV User Guide YML27 www.netcommlimited.com...
-
Page 63: Route
This option can be used to determine which IP address / MAC address is assigned to a particular host. This can be useful when setting up URL filtering, Time of Day filtering or Static DHCP addressing. Figure 93: Status –ARP NF1ADV User Guide YML38 www.netcommlimited.com... -
Page 64: Dhcp
Click DHCP to display the DHCP information. Figure 94: Status – DHCP You can use this to determine when a specific DHCP lease will expire, or to assist you with setting up Static DHCP addressing. NF1ADV User Guide YML27 www.netcommlimited.com... -
Page 65: Additional Product Information
You may then see a window prompting you to setup a "HomeGroup". Click "Cancel" on this. You can verify your wireless connection by clicking the "Wireless Signal" indicator in your system tray. After clicking on this, you should see an entry matching the SSID of your NF1ADV with "Connected" next to it. Mac OSX 10.6 Click on the Airport icon on the top right menu. -
Page 66: Troubleshooting
STEP CORRECTIVE ACTION Make sure you are using the correct IP address of the NF1ADV. You can check the IP address of the device from the Network Setup configuration page. Check that you have enabled remote administration access. If you have configured an inbound packet filter, ensure your computer’s IP address matches it. - Page 67 NF1ADV User Guide YML38 www.netcommlimited.com...
-
Page 68: Using The Nf1Adv To Make And Receive Telephone Calls
A working analogue telephone connected into either the Line 1 or Line 2 port. You hear the dial tone and the Phone 1 or 2 LED on the front of your NF1ADV should light up after lifting the handset. How to place a call To make a call, simply lift the handset and dial the number following the instructions provided by your telephone handset manufacturer. -
Page 69: Call Feature Codes
Call feature codes Quick Reference Table The NF1ADV supports a number of call feature codes for supplementary services. FEATURE ACTIVATION DEACTIVATION STATUS #31# *31# Caller ID (to block an individual call) (to unblock an individual call) Call Waiting *43# #43#... - Page 70 Check to make sure you are using the correct cable (Cat-3 UTP Telephone Cable with RJ-11 plugs). Check to make sure the line light on the front panel of the NF1ADV turns solid blue if you lift the handset. Check to make sure the blue MBB indication light on the front of the NF1ADV is blinking.
-
Page 71: Technical Data
Table 28: NF1ADV Technical Specifications Electrical Specifications A suitable power supply is available on request or via direct purchase from the NetComm Online shop. It is recommended that the NF1ADV be powered using the 12VDC/2.0A power supply which is included with the device. -
Page 72: Faq
NF1ADV for 10-15 seconds until all the indicator lights on the unit flash to indicate the device is reset. After a reset, use the default WiFi settings (SSID and WPA key) which can be found on the base of your NF1ADV. (Note - this will also reset any custom settings and passwords you may have already set up). -
Page 73: Appendix A: Tables
Table 21: Status- LAN Settings ............................ 61 Table 22: Status - WAN Service Settings........................61 Table 23 - Additional Product Information - Call Feature Codes Quick Reference ............ 69 Table 24: NF1ADV Technical Specifications ........................ 71 NF1ADV User Guide YML38... -
Page 74: Appendix B: Print Server
‘Printers’ if you are using Windows Vista or select “Devices and Printers” if you are using Windows 7. Once in the ‘Printers’ page, click the ‘Add a printer’ button as shown below. NF1ADV User Guide YML27 www.netcommlimited.com... - Page 75 “http://192.168.1.1:631/printers/Printer_Name” in the box below. Ensure the printer name is the name you entered in step 1 Click ‘Next’. NOTE: The PrinterName must be the same as the printer name entered into the Printer section of Dual-3G29WN2. Figure 99: Windows 7 - Add Shared Printer Name NF1ADV User Guide YML38 www.netcommlimited.com...
- Page 76 Figure 100: Add Printer Drivers Choose whether you want this printer to be the default printer, and then click ‘Next’. Figure 101: Add Printer Name Click ‘Finish’. Your device is now configured and ready for use. NF1ADV User Guide YML27 www.netcommlimited.com...
-
Page 77: For Mac Osx
To set up your printer, check the Apple menu and select the “System Preferences” option. In the System Preferences menu click on the “Print & Fax” option. Figure 103: System Preferences With your Printer driver installed, please add your printer from the Print &Fax menu. Figure 104: Print & Fax Menu NF1ADV User Guide YML38 www.netcommlimited.com... - Page 78 NOTE: The Printer Name must be the same as the printer name entered into the Printer section of Dual-3G29WN2. From the “Print Using” drop down list and select your corresponding printer driver. Figure 107: Add Printer Driver Click Add and check the printer status. Figure 108: Check Printer Status NF1ADV User Guide YML27 www.netcommlimited.com...
-
Page 79: Appendix C: Samba Server
In the address field of the Connect to Server dialog, type in the URL Smb:// “NetbiosName”/“DirectioryName” (eg smb://ntc- cpe/ntc-cpe) . Figure 110: USB Drive Access with Mac Select the Connect button to connect your USB driver. NF1ADV User Guide YML38 www.netcommlimited.com... -
Page 80: Legal & Regulatory Information
NetComm’s (or its licensors’) intellectual property rights to you. You are permitted to use this Manual for the sole purpose of using the NetComm product to which it relates. Otherwise no part of this Manual may be reproduced, stored in a retrieval system or transmitted in any form, by any means, be it electronic, mechanical, recording or otherwise, without the prior written permission of NetComm. -
Page 81: Contact
Contact Address: NETCOMM WIRELESS LIMITED Head Office PO Box 1200, Lane Cove NSW 2066 Australia P: +61(0)2 9424 2070 F: +61(0)2 9424 2010 sales@NetComm.com.au www.NetCommlimited.com NF1ADV User Guide YML38 www.netcommlimited.com...
Need help?
Do you have a question about the FIBRE NF1ADV and is the answer not in the manual?
Questions and answers