Table of Contents
Advertisement
Advertisement
Table of Contents

Related Manuals for Rancilio EGRO 5511


Summary of Contents for Rancilio EGRO 5511
- Page 1 Technical Manual Technical Manual EGRO 5511...
- Page 3 EGRO 5511 TECHNICAL MANUAL Section 1: Introduction and Overview • Safety precautions • Machine overview Section 2: Installation • Quick-start guide Section 3: Programming • Programming modes • Menus and descriptions • Error codes • Software Directory • Recommended Parameters Section 4: Electrical •...
- Page 4 Page 4...
- Page 5 EGRO 5511 Manual SECTION 1: INTRODUCTION & OVERVIEW Page 5...
- Page 6 EGRO 5511 Manual SAFETY PRECAUTIONS GENERAL SAFETY RULES Do not leave packing materials (plastic bags, expanded polystyrene, nails, cardboard, etc.) within the reach of children, as these items are a potential source of danger. Verify that that the electrical data of the machine corresponds with the electrical supply network before connecting the machine to the power source.
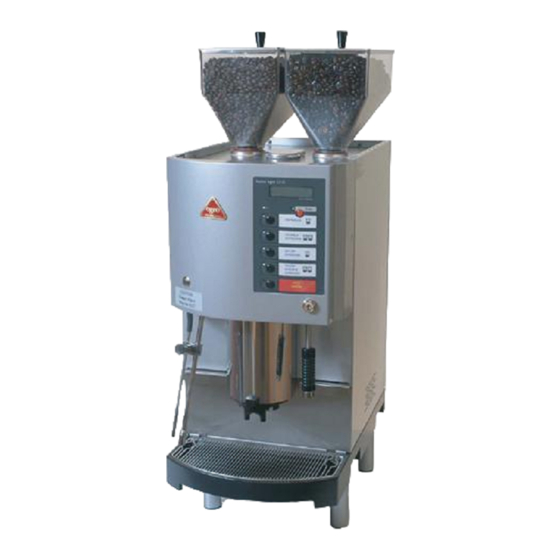
- Page 7 EGRO 5511 Manual MACHINE OVERVIEW ITEM Bean Hoppers (2 x 2.8 lbs) Front Face Plate TS Wand Activation Button Temperature Sensitive(TS) Steam Wand Cleaning Tablet Access Cover Touch Pad Programming Key Hot Water Spout Grounds Access Door Drip Tray Coffee Spout...
- Page 8 Page 8...
- Page 9 EGRO 5511 Manual SECTION 2: INSTALLATION Page 9...
- Page 10 · (4) 5” Feet · Wrenches (mm): 7,8,10,12,13,14,20,21,22 · (1) Service card · Needle nose pliers, with hole · Cleaning tablets - (1 jar) SPACE REQUIREMENTS The space requirements for the Egro 5511 are as follows: 6” 7” 4” 4” 34”...
- Page 11 Egro machines do not use a neutral line. A dedi- cated ground wire is required for proper perfor- mance. Slowly tilt the Egro 5511 to the right, and screw in two legs to the bottom left side. = Ground = Hot leg...
- Page 12 Cut a 4” piece from the hose using a utility Underneath machine, with knife, and attach it to the barbed drain tray 4” drain hose fitting under the Egro 5511 ( piece attached to drain tray fitting 4. 4. Locate the plastic T-fitting provided ( ·...
- Page 13 Remove the bag containing the programming MUST de-pressurize before it can function correctly.) keys from around the hot water spout. After turning on the Egro 5511, press the TS wand activation button. Do not try to manipulate the programming of the Egro 5511 while it is de-pressurizing.
- Page 14 4. 4. Turn the bean hoppers on top of the Egro 5511 to adjust the grinder burrs. FINER GRIND = Turn hoppers clockwise COARSER GRIND = Turn hoppers counter- clockwise Make sure that the adjustment plate is securely held in place by the notches before removing the screwdriver from the slot.
- Page 15 Page 15...
- Page 16 EGRO 5511 Manual SECTION 3: PROGRAMMING Page 16...
- Page 17 EGRO 5511 Manual OPERATING MODES 'Mode' refers to a specific style of operation of the machine. The machine operates in a dif- ferent manner in each mode or, alternatively, other operations are carried out. The machine is equipped to operate in six different modes; modes 4 and 5 can only be...
- Page 18 EGRO 5511 Manual On removing the key, the following is indicated on the display screen: Mode Display Text But- Turn the key ¼ On pressing but- Remove Mode After 1 sec. turn M_1:Normal M_0:Stand by Stand by M_0:Stand by Stand by...
- Page 19 EGRO 5511 Manual Power On LED Off : The machine is switched off at the main switch or the plug has been removed from the wall socket The machine is switched on (display: Select ) or it was switched off with the key (dis-...
- Page 20 EGRO 5511 Manual 2.2 Touch pad buttons - Programming The buttons 0, 1, 3, 5, 7 and 9 have the following functions during programming: BUTTON 0 Cancel changes; abort; or return to BUTTON 1 STOP previous menu level. Confirms and saves the values displayed;...
- Page 21 EGRO 5511 Manual DEFAULT SETTINGS The LOAD DEFAULTS message allows the base parameters (factory settings) of the menus PRODUCTS, CONFIGURATION 1 and CONFIGURATION 2 to be uploaded. This function erases the existing settings and cannot be revoked. Before the operation is carried out a message appears on the display requesting confirmation that the loading of default settings is really required.
- Page 22 PROGRAMMING MENU OVERVIEW (i.e. ‘4.2’) Following each submenu name there is a small number . This number indicates which part of the Programming section the submenu description is located in. PRODUCTS CONFIG 1 CONFIG 2 SERVICE Language # Price Last Errors Grinders Decimal Point # FM-Puls.
- Page 23 EGRO 5511 Manual 4.2 PRODUCTS MENU The Products menu allows for the customizable programming of each drink product individually. Every setting that can have an influence the quality and consistency of the drink may be fine-tuned within the Products menu.
- Page 24 EGRO 5511 Manual 4.2 PRODUCTS MENU - continued PROGRAMMING MENU DIAGRAM PRODUCT TOTAL PRODUCTS CONFIG 1 CONFIG 2 SERVICE SUBMENU DESCRIPTION Expansion time for wet coffee grounds. (Only valid if Pre-Inf is enabled) # PI Pause (OPTIONS: 0.1s - 9.9s) (Recommended setting: 1.0s - 4.0s) Tamping pressure for coffee grounds.
- Page 25 EGRO 5511 Manual 4.3 PRODUCT NAME LISTING The product text in the second row must be activated following the list of numbers given be- low. (Menu Products.. , Submenu P.* P_Name) Number Product Name Number (cont.) Product Name (cont.) Empty...
- Page 26 EGRO 5511 Manual 4.4 CONFIG 1 MENU The Config 1 menu allows for the adjusting of machine values. The submenus contained in this menu are not drink specific. The adjustments made within the Config 1 menu will affect all drink products.
- Page 27 EGRO 5511 Manual 4.4 CONFIG 1 MENU - continued PROGRAMMING MENU DIAGRAM PRODUCT TOTAL PRODUCTS CONFIG 1 CONFIG 2 SERVICE SUBMENU DESCRIPTION P1 Turns DO NOT CHANGE! Factory setting of the position of the top brewing piston. P1 Out DO NOT CHANGE! Factory setting of the position of the top brewing piston.
- Page 28 EGRO 5511 Manual 4.5 CONFIG 2 MENU The Config 2 menu allows for the adjusting of machine values in addition to Config 1. The submenus contained in this menu are not drink specific. The adjustments made within the Config 2 menu will affect all drink products.
- Page 29 EGRO 5511 Manual 4.5 CONFIG 2 MENU - continued PROGRAMMING MENU DIAGRAM PRODUCT TOTAL PRODUCTS CONFIG 1 CONFIG 2 SERVICE SUBMENU DESCRIPTION NOT USED IN USA. Enables or disables loading of drink prices into a CCI peripheral. Price=> CCI (OPTIONS: 0=Disabled; 1=Enabled) Enables or disables the shift button.
- Page 30 EGRO 5511 Manual 4.6 SERVICE MENU The Service menu is used for maintenance and diagnostics. It contains information as well as test functions. PROGRAMMING MENU DIAGRAM PRODUCT TOTAL PRODUCTS CONFIG 1 CONFIG 2 SERVICE SUBMENU DESCRIPTION Last Errors Errors submenu.
- Page 31 EGRO 5511 Manual SUBMENU MONITOR Monitor functions allow various machine components to be checked. No test can check com- pletely the entire functionality of any component. In addition during error testing, the me- chanical soundness of the component must be confirmed.
- Page 32 EGRO 5511 Manual 5.2 Function HEATER TEST Function: Switch on heaters manually Component Temperature in °C Selection: +/- Start/Stop: ↓ 000C Status: 0 = Heater off 1 = Heater on Display: Current temperature in °C Status The heater must be switched off manually.
- Page 33 EGRO 5511 Manual 5.3 Function AC MOTOR TEST Function: Manual control of the AC Motor Component Status Selection: +/- Start/Stop: ↓ Status: 0 = off PUMP 1 = on Display Component Jack on control card (red) PUMP M1 Water pump motor...
- Page 34 EGRO 5511 Manual 5.5 Function LEVEL TEST Function: Checks the water level sensor Component in the steam boiler Components: Level sensor B3 (J11/5) Status: B3 = 1 below water level LEVEL (level o.k.) B3 = 0 above water level Status (level too low) 5.6 Function POS-SW TEST...
- Page 35 EGRO 5511 Manual 5.7 Function FLOWM TEST Function: Check the Flowmeter Flowmeter P1 (coffee) ↓ Start/Stop: Display: Continuous display of FM signal. 0 0 99 100 FM-Imp. = ca. 1/2 dl. 5.8 Function EXT.BOARD TEST 5.8.1 24V OUTPUTS. Function: Check the 8 (24VDC) outputs on...
- Page 36 EGRO 5511 Manual 5.9 Function COOL DOWN Function: Cooling down the inside of the ma- chine by rinsing the boiler with cold COOLING water. The brew valve is open. Start/Stop: ↓ Page 35...
- Page 37 EGRO 5511 Manual PROGRAMMING - ERROR MESSAGES Applicable as from Software Version 1.20 Number of brew cycles E061 18200 Error-Number Description Source Display Error in NVRAM • Switch machine on and off • Main water supply faucet/ Pump • Brew valve Y1 does not close •...
- Page 38 EGRO 5511 Manual PROGRAMMING - ERROR MESSAGES - continued • Coffee powder - metering / grinding Piston = Brew duration > 90 s • Brew filter clogged (Brew filter clogged) • Pump Water control - See Error 61 • See error 61 •...
- Page 39 EGRO 5511 Manual PROGRAMMING - SOFTWARE DIRECTORY Valid for software version 1.22 Vers. Date • Error 43 by steam extraction with „Steam auto shut off” With the machine specified under 1.22 07.04.06 point 1, it’s possible that during the operation the error 43 arises (pressure switch does not supply during more than 4,5min the i.O.
- Page 40 Page 39...
- Page 41 EGRO 5511 Manual SECTION 4: ELECTRICAL Page 40...
- Page 42 PUMP MOTOR GRINDER MOTORS HEATING ELEMENTS There are two heating elements located inside the Egro 5511. The coffee boiler has a 230v 3000w external heating element. The steam boiler has a 230v 3000w internal heating element. COFFEE BOILER HEATING ELEMENT...
-
Page 43: Power Switch
EGRO 5511 Manual ELECTRICAL High Voltage - continued RELAYS TERMINAL BLOCK Electrical device such that current flowing Receives the incoming lines of power from through it in one circuit(24v from the mother- the plug. From the Block a Black wires leads... - Page 44 EGRO 5511 Manual ELECTRICAL High Voltage - continued HIGH LIMITS Safety devices for the coffee boiler and steam boiler heating elements. 230v. Coffee boiler high limit has one for each leg of power. This is a thermo protection for the heating element.
- Page 45 EGRO 5511 Manual ELECTRICAL Low Voltage FLOWMETER BREW CHAMBER HEAT SLEEVE 24v + 5v. Counts the pulses of the water 24v. To ensure temperature stability of the going to the coffee boiler and the brew espresso extraction this sleeve maintains the group.
- Page 46 PISTON MOTORS TS STEAM WAND PROBE SOLENOIDS There are five operational solenoids located with the Egro 5511. All the solenoids are 24vdc. BREW (10W) STEAM (10W) STEAM BOILER FILL (8W) TEA - COFFEE BOILER (10W) TEA - STEAM BOILER (10W)
- Page 47 EGRO 5511 Manual ELECTRICAL Motherboard Page 46...
- Page 48 EGRO 5511 Manual ELECTRICAL Motherboard - continued INPUT LISTING (Orange, Green, 2x Grey)= Leads to Power Board (2x White)= lead to 6.3a Fuse (230v) (Brown, White, grey)=Bottom of motor gear box (Red & Black)= Motor for gears (Green, yellow, pink)= Piston home position sensor (24v) Same as J2 (Blue &...
- Page 49 EGRO 5511 Manual ELECTRICAL Motherboard - continued LED LISTING LED1 24 Volt (green continuous) LED2 5 Volt (green continuous) LED3 Run mode (green flashing) LED4 Pump LED5 Left grinder LED6 Right grinder LED7 Coffee boiler LED8 Steam boiler LED9 Brew valve...
- Page 50 Page 49...
- Page 51 Page 50...
- Page 52 Page 51...
- Page 53 EGRO 5511 Manual SECTION 5: HYDRAULIC & STEAM Page 52...
-
Page 54: Temperature Sensor
EGRO 5511 Manual HYDRAULIC & STEAM The Hydraulic & Steam section of this manual details the hydraulic components of the Egro 5511. The hydraulic components are broken down into three main sections: Coffee Boiler, Steam Boiler, and Brew Group Assembly. - Page 55 EGRO 5511 Manual HYDRAULIC & STEAM Coffee Boiler - continued INCOMING WATER CHECK VALVE WATER PRESSURE GAUGE Located on the bottom of the boiler. Allows Located on the bottom of the boiler. Indicates the water to only pass in one direction - incoming water pressure from the pump through the boiler.
-
Page 56: Pressure Relief Valve
EGRO 5511 Manual HYDRAULIC & STEAM Steam Boiler STEAM BLOCK PRESSURE RELIEF VALVE Any components that receive steam have Safety valve in case of boiler over-pressurization. solenoids located on this block. Set at 3 bars of pressure. STEAM BLOCK PRESSURE RELIEF VALVE... - Page 57 EGRO 5511 Manual HYDRAULIC & STEAM Steam Boiler - continued TS STEAM WAND SOLENOID INCOMING WATER SUPPLY Located between the grinder chutes. 3 way Incoming water supply from fill solenoid on the solenoid. Waste ties into drain tray. When cold water block.
- Page 58 EGRO 5511 Manual HYDRAULIC & STEAM Brew Group Assembly Page 57...
- Page 59 EGRO 5511 Manual HYDRAULIC & STEAM Brew Group Assembly - continued BREW GROUP LISTING Upper piston quick-connect fitting. (Incoming water from the Coffee Boiler) Bottom Piston quick-connect fitting. (Extracted espresso leads to the coffee spout) Allen bolts. (Hold the piston motor assembly on the brew group) Piston motor.
- Page 60 Page 59...
- Page 61 EGRO 5511 Manual SECTION 6: ADJUSTMENT & MAINTENANCE Page 60...
- Page 62 EGRO 5511 Manual BREW GROUP REPLACEMENT Complete Brew Group Assembly Replacement Unplug machine Remove the Left side panel to gain access to the mother board. Disconnect the Motors from the motherboard Connections “J2” & “J3” located in the up right hand side of the motherboard.
- Page 63 EGRO 5511 Manual TS WAND TEMPERATURE ADJUSTMENT TS Wand Adjustment ¯ TS wand ¯ (1) Adjustment board for Final Temperature. ¯ (2) Close up of Adjustment board. ¯ Range is 140°-170° ¯ To adjust the final temp. ¯ Remove left side panel ¯...
- Page 64 4. 4. Turn the bean hoppers on top of the Egro 5511 to adjust the grinder burrs. FINER GRIND = Turn hoppers clockwise COARSER GRIND = Turn hoppers counter- clockwise Make sure that the adjustment plate is securely held in place by the notches before removing the screwdriver from the slot.
- Page 65 EGRO 5511 Manual GRINDER BURR REPLACEMENT Grinder Burr Replacement Turn off the machine and unplug Remove the bean hoppers Remove the top panel This requires all 3 side panels need to be removed; after the screws are removed Remove Locking plate To do this;...
- Page 66 EGRO 5511 Manual DIALING IN 10 GRAMS This section is critical to the proper function of the Egro 5511. It gives the machine an accurate starting point for drink products. *Anytime the roast of espresso or the espresso brand is changed, you will need to dial in 10 grams* 1.
- Page 67 EGRO 5511 Manual DIALING IN 10 GRAMS - continued Weigh the grounds on a gram scale. If the weight 10 grams is not 10g, then press button two times to scroll backward to the screen “Gl Sec/10Gr #.#”. Press button to edit the grinding time for the left grinder.
- Page 68 EGRO 5511 Manual DRAINING THE STEAM BOILER To drain the steam boiler, release all steam pressure and remove the bolt circled below from the bottom of the boiler using a 17mm wrench. WARNING! THE STEAM BOILER MUST BE COLD BEFORE YOU ATTEMPT TO DRAIN IT!
- Page 69 Page 68...
- Page 70 EGRO 5511 Manual PREVENTATIVE MAINTENANCE SCHEDULE 5511 Part # Component Component Location R= Replace Number of Cycles C= Clean I= Inspect L= Lubricate 29441 O-Ring Spindle. Lower 29441 O-Ring Spindle. Lower 39064 Turcon Gasket Spindle.Upper 55838 Spindle-Motor DC 24 V assy.
Need help?
Do you have a question about the EGRO 5511 and is the answer not in the manual?
Questions and answers