Table of Contents
Advertisement
Quick Links
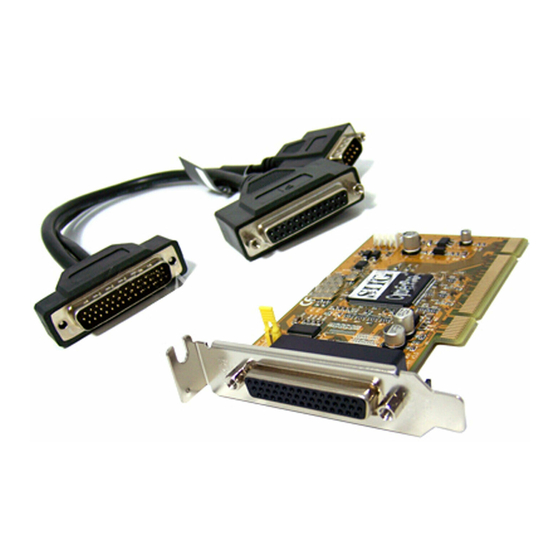
Introducing the Low Profile PCI -1S1P
The Low Profile PCI -1S1P conforms to the new PCI card form factor
standard made for space constrained system designs.
Features and Benefits
• Conforms to PCI v2.2 Plug and Play
• Full support for DOS- and Windows-based software
• IRQ sharing feature eliminates IRQ conflicts
Serial interface:
• High-speed 16550 UART serial port (9-pin) supports baud rates
up to 920Kbps. Works with various types of serial devices
• Built-in 16-byte FIFO buffers dramatically increase data transmit/
receive speed
Parallel interface:
• Conforms to IEEE 1284-1994 parallel port standard
• High-speed parallel port supports various types of parallel port
devices
• Supports EPP, ECP(PIO mode), Bi-directional Parallel Port (BPP)
and Standard Parallel Port (SPP) modes
Dimensions:
• PCB: 119.91 mm (L) x 64.41 mm (H)
• Bracket: 18.42 mm (W) x 79.20 mm (H)
System Requirements
• Pentium or equivalent computer with an available 32-bit PCI slot
• DOS/Windows 3.1x, Windows 95/98/98 SE/ME/NT 4.0/2000
04-0207A
Low Profile PCI-1S1P
Quick Installation Guide
1
Advertisement
Table of Contents

Related Manuals for SIIG Low Profile PCI-1S1P


Summary of Contents for SIIG Low Profile PCI-1S1P
- Page 1 Low Profile PCI-1S1P Quick Installation Guide Introducing the Low Profile PCI -1S1P The Low Profile PCI -1S1P conforms to the new PCI card form factor standard made for space constrained system designs. Features and Benefits • Conforms to PCI v2.2 Plug and Play •...
-
Page 2: Hardware Installation
Package Contents • One Low Profile PCI -1S1P board • One Driver Installation diskette • One 5-year warranty card • This quick installation guide Hardware Installation General instructions for installing the card are provided below, since the design of computer cases and motherboards vary. Refer to your computer’s reference manual for further information, if needed. - Page 3 Panel, System, then click Device Manager. 2. Double click Ports (COM & LPT) and new Cyber PCI ports should be displayed. Also, double click SIIG Cyber PCI option and SIIG ... PCI Board should be displayed. The board is ready to connect new devices.
- Page 4 Windows and click Finish. To verify successful installation in Windows NT 4.0: 1. Go to Start / Setting / Control Panel, double click SIIG Cyber PCI 20X device icon. 2. New COM port address and LPT number will be assigned for the ports when successfully installed.
- Page 5 To verify successful installation in Windows 2000: 1. Double click My Computer, Control Panel, System, Hardware, and click Device Manager. 2. Click on the + (plus sign) in front of Ports (Com & LPT). 3. New Cyber port(s) should be listed. DOS/Windows 3.1x: 1.
-
Page 6: Troubleshooting
Solution: Please visit our web site at WWW.SIIG.COM, go to Driver Update page, and download an appropriate driver for your Intel Celeron system. For more troubleshooting tips and driver updates, please visit our web site at WWW.SIIG.COM and go to Online Support or Driver Update. -
Page 7: Technical Support
RMA number posted on the outside of the shipping carton. Step 3: Ship the Product You are responsible for the cost of shipping back to SIIG at the following address: SIIG, Inc. - Page 8 Fremont, CA 94538-3152 Low Profile PCI -1S1P is a trademark of SIIG, Inc. SIIG and SIIG logo are registered trademarks of SIIG, Inc. Microsoft, Windows and Windows NT are registered trademarks of Microsoft Corporation. Pentium is a registered trademark of Intel Corporation.
Need help?
Do you have a question about the Low Profile PCI-1S1P and is the answer not in the manual?
Questions and answers