Table of Contents
Advertisement
Quick Links
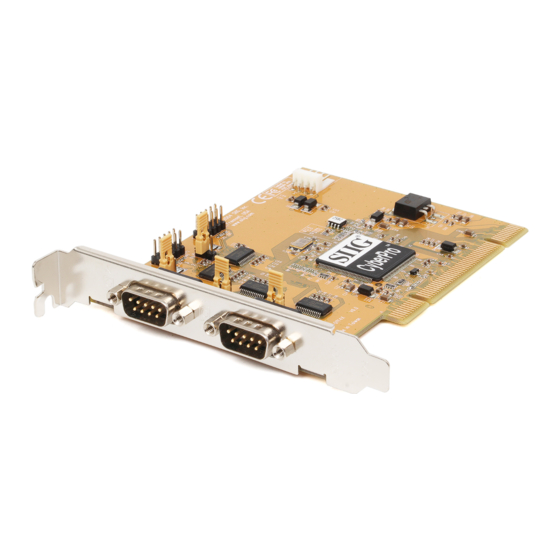
Introducing the CyberPro PCI 4S
The CyberPro PCI 4S high-speed serial I/O card provides
four additional 9-pin serial ports.
Features and Benefits
•
Conforms to PCI v2.2 Plug and Play
•
Full support for Windows-based software
•
Reduces CPU load and improves system
performance dramatically
•
IRQ sharing feature reduces IRQ conflicts
•
High-speed serial port (9-pin) works with 56K V.90
external modems, ISDN terminal adapters, PDAs,
digital cameras, label printers and other serial port
devices
•
Built-in FIFO buffers dramatically increase data
transmit/receive speed, especially under Windows'
multitasking environment
•
Each serial port can be configured for either 5v or
12v output, for serial devices that require additional
power
System Requirements
•
Pentium or equivalent computer with an available
PCI slot
•
Windows
/64-bit)/Server 2003 (32-/64-bit)/Vista (32-/64-bit)
04-0346C
CyberPro PCI 4S
Quick Installation Guide
95/98/98SE/ME/NT 4.0/2000/XP (32-
®
1
Advertisement
Table of Contents

Related Manuals for SIIG JJ-P49012-S6


Summary of Contents for SIIG JJ-P49012-S6
-
Page 1: Quick Installation Guide
CyberPro PCI 4S Quick Installation Guide Introducing the CyberPro PCI 4S The CyberPro PCI 4S high-speed serial I/O card provides four additional 9-pin serial ports. Features and Benefits • Conforms to PCI v2.2 Plug and Play • Full support for Windows-based software •... -
Page 2: Package Contents
Package Contents • CyberPro PCI 4S board • Slot bracket with 2 DB9 (9-pin) serial ports • Driver CD • Quick Installation Guide Layout (P3) Serial port 2 (P2) Serial port 1 (P1) (P1) * Note: Make this connection only when two or more serial ports are configured for 5V/12V output. - Page 3 Jumper Settings (JP1, JP2, JP3, JP4) Open = 0 volts (default) Short 1-2 = 5V Short 2-3 = 12V Note: Most serial devices do not require additional power through the serial port. Refer to your serial device's manual for more information. The jumpers can be removed if the ports do not need power.
-
Page 4: Hardware Installation
Hardware Installation General instructions for installing the card are provided below. Since the design of the computer cases and motherboards vary, refer to your computer’s reference manual for further information, if needed. Static Electricity Discharge may permanently damage your system. Discharge any static electricity build up in your body by touching your computer’s case for a few seconds. -
Page 5: Driver Installation
Driver Installation This section provides information on how to install the CyberPro PCI 4S drivers. Windows 95 At the Update Device Driver Wizard, click Next. Insert the driver CD, and click Other Locations. Type in D:\9x, click OK, then Finish. (Change D: to match your CD-ROM drive letter) From the Insert Disk window, click OK. - Page 6 From the main desktop, right click My Computer, click Properties, then click Device Manager. Double click Ports (COM & LPT), CyberSerial PCI 16Cxxx... should be displayed four times. Double click Multi-function adapters, SIIG CyberPro 4S PCI board and PCI Function should be displayed. Windows NT 4.0 From the desktop click Start, then Run.
- Page 7 Windows 2000 At the Found New Hardware Wizard, click Next. Select Search for a suitable driver for my device (recommended), and click Next. Check Specify a location, uncheck the other boxes, and click Next. Insert the driver CD, type in D:\2000, then click OK. (Change D: to match your CD-ROM drive letter) Click Next and Finish.
- Page 8 Device Manager. Click on the + (plus sign) in front of Ports (COM & LPT), CyberSerial PCI 16Cxxx... should be displayed four times. Double click Multifunction adapters, SIIG CyberPro 4S PCI board should be displayed. Windows Vista ™ At the Found New Hardware window, insert the driver CD, click Locate and install driver software (recommended), then click Continue.
- Page 9 Changing COM Port Address Some serial devices need a specific COM port in order to work. If your serial device works properly, do not change this setting. Windows 95/98/98SE/ME From the Device Manager window double click Ports (COM & LPT), then double click the CyberSerial PCI serial port you want to change.
- Page 10 Blank Page...
-
Page 11: Technical Support And Warranty
Step 1: Submit your RMA request. Go to www.siig.com, click Support, then RMA to submit a request to SIIG RMA. If the product is determined to be defective, an RMA number will be issued. SIIG RMA department can also be reached at (510) 413-5333. - Page 12 6078 Stewart Avenue Fremont, CA 94538-3152, USA CyberPro PCI 4S is a trademark of SIIG, Inc. SIIG and the SIIG logo are registered trademarks of SIIG, Inc. Microsoft, Windows and Windows Vista are registered trademarks of Microsoft Corporation. Pentium is a registered trademark of Intel Corporation. Other names used in this publication are for identification only and may be trademarks of their respective companies.
Need help?
Do you have a question about the JJ-P49012-S6 and is the answer not in the manual?
Questions and answers