Table of Contents
Advertisement
Advertisement
Table of Contents

Related Manuals for Gigabyte GZ-FW1CA-AJS


Summary of Contents for Gigabyte GZ-FW1CA-AJS
- Page 1 3D Mercury English User’s Manual GZ-FW1CA-AJS/AJB...
- Page 2 Thank you for purchasing Gigabyte Tech. thermal product. Gigabyte Tech. is dedi- cated to the integration of casing water/air-cooling solution technology to provide users with the most optimal solution for thermal dissipation. The five features of 3D Mercury series casing include state-of-the-art design, built-in liquid cooling system, system security, easy installation and etc.
-
Page 3: Table Of Contents
Table of Contents 1. Components Introduction Casing’s Internal Structure Front, Rear, and Left Side Panel Structure 2. Features 3. Specification Features 4. Installation Instruction Installation of Power Supply 4-2 Installation of Motherboard 4-3 Installation of Add on Card 4-4 Installation of Front Multi-Media I/O Ports 4-5 Connection of Fan Power Cables 4-6 Installation of 5.25”... -
Page 4: Components Introduction
Power Supply Secur- h. AM2 Water block ing Screw x 12 ing screw x 4 bracket i. Extended screw for j. Extended power sup- k. Gigabyte Liquid Cool- securing power sup- ply retainer plate. ant x 2 ply retainer plate. -
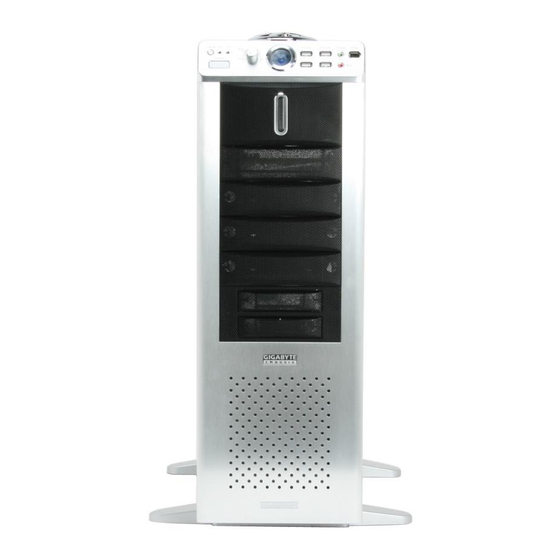
Page 5: Front, Rear, And Left Side Panel Structure
9. Front Cable Kit a. USB 2.0 x 2 b. Audio (HD & AC97) c. IEEE1394 (Multi-connectors) d. 3-Pin Fan Connector e. Power SW/Reset SW/HDD f. Motherboard 2-pin connec- LED Connector tor and 4-pin connector to power supply. 1-2 Front, Rear, and Left Side Panel Structure a) Left Side Panel Side Grill for LCS air intake Latch... -
Page 6: Features
Quad multi-graphic cards, and support 12” x 13” motherboard. - High Quality Design Gigabyte Tech. top-class full tower thermal solution casing Lightweight aluminum alloy with hair-line brush anodized finishing Full-open aluminum side panel door design, with hair-line brush anodized finishing. -
Page 7: System Security
Complete front panel multi-media support, including 4 x USB 2.0, 1 x IEEE1394, 1 x audio jacks (HD & AC97) Full Support of Gigabyte Tech. thermal solution LCS and air-cooling products lines Support ATX / Micro ATX / Mini ATX / E-ATX / CEB motherboard. -
Page 8: Specification Features
3. Specification Features Model: GZ-FW1CA-AJS/AJB Case Type: FULL TOWER Size: 205 x 620 x 535 (W x H x D) Front Bezel Material: Aluminum Color: Silver/Black Side Panel: Vent mesh/Transparent acrylic Body Material: Aluminum (1.0mm) / nickel-plated SECC (1.0mm) Net weight: 12KG 5.25”... -
Page 9: Installation Instruction
4. Installation 4-1-3 Secure the power supply onto the retainer plate, by using the 4 fixed Instruction screws. Please follow the reference sections in order for installation 4-1 Installation of Power Supply To facilitate the installation, it is recom- mended to set the chassis upright on the 4-1-4 Slide in the power supply from the table. - Page 10 4-1-6 If a longer power supply is used, 4-1-7c Secure the power supply onto please use the extended power supply the retainer plate, by using the 4 retainer plate and secure with the ex- fixed screws. tended screws. 4-1-7d Remove the screws on the top cover of the chassis, two at the rear and two on either side of the chassis.
-
Page 11: Installation Of Motherboard
4-1-7f Remove the screws on the liquid 4-1-7i Reverse the steps to reassemble cooling system tray (above the the parts power supply area and back 4-2 Installation of Mother- panel, total of 5 screws.) board 3D Mercury can support ATX / Micro ATX / Mini ATX / E-ATX / CEB Please confirm the motherboard screw holes locations and size specification... -
Page 12: Installation Of Add On Card
4-2-2 If the motherboard is an LGA775, 4-2-5 Use the motherboard screws to please use the back plate and stick it be- secure the motherboard onto the back hind the motherboard. wall of the case (refer to your mother- board manual to check what type of motherboard you have). -
Page 13: Installation Of Front Multi-Media I/O Ports
4-4 Installation of Front 4-3-2 Remove the internally attached dust proof PCI cover. Multi-Media I/O Ports Incorrect connection of the slots can cause the motherboard to malfunction or completely destroy the motherboard. Please read the manual carefully during installation as incorrect installation or connection that causes faults will void your warranty The front panel includes... -
Page 14: Connection Of Fan Power Cables
IEEE 1394 connector A AC’97 Definition Definition Definition Definition MIC Power NO Pin TPA+ TPB- Line Out(L) TPA- Line Out(R) +12V +12V TPB+ 4-4-4 Basic casing power switch control cable kit. IEEE 1394 connector B Connector Color Reset SW Green (+)/White (-) Power SW Red (+)/White (-) H.D.D. -
Page 15: Installation Of 5.25" Front Device Bay
power connector on the motherboard to complete the installation 4-6 Installation of 5.25” Front Device Bay 4-6-1 Open the side panel of the case and remove the mesh drive rail and metal EMI plate of the chassis. LOCK 4-7 Installation of 3.5” Front Device Bay Installation of the 3.5”... -
Page 16: Application Of Security Lock
4-9 Application of Secu- rity Lock 3D Mercury includes a safety lock on the side panel. Insert the key into the lock and rotate it 90 degrees according to the diagram to 4-8-2 For installation of the 4th and 5th lock and unlock it. -
Page 17: Application Of Transparent Side Panel
d. Take the transparent side panel win- dow out from the carton box and remove 4-11 Application of Trans- the plastic protection layer. parent Side Panel e. Screw the transparent side panel win- Required Tools: Cross screwdriver, dow onto the side panel with the protrud- transparent side panel window. - Page 18 Fig. a Note: The AMD K8 clip can be separat- ed from the water block (Fig. a) to adjust to the appropriate installation direction (Fig. b/c). Fig. b 4-12-2-2 Secure the water block onto the motherboard with the attached spring screws.
- Page 19 4-12-3 AMD K8 (754/939/940) Clip Cover Installation. 4-12-3-1 Please change the LGA775 clip cover with the AMD K8 clip cover and align the AMD K8 clip to the three raised points on the CPU. 4-12-4-2 Fasten the latch on the AMD AM2 clip cover and make sure that the water block is properly secured on the CPU.
-
Page 20: 4-Way Splitter Valve Instruction And User Manual
(female 2-pin) with the “+PW-” jumper on to the motherboard. 4-12-6-2 Connect the 4-pin connector from the pump to a 4-pin connector of the power supply. 4-13 4-way Splitter Valve Instruction and User Manual Note: Gigabyte Blue Eye and Chipset... - Page 21 water block are used as examples. 4-13-3 Cut a tube into suitable size, con- Warning: Please make sure that the PC nect one side of the tube with the sec- Power is turned off prior to installation. ond splitter on the 4-way splitter valve (2) and connect the other side with the 4-13-1 Remove the caps and tube clips outlet of the VGA Blue Eye and fasten...
- Page 22 4-13-5 Cut a tube into suitable size, connect one side of the tube with the first splitter on the 4-way valve (2) and connect the other side with the outlet of the chipset water block and fasten with tube clips. Fig.
- Page 23 Warning: Use only GIGABYTE liquid coolant; any damage arising from the use of other liquid products is not covered by war- ranty. Leakage of liquid coolant due to improper installation may damage the system and is not covered by warranty.
-
Page 24: Liquid Cooling System Maintenance
Fig. C f. Shake the chassis slightly to get ex- cess coolant out of the tubes. g. After all the coolant has been drained out. It is now safe to transport the chassis or replace parts that need to c. Remove the lid from the top of the be replaced. - Page 25 e. Remove the tube that is connected to h. Remove the 2 screws that secure the the tank. funnel, and then remove the funnel and the coolant level measurer for the LWP alarm. f. Remove the 4 connectors from the front PCB and the 2 fixing screws.
- Page 26 Recommended parts to purchase remove the front panel. - GIGABYTE VGA Air Cooler - GIGABYTE Blue Eye (VGA Liquid Cooling) - GIGABYTE Chipset Water block - GIGABYTE Radiator c. Take out the fan holder and separate...
Need help?
Do you have a question about the GZ-FW1CA-AJS and is the answer not in the manual?
Questions and answers