Table of Contents
Advertisement
Advertisement
Table of Contents

Subscribe to Our Youtube Channel
Related Manuals for HP 640 Fax series


Summary of Contents for HP 640 Fax series
- Page 1 HP 640 Fax series User Guide Part number: CB782-90008 Third edition: 09/2007...
- Page 2 WARNING! Potential shock hazard The Hewlett-Packard Company shall not be liable for • Read and understand all instructions in the setup incidental or consequential damages in connection with, poster.
-
Page 3: Table Of Contents
Contents 1 Quick start ........1 Load paper . - Page 4 Block junk fax numbers..........24 Add a junk fax number .
- Page 5 Use Hewlett-Packard support services ........
- Page 6 iv Contents...
-
Page 7: Quick Start
Quick start This chapter gives you a quick introduction to the basic functions of your new fax machine. Please refer to the later chapters for detailed instructions. 1 The “arrow buttons” located at the left and right of OK button on the control panel are designated by in the instructions. -
Page 8: Load Documents To Fax Or Copy
Load documents to fax or copy 3 Fan, neatly stack, then insert up to 50 sheets of paper with the print side facing you. 4 Push the Paper Tray Cover back into place. Load documents to fax or copy You can load up to 10 pages in the document feeder. Load the documents face down (printed side toward the machine). -
Page 9: Receive A Fax
Receive a fax Receive a fax How faxes are received depends on how the Answer Mode/Receive Mode is set. For more information, see Set rings to answer on page 23. FAX or TAM answer mode The fax machine will answer the telephone, automatically detect fax tones, and receive a fax. -
Page 10: Make A Telephone Call
Make a telephone call 7. Press to select Reverse if you want the last page printed first. Printing the copies in reverse order will cause the first page to be on top when the copy is complete. 8. Pressing either Copy or OK will start copying. Make a telephone call Use one of the following methods: •... -
Page 11: Hp Fax Basics
HP Fax basics This chapter lists the basic features of your new HP Fax and introduces you to the machine. The HP Fax features The HP Fax offers the following features: 50 page fax memory • 50 page paper tray •... -
Page 12: The Hp 640 Fax
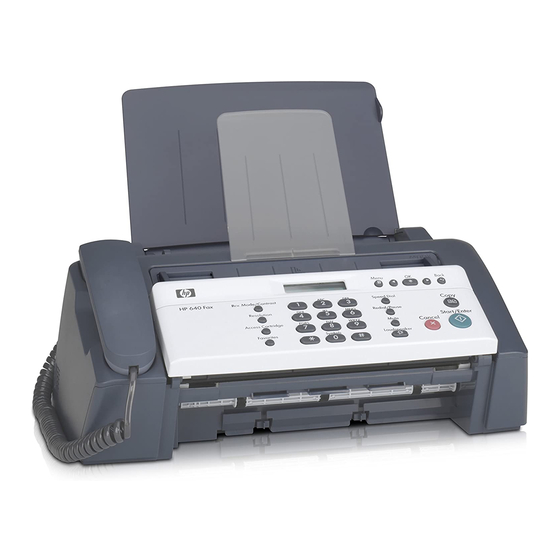
The HP 640 Fax The HP 640 Fax Parts of the HP Fax Front view Figure 2-1 Document support Paper tray Paper tray cover Document guide Document feeder Handset Paper guide Paper support Rear view Figure 2-2 Power cord socket 6 HP Fax basics... - Page 13 The HP 640 Fax Bottom view Figure 2-3 Connect handset to the HANDSET port. Connect telephone line to the LINE port. Connect answering machine or extension phone to the EXT. port. HP Fax basics 7...
-
Page 14: Control Panel Of Hp Fax
The HP 640 Fax Control Panel of HP Fax Control panel of HP Fax Figure 2-4 Label Name and Description Rcv.Mode/Contrast: • When no document is loaded, pressing this button changes the Receive Mode. See Answer/receive mode on page 28. •... - Page 15 The HP 640 Fax Label Name and Description Menu: Displays the options available for your HP Fax. Scroll/Volume: • When you are entering numbers or text, moves the cursor to the digit or character to be edited. • When Menu has been pressed, displays the next and previous menu options. Referred to as the arrow keys in text and are designated by: •...
-
Page 16: The Menus
The menus The menus 10 HP Fax basics... -
Page 17: Overview Of Menu Options
Overview of menu options Overview of menu options Your fax machine has settings that you can change. To find out how the options are currently set, print the System Data report (see on page 39). Print reports To change these settings, see on page 14. - Page 18 Overview of menu options Option Settings Man Fax Rcv Code The Manual Fax Receive Code allows you to start receiving a fax from an extension phone. If you pick up the extension phone and hear a fax tone, enter the code and the fax will start receiving. You cannot change the * *, just the number between them.
-
Page 19: Advanced Fax Menu
Loudspeaker ADVANCED FAX menu Option Settings Allows you to send a fax to several fax numbers at once. Set Broadcasting Allows you to set up a fax to be sent at any time in the next 24 hours. Set Delayed Fax Allows you to set up a fax to be polled by another machine. -
Page 20: Navigate The Menus
Navigate the menus Navigate the menus Ready mode Whenever the HP Fax is ready for faxing and copying (called Ready mode), it will display the date, time, and answer mode. For example, OCT-05 14:23 FAX. Menu buttons Use the Menu buttons to navigate the menu items. Press the Menu button to access the menu system. -
Page 21: Enter Dates, Times, Text, And Telephone Numbers
Enter dates, times, text, and telephone numbers Enter dates, times, text, and telephone numbers Use these buttons when menu items ask you to enter dates, time or text. If the date format seems unfamiliar, check that you selected the correct one for your •... -
Page 22: Fax Header Telephone Number
Enter dates, times, text, and telephone numbers For example, to enter ‘Jacque & Baja,Inc.’ follow these steps. Press Result ‘JACQUE’ will display. Enters a space. ‘&’ will display. Enters a space. ‘BAJA’ will display. ‘,’ will display. ‘INC’ will display ‘.’... -
Page 23: Speed Dialing
Speed dialing For example, to enter ‘+123 456 7890’ follow these steps. Press Result ‘+‘ will display. ‘123’ will display. Enters a space. ‘456’ will display. Enters a space. ‘7890’ will display. ‘ Speed dialing Your HP Fax has a built-in phone book that allows you to enter up to 50 names and numbers for faxing or telephone use. -
Page 24: Print The Phone Book
Speed dialing Enter the name (up to 20 characters) and press OK. If you do not want a name, just skip this step by pressing OK. If you have subscribed to a Caller ID service, we recommend that you enter TIP: a name. -
Page 25: Paper Types And Sizes
Paper types and sizes Paper types and sizes The HP Fax is designed to work optimally with plain paper (cotton bond: 20 lb., 75 g/m ) in the following sizes: A4, Letter, and Legal. Some papers have a side that’s been conditioned for printing. The print side is TIP: usually indicated on the paper’s packaging. -
Page 26: Document Types And Sizes
Document types and sizes Document types and sizes The following document size is acceptable when you send a fax. The minimum document size is 148 mm (5.8 in.) wide by 128 mm (5 in.) long. • The maximum size is 216 mm (8.5 in.) wide by 356 mm (14 in.) long. •... -
Page 27: Set Document Resolution And Contrast For A Single Copy
Set document resolution and contrast for a single copy Set document resolution and contrast for a single copy Document resolution and contrast are set in the same manner for both faxes and copies. For most faxes and copies, default settings will work well. If you need to send/copy a document with unusual contrast characteristics, including images/embedded pictures, you can adjust the resolution and contrast for that document using the control panel buttons. -
Page 28: Adjust Volume
Adjust volume • PHOTO is used when faxing images/embedded pictures or other documents containing color or gray shades. When Photo is chosen, the resolution is automatically set to FINE. Dial the number and press Start/Enter or press Copy. When sending/copying is finished, resolution/contrast automatically returns to default. Adjust volume You can adjust the volume level for both the ringer and the speaker. -
Page 29: Additional Features
Set rings to answer Additional features This chapter contains information on additional features you may want to set or change for your HP Fax. • Rings to answer: Sets the number of rings before the HP Fax answers the phone. •... -
Page 30: Use Caller Id
Use Caller ID Use Caller ID Many countries have the Caller ID system that enables the receiver to view the numbers or names of callers. Once you have subscribed to Caller ID services through your local phone company, your machine can display caller information. Turn Caller ID on 1. -
Page 31: Delete A Number
Favorites Delete a number 1. Press Menu repeatedly until BASIC FAX appears and press OK. 2. Press until Set Junk Fax No. displays and press OK. 3. Press until Delete displays and press OK. The machine shows the first junk number. 4. -
Page 32: Print A Document
Image TCR Print a document 1. Press Favorites repeatedly until Print appears and press OK. 2. Press to select to print one or all documents and when the correct document ID is displayed, press OK. Image TCR Image TCR (Transmission Confirmation Report) is a valuable tool for keeping records of faxes you send. -
Page 33: Distinctive Ring (Drpd)
Distinctive ring (DRPD) Distinctive ring (DRPD) Distinctive ring or distinctive ring pattern detection (DRPD) is a service offered by some telephone companies. When you subscribe to this service through your local phone company, you have different ring patterns; such as double ring and triple ring, that allow you to have different telephone numbers on one physical line. -
Page 34: Answer/Receive Mode
Answer/receive mode Answer/receive mode How the product receives faxes depends on the answer/receive mode you chose when you set up the product. You can send faxes in any answer/receive mode. The answer/ receive mode setting determines how the device answers the incoming call. How are you going to use your HP Fax? Read about... - Page 35 Answer/receive mode • You must have an answering machine attached to the EXT line socket mode located on the bottom of your HP Fax. • In Ready mode, TAM appears in the right hand corner of the display. • When a call comes in, the answering machine answers and listens. If it detects fax tones, it receives the fax;...
- Page 36 Answer/receive mode 30 Additional features...
-
Page 37: Advanced Faxing
Broadcasting Advanced faxing In this chapter, you will learn how to use the advanced fax features of your machine. 1 The “arrow buttons” located at the left and right of OK button on the control panel are designated by in the instructions. -
Page 38: Delayed Fax
Delayed fax Delayed fax You can set your machine to send a fax any time in the next 24 hours. For example, it is usually cheaper to send a fax at night because telephone rates are lower than they are during the day. -
Page 39: Polling
Polling Polling Polling enables you to set up a document so it can be retrieved at a later time. For example, you can place the document in your machine, and the other party can retrieve it when they are in the office or when their calling rates are lower. Setting send polling You can program your fax machine to send a document when it is requested by a remote fax machine. -
Page 40: Polling Another Fax To Receive
To cancel the scheduled job Polling another fax to receive You can dial another fax machine that has a document waiting and request it to be sent to your fax machine. 1. Dial the telephone number of the remote machine that is ready to be polled. TIP: One touch buttons do not work in this area. -
Page 41: Forward Faxes
Forward faxes Forward faxes While you are away from your home or office, you do not have to miss important faxes. Your machine can forward any faxes it receives to a fax machine at your current location, and if you choose, it can print a copy for you to review when you get back as well. - Page 42 Forward faxes 36 Advanced faxing...
-
Page 43: Feature Reference
Set the date and time Feature reference This chapter contains instructions for other features of the HP Fax that you may want to use from time to time. 1 The “arrow buttons” located at the left and right of OK button on the control panel are designated by in the instructions. -
Page 44: Alarm Sounds
Set the fax header information Alarm sounds Alarm sounds include the fax tones and beeps. 1. Press Menu repeatedly until SET UP SOUND appears and press OK. 2. Press to select Alarm Sound and press OK. 3. Select On or Off and press OK. Key sounds The Key sounds are the beeps the keys make. -
Page 45: Print Reports
Print reports 5. Press OK when the display shows Fax Name. 6. Enter the fax name (up to 40 characters) by using the number keypad. • You can include special characters (space, plus sign, etc.). For more information, on page 15. Enter dates, times, text, and telephone numbers 7. -
Page 46: Reprinting Faxes
Reprinting faxes Report name Content Sending Confirm This report shows the fax number, the number of pages, elapsed time of the operation, the communication mode, and the communication results. To set up your machine to automatically print, see Sending Confirm under the “BASIC FAX menu” on page 11. -
Page 47: Clearing Memory
Clearing memory 3. Select between Print New Fax or Reprint Old Fax and press OK. • Print New Fax: The machine prints all new faxes which have never been printed. • Reprint Old Fax: The machine prints all faxes regardless of new or old. Clearing memory You can selectively clear information stored in your machine’s memory. -
Page 48: Redial A Number In Memory
Redial a number in memory Redial a number in memory These steps allow you to dial one of the last 10 numbers called that is in memory. 1. Hold Redial/Pause for about two seconds. 2 Press until Recent Numbers displays and press OK. 3 Press to find the number you want to dial. -
Page 49: Care And Maintenance
Print cartridge information Care and maintenance This chapter contains information about changing print cartridges, maintaining your HP Fax, the menu settings, error messages, and troubleshooting. Print cartridge information The print cartridge life is very sensitive to the content of received faxes or copies you make. -
Page 50: Print The Self Test
Print the self test Print the self test When you want to test if the machine is working correctly, you can check it by printing the self test. 1. Press Menu repeatedly until TOOLS appears and press OK. 2. Scroll to Self Test by pressing and press OK. - Page 51 Replace the print cartridge 3. Open the control panel and cartridge compartment cover (it will click and remain open). 1 Control panel 2 Cartridge compartment cover 4. Push the cartridge down and remove it. 5. To load the cartridge insert the cartridge as shown below. When the cartridge is pushed to the back of the cartridge carrier, push the top of the cartridge until it clicks into place.
-
Page 52: Clear Jammed Documents And Paper
Clear jammed documents and paper 6. Close the cartridge compartment cover and control panel. 7. Press Start/Enter. 8. Press 1 for new cartridge, or 2 for the old one. • When you put in a new cartridge, you must choose 1:New •... -
Page 53: If The Paper Is Jammed In The Paper Feed Area
Maintain the print cartridge If the paper is jammed in the paper feed area 1. Remove the jammed paper as shown. If the paper tears when it is being removed check to ensure that no small pieces have been left inside the machine. 2. -
Page 54: Clean The Cartridge Carrier Contacts
Maintain the print cartridge 4. Reinstall the cartridge and close the cover and panel. If you spend a long time cleaning the cartridge, the cartridge carrier may have moved back to the original position. If so, press Access Cartridge again to move the carrier to the install position. -
Page 55: Clean The Document Scanner Area
Clean the document scanner area Clean the document scanner area To keep your machine working properly, occasionally clean the white roller, document feeder rubber piece, and the scanning glass. If they are dirty, documents sent to another fax machine will not be clear. CAUTION: When you turn the power off to clean the scanner, documents stored in memory will be lost. - Page 56 Clean the document scanner area 4. Clean the document feeder rubber piece at the back of the control panel. 5. Carefully wipe the scanning glass with a soft, dry, lint free cloth. • If the glass is very dirty, first wipe it with a slightly dampened cloth, then with a dry one.
-
Page 57: Adjust The Scanner
Adjust the scanner Adjust the scanner The scanner is adjusted at the factory. If, however, you drop your machine while moving it, we recommend you adjust scanner. 1. Press Menu repeatedly until TOOLS appears and press OK. 2. Scroll to Adjust Scanner by pressing and press OK. - Page 58 LCD error messages Display Status/Solution You attempted to cancel a scheduled job but no jobs are Job Not Assigned scheduled. You attempted to delete, print or send the Favorites document when there is no document stored. You attempted to delete a junk fax number when there is no Junk Fax Empty junk fax number.
- Page 59 LCD error messages Display Status/Solution Number Not Assigned There is no number assigned to this One-Touch or two-digit Speed number. The remote user entered the wrong poll code. Poll Code Error You have already programmed a polling send. Cancel Poll job exists scheduled job and try again.
-
Page 60: Troubleshooting
Your problem may be listed in “LCD error messages” on page 51. The chart below shows other problems you can solve yourself. For problems you cannot resolve here, see Use Hewlett-Packard support services on page 64. TIP: You can test your HP Fax to make sure it is set up properly for faxing. Place a document in the document feeder, dial 1-888 HP FAX ME (1-888-473-2963) and press . - Page 61 Troubleshooting Problem Solution The machine does not send anything. Check that the document is loaded face down.Send should appear in the display after it dials. Check if the machine to which you are sending can receive your fax. You cannot poll another machine. The fax machine you are polling may be using a poll code (password).
-
Page 62: Print Quality Problems
Troubleshooting Print quality problems Problem Solution View ink level Light or blurred characters. Check ink level as described in on page 43. To Replace the print cartridge install a new print cartridge, see on page 44. Make sure the print cartridge is installed correctly. To clean the Maintain the print cartridge print cartridge, see on page 47. -
Page 63: Specifications And Regulatory Information
Paper types and sizes Specifications and regulatory information This chapter contains product and supplies specifications, ordering information, and regulatory statements. Paper types and sizes The HP Fax is designed to work optimally with plain cotton bond paper. The following paper sizes and weight can be used with your machine: Paper size Dimensions Paper weight... -
Page 64: Print Cartridge
Print cartridge Print cartridge The HP Fax uses the following print cartridge. HP 701 black inkjet print cartridge CC635A Product specifications The specifications are subject to change without notice. Item Specification Type of unit Inkjet Desktop Facsimile Transceiver Communication System Public Switched Telephone Network (PSTN) and PABX Compatibility ITU Group3... - Page 65 Product specifications Item Specification Weight 3.0 Kg (6.6 lb) (including handset) Power source See Rating Label attached on the back of the machine. Resolution Copy Standard/Fine: 300 x 300 dpi Super Fine/Photo: 600 x 300 dpi Faxing Standard: 100 x 200 dpi Fine: 200 x 200 dpi Super Fine: 400 x 200 dpi Speed dials...
-
Page 66: A Sample Of Itu #1 Test Chart (Reduced To 60.5%)
A sample of ITU #1 test chart (reduced to 60.5%) A sample of ITU #1 test chart (reduced to 60.5%) 60 Specifications and regulatory information... -
Page 67: Environmental Product Stewardship Program
Environmental product stewardship program Protecting the environment Hewlett-Packard Company is committed to providing quality products in an environmentally sound manner. This product has been designed with several attributes to minimize impacts on our environment. For more information, visit HP Commitment to the Environment website at: http://www.hp.com/go/environment... -
Page 68: Regulatory Notices
There are no customer serviceable parts inside the HP 640 Fax. If trouble is experienced with the HP 640 Fax, for repair or warranty information, please contact Hewlett-Packard technical support by calling 866-331-9600. If you have Internet access, you can go to www.hp.com/support for more information on the HP 640 Fax. - Page 69 CAUTION Pursuant to Part 15.21 of the FCC Rules, any changes or modifications to this equipment not expressly approved by the Hewlett-Packard Company, may cause harmful interference and void the FCC authorization to operate this equipment. note à l’attention des utilisateurs du réseau téléphonique Canadien/notice to users of the Canadian telephone network This product meets the applicable Industry Canada technical specifications/Le présent materiel est conforme...
-
Page 70: Use Hewlett-Packard Support Services
Use Hewlett-Packard support services Use Hewlett-Packard support services www.hp.com/support If you are unable to find the answer you need in the printed documentation supplied with your product or on the web, you can contact one of the HP support services listed in the following pages. If a support service number is not listed for your country, contact your nearest authorized HP dealer for help. -
Page 71: Hewlett-Packard Limited Warranty Statement
Extent of limited warranty Hewlett-Packard (“HP”) warrants to the end-user customer that the HP products specified above will be free from defects in material and workmanship for the duration specified above, which duration begins on the date of purchase by the customer. - Page 72 • Grant the Customer additional warranty rights, specify the duration of implied warranties which the manufacturer cannot disclaim, or not allow limitations on the duration of implied warranties. Complete the following information. It is necessary for contacts with the selling dealer or Hewlett-Packard Company:...
- Page 73 Caller ID menu 12 Index Cancel button 9 cancel schedule menu 13 cancelling a scheduled job 34 cartridge Access Cartridge cleaning 47 button 44 maintenance 43 alarm sounds 38 part number 59 align cartridge replacing 44 menu 13 changing language 11 answer ring pattern detection 27 clean cartridge answer/receive mode 28...
- Page 74 document feeder number of pages 5 image TCR 26 document jams 46 menu 12 documents ink cartridge load 2 maintenance 47 number of pages 2 part number 43, 58 DRPD 27 replacing 44 ink level 13 cartridge 43 ECM mode 59 ITU #1 chart 60 menu 12 entering 15...
- Page 75 mute button 8 rcv.mode/contrast button 8 ready mode 14 number keypad 8 rear view 6 received journal 39 receiving faxes 28 redial/pause button 9 button 8 one-touch redialing dialling 18 automatic fax redial 22 out of ink 13 redial a number in memory 42 out of paper.
- Page 76 sending confirm 40 troubleshooting image TCR 12 fax problems 54 menu 11 messages 51 sent journal 39 paper feeding 56 set broadcasting print quality 56 menu 13 set delayed fax menu 13 unwanted faxes 12 set fax forward menu 13 set junk fax no view ink level menu 12...
Need help?
Do you have a question about the 640 Fax series and is the answer not in the manual?
Questions and answers