HP 1040 SERIES User Manual
Hewlett-packard fax machine user guide
Hide thumbs
Also See for 1040 SERIES:
- Maintenance and service manual (105 pages) ,
- Troubleshooting manual (30 pages) ,
- Quick start instructions (5 pages)

Related Manuals for HP 1040 SERIES


Summary of Contents for HP 1040 SERIES
- Page 1 HP 1040/1050 Fax series User Guide Part number: Q7270-90102 First edition: 10/2004...
- Page 2 • Telephone lines can develop hazardous voltages. To avoid electrical shock, do not touch the contacts on the end of the cord, or any of the sockets on the HP Fax. Replace damaged cords immediately. • Never install telephone wiring during a lightening storm.
-
Page 3: Table Of Contents
Document types and sizes 23 Set document resolution and contrast for a single copy 24 Adjust volume 25 Ringer volume 25 Speaker volume 25 Automatic fax redial 26 Receiving via an extension telephone (HP 1040 Fax only) 26 Contents i... - Page 4 Delete a number 29 Scan & Fax Mode 29 Image TCR 29 Distinctive ring (DRPD) 30 Step 1—Teach the HP Fax the ring pattern 30 Step 2—Set up distinctive ring (DRPD) answer mode 31 Answer/receive mode 31 HP1040 Fax 31...
- Page 5 Print reports 51 Automatic reports 51 Reports you can print 51 Reprinting faxes 52 Clearing memory 53 Loudspeaker—HP 1040 Fax 53 Speakerphone—HP 1050 Fax 53 Redial a number in memory 54 7 Care and maintenance Print cartridge information 55 View ink level 55...
- Page 6 Declaration of conformity 78 Use Hewlett-Packard support services 79 Hewlett-Packard LIMITED WARRANTY STATEMENT 80 iv Contents...
-
Page 7: Quick Start
BASIC FAX menu. For more information, on page 13. Paper Size The HP Fax is designed to work with a variety of plain papers (cotton bond 75–90 g/ (20–24 lb.)) in A4, Letter, and Legal sizes. TIP: Some papers have a side that’s been conditioned for printing. -
Page 8: Load Documents To Fax Or Copy
Load documents to fax or copy Load documents to fax or copy You can load up to 10 pages in the document feeder. Load the documents face down (printed side toward the machine). Send a fax Place the document to be sent (up to 10 pages) in the document feeder. Dial the number by using one of these methods: •... -
Page 9: Receive A Fax
How faxes are received depends on how the Answer Mode/Receive Mode is set. For more information, see FAX or TAM answer mode The fax machine will answer the telephone, automatically detect fax tones, and receive a fax. TIP: If you answer the telephone and hear fax tones, press the Start/Enter button to receive the fax. -
Page 10: Make A Telephone Call
• Press and hold a One Touch number. This turns on the speaker. When you are connected, pick up the handset (HP 1050 Fax does not have to pick up handset since it has a speakerphone.) For more information, see •... -
Page 11: Hp Fax Basics
HP Fax basics This chapter lists the basic features of your new HP Fax and introduces you to the machine. For detailed instructions, refer to the later chapters. The HP Fax features The HP Fax offers the following features: •... -
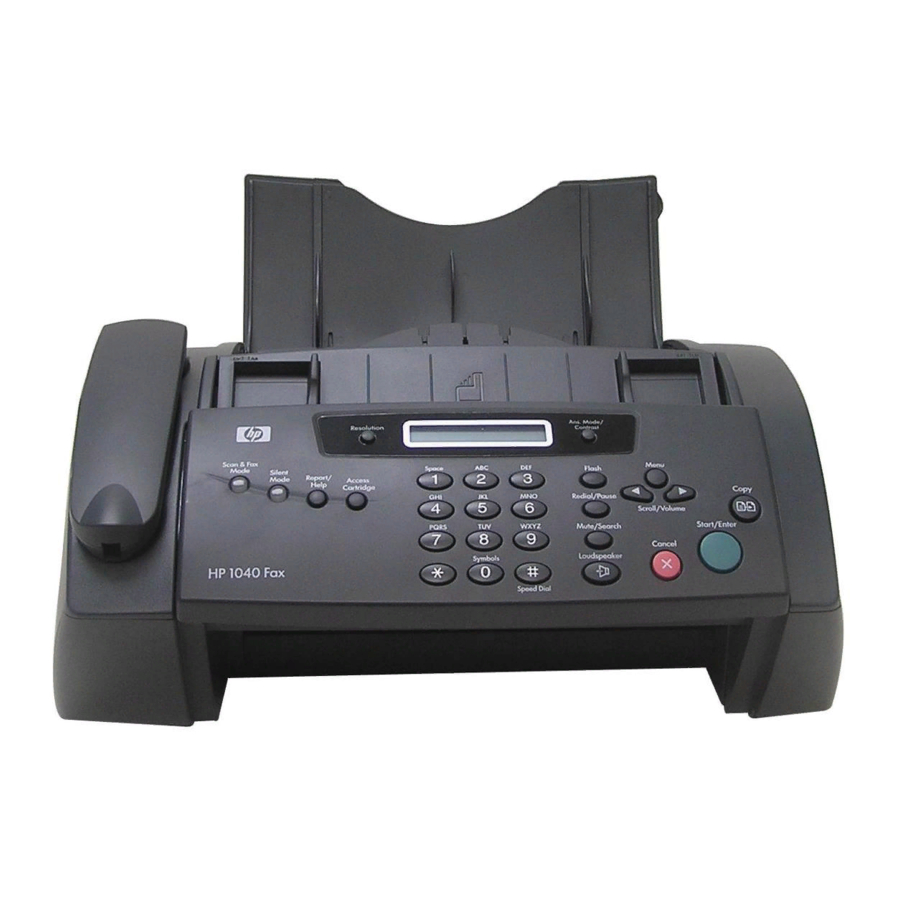
Page 12: The Hp Fax 1040/1050
The HP Fax 1040/1050 The HP Fax 1040/1050 Parts of the HP Fax Figure 2-1 Front view Figure 2-2 Rear view 6 HP Fax basics Document support Paper tray Paper tray cover Document guide Document feeder Handset Paper guide Paper support... -
Page 13: Control Panel Of Hp Fax
Figure 2-3 Bottom view Control Panel of HP FAX Figure 2-4 Control panel of HP 1040 Fax The HP Fax 1040/1050 Connect handset to the HANDSET port. Connect telephone line to the LINE port. HP 1040 only: Connect answering machine or extension phone to the EXT. - Page 14 The HP Fax 1040/1050 Figure 2-5 Control panel of HP 1050 Fax HP 1050 Fax Figure 2-6 HP 1040 & HP 1050 Fax control panel—Left side HP 1050 Fax 8 HP Fax basics PQRS WXYZ Scan & Fax Mode: When Scan & Fax mode is turned on, the device scans all pages before starting to send the fax.
- Page 15 HP 1040 & HP 1050 Fax control panel—Middle PQRS WXYZ Figure 2-8 HP 1040 & HP 1050 Fax control panel—Right side upper Space: [The 1 key]. Enters a space between words when entering a name in a text field. Display: Displays menu items and messages from the HP Fax.
- Page 16 The HP Fax 1040/1050 Figure 2-9 HP 1040 & HP 1050 Fax control panel—Right side lower Figure 2-10 HP 1040 Fax only control panel—Right middle 10 HP Fax basics Copy: • Press twice to copy a document with the default copy settings.
- Page 17 Figure 2-11 HP 1050 Fax only control panel—Right middle WXYZ Figure 2-12 HP 1050 Fax only control panel—Upper right Mute/Search: • Mutes the telephone during a telephone call. • Search for a number stored in memory. Speakerphone: The HP 1050 provides a fully functional speaker phone.
-
Page 18: The Menus
The menus The menus 12 HP Fax basics... -
Page 19: Overview Of Menu Options
(AUTO or TAM mode), we suggest you set the ring count to at least 4 (HP 1040) or 2 (HP 1050 with Toll Saver turned on) to give you time to answer. -
Page 20: Advanced Fax Menu
Man Fax Rcv Code extension phone. If you pick up the extension phone and hear a fax tone, (HP 1040 only) enter the code and the fax will start receiving. You cannot change the * *, just the number between them. The code can be 0 to 9. -
Page 21: Set Up Sound Menu
Set the dialing mode to the type of the exchange to which you are connected: Dial Mode Tone or Pulse. If you turn the Automatic Reduction option off, you can set the fax machine to Discard Size discard any excess image at the bottom of the page when receiving a document as long as or longer than the paper loaded in your machine. -
Page 22: Loudspeaker-Hp 1040 Fax
Speakerphone—HP 1050 Fax The HP 1050 Fax has full speakerphone capabilities. You never have to lift the handset if you do not want to. Press Speakerphone to make and receive calls as well as listening to your answering machine messages. -
Page 23: Navigate The Menus
Navigate the menus Ready mode Whenever the HP Fax is ready for faxing and copying (called Ready mode), it will display the date, time, and answer mode. For example, OCT-05 02:23PM FX Menu buttons Use the Menu buttons to navigate the menu items. -
Page 24: Enter Dates, Times, Text, And Telephone Numbers
• If the date format seems unfamiliar, check that you selected the correct one for your country when setting up your HP Fax (see • Some items on the display will show up with the blinking cursor under the item to change. -
Page 25: Fax Header Telephone Number
Enters a space. ‘&’ will display. Enters a space. ‘BAJA’ will display. ‘,’ will display. ‘INC’ will display ‘.’ will display. Result ‘(‘ will display. ‘123’ will display. ‘)’ will display. Enters a space. Set the fax header HP Fax basics 19... - Page 26 Enter dates, times, text, and telephone numbers Press ‘ 20 HP Fax basics Result ‘456’ will display. ‘- ‘will display. ‘7890’ will display...
-
Page 27: Speed Dialing
Speed dialing Your HP Fax has a built-in phone book that allows you to enter up to 80 or 100 (varies by model) names and numbers for faxing or telephone use. Once entered, you can dial the number by any of these methods. -
Page 28: Print The Phone Book
Dial from the phone book Dialing works the same for both faxes and telephone calls. If a document is loaded, the HP Fax sends the fax. One-touch dialing Press and hold the number (0 through 9) on the phone pad. -
Page 29: Paper Types And Sizes
Paper types and sizes The HP Fax is designed to work optimally with plain paper (cotton bond: 20 lb., 75 g/ ) in the following sizes: A4, Letter, and Legal. TIP: Some papers have a side that’s been conditioned for printing. The print side is usually indicated on the paper’s packaging. -
Page 30: Set Document Resolution And Contrast For A Single Copy
Blue lines on a ruled pad don’t fax well. For more information on the types of paper you can use for documents, see NOTE: You must set the resolution and contrast before dialing the number. 24 HP Fax basics Document types and sizes on page 23. -
Page 31: Adjust Volume
• Whenever you press the button, it will increase or decrease the volume. • The volume 0 indicates that the machine will not ring when a call is received. Speaker volume Press Loudspeaker (HP 1040) or Speakerphone (HP 1050). !" Then press Load documents to fax or copy to adjust the volume of the speaker. -
Page 32: Automatic Fax Redial
Or, press Cancel to stop redialing and the machine returns to Ready mode. Receiving via an extension telephone (HP 1040 Fax only) If you have an extension phone on the same line as your HP Fax you can remotely start receiving a fax. -
Page 33: Additional Features
Enter the number of rings you want (2–7) and press Start/Enter. The HP Fax rings the set number of times and then answers. It then produces a different sounding ring to alert you to which type of call is incoming. -
Page 34: Use Caller Id
Use Caller ID • The additional ring occurs 5 times for a voice call. After the 5 additional rings, the answering machine will answer. Use Caller ID Many countries have the Caller ID system that enables the receiver to view the numbers or names of callers. -
Page 35: Delete A Number
Scan & Fax Mode Scan & Fax Mode causes the HP Fax to scan all the pages of the fax into memory before starting to send. This is useful for situations where the fax you are calling might be busy and need to be redialed. -
Page 36: Distinctive Ring (Drpd)
Use Distinctive Ring to set your HP Fax to answer one of your phone numbers as a fax only line. The phone number (ring pattern) that you teach the HP Fax will be answered as if the machine is in FAX mode. -
Page 37: Step 2-Set Up Distinctive Ring (Drpd) Answer Mode
• In Ready mode, DR appears in the right hand corner of the display. • Now, the HP Fax will manage calls and faxes as if it were set to AUTO mode (see AUTO mode TIP: Distinctive ring must be set up again if you reassign your fax number or connect the machine to another telephone line. -
Page 38: Hp1050 Fax
AUTO mode • mode • mode HP1050 Fax How are you going to use your HP Fax? • Telephone and fax with the integrated answering machine in the Digital Message Center. • Telephone and fax machine without the answering machine. - Page 39 When a call comes in, the machine answers it. If a fax is being sent, the device receives the fax. If the HP Fax does not sense a fax signal, it will ring in a different tone to tell you it may be a regular telephone call.
- Page 40 Answer/receive mode • mode • mode • mode Press the Answer button. The button will light up. When the Answer button is on. TAM mode overrides any mode that was set with the Rcv.Mode/Contrast button. Additional features • In Ready mode, FX appears in the right hand corner of the display.
-
Page 41: Digital Message Center (Hp 1050 Fax Only)
Digital message center (HP 1050 Fax only) Your HP Fax has a built-in digital messaging center that gives you full message capabilities. • 30 minutes of digital message recording (includes incoming message and greeting) • Default incoming message (ICM) length is 60 seconds •... -
Page 42: Record Your Greeting
You can also play it at any time. Press the Greeting button. The display shows the date and time the greeting was recorded and counts down the seconds as it is played. Digital message center (HP 1050 Fax only) -
Page 43: Screen Or Monitor Your Calls
Screen or monitor your calls The HP Fax allows you listen to messages being recorded so you can decide whether to answer them. To monitor your calls, you must turn call monitoring on in the menu. Press the Menu button repeatedly until SET UP TAM displays and press Start/Enter. -
Page 44: Skipping A Message
Messages are not erased when you listen to them. If you do not periodically erase messages, the memory will become full. If the memory becomes full, the HP Fax will disconnect the current caller and fail to answer the phone until memory is made available by erasing messages. -
Page 45: Remote Access
You must enter a command within 15 seconds or the HP Fax will disconnect the line. Press #0 to end the remote session. NOTE: If you do not enter #0, it may take several minutes for the HP Fax to disconnect and release the phone line. Table 4-1 Remote access commands... -
Page 46: Toll Saver
This feature allows you to hang up before incurring phone charges. When Toll Saver is on and there are no new messages, the HP Fax adds two rings to the Rings to Answer setting. For example, if Rings to Answer is set to 4, the device will ring 6 times before answering if there are no new messages. -
Page 47: Message Paging
Message paging If you are out of the office, you can have the HP Fax call you when you receive a new message. TIP: You should only turn paging on if you are going to be gone. There is a delay between receiving the message and the paging message going out. - Page 48 Record a conversation Digital message center (HP 1050 Fax only)
-
Page 49: Advanced Faxing
In this chapter, you will learn how to use the advanced fax features of your machine. Broadcasting With Broadcasting you can have your HP Fax send your fax to up to 15 (HP 1040 Fax) or 20 (HP 1050 Fax) fax numbers at once. The documents are automatically erased from memory when Broadcasting is finished. -
Page 50: Delayed Fax
Delayed fax Delayed fax You can set your machine to send a fax any time in the next 24 hours. For example, it is usually cheaper to send a fax at night because telephone rates are lower than they are during the day. -
Page 51: Polling
You can program your fax machine to send a document when it is requested by a remote fax machine. NOTE: Your HP Fax allows you to set one poll job at a time and it can be retrieved once. Turn the document face down and feed it into the machine. -
Page 52: Polling Another Fax To Receive
To cancel the scheduled job Polling another fax to receive You can dial another fax machine that has a document waiting and request it to be sent to your fax machine. Dial the telephone number of the remote machine that is ready to be polled. -
Page 53: Forward Faxes
• HP 1040: During forwarding time, the answer mode temporarily changes to • HP 1050: During forwarding time, the answer mode continues to say FW. The machine will receive and forward faxes and answer and record voice messages. - Page 54 Forward faxes Advanced faxing...
-
Page 55: Feature Reference
Feature reference This chapter contains instructions for other features of the HP Fax that you may want to use from time to time. Set the date and time The current date and time are shown in the display when the machine is on and ready for use (Ready mode). -
Page 56: Key Sounds
Select On or Off and press Start/Enter. Silent mode You can turn the sounds of the HP Fax (including ringing) on and off using the control panel button. You can also set all sounds to turn off on a daily schedule; for example, turn all the sounds off between 8 pm and 8 am. -
Page 57: Print Reports
Print reports Your fax machine can print many reports for your use. Automatic reports These reports print automatically. Report name Multi-Communication Power Fail Report Reports you can print You can print these reports whenever you need to. Some of these reports can be set to print automatically also. -
Page 58: Reprinting Faxes
A power outage also clears the fax machine memory. NOTE: HP 1050 Fax: The device has 30 minutes of backup memory. If the power is off longer than that, the faxes will be cleared. Press Report/Help. -
Page 59: Clearing Memory
Speakerphone—HP 1050 Fax The HP 1050 Fax has full speakerphone capabilities. Press Speakerphone to make and receive calls as well as listening to your answering machine messages. While you are using Speakerphone, do not place the handset beside the speaker, as this may result in howling. -
Page 60: Redial A Number In Memory
Redial a number in memory Redial a number in memory These steps allow you to dial one of the last 10 numbers called that is in memory. Hold Redial/Pause for about two seconds. !" Press until Recent Numbers displays and press Start/Enter. !"... -
Page 61: Care And Maintenance
• Always use the HP 20 (C6614) ink cartridge. NOTE: Your HP Fax was shipped with a starter ink cartridge. Replace it with the HP 20 cartridge. • DO NOT unpack the cartridge until you are ready to use it. -
Page 62: Print The Self Test
Print the self test NOTE: If the HP Fax is low on ink (ink level is 1/8), new faxes that come in will not be printed. They will be stored in memory. You must manually print the faxes from memory... - Page 63 Open the control panel and cartridge compartment cover (it will click and remain open). Pull the cartridge toward you and remove it. To load the cartridge insert the cartridge as shown below. When the cartridge is pushed to the back of the cartridge carrier, push the top of the cartridge until it clicks into place.
-
Page 64: Clear Jammed Documents And Paper
Clear jammed documents and paper Press Start/Enter. Press 1 for new cartridge, or 2 for the old one. • When you put in a new cartridge, you must choose 1:New • When you put in a used cartridge, choose 2:Used. This helps you to check the correct amount of ink you have left. -
Page 65: If The Paper Is Jammed In The Paper Feed Area
If the paper is jammed in the paper feed area Remove the jammed paper as shown. If the paper tears when it is being removed check to ensure that no small pieces have been left inside the machine. Reload new paper with the print side facing toward you. -
Page 66: Clean The Cartridge Carrier Contacts
Maintain the print cartridge Reinstall the cartridge and close the cover and panel. If you spend a long time cleaning the cartridge, the cartridge carrier may have moved back to the original position. If so, press Access Cartridge again to move the carrier to the install position. -
Page 67: Clean The Document Scanner Area
To keep your machine working properly, occasionally clean the white roller, document feeder rubber piece, and the scanning glass. If they are dirty, documents sent to another fax machine will not be clear. CAUTION: When you turn the power off to clean the scanner, documents stored in memory will be lost. - Page 68 Clean the document scanner area Clean the document feeder rubber piece at the back of the control panel. Carefully wipe the scanning glass with a soft, dry, lint free cloth. • If the glass is very dirty, first wipe it with a slightly dampened cloth, then with a dry one.
-
Page 69: Adjust The Scanner
Adjust the scanner The scanner is adjusted at the factory. If, however, you drop your machine while moving it, we recommend you adjust scanner. Press Menu repeatedly until TOOLS appears and press Start/Enter. Scroll to Adjust Scanner by pressing Load a plain WHITE sheet of paper (no writing or graphics) into the document feeder and press Start/Enter. - Page 70 LCD error messages Display Junk Fax Empty Junk Fax Full Load Document Memory Full Memory Full Press Start/Enter to continue Memory Received Ink Low. Install new ink cartridge Memory Received Load paper and press Start/Enter Memory Received Install ink cartridge New Fax Received No answer from remote fax...
- Page 71 You tried to copy or fax a document which is longer than 390 mm (15.4 in.). The fax machine is busy doing something else. System Busy Try again later The machine is waiting (three minutes) to automatically redial To redial now, the fax number that was busy or did not answer.
-
Page 72: Troubleshooting
Check if the machine to which you are sending can receive your fax. The fax machine you are polling may be using a poll code (password). The machine sending to you may be faulty. A noisy phone line can cause line errors. - Page 73 Problem Spots or lines missing from the fax you receive. You are receiving poor quality copies. The fax machine sending to you may have a dirty scan glass. Some of the words on the fax you received appear stretched. Your machine does not make copies. Make sure your document is loaded face down.
-
Page 74: Print Quality Problems
Troubleshooting Print quality problems Problem Light or blurred characters. Smudged or dark characters. Characters with white lines. Improperly formed or misaligned characters. Abnormal black horizontal lines Paper feeding problems Problem Paper is jammed during printing. Paper sticks together. Paper fails to feed. Multiple sheets of paper feed. -
Page 75: Digital Message Center Problems
This is normal. The message repeats to give you time to enter the access code to retrieve your message. This is normal. The fax machine will attempt to receive a fax after several rings. The memory is full. Erase some messages to free up memory for more. - Page 76 Troubleshooting Care and maintenance...
-
Page 77: Specifications And Regulatory Information
This chapter contains product and supplies specifications, ordering information, and regulatory statements. Paper types and sizes The HP Fax is designed to work optimally with plain cotton bond paper. The following paper sizes and weight can be used with your machine: Paper size Dimensions 210mm x 297mm (8.3in x 11.7in) -
Page 78: Print Cartridge
Print cartridge Print cartridge The HP Fax uses the following print cartridge. HP 20 black inkjet print cartridge C6614 Product specifications The specifications are subject to change without notice. Item Type of unit Communication System Compatibility Compression scheme Modem speed... - Page 79 Super Fine/Photo: 600 x 300 dpi Fine: 196 x 203 dpi Super Fine: 392 x 203 dpi 80 (HP 1040) or 100 (HP 1050) 64 levels 1 Mbyte (capable of 100 pages at ITU#1 test chart (2.5% coverage on A4)
-
Page 80: A Sample Of Itu #1 Test Chart (Reduced To 60.5%)
A sample of ITU #1 test chart (reduced to 60.5%) A sample of ITU #1 test chart (reduced to 60.5%) Specifications and regulatory information... -
Page 81: Environmental Product Stewardship Program
ENERGY STAR is a U.S. registered service mark of the U.S. EPA. As an ENERGY STAR partner, HP has determined that this product meets ENERGY STAR guidelines for energy efficiency. For more information on ENERGY STAR guidelines, go to the following website: http://www.energystar.gov... -
Page 82: Regulatory Notices
For regulatory identification purposes, your product is assigned a Regulatory MOdel Number. The Regulatory Model Number for your product is SDGOB0403-01 or SDGOB0403-02. This regulatory number should not be confused with the marketing name (HP 1040/1050 Fax series) or product number (Q7200 series). Notice to users of the U.S. telephone network: FCC requirements This equipment complies with FCC rules, Part 68. - Page 83 Regulatory notices against harmful interference in a residential installation. This equipment generates, uses, and can radiate radio frequency energy, and, if not installed and used in accordance with the instructions, may cause harmful interference to radio communications. However, there is no guarantee that interference will not occur in a particular installation.
-
Page 84: Declaration Of Conformity
Hewlett-Packard Company 16399 West Bernardo Drive San Diego CA 92127, USA SDGOB-0403-01, -02 HP Fax 1040 (Q7270A) Series (-01) HP Fax 1050 (Q7278A) Series (-02) (-01) Q7270A, Q7271A, Q7272A, Q7273A, Q7274A (-02) Q7278A, Q7279A, Q7280A, and Q7281A UL1950/CSA22.2 No.950, 3 Ed.:1995... -
Page 85: Use Hewlett-Packard Support Services
• Remove the print cartridge and place it in an airtight bag so it will not dry out. Do not send the print cartridge with the unit unless asked to do so. • If you do not have the original packing material, you can request a replacement package set from HP Customer Support. Shipping damage caused by improper packaging is not covered under the warranty. -
Page 86: Hewlett-Packard Limited Warranty Statement
HP does not warrant that the operation of any product shall be uninterrupted or error free. HP's limited warranty covers only those defects which arise as a result of normal use of the product, and does not cover any other problems, including those which arise as a result of (a) Improper maintenance or modification, (b) Software, accessories, media, or supplies not provided or supported by HP, (c) Operation outside the product’s specifications, or (d) Unauthorized modification or misuse. - Page 87 This Warranty Statement gives the customer specific legal rights. The customer may also have other rights which vary from state to state in the United States, from province to province in Canada, and from country to country elsewhere in the world. To the extent this Warranty Statement is inconsistent with local law, this Warranty Statement shall be deemed modified to be consistent with such local law.
- Page 88 Hewlett-Packard LIMITED WARRANTY STATEMENT Specifications and regulatory information...
- Page 89 Index Access Cartridge button 8, alarm sounds align cartridge menu announcement only Ans.Mode/Contrast button Answer button answer mode answer ring pattern detection answering machine calling password remote access turning on arrow buttons AUTO mode auto reduction menu automatic fax redial block junk faxes bottom view broadcasting...
- Page 90 Greeting button greeting length of playing recording greeting only HANDSET port help help list HP Fax parts of HP support ICM Record Time menu image TCR menu incoming messages length of ink cartridge maintenance part number 55,...
- Page 91 LINE port loading documents loading paper Loudspeaker button loudspeaker 16, making a copy man fax rcv code, HP 1040 menu memory clearing Menu button menu BASIC FAX, options picture using menu setting language message...
- Page 92 print quality problems pulse dialing button 10, Rcv.Mode/Contrast button ready mode rear view receive mode received journal receiving faxes 31, recording conversation greeting Redial/Pause button 10, redialing automatic fax redial redial a number in memory regulatory information regulatory notices Canadian statement notice to users in Canada remote access remote password...
- Page 93 Speakerphone button speakerphone 16, Speed Dial button speed dial dialing programming using speed dials number of Start/Enter button supplies print cartridge Symbols button system data TAM mode 32, TAM status report TEL mode 32, telephone dialing telephone numbers entering text entering time, setting toll saver...
Need help?
Do you have a question about the 1040 SERIES and is the answer not in the manual?
Questions and answers