
Related Manuals for H3C H3C SECPATH F1000-A,SECPATH F1000-A HOST


Summary of Contents for H3C H3C SECPATH F1000-A,SECPATH F1000-A HOST
- Page 1 H3C SecPath F1000-A Firewall Installation Manual Hangzhou H3C Technologies Co., Ltd. http://www.h3c.com Manual Version: T2-08044H-20070622-C-1.03...
- Page 2 Copyright © 2006-2007, Hangzhou H3C Technologies Co., Ltd. and its licensors All Rights Reserved No part of this manual may be reproduced or transmitted in any form or by any means without prior written consent of Hangzhou H3C Technologies Co., Ltd. Trademarks H3C, , Aolynk,...
-
Page 3: About This Manual
About This Manual Related Documentation In addition to this manual, each H3C SecPath Series Security Products documentation set includes the following: Manual Description It introduces the functional features, H3C SecPath Series Security Products principles and guide to configuration and Operation Manual operation for H3C SecPath Series Security Gateways/Firewalls. - Page 4 Chapter Contents Introduces system hardware maintenance, 6 Hardware Maintenance including replacing DDR SDRAM. Lists common system failures and specific 7 Troubleshooting locating methods. Details appearance, panel and LEDs of the Multifunctional Interface functional modules available on the SecPath Modules F1000-A, as well as module installation and connection of interface cables.
- Page 5 II. GUI conventions Convention Description Button names are inside angle brackets. For example, click < > <OK>. Window names, menu items, data table and field names are inside square brackets. For example, pop up the [New User] window. Multi-level menus are separated by forward slashes. For example, [File/Create/Folder].
-
Page 6: Table Of Contents
Installation Manual H3C SecPath F1000-A Firewall Table of Contents Table of Contents Chapter 1 Product Overview ......................1-1 1.1 Brief Introduction........................ 1-1 1.2 Hardware Features ......................1-2 1.2.1 Appearance ......................1-2 1.2.2 System Description ....................1-2 1.2.3 LEDs........................1-3 1.2.4 Attributes of the Fixed Interfaces ................1-4 1.2.5 MIM ......................... - Page 7 Installation Manual H3C SecPath F1000-A Firewall Table of Contents 4.2 Configuration Fundamentals....................4-6 4.2.1 Basic Configuration Procedures................4-6 4.2.2 Command Line Interface..................4-7 Chapter 5 Software Maintenance....................5-1 5.1 Introduction ........................5-1 5.1.1 Boot Menu ....................... 5-1 5.1.2 Upgrading the Application and Boot ROM Programs Using XModem....5-3 5.1.3 Backing up and Restoring the Extended Segment of the Boot ROM .....
- Page 8 Installation Manual H3C SecPath F1000-A Firewall Table of Contents 8.5.5 Interface Connection Cable................... 8-10 8.5.6 Connecting the Interface Cable................8-11 8.6 1GEF/2GEF Module ......................8-12 8.6.1 Introduction......................8-12 8.6.2 Appearance ......................8-12 8.6.3 Interface Attributes ....................8-13 8.6.4 Panel and Interface LEDs ..................8-13 8.6.5 Interface Connection Fiber Cable .................
- Page 9 Installation Manual H3C SecPath F1000-A Firewall List of Figures List of Figures Figure 1-1 Front panel of the H3C SecPath F1000-A............1-2 Figure 1-2 Rear panel of the H3C SecPath F1000-A ............1-2 Figure 3-1 Installation procedure ................... 3-1 Figure 3-2 Install the H3C SecPath F1000-A firewall in a rack..........3-3 Figure 3-3 Grounding screw on the firewall ................
- Page 10 Installation Manual H3C SecPath F1000-A Firewall List of Figures Figure 8-9 Ethernet cable ...................... 8-6 Figure 8-10 Category-5 twisted-pair cable................8-7 Figure 8-11 1GBE module ..................... 8-9 Figure 8-12 2GBE module ..................... 8-9 Figure 8-13 1GBE module panel ..................8-10 Figure 8-14 2GBE module panel ..................
- Page 11 Installation Manual H3C SecPath F1000-A Firewall List of Tables List of Tables Table 1-1 Technical specifications of the H3C SecPath F1000-A .......... 1-2 Table 1-2 LEDs on the front panel of the H3C SecPath F1000-A.......... 1-3 Table 1-3 Attributes of the console port.................. 1-4 Table 1-4 Attributes of the AUX port ..................
-
Page 12: Chapter 1 Product Overview
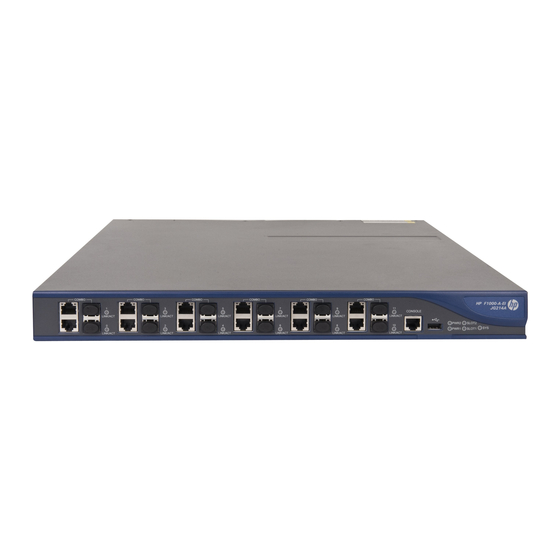
Installation Manual H3C SecPath F1000-A Firewall Chapter 1 Product Overview Chapter 1 Product Overview 1.1 Brief Introduction H3C SecPath F1000-A Firewall is a new-generation firewall intended for the use on enterprise networks. It can act as the egress firewall for medium businesses and internal firewall for large and medium enterprises. -
Page 13: Hardware Features
Installation Manual H3C SecPath F1000-A Firewall Chapter 1 Product Overview It supports active/standby switchover to protect current services against interruption, eliminating the defects of traditional networking solution, for example, VRRP networking solution. You can upgrade the application and Boot ROM programs on line to add features and extend functions. -
Page 14: Leds
Installation Manual H3C SecPath F1000-A Firewall Chapter 1 Product Overview Item Description 44 × 436 × 430 mm (1.7 × 17.2 × 16.9 in.), excluding the Physical dimensions (H × W × D) rubber feet Rated voltage range: 100 VAC to 240 VAC, 50 Hz or 60 AC+AC Max voltage range: 90 VAC to 264 VAC, 50 Hz or 60 Hz Input... -
Page 15: Attributes Of The Fixed Interfaces
Installation Manual H3C SecPath F1000-A Firewall Chapter 1 Product Overview Description Software running LED: Blinking means the software is operating normally; OFF means the software is faulty. GE interface LED: LINK ON means a link is present; OFF means no link is present. GE interface LED: ON means data are being transmitted/received on the interface;... -
Page 16: Table 1-5 Attributes Of The Ge Electrical Interfaces
Installation Manual H3C SecPath F1000-A Firewall Chapter 1 Product Overview III. Gigabit Ethernet (GE) Interface On the H3C SecPath F1000-A, the SRPU board provides two 10/100/1000 Mbps Ethernet interfaces: Ethernet 0 (right) and Ethernet 1 (left), each as optical or electric interface. - Page 17 Installation Manual H3C SecPath F1000-A Firewall Chapter 1 Product Overview Description Multi-mo Single Single Single Single mode mode Attribute mode mode short-ha medium-ha ultra-long short-haul long-haul ul (850 ul (1310 haul (1550 (1310 nm) (1550 nm) Central 850 nm 1310 nm 1310 nm 1550 nm 1550 nm...
- Page 18 Installation Manual H3C SecPath F1000-A Firewall Chapter 1 Product Overview...
-
Page 19: Chapter 2 Preparation For Installation
Installation Manual H3C SecPath F1000-A Firewall Chapter 2 Preparation for Installation Chapter 2 Preparation for Installation 2.1 Site Requirements The H3C SecPath Series Firewalls must be used indoors. To guarantee the normal operation and long service life of your device, install it in an environment that can meet the requirements in the following subsections. -
Page 20: Esd Prevention
Installation Manual H3C SecPath F1000-A Firewall Chapter 2 Preparation for Installation Table 2-2 Limit to the content of dust in an equipment room Substance Unit Content ≤ 3 X 10 Dust Particles/m³ (No visible dust on the table top for three days) Note: diameter of a dust particle ≥... -
Page 21: Electromagnetic Environment
Installation Manual H3C SecPath F1000-A Firewall Chapter 2 Preparation for Installation 2.1.4 Electromagnetic Environment All interference sources, wherever they are from, impact the firewall negatively in the conducted emission patterns of capacitance coupling, inductance coupling, electromagnetic wave radiation, and common impedance (including the grounding system) coupling. -
Page 22: Unpacking Check
Installation Manual H3C SecPath F1000-A Firewall Chapter 2 Preparation for Installation Follow these safety precautions when installing or using your device: Keep the device far from the moisture and heat sources. Make sure that the device is well earthed. Always wear an ESD-preventive wrist strap when installing and maintaining the SecPath 1000F, making sure the strap has good skin-contact. -
Page 23: Chapter 3 Hardware Installation
Installation Manual H3C SecPath F1000-A Firewall Chapter 3 Hardware Installation Chapter 3 Hardware Installation 3.1 Installation Procedure Start Install the cabinet (optional) Install the device at the specified place Connect the grounding wires Connect the power cord Connect the console terminal to device Verify the installation Power up the device... -
Page 24: Mounting The Device
Installation Manual H3C SecPath F1000-A Firewall Chapter 3 Hardware Installation Caution: Before you install your device, make sure that: You have read Chapter 2 “Preparation for Installation” carefully. The requirements in Chapter 2 are satisfied. 3.2 Mounting the Device You can install your device on a workbench/tabletop or in a rack. 3.2.1 Tabletop/Workbench-Mounting the Device If a 19-inch standard rack is unavailable, you can place the firewall on a clean workbench/tabletop. -
Page 25: Installing An Mim
Installation Manual H3C SecPath F1000-A Firewall Chapter 3 Hardware Installation (1) Pan-head screws (4) (2) Mounting ear (3) Guide rail Figure 3-2 Install the H3C SecPath F1000-A firewall in a rack 3.3 Installing an MIM For details about installing MIMs, see Chapter 8 “Multifunctional Interface Modules”. 3.4 Connecting the Grounding Wires Caution: When installing or using your device, properly connect the grounding wire for lightning... -
Page 26: Connecting To The Console Terminal
Installation Manual H3C SecPath F1000-A Firewall Chapter 3 Hardware Installation (1) Grounding screw Figure 3-3 Grounding screw on the firewall Connect this screw to the earth ground using a grounding wire. The grounding resistance must be smaller than 5 ohm. If the device is mounted in a 19-inch standard rack, the rack must be earthed. -
Page 27: Connecting The Ethernet Interface
Installation Manual H3C SecPath F1000-A Firewall Chapter 3 Hardware Installation Figure 3-4 Console cable assembly III. Connecting the console cable When configuring the firewall through a console terminal, follow these steps to connect the console cable: Step 1: Select a console terminal. The console terminal can be either a standard ASCII terminal with an RS-232 serial port, or more commonly, a PC. -
Page 28: Figure 3-5 Ethernet Cable Assembly
Installation Manual H3C SecPath F1000-A Firewall Chapter 3 Hardware Installation Figure 3-5 Ethernet cable assembly Note: In making network cables, shielded cables are preferred for the sake of electromagnetic compatibility. Cables for optical Ethernet interfaces For an optical Ethernet interface, you can choose the appropriate fiber cable, single-mode or multi-mode, depending on the 1000Base-FX SFP optical transceiver you are using (see Table 1-6 for fiber options). - Page 29 Installation Manual H3C SecPath F1000-A Firewall Chapter 3 Hardware Installation III. Connecting an Ethernet cable Take the fixed 10/100/1000 Mbps Ethernet 1 port on the front panel of the H3C SecPath F1000-A firewall for example. Follow these steps to connect its Ethernet cable: Caution: For each fixed Ethernet interface (for example, 10/100/1000 Mbps Ethernet 1 on the H3C SecPath F1000-A firewall), if both of its electrical and optical ports are connected,...
-
Page 30: Connecting A Psu
Installation Manual H3C SecPath F1000-A Firewall Chapter 3 Hardware Installation Caution: Laser danger: never look into the optical ports that are connected to the laser. It can harm your eyes. Step 1: Correctly connect one end of a fiber-optic cable to the Rx port of the 10/100/1000 Mbps interface on the firewall and the other end to the Tx port on the peer device. -
Page 31: Figure 3-6 Power Socket On The Ac-Powered Firewall
Installation Manual H3C SecPath F1000-A Firewall Chapter 3 Hardware Installation (1) PWR1 switch (2) PWR0 switch (3) AC-input PWR1 (4) AC-input PWR0 Figure 3-6 Power socket on the AC-powered firewall II. Recommended power socket You are recommended to use a single-phase three-terminal socket with an earth contact, which must be properly grounded. -
Page 32: Connecting A Dc-Input Psu
Installation Manual H3C SecPath F1000-A Firewall Chapter 3 Hardware Installation 3.7.2 Connecting a DC-Input PSU I. DC-input PSU DC input power: – 60 VDC to – 48 VDC II. Connecting a DC-input PSU Take the H3C SecPath F1000-A firewall for example. Step 1: Make sure that the PGND is securely connected to the earth ground. - Page 33 Installation Manual H3C SecPath F1000-A Firewall Chapter 3 Hardware Installation Note: Installation verification is extremely important, because the operations of the firewall depend on its stability, grounding, and power supply. 3-11...
-
Page 34: Chapter 4 Booting And Configuration
Installation Manual H3C SecPath F1000-A Firewall Chapter 4 Booting and Configuration Chapter 4 Booting and Configuration 4.1 Booting You can only configure the H3C SecPath Series Firewall through the console port when you use it for the first time. 4.1.1 Setting up a Configuration Environment I. -
Page 35: Figure 4-2 Set Up A New Connection
Installation Manual H3C SecPath F1000-A Firewall Chapter 4 Booting and Configuration Figure 4-2 Set up a new connection Step 2: Set the terminal parameters. Set the HyperTerminal parameters of Windows98 as follows: Select serial interface Select the serial interface to be used from the Connect using drop-down list as shown in Figure 4-3. -
Page 36: Figure 4-4 Set Communications Parameters
Installation Manual H3C SecPath F1000-A Firewall Chapter 4 Booting and Configuration Baud rate = 9600 Data bits = 8 Parity = None Stop bits = 1 Flow control = None Click <OK> and the HyperTerminal window appears. Figure 4-4 Set communications parameters Select emulation type Choose [Properties/Settings] to enter the corresponding page and select the emulation as VT100 or Auto detect. -
Page 37: Powering Up The Firewall
Installation Manual H3C SecPath F1000-A Firewall Chapter 4 Booting and Configuration Figure 4-5 Settings tab 4.1.2 Powering up the Firewall I. Checking before power-up Before powering up the firewall, check that: Both the power cord and the grounding wire are correctly connected. Proper power supply is used. -
Page 38: Booting Process
Installation Manual H3C SecPath F1000-A Firewall Chapter 4 Booting and Configuration III. Checking/Operating after power-up After powering up the firewall, check that: The ventilation system is operating well. After powering up the firewall, you can hear the sound of the fan blade spinning and feel the airflow when you put your hands close to the air vents. -
Page 39: Configuration Fundamentals
Installation Manual H3C SecPath F1000-A Firewall Chapter 4 Booting and Configuration Press <Ctrl+B> to enter the Boot menu. Otherwise, the system starts decompressing the program. Note: To enter the Boot Menu, you must press <Ctrl+B> within three seconds after the prompt “Press Ctrl-B to Enter Boot Menu…”... -
Page 40: Command Line Interface
Installation Manual H3C SecPath F1000-A Firewall Chapter 4 Booting and Configuration 4.2.2 Command Line Interface I. Features of the CLI The CLI of the firewall offers lots of configuration commands for you to configure and manage the firewall. The CLI allows you to: Configure the device through the console port at the local. -
Page 41: Chapter 5 Software Maintenance
Installation Manual H3C SecPath F1000-A Firewall Chapter 5 Software Maintenance Chapter 5 Software Maintenance 5.1 Introduction The firewall maintains three types of files: Boot ROM program files Application program files Configuration files software maintenance mainly involves upgrading/downloading Boot ROM/application program files and uploading/downloading configuration files. 5.1.1 Boot Menu This section introduces the Boot menu that you use in maintaining the software of the firewall. - Page 42 Installation Manual H3C SecPath F1000-A Firewall Chapter 5 Software Maintenance Start up and ignore configuration Enter debugging environment Boot Rom Operation Menu Do not check the version of the software Exit and reboot Enter your choice(1-9): Note that: To download an application program using XModem, see section 5.1.2 “Upgrading the Application and Boot ROM Programs Using XModem”.
-
Page 43: Upgrading The Application And Boot Rom Programs Using Xmodem
Installation Manual H3C SecPath F1000-A Firewall Chapter 5 Software Maintenance Caution: You are recommended to upgrade the software of the firewall under the guidance of support engineers. In addition, when upgrading the firewall, make sure the version of the Boot ROM software is consistent with that of the application program. 5.1.2 Upgrading the Application and Boot ROM Programs Using XModem You can use the console port to upgrade the software using XModem without the need of setting up a configuration environment. -
Page 44: Figure 5-1 Send File Dialog Box
Installation Manual H3C SecPath F1000-A Firewall Chapter 5 Software Maintenance Note: The new baud rate takes effect only after you reconnect the terminal emulation program. Step 4: Select [Transmit/Send File] in the terminal window. The following dialog box pops up: Figure 5-1 Send File dialog box Step 5: Click <Browse>. - Page 45 Installation Manual H3C SecPath F1000-A Firewall Chapter 5 Software Maintenance Writing file flash:/system to FLASH... Please wait, it may take a long time ################################################ Writing into Flash Succeeds. Writing file flash:/http.zip to FLASH... Please wait, it may take a long time ########################################################################## ###### #########...
-
Page 46: Backing Up And Restoring The Extended Segment Of The Boot Rom
Installation Manual H3C SecPath F1000-A Firewall Chapter 5 Software Maintenance Caution: This upgrade approach is only used to upgrade a portion of the Boot ROM program, so you can make a second attempt once errors occur. 5.1.3 Backing up and Restoring the Extended Segment of the Boot ROM I. -
Page 47: Upgrading An Application Program Using Tftp
Installation Manual H3C SecPath F1000-A Firewall Chapter 5 Software Maintenance 5.1.4 Upgrading an Application Program Using TFTP Upgrade an application program with net is to download the application program using an Ethernet interface. In this approach, the firewall is the client that needs to be connected to the TFTP server using one of its fixed Ethernet interfaces. - Page 48 Installation Manual H3C SecPath F1000-A Firewall Chapter 5 Software Maintenance Caution: The upgrade should be performed through interface ETH0 on the firewall. The item “IP address of the server: [192.168.1.10]” must be set to the IP address of the TFTP server connected to the Ethernet interface on the firewall. You are recommended to configure the IP addresses of the TFTP server network interface and that of the ETH0 on the firewall into the same network segment.
-
Page 49: Uploading/Downloading A Program/File Using Ftp
Installation Manual H3C SecPath F1000-A Firewall Chapter 5 Software Maintenance 5.1.5 Uploading/Downloading a Program/File Using FTP The H3C SecPath Series Firewalls can act as the FTP server. Any FTP clients (local or remote) connected to the firewall can update configuration files or upgrade application/Boot ROM programs using FTP. -
Page 50: Figure 5-4 Set Up An Environment For Remote Uploading/Downloading Using Ftp
Installation Manual H3C SecPath F1000-A Firewall Chapter 5 Software Maintenance Caution: The IP addresses assigned to the network interfaces of the PC and the firewall must reside on the same network segment. Set up a remote uploading/downloading environment using FTP H3C SecPath F1000-A (FTP Server) H3C SecPath F1000-A (FTP Server) H3C SecPath F1000-A (FTP Server) - Page 51 Installation Manual H3C SecPath F1000-A Firewall Chapter 5 Software Maintenance [VPNGateway-luser-vpngateway] service-type ftp ftp-directory flash: Step 5: Add an authority level. [VPNGateway-luser-vpngateway] level 3 Step 6: Enable the FTP server. [VPNGateway] ftp-server enable After the FTP server is enabled and the user is added onto the firewall, any FTP client program can use the username and password to log onto the FTP server.
- Page 52 Installation Manual H3C SecPath F1000-A Firewall Chapter 5 Software Maintenance local file remote file Upon the completion of uploading, the prompt “ftp>” appears again. Enter dir to view the name and size of the uploaded file on the firewall. It has the same size as the original file on the host if the uploading is successful.
-
Page 53: Modifying Boot Rom Password
Installation Manual H3C SecPath F1000-A Firewall Chapter 5 Software Maintenance Directory of flash:/ -rw- 8691281 Jun 16 2009 06:46:36 system -rw- 1830 Jun 17 2009 07:47:16 config.cfg -rw- 834724 Jun 18 2009 02:22:39 http.zip If the Web file is not included, the system gives the corresponding prompt. The Web file name defaults to http.zip. -
Page 54: Resetting A Lost Password
Installation Manual H3C SecPath F1000-A Firewall Chapter 5 Software Maintenance 4: Boot the system from flash (This option requires backing up the extended segment of Boot ROM in flash, refer to 5.1.3 for details.) 5: The system ignores the software version of the Boot ROM program, its extended segment, and application program for backward compatibility. -
Page 55: Chapter 6 Hardware Maintenance
Installation Manual H3C SecPath F1000-A Firewall Chapter 6 Hardware Maintenance Chapter 6 Hardware Maintenance 6.1 Preparing Tools Phillips screwdriver Flat-blade screwdriver ESD-preventive wrist strap Static shielding bag Note: These tools are not shipped with the firewall, so you need to prepare them yourself. 6.2 Opening the Chassis Cover Step 1: Power down the firewall and remove the power cords. -
Page 56: Replacing A Ddr Sdram
Installation Manual H3C SecPath F1000-A Firewall Chapter 6 Hardware Maintenance (1) Remove the six screws (2) Pull it out towards this direction Figure 6-1 Open the chassis Caution: Do not replace the hardware unless necessary and under the guidance of support engineers. -
Page 57: Figure 6-2 Ddr Sdram Maintenance Flow
Installation Manual H3C SecPath F1000-A Firewall Chapter 6 Hardware Maintenance Hardware maintenance mainly involves DDR SDRAM replacement. Follow this maintenance flow to replace a DDR SDRAM: Start Start Start Start Start Start Start Start Prepare the tools Prepare tools Prepare the tools Prepare tools Prepare the tools Prepare tools... -
Page 58: Locating The Ddr Sdrams On The Mainboard
Installation Manual H3C SecPath F1000-A Firewall Chapter 6 Hardware Maintenance bytes Flash Memory Hardware Version is 3.0 CPLD Version is 2.0 Press Ctrl-B to enter Boot Menu “512M bytes DDR SDRAM” means that the firewall is installed with a DDR SDRAM of 512M bytes. -
Page 59: Removing A Ddr Sdram
Installation Manual H3C SecPath F1000-A Firewall Chapter 6 Hardware Maintenance Figure 6-3 Position of the DDR SDRAMs, Flash, and Boot ROM on the mainboard Each DDR SDRAM has one positioning recess at its bottom for correct orientation. When installing a DDR SDRAM into a memory bank, press the positioning recess into the pin in the bank. -
Page 60: Installing A Ddr Sdram
Installation Manual H3C SecPath F1000-A Firewall Chapter 6 Hardware Maintenance Caution: Hold the DDR SDRAM only by its non-conductive edge, because it is prone to ESD and could be damaged by incorrect operations. You need to exercise some strength to pull the DDR SDRAM out of its bank but do not overdo it. -
Page 61: Replacing An Mim
Installation Manual H3C SecPath F1000-A Firewall Chapter 6 Hardware Maintenance (2) (1) (2) (2) (1) Insert the cover in this direction (2) Install six screws at these places Figure 6-5 Close the chassis cover Step 5: Tighten the four captive screws that are removed in steps 3 and 4 described in section 6.2 “Opening the Chassis Cover”... -
Page 62: Chapter 7 Troubleshooting
Installation Manual H3C SecPath F1000-A Firewall Chapter 7 Troubleshooting Chapter 7 Troubleshooting 7.1 Troubleshooting the Power System Symptom: The PWR0/PWR1 LED does not light. Troubleshooting: Check that: The power switch of the PSU is turned on. The power switch of the mains supply is turned on. The power cord is connected correctly. -
Page 63: Troubleshooting The Software Upgrade
Installation Manual H3C SecPath F1000-A Firewall Chapter 7 Troubleshooting II. Illegible characters on the terminal Symptom: The powered-up firewall displays illegible characters on the console terminal. Troubleshooting: Make sure you have set on your terminal (HyperTerminal): Bits per second = 9600 Data bits = 8 Parity = None Stop bits = 1... - Page 64 Installation Manual H3C SecPath F1000-A Firewall Chapter 7 Troubleshooting Download From Net Exit to Main Menu Enter your choice(1-3): 2 Starting the TFTP download... Failed to find the updated file Please check the network setting!! Troubleshooting: Check that the file to be downloaded exists and you have correctly specified the directory in the TFTP server.
-
Page 65: Chapter 8 Multifunctional Interface Modules
Installation Manual H3C SecPath F1000-A Firewall Chapter 8 Multifunctional Interface Modules Chapter 8 Multifunctional Interface Modules 8.1 Multifunctional Interface Module Options Following are the Multifunctional Interface Modules (MIMs) available for the H3C SecPath F1000-A firewall: I. Ethernet interface modules 1-port 10Base-T/100Base-TX Fast Ethernet interface module (1FE) 2-port 10Base-T/100Base-TX Fast Ethernet interface module (2FE) 4-port 10Base-T/100Base-TX Fast Ethernet interface module (4FE) 1-port 10Base-T/100Base-T/1000Base-TX Ethernet interface module (1GBE) -
Page 66: Figure 8-1 Install The Mim I
Installation Manual H3C SecPath F1000-A Firewall Chapter 8 Multifunctional Interface Modules II. Installing an MIM Caution: Before performing any of the following operations, make sure you have completely powered down the firewall to avoid getting electric shocks. Step 1: Place the firewall with its front facing towards you. Step 2: Turn off the mains supply and remove the power cord. -
Page 67: Troubleshooting An Mim
Installation Manual H3C SecPath F1000-A Firewall Chapter 8 Multifunctional Interface Modules Step 5: Pull the MIM towards you until it is completely separated from the bottom of the chassis. Caution: If you remove an MIM and do not install a new one right away, you must replace the blanking filler panel to prevent dust and debris from entering the firewall and to provide adequate ventilation. -
Page 68: Figure 8-3 1Fe Module
Installation Manual H3C SecPath F1000-A Firewall Chapter 8 Multifunctional Interface Modules Figure 8-3 1FE module II. Appearance of the 2FE module Figure 8-4 shows the 2FE module. Figure 8-4 2FE module III. Appearance of the 4FE module Figure 8-5 shows the 4FE module. Figure 8-5 4FE module... -
Page 69: Interface Attributes
Installation Manual H3C SecPath F1000-A Firewall Chapter 8 Multifunctional Interface Modules 8.4.3 Interface Attributes Table 8-1 shows the interface attributes of the 1FE, 2FE and 4FE modules. Table 8-1 Interface attributes of the 1FE, 2FE and 4FEmodules Attribute 1FE module 2FE module 4FE module Connector... -
Page 70: Interface Cable
Installation Manual H3C SecPath F1000-A Firewall Chapter 8 Multifunctional Interface Modules Table 8-2 describes the LEDs on the 1FE/2FE/4FE module panel and how to read their state. Table 8-2 LEDs on the 1FE/2FE/4FE module Description LINK OFF means no link is present; ON means a link is present. OFF means no packets are being transmitted/received on the ACTIVE interface;... -
Page 71: Table 8-3 Straight-Through Cable Pinout
Installation Manual H3C SecPath F1000-A Firewall Chapter 8 Multifunctional Interface Modules Blue Pair 1 White/blue Orange Pair 1 White/orange Green Pair 1 White/green Brown Pair 1 White/brown Figure 8-10 Category-5 twisted-pair cabl Table 8-3 Straight-through cable pinout Category-5 Direction of RJ-45 Signal twisted-pair... -
Page 72: Connecting The Interface Cable
Installation Manual H3C SecPath F1000-A Firewall Chapter 8 Multifunctional Interface Modules Category-5 Direction of Direction of twisted-pair RJ-45 RJ-45 signal signal cable –– White (brown) –– –– Brown –– Ethernet cables are divided into two categories: straight-through and crossover. Straight-through cable: The sequences of the twisted pairs crimped in the RJ-45 connectors at both ends are the same. -
Page 73: 1Gbe/2Gbe Module
Installation Manual H3C SecPath F1000-A Firewall Chapter 8 Multifunctional Interface Modules 8.5 1GBE/2GBE Module 8.5.1 Introduction 1-/2-port 10Base-T/100Base-T/1000Base-TX Ethernet interface module (1GBE/2GBE) can provide the communications between the firewall and a LAN. The 1GBE/2GBE module supports: The transmission distance of 100 meters over category-5 twisted-pair cable Three operating rates: 1000 Mbps, 100 Mbps, and 10 Mbps, with auto-sensing Full-duplex mode 8.5.2 Appearance... -
Page 74: Panel And Interface Leds
Installation Manual H3C SecPath F1000-A Firewall Chapter 8 Multifunctional Interface Modules Attribute 1GBE 2GBE 10/100/1000 Mbps, auto-sensing Operating mode Full-/half-duplex autonegotiation 8.5.4 Panel and Interface LEDs Figure 8-13 and Figure 8-14 show respectively the panel of the 1GBE and 2GBE modules. -
Page 75: Connecting The Interface Cable
Installation Manual H3C SecPath F1000-A Firewall Chapter 8 Multifunctional Interface Modules Figure 8-15 Ethernet cable II. Making an Ethernet cable To make an Ethernet cable with RJ-45 connectors using a category-5 twisted-pair cable, refer to Figure 8-16. A category-5 twisted-pair cable is composed of eight wires that are identified and grouped by colors of the outer insulator. -
Page 76: 1Gef/2Gef Module
Installation Manual H3C SecPath F1000-A Firewall Chapter 8 Multifunctional Interface Modules operate normally; OFF means the POST fails. In the latter case, contact your agent for help. Step 3: Check the status of the LINK LED on the 1GBE/2GBE module panel. ON means a link is present. -
Page 77: Interface Attributes
Installation Manual H3C SecPath F1000-A Firewall Chapter 8 Multifunctional Interface Modules 8.6.3 Interface Attributes Table 8-7 shows the interface attributes of the 1GEF/2GEF module. Table 8-7 Interface attributes of the 1GEF/2GEF module Attribute 1GEF 2GEF Connector SFP/LC Number of connectors Interface IEEE 802.3, 802.3u and 802.3ab standard... -
Page 78: Interface Connection Fiber Cable
Installation Manual H3C SecPath F1000-A Firewall Chapter 8 Multifunctional Interface Modules Figure 8-19 1GEF module panel Figure 8-20 2GEF module panel Table 8-8 LEDs on the 1GEF/2GEF module Description LINK OFF means no Rx link is present; ON means an Rx link is present. OFF means no packets are being transmitted/received on the interface;... -
Page 79: Connecting The Interface Fiber Cable
Installation Manual H3C SecPath F1000-A Firewall Chapter 8 Multifunctional Interface Modules 8.6.6 Connecting the Interface Fiber Cable Caution: In connecting the fiber cable, observe the following: Do not over-bend the fiber cable. Its curvature radius must be equal to or greater than 10 cm. -
Page 80: Module Attributes
Installation Manual H3C SecPath F1000-A Firewall Chapter 8 Multifunctional Interface Modules Figure 8-21 SSL module 8.7.3 Module Attributes Table 8-9 shows the attributes of the SSL module. Table 8-9 SSL module attributes Attribute Description Supported protocol Key algorithm (DES, 3DES, AES and RC4) Hardware algorithm Authentication algorithm (HMAC-MD5 and HMAC-SHA-1) -
Page 81: Troubleshooting Ssl Module
Installation Manual H3C SecPath F1000-A Firewall Chapter 8 Multifunctional Interface Modules 8.7.5 Troubleshooting SSL Module Symptom 1 : The STATUS LED is OFF when the firewall starts. Solution : The STATUS LED should be ON when the firewall starts. OFF means that the module or some components on the module are not powered on normally.
Need help?
Do you have a question about the H3C SECPATH F1000-A,SECPATH F1000-A HOST and is the answer not in the manual?
Questions and answers