Ultimaker PVA Removal Station Manual
- Installation and user manual (28 pages)
Advertisement
Submit your feedback to Ultimaker via support.ultimaker.com.
Intended use
This product is intended for use mainly within a commercial, professional, or educational environment. The PVA Removal Station is designed and built for the fast and easy dissolution of polyvinyl alcohol (PVA) support material which was generated during dual extrusion printing.
The PVA Removal Station dissolves PVA by generating flowing water, which removes all PVA material up to four times faster than when the object is submerged in still water. To achieve optimum dissolving speeds, the PVA Removal Station varies the flow direction periodically. By changing the direction, the water flow will reach all printed product cavities.
Safety and compliance
Safety messages
The information provided below is applicable to the Ultimaker PVA Removal Station ("Ultimaker product").
This guide contains warnings and safety notices.
 Provides additional information that is helpful to do a task or to avoid problems.
 Warns of a situation that may cause material damage or injuries if the safety instructions are not followed.
The following ISO warning symbols are also used:
![]() Magnetic field (ISO 7010-W006)
Magnetic field (ISO 7010-W006)
 Electricity hazard (ISO 7010-W012)
 Read the user manual (ISO 7010-M002). Before using this product, read the complete user manual to learn about all its features and safety related information
General safety information
- The PVA Removal Station has moving parts that can cause injury. Never reach inside the Ultimaker PVA Removal Station while it is in operation. Always control the PVA Removal Station with the user interface at the front.
- Do not change or adjust any parts of the PVA Removal Station unless the change or adjustment is authorized by the manufacturer.
- Do not store items inside the PVA Removal Station.
- The PVA Removal Station is not intended for use by persons with reduced physical and/or mental capabilities, or lack of experience and knowledge, unless they are supervised or have been given instructions concerning the use of the appliance by a person responsible for their safety.
- Children should be under constant supervision when using the PVA Removal Station. Maintenance actions shall only be performed by an adult.
Hazards
Electrical safety
An easily accessible mains socket must be used so that the product can quickly be unplugged when necessary. Be sure that the building installation has dedicated means for over-current and short-circuiting. The PVA Removal Station is powered by mains voltage, which is hazardous when touched.
Always unplug the product before performing maintenance. Modifications such as soldering of electronic subunits are forbidden.
Never immerse the PVA Removal Station docking station in water or any other liquid.
Immediately unplug the PVA Removal Station if water comes into contact with the docking station.
Only use the original power cable supplied with the device. Do not damage, cut, or repair the cable. A damaged cable should be immediately replaced with a new original power cable from a recognized Ultimaker reseller.
Never use the PVA Removal Station if the power cable, docking station, container, or rotor is damaged.
Mechanical safety
The PVA Removal Station has a movable component in the form of a rotor. Although the force of the rotor is limited, do not touch the rotor during operation. When cleaning a printed product in the PVA Removal Station, make sure the product is placed inside the rinsing basket. Without the basket, printed products could come in contact with the rotor and cause damage. Turn off the PVA Removal Station or rotor when removing the rinsing basket from the container.
![]() The PVA Removal Station uses magnetic force to drive the removable rotor. Be aware of the magnetic force when handling the rotor close to other metal or magnetic objects.
The PVA Removal Station uses magnetic force to drive the removable rotor. Be aware of the magnetic force when handling the rotor close to other metal or magnetic objects.
The scratch tool has sharp edges. Use this tool with caution. Protective gloves are advised.
Always unplug the PVA Removal Station before doing maintenance.
Radiation
The PVA Removal Station does not emit high levels of radiation. However, it is advised not to look into the container illumination for longer periods of time.
Health and safety
Water contamination
As Ultimaker wishes to ensure the safety and quality of our products, we conduct different tests throughout our research and product development process. In this respect, Ultimaker has engaged a third-party research partner to conduct water contamination studies to verify the health and safety requirements around the usage of the PVA Removal Station within the normal use boundaries, taking into account that PVA is known to be a nutrient to certain types of microorganisms.
Based on the test results received, Ultimaker has verified that the growth of such microorganisms is very limited (and therefore does not impose a health risk) when using the PVA Removal Station in accordance with the user manual and in particular when
- using tap water that complies with the minimum quality requirements for drinking water as established by the World Health Organization and
- changing the water in the PVA Removal Station when so shown by the indicator (which also keeps the speed optimal).
Using gloves or washing hands with soap after using the PVA Removal Station is advised as a common hygiene practice.
Food and beverages should be kept away from the device.
Use of liquids
Only use cold water in the PVA Removal Station. Filling the container with warm or hot water may damage the printed objects. Chemicals, including but not limited to acetone, organic solvents, and alkalis, should never be used in the PVA Removal Station. The use of chemicals can deteriorate the material of the container, thereby damaging the product and creating possible health and safety risks.
Note: When using warmer water or water with high chlorine levels, the PVA Removal Station may require more frequent maintenance such as refreshing the water and cleaning the container.
Note: Do not leave the container filled with water if the PVA Removal Station is not in use. Prolonged exposure to still water could potentially lead to corrosion of the rotor pin. Empty, clean, and dry the container if the PVA Removal Station is not used for 7 days or longer.
Note: PVA is a biodegradable material and can be disposed of down the drain, providing the wastewater distribution network is connected to a wastewater treatment plant. Check local regulations for more comprehensive guidance.
Introduction
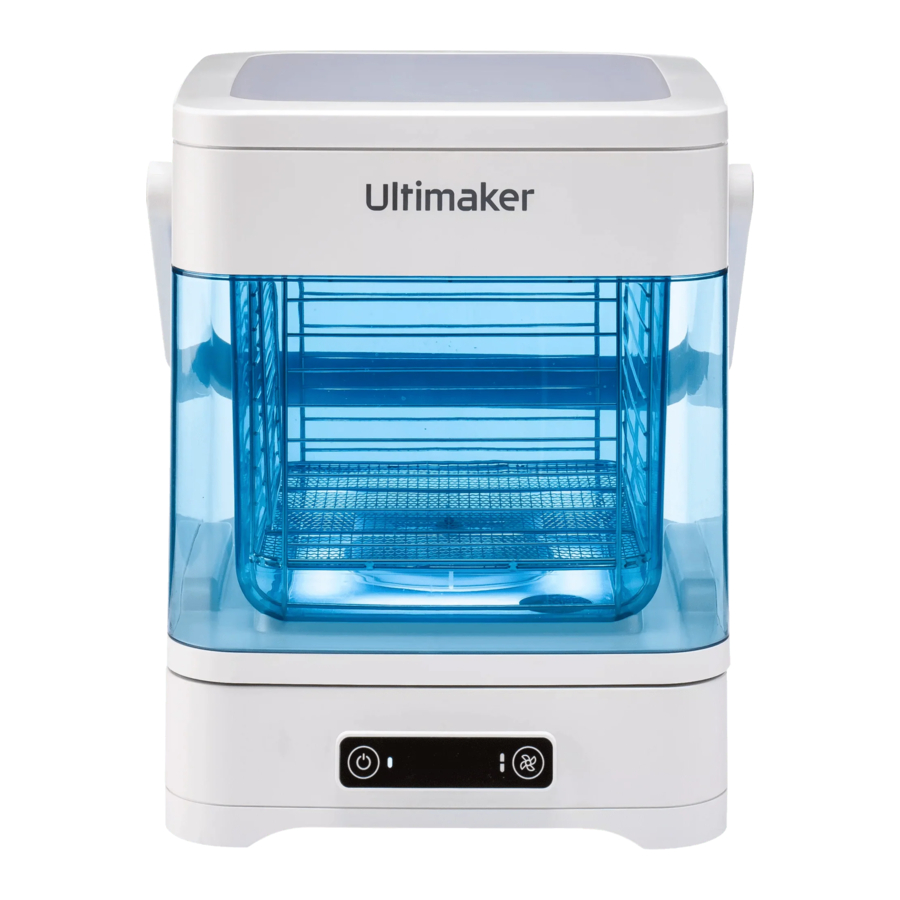
Main components

- Top cover
During operation, the top cover should be placed on the container to close it. This prevents water splashing out of the PVA Removal Station. - Container
The large container has a volume of 13.7 liters. The container is filled with cold water to enable the cleaning process. The container has two grips and a large handle for easy transportation. The back of the container has a pouring spout to facilitate water disposal. - Magnetic rotor
The magnetic rotor is placed at the bottom of the container. During the cleaning process, the rotor will turn to enable water flow. There are two rotor speeds: Normal and Low. The rotor will automatically change direction during operation to optimize dissolving speeds. - Docking station
The docking station is the base of the PVA Removal Station. It contains integrated electronics and a motor. The docking station also features the interface. The power cable is connected to the docking station. - Interface
The simple but elegant interface has two buttons and three small LEDs. Turn the PVA Removal Station on and off with the power button on the left. The button on the right side sets the rotor speed (Normal, Low, or Paused). The interface also controls the container illumination and indicates error states. - Rinsing basket
During the cleaning process, printed objects are placed in the rinsing basket. This ensures that the objects are kept fully submerged and away from the turning rotor. The rinsing basket has an inner divider to restrict movement of the printed part.
Specifications
Ultimaker PVA Removal Station specifications
| Properties | Container volume | 13.7 L (3.6 US Gal) |
| Maximum part size (XYZ) | 200 x 230 x 165 mm (7.8 x 9 x 6.4 in) | |
| Supported materials | Optimized for: Ultimaker PLA and PVA Also suitable for PETG, Tough PLA, Nylon, and CPE in combination with PVA. (also supports third-party materials) | |
| Supported solvents | Water | |
| Rotational speed | 225 RPM (Normal) 100 RPM (Low) | |
| Operating sound | < 50 dBA | |
| Physical dimensions | Dimensions (with handle upright) | 303 x 325 x 374 mm (11.9 x 12.8 x 14.7 in) 303 x 325 x 528 mm (11.9 x 12.8 x 20.8 in) |
| Net weight | 6.35 kg (14 lbs) | |
| Container weight (empty) | 4.2 kg (9.3 lbs) | |
| Shipping box dimensions | 400 x 400 x 500 mm (15.7 x 15.7 x 19.7 in) | |
| Shipping weight | 8.5 kg (18.7 lbs) | |
| Ambient conditions | Operating ambient temperature | 15 – 32 ºC (59 – 90 ºF) |
| Non-operating temperature | 0 – 32°C (32 – 90 ºF) | |
| Relative humidity | 10 - 90% RH non-condensing | |
| Electrical requirements | Voltage | 100 - 240 VAC |
| Frequency | 50 - 60 Hz | |
| Power | Max. 600 W | |
| Warranty | Warranty period | 12 months |
Installation
Unboxing
The Ultimaker PVA Removal Station comes in reusable, durable packaging, specially designed to protect your product. Follow the steps below properly to unpack your Ultimaker PVA Removal Station.
Note: It is recommended to remove the packaging with the box placed on the floor for safety. Please retain all packaging for warranty purposes.
- Open the outer packaging box.
- Take the accessories out of the box and place them aside.
- Remove the protective foam placed on top of the PVA Removal Station.
- Rotate the handle upwards and lift the container out of the box.
- Temporarily place the container on a flat and stable surface and remove the protective cardboard.
![]()
- Use the handles in the cardboard box, to lift the docking station out of the box.
- Remove the packaging material from the docking station and place the station on a flat and stable surface.
- Remove the top cover of the container and remove the protective material from the rinsing basket.
![]()


What's in the box
The Ultimaker PVA Removal Station consists of several components and accessories. Check if all items are included before continuing:
Main components
- Docking station
- Container
- Top cover
- Rinsing basket
- Magnetic rotor
Accessories
- Power cable
- PVA scratch tool
- Quick start guide
- Safety and warranty information
Hardware installation
After unboxing, complete the installation of the PVA Removal Station in only a few simple steps. Make sure that all packaging material is removed from the product and choose a suitable location to install the PVA Removal Station.
Always place the Ultimaker PVA Removal Station on a dry, flat and stable surface. Do not place the equipment in a humid environment.
To connect the power cable and complete the setup, take the following actions:
- Turn the docking station over and gently place it on a dry, flat, and stable surface.
- Connect the power cable to the power socket in the cavity underneath the device.
- Place the docking station in the upright position again.
- Plug the other side of the power cable into a suitable wall outlet.
- Gently place the container on top of the docking station.
![]()

Operation
Fill the container
To dissolve PVA of 3D printed parts, the container must be filled with cold tap water. Take the following steps to fill the container:

- Remove the top cover and rinsing basket from the container.
- Lift the container from the docking station. Use either the handle at the top, or use the grips on either side at the bottom of the container.
![caution]() Dried-up PVA residue has highly adhesive properties. If any PVA residue came into contact with the docking station, this could result in the container remaining attached to the docking station when the container is lifted. Make sure the two parts are detached before walking away with the container.
Dried-up PVA residue has highly adhesive properties. If any PVA residue came into contact with the docking station, this could result in the container remaining attached to the docking station when the container is lifted. Make sure the two parts are detached before walking away with the container. - Fill the container with cold tap water. Do not fill the container beyond the water level indicator.
![caution]() Only use cold water to fill the container. Too high water temperatures will damage or deform most printed parts or even the container. Do not fill the device with other liquids.
Only use cold water to fill the container. Too high water temperatures will damage or deform most printed parts or even the container. Do not fill the device with other liquids.
Note: The container has a temperature warning label on the bottom. Pay attention to this label when filling the container. The label will turn red if the water is too hot. Wait until the water has cooled before placing printed parts into the water.
- Return to the docking station and gently place the container on top. Ensure the two parts are properly aligned.
Note: Always first make sure the docking station is clean and dry. Remove all saturated PVA with a moist towel and dry the docking station before placing the container on top.
Immediately unplug the PVA Removal Station if water has splashed over the docking station. Allow the docking station to air dry completely before next use.
Place parts in the rinsing basket
To speed up the dissolving of the PVA support material, first manually remove as much PVA material as possible, prior to placing the print in the basket. Be careful not to damage the printed part in the process. Use pliers to remove larger chunks of PVA.

Protective gloves are advised as broken pieces of PVA can be sharp.
- Unlock the rinsing basket and open the lids.
- Place the printed object in the rinsing basket.
- Adjust the basket's divider to restrict movement of the object.
Note: Make sure that no parts of the printed object are protruding through the sides of the basket.
- Close the lids of the basket to fix the divider in place and lock the lids shut.
- Lift the rinsing basket and lower it into the container.
- Place the top cover onto the container.
Tip: Placement of the printed part can reduce dissolving time. Place and restrict the object, with the majority of the PVA at the bottom, as far as possible in the lower corners of the rinsing basket. This is where the water flow is most intense.
Select rotor speed
The PVA Removal Station is equipped with two rotor speed settings: Normal and Low. The Low speed mode is recommended for smaller, fragile printed objects. Additionally, a Pause mode is available to allow intermediate inspection of the part and dissolving process.
Note: The PVA Removal Station makes use of two rotational directions for optimal cleaning performance. This will happen automatically. At the rotational direction change, the rotor will be stationary for several seconds; this is normal.

- Press the power button to power on the PVA Removal Station. The container illumination will start up. The device powers on inPause mode.
- Press the rotor speed button once to activateNormal rotor speed. Both LED indicators will light up to indicate full rotor speed.
- To activate theLow rotor speed mode, press the rotor button again. Now, only the lower indicator will be lit, indicating reduced rotor speed.
- The PVA Removal Station is now set up, and the PVA dissolving process is active.
Note: Pressing the rotor button a third time will activate the Pause mode. Keep pressing the button to cycle through the three different modes (Normal, Low, Pause) until you have reached the desired setting.

Remove the print
For most printed objects, all the PVA material will have dissolved between 1 – 8 hours (depending on the size and density of the support structure). When no more PVA is visible, remove the object(s) from the PVA Removal Station.
Tip: Speed up the process by removing the printed part from the PVA Removal Station after approximately 10 minutes and removing most of the support structures with the scratch tool. Place the object back into the container to finish the process until all of the PVA material has dissolved.
Inspect the print
- Turn off the PVA Removal Station by pressing the power button, or press the rotor button to activate thePause mode (press twice when in Normal mode, press once when in Low mode).
- Lift the top cover off the PVA Removal Station and place it next to the device.
![information]() Note: Some condensation may have formed on the underside of the top cover. This is normal. However, remove the cover carefully to prevent dripping water on the working station.
Note: Some condensation may have formed on the underside of the top cover. This is normal. However, remove the cover carefully to prevent dripping water on the working station. - Lift the rinsing basket out of the container, rotate it 90°, and lower the basket back in the container. It will rest on the internal edges of the container above the waterline. The rinsing basket is now in the parking position (see image on the right).
![]()
- Unhook the lock and open the two lids of the rinsing basket.
- Closely inspect the printed object(s) and determine if all PVA material has successfully been dissolved.

If there is still PVA residue on the printed object, place it back in the rinsing basket, close the lids, and rotate the basket 90º to lower it back into the container. Continue the process by pressing the rotor button.
If no more PVA is visible, proceed with rinsing the object.
Rinse with fresh water
After the support material has dissolved completely, quickly rinse the printed part with fresh water. This ensures the object is completely clean and prevents a thin film of PVA from forming on the object as it dries.
Only use cold water to rinse your printed objects. Water above 35º C can damage or deform the printed object. Do not use other liquids to rinse the product.
Tip: The top cover turned upside down can be used as a dripping tray to transport the rinsing basket with wet models.
Leave to dry
After rinsing, let the printed part air-dry. The use of a (paper) towel can speed up the drying progress, but note that fibers may stick to the printed object.
Place the object in a suitable location for drying. Note that printed parts can contain more water than they appear to. Do not place the objects on moisture-sensitive surfaces or near other objects, such as paper or electrical appliances.
Tip: Place the basket in the parking position above the container and leave the object to drain and dry in the rinsing basket.
Container illumination
The PVA Removal Station container is illuminated. The default brightness setting is 100%, but the illumination brightness can be adjusted if desired.
- When the PVA Removal Station is turned off, press the power button and hold for 8 seconds.
- The upper LED of the rotor speed indicator will light up. This indicated that theBrightness mode is enabled.
- Press the rotor speed button to go through the available brightness levels.
- Press the power button once to confirm the chosen brightness level, or wait 5 seconds.

- Power button
- Rotor speed LEDs
- Rotor speed button
Maintenance
Maintenance schedule
To keep your PVA Removal Station in optimal condition, we recommend the following maintenance schedule, based on 2,000 operating hours per year:
Ultimaker PVA Removal Station maintenance schedule
| Every week (if not in use) | Empty the container | If the PVA Removal Station is not used for 7 days or longer, empty and clean the container according to the instructions in Disposal of wastewater and Storage sections. |
| Every month (or every water exchange) | Refresh the water | Check the water saturation level regularly and refresh the water according to the saturation indicator. See Maintenance sections for more information about checking, refreshing, and disposing of the water. |
| Clean the container | When the container is emptied, gently clean the inside with a soft brush. | |
| Clean the rotor and rotor pin | Remove the rotor and gently clean it with a soft brush. Clean and dry the rotor pin with a soft cloth. | |
| Clean the docking station | Gently clean the outside of the docking station with a damp cloth to remove any PVA residue. | |
| Check for damage | Check all parts of the PVA Removal Station for damage. If any damage is detected, discontinue use immediately and contact support or your local reseller. | |
| Every 3 months (or every 500 operating hours) | Check for play on the rotor bearings | Ensure the rotor turns freely and is not tilted to one side so that it scrapes aling the bottom of the container. Replace the rotor if it is worn. |
| Check the rotor bearing ring | The rotor bearing ring prevents wear of the rotor. Check for imperfections and signs of wear, and replace the ring if necessary. | |
| Remove limescale | Limescale is a chalky deposit left after water evaporation. Clean the container with vinegar or a limescale remover and thoroughly rinse the container afterward. |
Maintenance actions shall only be performed by an adult. Carefully follow the provided instructions. Always turn off the PVA Removal Station and disconnect the power cable when performing maintenance actions, unless specified otherwise.
Prolonged exposure to still water could potentially lead to corrosion of the rotor pin. Use the PVA Removal Station regularly, or empty, clean and dry the container if the PVA Removal Station is not used for 7 days or longer.
For more information about the recommended maintenance actions and detailed instructions, take a look at the PVA Removal Station support pages.
Check the water saturation level
The water will slowly become saturated with PVA after each use. It is possible to use the water in the PVA Removal Station for more than one print or cycle, but higher PVA saturation levels of the water negatively impact the efficiency. Using fresh water will speed up the cleaning process. It is recommended to regularly check the saturation level.
Tip: Turn off the PVA Removal Station using the power button. The container illumination interferes with the inspection.
- Remove the top cover and lift the rinsing basket out of the container.
- Look down into the PVA Removal Station at the saturation indicator at the bottom. This is located on top of the magnetic rotor.
- Determine if the ring can be divided into two colored segments.
- If the ring appears as one uniform color, the water is saturated with PVA and the water should be disposed of.

Fresh water

The ring on the rotor can still clearly be divided into separate segments
Saturated water

The water looks yellowish and the segments on the rotor ring are hard to distinguish
Highly saturated water will increase motor load and increase cleaning time. For optimum performance of the Ultimaker PVA Removal Station, refresh the water immediately when the indication segments are not visible anymore or when the water has not been refreshed for one month.
Disposal of wastewater
The container should be emptied in the following situations:
- When the water is too saturated with PVA (see Check the water saturation level section )
- When the water has not been refreshed in more than one month (see Maintenance schedule section)
- When the PVA Removal Station will not be used for a longer period of time (see Storage section)
Do not leave the container filled with water if the PVA Removal Station is not in use. Prolonged exposure to still water could potentially lead to corrosion of the rotor pin. Empty, clean, and dry the container if the PVA Removal Station is not used for 7 days or longer.
When emptying the container, it is highly recommended to stir the water first.
- Turn on the PVA Removal Station using the power button.
- Set the rotor speed to Normal.
- Let the PVA Removal Station mix the water for 1 minute.
- Remove the top cover and rinsing basket from the container and place them aside.
Tip: The top cover turned upside down can be used as a dripping tray for the rinsing basket.
- Lift the container from the docking station. Use either the handle at the top, or use the grips on either side at the bottom of the container.
![caution]() Dried-up PVA residue has highly adhesive properties. If any PVA residue came into contact with the docking station, this could result in the container remaining attached to the docking station when the container is lifted. Make sure the two parts are detached before walking away with the container.
Dried-up PVA residue has highly adhesive properties. If any PVA residue came into contact with the docking station, this could result in the container remaining attached to the docking station when the container is lifted. Make sure the two parts are detached before walking away with the container. - Move the container to a water disposal location. Gently tilt the container and pour out the water using the pouring spout at the back of the container.
Note: PVA is a biodegradable material and can be disposed of down the drain, providing the wastewater distribution network is connected to a wastewater treatment plant. Check local regulations for more comprehensive guidance.
After disposal of the water, run hot water from the tap for approximately 30 seconds to remove any PVA residue from the drain and avoid longer-term clogging issues.
- Clean the container, rotor, and rotor pin according to the maintenance instructions.
You can now refill the container for continued use or place it away in storage.
Storage
The Ultimaker PVA Removal Station must be stored according to the specified ambient conditions (see Specifications section) when the device is not in use.
Do not leave the container filled with water if the PVA Removal Station is not in use. Prolonged exposure to still water could potentially lead to corrosion of the rotor pin. Empty, clean, and dry the container if the PVA Removal Station is not used for 7 days or longer.
Take the following actions to ensure the PVA Removal Station is stored safely and correctly:
- Remove the rinsing basket from the container. Rinse it with clean water and leave to dry or dry it with a clean cloth.
- Empty the container according to the instructions in Disposal of wastewater section.
- Remove the rotor from the pin in the container. Clean and dry the container, rotor, and rotor pin according to the maintenance instructions.
- Do not reinstall the rotor in the container, but place it in the rinsing basket. This prevents any remaining PVA residue from gluing the rotor to the bottom of the container.
- Place the rinsing basket with the rotor inside the container.
- Put the top cover on the PVA Removal Station.
Tip: The PVA Removal Station can be placed back in its original packaging when placed in storage.
Troubleshooting
Failure modes
If something goes wrong during operation of the PVA Removal Station, or the PVA Removal Station does not behave as expected, use the troubleshooting information provided to locate the root cause and solution for any issues.
| Failure mode | Potential cause | Suggested actions |
| No water flow | No power | Check if the power cable is connected. The LED next to the power button should be on if power is supplied and the unit is turned on. |
| No rotor | Check if the rotor is placed in the container. | |
| Container leaks | Check the container for cracks and check for water spillage around the PVA Removal Station. | |
| Rotor blocked or unbalanced | Check if the rotor is stuck (PVA buildup) or blocked by a printed part. Check the rotor bearings for signs of wear. Replace the rotor if necessary. | |
| Rotor is rotating slowly and Slow speed LED is blinking | Overheating warning | The PVA Removal Station is in cooling-down mode and will automatically resume normal cleaning speed. If the issue persists, try the following:
|
| The device is shaking and vibrating | Magnetic coupling is slipping | Turn off the PVA Removal Station. Turn it back on and restart the cleaning procedure. If the issue persists, try the following:
Replace the rotor if necessary. |
| Rotor slips from pin when emptying container | Rotor not placed correctly | Clean the rotor and container and carefully put the rotor back onto the pin. Ensure the O-ring is pushed completely through the rotor. |
| Rotor pin O-ring worn out | Replace the O-ring on the rotor pin. | |
| Corrosion or brown residue on rotor pin or rinsing basket | Prolonged exposure to still water | Empty, clean, and dry the PVA Removal Station if the device is not used for 7 days or longer. Thoroughly clean the rotor pin and rinsing basket with a brush to remove the corrosion or residue before continuing use. |
| Rinsing basket in contact with rotor pin | Check if the bottom of the rinsing basket is bent or deformed. Replace the rinsing basket if necessary. | |
| Water contamination | Empty the container. Thoroughly clean the rotor pin and rinsing basket with a brush to remove the corrosion or residue before continuing use. Refill the container with cold, clean water. | |
| Interface is blinking | Error message | See Error messages section |
For additional information, visit the PVA Removal Station support pages. If the issue persists, reach out to your local reseller or contact Ultimaker's Customer Service team by submitting a support ticket.
Error messages
If the PVA Removal Station encounters a technical issue, the rotor will stop and the interface will display an error message. The error can be caused by a hardware failure, negligence, or inappropriate use.
Error messages will be presented in the form of both rotor speed LEDs blinking in a pattern. To determine the error code, count the number of times both LEDs flash, between a distinctive pause of 1 second.
Take the suggested actions listed below, then restart the PVA Removal Station to clear the error message.

| Error code | Potential cause | Suggested actions |
| 1 | No rotor detected | Check if the rotor is placed correctly onto the pin at the bottom of the container. |
| No water detected | Fill the PVA Removal Station with an appropriate amount of water. Never fill the container beyond the water level indicator. | |
| 2 | Rotor is jammed | Check if a printed part is jamming the rotor. Never place printed objects in the PVA Removal Station without the rinsing basket. Make sure no parts of the object are protruding through the rinsing basket. Clean the rotor and container and refresh the water. |
| 3 | The device has overheated | Turn off the PVA Removal Station and let it cool down for 30 minutes. If the issue persists, try the following:
|
| 4 | Motor error | Keep the device powered off for several minutes. If the error persists, the docking station may have an internal malfunction. Contact your reseller or submit a support ticket. |
For additional information, visit the PVA Removal Station support pages. If the issue persists, reach out to your local reseller or contact Ultimaker's Customer Service team by submitting a support ticket.
Documents / Resources
References
Download manual
Here you can download full pdf version of manual, it may contain additional safety instructions, warranty information, FCC rules, etc.
Advertisement


Need help?
Do you have a question about the PVA Removal Station and is the answer not in the manual?
Questions and answers