Ultimaker S5 Pro Bundle Installation And User Manual
Hide thumbs
Also See for Ultimaker S5 Pro Bundle:
- Quick start manual (174 pages) ,
- Installation manual (4 pages)
Table of Contents
Advertisement
Quick Links
Advertisement
Table of Contents
Troubleshooting

Related Manuals for Ultimaker Ultimaker S5 Pro Bundle


Summary of Contents for Ultimaker Ultimaker S5 Pro Bundle
- Page 1 Ultimaker S5 Pro Bundle Installation and user manual...
-
Page 2: Table Of Contents
5. Maintenance 5.1 Update the firmware 5.2 Material handling and storage 5.4 Clean the Ultimaker S5, Air Manager and Material Station 5.6 Check for play on the axles 5.7 Check the tension of the short belts 5.8 Check for debris in the front fan of the print head 5.9 Check the quality of the nozzle cover... - Page 3 6.3 Print quality issues 6.4 Material Station not recognised 6.5 Air Manager not recognized 6.6 Material stuck 6.7 Material greyed out 7. Warranty 7.1 General 7.2 Conditions 7.3 Notification 7.4 Exclusions 7.5 Applicable law and competent court Ultimaker S5 Pro Bundle user manual...
- Page 4 Please carefully read and understand the contents of this installation and user manual. Failure to read the manual may lead to personal injury, inferior results or damage to the Ultimaker S5 or its peripherals. Always make sure that anyone who uses this 3D printer knows and understands the contents of the manual to make the most out of the Ultimaker S5 Pro Bundle.
-
Page 5: Safety And Compliance
1. Safety and compliance... -
Page 6: Safety Messages
• The Ultimaker S5 generates high temperatures and has hot moving parts that can cause injury. Never reach inside of the Ultimaker S5 while it is in operation. Always control the printer with the touchscreen at the front or the power switch at the back. Allow the Ultimaker S5 to cool down for 5 minutes before reaching inside •... - Page 7 Risk of burns There is a potential risk of burns: the print head of the Ultimaker S5 can reach temperatures up to 280 °C, while the heated bed can reach temperatures of 140 °C. Do not touch either of these parts with your bare hands.
-
Page 8: Health And Safety
3D printing thermoplastics may result in the release of Ultra Fine Particles (UFPs) and Volatile Organic Compounds (VOCs) depending on the thermoplastic used and settings of the 3D printer. The Ultimaker products are designed for use with Ultimaker materials and are open for use with materials from third-party suppliers. -
Page 9: Introduction
2. Introduction... -
Page 10: Main Components
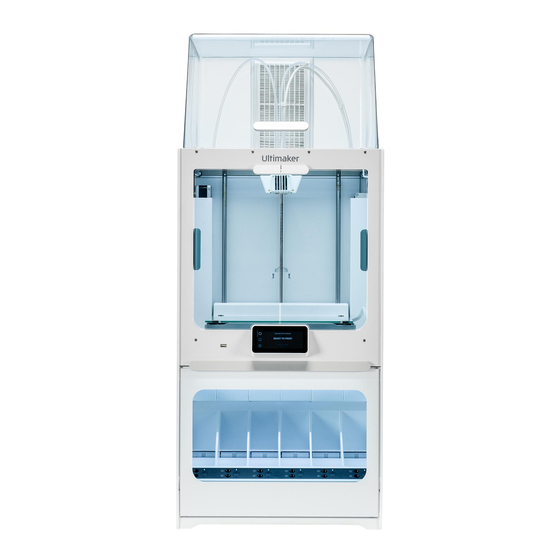
2.1 Main components Ultimaker S5 Pro Bundle 1. Air Manager 2. Ultimaker S5 3. Material Station Ultimaker S5 Pro Bundle user manual... - Page 11 10. UMB OUT port 1. Glass door 5. UMB IN port 2. Material bay 6. UMB OUT port 3. Filament entry ports 1(top) and 2 (bottom) 7. Dehumidifier exhaust 4. Eject button 8. Decoupler 9. Power entry Ultimaker S5 Pro Bundle user manual...
- Page 12 4. Build plate clamps 10. Power socket and switch 5. Touchscreen 11. Ethernet port 6. USB port 12. Double spoolholder with NFC cable* 13. NFC socket * Not used in the full Ultimaker S5 Pro Bundle Ultimaker S5 Pro Bundle user manual...
-
Page 13: Specifications
(19.5 x 19.5 x 47.1 in) Net weight 42 kg (92.6 lbs) Software Supplied Software Ultimaker Cura, our free print preparation software Ultimaker Connect, our free printer management solution Ultimaker Cloud, enables remote printing Supported OS MacOS, Windows and Linux Warranty... -
Page 14: Installation
3. Installation... -
Page 15: Unboxing
3.1 Unboxing The Ultimaker S5 Pro Bundle consists of three products, each packaged separately. The Ultimaker S5, the Material Station, and the Air Manager come in reusable, durable packaging, specially designed to protect the products. Follow the steps below properly to unpack your Ultimaker S5 Pro Bundle. - Page 16 3.2 What’s in the box Each of the products in the Ultimaker S5 Pro Bundle comes with a quick start guide and several hardware accessories: Ultimaker S5 Accessories Consumables 1. Glass build plate 11. Tough PLA (750 g) 2. Spool holder with material guide 12.
-
Page 17: Hardware Installation
3.3 Hardware installation The Ultimaker S5 Pro Bundle will be installed in three stages. First, the Ultimaker S5 will be prepared, followed by the Material Station. Third, the Air Manager will be mounted. Finish the Pro Bundle installation by connecting all cables. -
Page 18: Welcome Setup
• Type CC: for printing composite materials Each Ultimaker S5 comes with two print cores AA 0.4 (of which one is already installed in print head slot 1) and one print core BB 0.4. This means that it is possible to print with two build materials or with a build and support material. - Page 19 Network installation The Ultimaker S5 can connect to a local area network, using either Wi-Fi or Ethernet. To connect to a network, select Network setup from the welcome setup list. If you want to set up a wireless network connection, select Wi-Fi setup. If you want to use Ethernet, or don’t want to set up network connectivity, select Skip.
-
Page 20: Firmware Update
After downloading, run the installer to complete the installation of Ultimaker Cura. When opening Ultimaker Cura for the first time, you will be asked to select your 3D printer. Select the Ultimaker S5 profile, and you are ready to go. You can now directly connect to the printer and start using Ultimaker Cura. -
Page 21: Operation
4. Operation... -
Page 22: Touchscreen
You can control the Ultimaker S5 Pro Bundle by using the touchscreen at the front of the printer. When turned on for the first time the Ultimaker S5 Pro Bundle will run the welcome setup. After this, the main menu will be shown when turning the printer on. - Page 23 Print recommendations Each material requires different settings for optimal results. If you use Ultimaker Cura to prepare your model, these settings are automatically set correctly if the correct print core(s) and material(s) are selected. It is recommended to apply a thin layer of glue (using the glue stick from the accessory box) or an adhesion sheet to the glass build plate before starting a print.
-
Page 24: Preparing A Print With Ultimaker Cura
4.3 Preparing a print with Ultimaker Cura Interface After you have added the Ultimaker S5 in Ultimaker Cura, the main interface will become visible. Here is an overview of the user interface (UI): UI elements: 1. Open file 2. Printer selection panel 3. - Page 25 Ultimaker printer. When printing on a networked Ultimaker printer you can send your print jobs directly from Ultimaker Cura to the printer. The status of the printer will change to printing, and you can begin to track the print’s progress. You can also queue multiple print jobs and view them in the print queue.
-
Page 26: Remove The Print
Once the print has been removed and the build plate is placed back in the printer, select Confirm removal on the display of the Ultimaker S5. This will allow the next print job to start. Ultimaker S5 Pro Bundle user manual... -
Page 27: Remove Support Material
Remove Breakaway support Prints using Ultimaker Breakaway as support material will require post-processing to remove the support structures. This can be achieved by breaking the support structures from the build material. It is advised to wear protective gloves when the support structure contains sharp corners or when working with bigger models. -
Page 28: Change The Printer Configuration
Material Station. Change print core Print cores can be easily changed on the Ultimaker S5 by using the procedure from the menu. Besides changing print cores, you also have the option to only load or unload a print core: 1. -
Page 29: Calibration
Active leveling is automatically performed by the printer at the start of a print to create a reliable first layer. During active leveling, the Ultimaker S5 will create a detailed heightmap of the build plate surface. This information is used to compensate for any inaccuracies of the build surface during the first layers of the print. It will do this by adjusting the build plate height while printing. - Page 30 2. The Ultimaker S5 will now print a grid pattern on the build plate. Wait until it is complete 3. Once the Ultimaker S5 has cooled down, remove the build plate from the printer and align it with the XY calibration sheet.
-
Page 31: Uninstalling The Air Manager
It is recommended to uninstall the entire Air Manager, without removing individual modules. 1. Turn off the Ultimaker S5 using the power switch at the back 2. Disconnect the Air Manager cable from the UMB OUT port on the back of the Ultimaker S5 or the Material Station 3. -
Page 32: Maintenance
5. Maintenance... -
Page 33: Update The Firmware
Do not power off the printer during the firmware installation. Update your Ultimaker via USB If your Ultimaker S5 Pro Bundle is not connected to a network, you can update to the latest firmware via USB. The firmware files are found on the Ultimaker website: 1. -
Page 34: Clean The Ultimaker S5, Air Manager And Material Station
5.4 Clean the Ultimaker S5, Air Manager and Material Station For the best print results, it is important to keep the Ultimaker S5 Pro Bundle clean while using it. It is advised not to use the Ultimaker S5 in a room where it can easily be covered with dust, and to remove small pieces of material that might accumulate in the printer. - Page 35 During this procedure do not touch the nozzles and be careful while cleaning them as they will become hot. 1. On the Ultimaker S5, navigate to the configuration menu, select Print core 1, then click on the icon in the top-right corner and select Set temperature 2.
- Page 36 A bottle of oil is included in the accessory box of your Ultimaker S5. This oil is specifically for the smooth axles of the Ultimaker S5. Only use the supplied oil, as using other oils or grease may affect the coating of the axles, which can affect the performance of your Ultimaker S5.
-
Page 37: Check For Play On The Axles
2. Start with the right X axle. Place the print head in the back-left corner of the printer to keep it out of the way 3. Hold the frame of the Ultimaker S5 with one hand, and firmly hold the right X axle with the other 4. -
Page 38: Check For Debris In The Front Fan Of The Print Head
The heat of the nozzles may cause wear on the nozzle cover over time. It is recommended to check the quality of the cover at least once every three months. The accessory box of the Ultimaker S5 contains three spare nozzle covers. -
Page 39: Lubricate The Lead Screw Of The Z Motor
Ultimaker S5. 1. Make sure that the build plate is positioned at the bottom of the Ultimaker S5 2. Apply a small amount of grease to the lead screw of the Z motor 3. -
Page 40: Clean The Feeders
If you don’t have the Ultimaker cleaning filament at your disposal, you can use PLA instead. Cleaning filament can be used to clean the print core on an Ultimaker S5 by applying hot and cold pulls. Hot pulls are used to get the biggest parts of degraded material out of the print core and are especially necessary when a print core is clogged. - Page 41 Reassembly 1. Insert the Bowden tube into the print head and secure with the clamp clip. Select Confirm to continue 2. Wait for the Ultimaker S5 to finalize the cleaning procedure 3. Close the cover of the Air Manager Ultimaker S5 Pro Bundle user manual...
-
Page 42: Lubricate The Feeder Gear
8. Place the feeder back on the printer and secure it with the two bolts 9. Push the Bowden tubes from the Ultimaker S5 and the Material Station all the way into the tube coupling collets. Secure the tubes with the clamp clips 5.14 Replace the Bowden tubes... -
Page 43: Clean The Fans
System fans The system fans are positioned at the back of the Ultimaker S5 and need to be cleaned once every year. This can be done by blowing into the fans in order to get small filament particles out. If necessary, an air blower or compressor can be used instead. - Page 44 If the filter is not replaced according to the above procedure, the filter usage counter will not be reset. Never replace the filter while the Ultimaker S5 is in operation or if the Air Manager fan is spinning. The filter in the sealed bag can be disposed of with your regular household waste.
-
Page 45: Troubleshooting
6. Troubleshooting... -
Page 46: Error Messages
Print core not recognized If a print core is not recognized by the Ultimaker S5, the printer will inform you. The main reason for this is dirty contact points on the PCB at the back side of the print core. When this happens, clean the contact points with a cotton swab and some alcohol. -
Page 47: Print Quality Issues
• Small particles of material in the feeder or Bowden tube • A partial clog in the print core If your Ultimaker S5 is affected by under–extrusion, it is advised to take a look at our online resource pages for detailed troubleshooting instructions. -
Page 48: Material Station Not Recognised
2. Ensure one end of the Air Manager cable is securely inserted into the filter housing 3. Ensure the other end of the cable is securely inserted into the UMB OUT port at the back of the Ultimaker S5, or, if you also have a Material Station, in the UMB OUT port at the back of the Material Station The Air Manager cable should not be connected to the NFC port. -
Page 49: Material Stuck
Station. Instead, try pushing the broken filament strand from another entry point. If the broken filament is visible in one of the Bowden tubes, detach the Bowden tube from the Ultimaker S5 feeder and push the broken piece out with another length of filament. -
Page 50: Warranty
7. Warranty... -
Page 51: General
7.1 General Ultimaker grants a standard warranty on the Ultimaker S5 Pro Bundle (‘Product’) in the country where the product was purchased. From the date the product is sold and delivered to an end-customer for the first time, as evidenced by the original customer’s purchase invoice, Ultimaker warrants the product is free from defects in material, design and... -
Page 52: Notification
• Failure of the product caused by an accident In any event, Ultimaker is not liable for indirect or consequential damages, including but not limited to loss of use, loss of profit or revenue. Furthermore, Ultimaker’s liability is limited to the purchase value of the product.
Need help?
Do you have a question about the Ultimaker S5 Pro Bundle and is the answer not in the manual?
Questions and answers