Advertisement
Quick Links
For Technical Support & Product
Questions Contact Us at
877-464-2376 or 719- 630-3800
Email: Support@LetsGoAero.com
BE SURE THE LEVELERS INCLUDED WITH THE TRAILER ARE FOLDED DOWN AND IN THE "DEPLOYED POSITION" BEFORE
INSTALLING AND USING THE CRASH PAD TENT AND DECKING, WHEN UNCOUPLED FROM THE HITCH.
STEP 1
TOOLS REQUIRED: 3/16IN ALLEN KEY & 7/16IN ALLEN KEY
Apply two (2) small Velcro Strips (approx 2in in
length) [G] to each end of the Support Bar as
shown. [Fg. 1]
NOTE: The Velcro should be approximately
.25in away from the holes at
each end. [Fg. 2]
Slide one (1) Spring Nut [V]
into each end of the Support
bars [F] and align the holes.
[Fg. 3]
041323Rev
*TRAILER AND HEXCAP COVER SOLD SEPARATELY
BEFORE STARTING
G
E
~.25IN
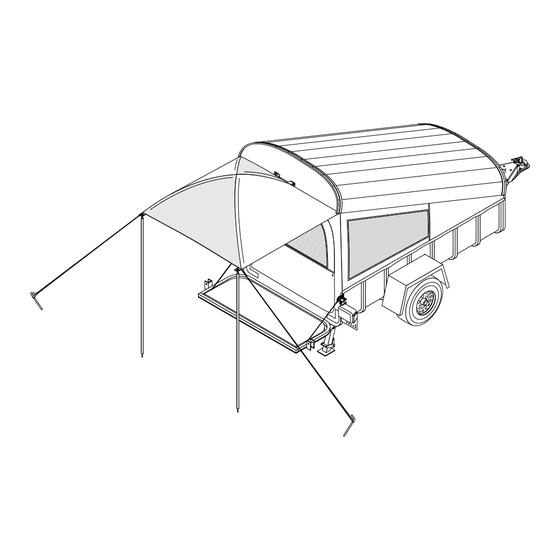
Crash Pad Camper Retrofit
Tent & Deck Platform for LittleGiant and SpecOps Trailers
G
E
[Fg. 2]
Page 1 of 10
PARTS LIST
QTY
PARTS:
10
A
1/4-20 BUTTON HEAD BOLT
10
B
1/4-20 WASHERS
10
C
1/4-20 NYLOCK NUT
10
D
SUPPORT BRACKETS
5
E
SUPPORT BAR
1
F
DECK
10
G
2IN VELCRO
2
H
1/2IN VELCRO - 84" LENGTH
1
I
1IN VELCRO - 54" LENGTH
2
J
1IN VELCRO - 84" LENGTH
4
K
.5IN TEK SCREWS
1
L
1IN VELCRO - 49" LENGTH
2
M
1IN VELCRO - 19" LENGTH
2
N
1IN VELCRO - 1.5" LENGTH
2
O
TAIL GATE CABLES
2
P
END GATE TABLE CABLES
2
Q
TAILGATE HINGES
2
TAILGATE BRACKET
S
4
T
3/4" TEX SCREWS
4
U
LOCK WASHERS
10
V
SPRING NUTS
TOOLS REQUIRES
3/16" ALLEN KEY
7/16" WRENCH OR SOCKET
DRILL
PATENT PROTECTED
P/N T02400
[Fg. 1]
G
Advertisement

Related Manuals for Let's Go Aero T02400


Summary of Contents for Let's Go Aero T02400
- Page 1 Crash Pad Camper Retrofit Tent & Deck Platform for LittleGiant and SpecOps Trailers P/N T02400 PARTS LIST For Technical Support & Product PARTS: Questions Contact Us at 877-464-2376 or 719- 630-3800 1/4-20 BUTTON HEAD BOLT 1/4-20 WASHERS Email: Support@LetsGoAero.com 1/4-20 NYLOCK NUT...
- Page 2 STEP 2 TOOLS REQUIRED: 3/16IN ALLEN KEY & 7/16IN ALLEN KEY Assemble the decking support by connecting two (2) Support Brackets [D] to one (1) Support Bar [E] using two (2) 1/4-20in Button Head Bolt [A], two (2) 1/4-20in Washers [B], and two (2) 1/4-20in Nylock Nuts [C] for each bar as shown.
- Page 3 STEP 4: Unfold and lay the Deck [Fg. 6] [F] over the Decking Supports. [Fg. 5] NOTE: The Deck [F] should be pushed all the way towards the front of the trailer. Be sure to adjust the Decking Supports as necessary to be sure the Support are evenly spaced underneath the Deck and the back and front decking supports are...
- Page 4 STEP 6: Further secure the Velcro installed on the inside of the [Fg. 8] Bulkhead by installing a .5in Tex Screw [K] at 3in and 15in, measured from each end (total 4). [Fg. 8] INSIDE HEXCAP BULKHEAD 15IN 15IN STEP 7: Apply 1”...
- Page 5 STEP 9: Using the hardware set aside in step 8 install the End Gate Hinges [Q] in the Trailer Frame [Fg. 12-13] Tubes as shown. [Fg. 13] [Fg. 12] STEP 10: Lay the removed end gate face down. Remove one (1) existing Nylock Nut and one (1) existing Flat Washer on each side of the End Gate Bracket as shown.
- Page 6 STEP 11: Remove and reinstall the End Gate Body Latch & Hardware adding the Tailgate Cable Latch to both sides [Fg. 17] of the trailer back end. END GATE BODY LATCH [Fg. 17] STEP 12: THIS STEP IS EASIER WITH TWO PEOPLE. [Fg.
- Page 7 TENT SET-UP TENT SET-UP PARTS PARTS: PARTS: TENT ALUMINUM ANGLES THIN AWNING POLES STAKES THICK AWNING SUPPORT POLES STEP 1: Unfold and lay out the tent. Familiarize yourself with the different sections of the Crash Pad Tent [P]. [Fg. 21] [Fg.
- Page 8 STEP 3: Complete the attachment of Tent [P] by attaching the [Fg. 23] remaining Velcro locations in the following order: -Upper Sides (inside of the trailer) UPPER SIDE -Lower Sides (outside of the trailer) -U-Tube Door Panel [Fg. 23] LOWER SIDE U-TUBE/DOOR PANEL STEP 4: Insert the Thin Awning Poles [Q] (2) into the sleeves on...
- Page 9 END GATE POSITION - OPTION 1 Hook the Tailgate Cable [O] onto the Tailgate Bracket [S] [Fg. 31] [Fg. 31-32] to create a flat surface with the end gate. [Fg. 32] END GATE POSITION - OPTION 2 Remove the hinge pins that lock the tailgate. Lay the End Gate on top of one trailer fender.
- Page 10 PROPER TENT CARE We advise you to assemble this product at least one at home before going on a trip. Obtain a familiarity with the assembly and disassembly process will help ensure your satisfaction and ease concerns you may have should you find yourself setting up in the dark or in adverse weather conditions IMPORTANT NOTICE: You may compromise the original FIRE RETARDENCY and WATER REPELLENCY protective coatings when you apply sprays or other chemical treatments to your tent.
Need help?
Do you have a question about the T02400 and is the answer not in the manual?
Questions and answers