
Related Manuals for SPRT SP-POS8811A


Summary of Contents for SPRT SP-POS8811A
- Page 1 POS Thermal Receipt Printer (SP-POS8811A) (Ver 1.00) Beijing Spirit Technology Development Co.,Ltd. www.sprt-printer.com...
-
Page 2: Table Of Contents
Content Introduction ................................3 Chapter 1 Feature and Performance ........................3 1.1 Print Performance ............................ 3 1.2 Printer Paper .............................3 1.3 Print Font ..............................4 1.4 Interface ..............................4 1.5 Print Control Commands ........................4 1.6 Power Supply ............................5 1.7 Operation Environment ........................... 5 1.8 Outline Dimension ........................... -
Page 3: Introduction
Introduction POS8811A printer is a new type line thermal printer, it features in fast speed print, low print noise, high reliability, perfect print quality and ribbon needless, avoiding the vexation of regular maintenance. POS8811A printer: small in outline dimension, simple operation, and extensive application, especially suitable for commercial cash register, PC-POS, bank POS and all kinds of receipts print. -
Page 4: Print Font
Inner diameter ---------- ф13mm (minimum) Paper thickness ---------- 0.06mm~0.08mm 1.3 Print Font ● ANK Character Set 12×24 dots, 1.5(W)×3.00(H)mm ● GB GB2312-80(Chinese): 24×24 dots, 3.00(W)×3.00(H)mm. 1.4 Interface ● Ethernet Interface: Standard Ethernet interface. ● USB Interface: Standard Ethernet interface. ● Bluetooth: Multi Mode Bluetooth. -
Page 5: Power Supply
1.6 Power Supply ● DC24V±10%, 1.5A, A-1009-3P power socket 1.7 Operation Environment ● Operation temperature: 0~50℃; Relative humidity: 10~80% ● Storage temperature: -20~60℃; Relative humidity: 10~90℃ 1.8 Outline Dimension ● 165(L)mm×120(W) mm×119 (H)mm 1.9 Model classification Model Interface Print speed (Max) SP-POS8811Ed Ethernet SP-POS8822Ed... -
Page 6: Paper Installation
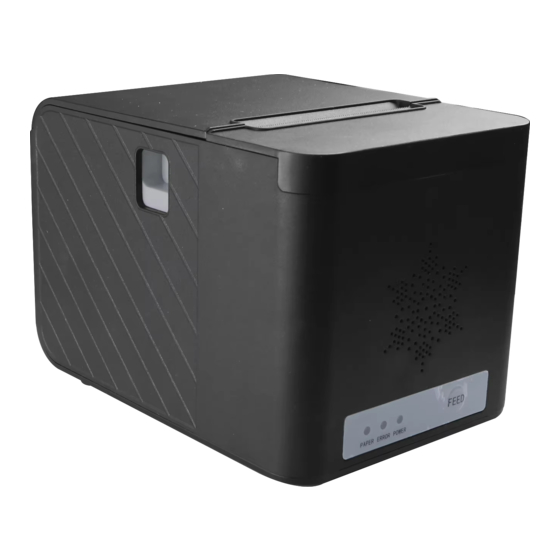
Figure 2-1 The name of each part of the printer 2.2 Paper Installation 2.2.1 Paper Loading Steps of Loading Thermal Paper are as below: Hold down the upper cover button on the left side, open the movable upper cover, draw a certain length of the paper roll, put the paper end on the print head, close the upper cover and press it downwards lightly. -
Page 7: Interfaces
2.3 Interfaces 2.3.1 Ethernet Interface The model equipped with an Ethernet port uses an RJ45 type network socket, as shown in Figure 2-2 in terms of appearance. Figure 2-2 Ethernet Interface 1、Switch on DHCP: Connect the device to the router through the network cable, open the paper cover and put in thermal paper, hold down the [FEED] key to power on. -
Page 8: Bluetooth Connection
2.3.3 Bluetooth Connection Hand-held device, laptop and other information terminal devices with Bluetooth can drive SP-POS8811/POS8822 to print by the Bluetooth interface. SP-POS8811/POS8822 is compatible with Bluetooth4.0 standard and effective communication distance is 10 meters. The printer's Bluetooth belongs to the slave unit. The initial name of the printer is SP-POS8811/POS8822, the initial password is ‘1234’. - Page 9 Figure 2-5 Cash Drawer Interface The pin definitions are as follows: PIN No. Signal Direction Structure ground —— Cash drawer driver signal 1 Output Cash drawer on/off status signal Input +24VDC —— Cash drawer driver signal 2 Output Signal ground ——...
-
Page 10: Indicators, Buzzers And Buttons
2.4 Indicators, Buzzers and Buttons The SP-POS8811/POS8822 printer has one button, a built-in buzzer and three indicator lights. 【FEED】is paper feeding button, the function of its enabling or disabling the button on/off can be set by print command, when the button is enabled, press 【FEED】 button, then the paper presenting driver starts up and paper fed into the printer;... - Page 11 flickering means the error type: ERROR Indicator ERROR Type ERROR Description Flashing Type LED Flikers once:Internal memory reading and writing error LED Flikers twice:over-voltage Flikers three times:under-voltage LED Flikers four times: CPU execution error (wrong address) Non-recoverable error LED Flikers five times: UIB error LED Flikers six times: FLASH writing error Flikers...
-
Page 12: Power On Status
Type LED Flickers constantly: printing head Auto-recoverabl over-heat; upper case cover opening e error error during printing 2.5 Power on status Paper cover close when power off. Press the power button, the error indicator and paper out indicator flash twice alternately and out, then printer will be on the normal working mode. 2.6 Self-test The self-test will check the condition of printer, if the printer prints out the self-test receipt correctly, it means the printer works normally, except interface with host. -
Page 13: Hexadecimal Printing
Fig.2-6 2.7 Hexadecimal Printing Turn on the printer according to the step below, it will enter the mode of Hexadecimal Printing 1.Open the cover; 2.Hold down【FEED】button,and connect with power; 3.Close the cover, the printer will print out 3 lines as below: Hexadecimal Dump To terminate hexadecimal dump, Press FEED button three times. -
Page 14: Parameter Setting
2.8 Parameter Setting This function is to set some simple parameters of the printer. 1. Use the setting tool to set up on the PC. 2. Set by pressing the keys, the specific operation method is as follows. Enter parameter setting method: In the shutdown state, first open the [Face], press and hold the [FEED] key, then turn on the power switch, and release the [FEED] key after the status indicator and the out of paper indicator flash alternately. - Page 15 Appendix A This appendix is a method of setting the default parameters of the printer by pressing the keys. Setting description: Use the opening and closing【face】 (trigger button) to select the setting item, every time you open and close the 【face】, the setting item will be changed to the next item, and the current setting value of the item will be printed out.
- Page 16 Error ON ALL ON Cut ON FEED Paper-out and reprint: FEED FEED Black mark mode: FEED FEED The manufacturer has the right to modify the contents of the manual without prior notice! The final right of interpretation belongs to SPRT!
Need help?
Do you have a question about the SP-POS8811A and is the answer not in the manual?
Questions and answers