
Related Manuals for SPRT SP-POS890


Summary of Contents for SPRT SP-POS890
- Page 1 SPRT ® POS Thermal Receipt Printer (SP-POS890) User’s Manual (Ver 1.05) Beijing Spirit Technology Development Co.,Ltd. www.sprt-printer.com...
-
Page 2: Table Of Contents
Content Introduction................................1 Chapter 1 Feature and Performance.........................1 1.1 Print Performance............................1 1.2 Print Paper..............................2 1.3 Print Font................................. 2 1.4 Interface................................2 1.5 Print Control Commands..........................3 1.6 Power Supply..............................3 1.7 Operation Environment..........................3 1.8 Outline Dimension............................3 1.9 Model classification............................3 Chapter 2 Operation Specification........................4 2.1 Printer Appearance............................ -
Page 3: Introduction
Introduction POS890 printer is a new type line thermal printer, it features in fast speed print, low print noise, high reliability, perfect print quality and ribbon needless, avoiding the vexation of regular maintenance. POS890 printer: small in outline dimension, simple operation, and extensive application, especially suitable for commercial cash register, PC-POS, bank POS and all kinds of receipts print. -
Page 4: Print Paper
(2) Cutter life: 1500,000 cuts ● Valid print width: 72mm 1.2 Print Paper ● Thermal paper roll model: TF50KS-E (Japan paper co.ltd) AF50KS-E (JUJO THERMAL) ● Thermal paper roll: Paper Type--Thermal Paper 79.5±0.5mm xф80mm(max) Inner Diameter---13mm (min.) Thickness --- 0.06mm~0.08m 1.3 Print Font ●... -
Page 5: Power Supply
spacing is adjustable. ● Graphics print commands: support the print of bit-map graphics and download bit-map graphics with different density ●GS barcode print commands: support UPC-A, UPC-E, EAN-13, EAN-8, CODE39, ITF25, CODEBAR, CODE93, CODE128,PDF417,QR code,DATA Matrix code print. 1.6 Power Supply ●... -
Page 6: Printer Appearance
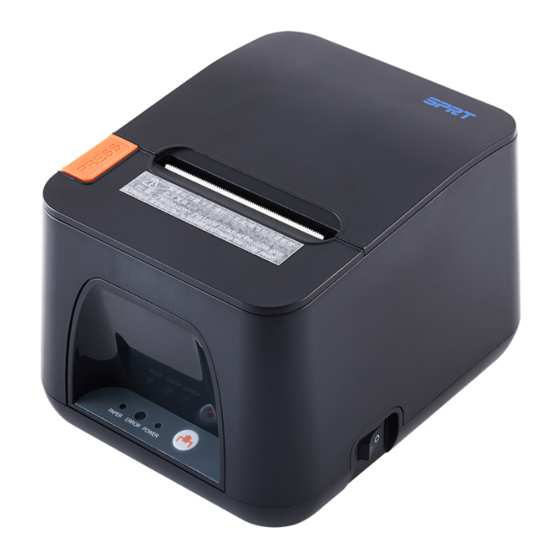
2.1 Printer Appearance... -
Page 7: Paper Installation
2.2 Paper Installation 2.2.1 Paper Loading POS890 adopts 79.5mm±0.5mm width thermal paper roll. Steps of Loading Thermal Paper are as below: Hold down the upper cover button on the left side, open the movable upper cover, draw a certain length of the paper roll, put the paper end on the print head, close the upper cover and press it downwards lightly. -
Page 8: Interface
If cutter jam, but hope no loss of data in printer, don’t turn off the power. Get the cutter back to the original position by the above mentioned method by hand. Then open the paper cover and take out the paper, close the paper cover. The printer will recover automatically from Cutting Error. -
Page 9: Cash Drawer Interface
2.3.3 Cash Drawer Interface The cash drawer interface of POS890 adopts RJ-11 6-pin socket, as Fig.2-5 shows: Fig.2-4 Cash Drawer Interface The pin assignment is as below: Pin No. Signal Direction Chassis Ground —— Cash drawer driver signal 1 Cash drawer on/off status signal +24VDC ——... -
Page 10: Buttons And Indicators
The pin assignment is as below: Pin No. Signal +24VDC Ground Fig.2-5 Definition of power socket and pin 2.4 Buttons and Indicators There is one button and two inner buzzers(a bigger on and a smaller one) and three indicators on POS890 printer. 【FEED】is paper feeding button, the function of its enabling or disabling the button on/off can be set by print command, when the button is enabled, press 【FEED】... - Page 11 The green POWER indicator is the power indicator. The POWER indicator lights, it indicate that the printer is turned on. The red indicator is the paper status indicator. The indicator light indicates that the printer is out of paper. Red/Blue indicator is ERROR/ALARM indicator, the red indicator is dark when printer work normally;...
-
Page 12: Power On Status
LED Flikers once:Internal memory reading and writing error LED Flikers twice:over-voltage LED Flikers three times:under-voltage LED Flikers four times: CPU execution error (wrong address) Non-recoverable error LED Flikers five times: UIB error LED Flikers six times: FLASH writing error LED Flikers seven times: parameter writing error Flikers eight... -
Page 13: Self-Test
working mode. 2.6 Self-test The self-test will check the condition of printer, if the printer prints out the self-test receipt correctly, it means the printer works normally, except interface with host. Otherwise it needs to repair. The self-test will print out the name of manufacturer, printer type, interface type and printer defaulted parameter, 96 characters in ASCII and defaulted Code page content(the language is English) or the name of Chinese characters library(if the language is Chinese) and Bar code type. -
Page 14: Hexadecimal Printing
Fig.2-6 2.7 Hexadecimal Printing Turn on the printer according to the step below, it will enter the mode of Hexadecimal Printing 1.Open the cover; 2.Hold down【FEED】button,and connect with power;... -
Page 15: Parameter Setting
3.Close the cover, the printer will print out 3 lines as below: Hexadecimal Dump To terminate hexadecimal dump, Press FEED button three times. This means the printer has entered hexadecimal printing mode, and under this mode, all of the input will be printed out as hexadecimal number, feed one line with single-click of “FEED”... - Page 16 indicator flash alternately. Then press the 【FEED】 for five times and close the paper cover, printer enter the program upgrade mode. At this time, the status indicator flash once a second. Quick enter method: Open the paper case cover firstly when printer is power off. Hold the 【FEED】button and switch on the printer, then release the 【FEED】button quickly, then printer enter the program upgrade mode.
- Page 17 Language: FEED FEED China English China-BIG5 FEED Font: FEED 12×24 9×17 FEED Print density: FEED FEED HIGH MEDIU FEED Print speed: FEED FEED FEED 250mm/s 200mm/s 220mm/s 150mm/s FEED Buzzer: FEED FEED FEED Error ON ALL ON Cut ON FEED Paper-out reprint: :...
Need help?
Do you have a question about the SP-POS890 and is the answer not in the manual?
Questions and answers