Advertisement
Quick Links
Made in America
Lifetime Guarantee
Thank you for purchasing this instrument panel from Intellitronix. We value our
customers!
INSTALLATION GUIDE
Create-A-Dash 6-Gauge Panel
Part Number: DP10003
* Always disconnect the battery before attempting any electrical work on your vehicle.*
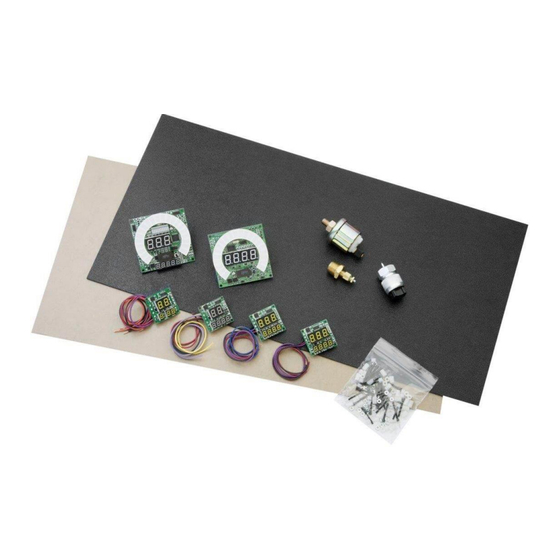
KIT COMPONENTS
◊ One (1) Fuel Level Panel
◊ One (1) Oil Pressure Panel
◊ One (1) Speedometer Panel
◊ One (1) Tachometer Panel
◊ One (1) Voltmeter Panel
◊ One (1) Water Temperature Panel
◊ One (1) Smoked Acrylic Lens (12" x 24")
◊ One (1) ABS Plastic Sheet (12" x 24")
◊ One (1) Temperature Sending Unit (S8013) 1/8" NPT, 0-255 Deg., 1/2" NPT Bushing
◊ One (1) Pressure Sending Unit (S8434) 1/8" NPT, 0-100 PSI Oil Pressure
◊ One (1) Universal Speedometer Sensor (S9013) 7/8" NPT Industry Standard threads
◊ One (1) Mounting Kit 24 #4-40 X 1 in Bolts
24 #4 X 5/16 Nylon Spacers
24 # Nylon washers
24 #4 Nylock nuts
PANEL MOUNTING INSTRUCTIONS
Use the ABS plastic sheet as a mounting base for all of the gauges. You may
wish to cover the sheet with masking tape in the areas where the gauges will
be installed in order to mark the locations of the mounting holes. Once you
have determined the location of each gauge, drill holes in the ABS plastic, and
use the spacers to mount each circuit board to the ABS plastic sheet. Be sure to
insert one spacer between the ABS sheet and each circuit board, and another
spacer between the circuit board and the head of the screw.
DP10003
Intellitronix
www.intellitronix.com
1 |
rev.10/30/2020) NB)
Advertisement

Related Manuals for Intellitronix DP10003


Summary of Contents for Intellitronix DP10003
- Page 1 Made in America Lifetime Guarantee Thank you for purchasing this instrument panel from Intellitronix. We value our customers! INSTALLATION GUIDE Create-A-Dash 6-Gauge Panel Part Number: DP10003 * Always disconnect the battery before attempting any electrical work on your vehicle.* KIT COMPONENTS ◊ ...
-
Page 2: Wiring Instructions
Resistors if the Tachometer does not have a push button for programing, please call Tech Support at Intellitronix, as you may need to send the gauge back to us to be reconfigured. There is no charge for this additional service. - Page 3 Check Engine - Green/Yellow Connect to the Negative side of the Check Engine Light circuit. Check Engine light will come on when working with a PCM DP10003 Intellitronix www.intellitronix.com...
- Page 4 ECU, the resistor in the adapter kit will help pull a stronger signal for the tachometer. If your engine is a 4 cylinder, please call Tech Support at Intellitronix, as you may need to send the gauge back to us to be reconfigured. There is no charge for this additional service.
- Page 5 1. Sets # of digits in RPM display, using button, display shows: (hundreds) 8800, (tens) 8880, and (ones) 8888. 2. Sets # of cylinders using button, display shows: 1cy, 2cy, etc. 3. Sets first digit on max RPM on gauge bar display (in thousands) using button, display shows: 1000 to 9990 DP10003 Intellitronix www.intellitronix.com rev.10/30/2020) NB)
- Page 6 Ground at the Engine block. To find High and Low output wire color or pin location will need to be looked up by Vehicle vin or Model and year. Speedometer - White (Intellitronix Speed Sender) - Disconnect the mechanical speedometer cable from the transmission and thread the new electronic sensor onto the transmission. This panel comes with a 3-wire sensor.
- Page 7 8,000 pulses per mile. You should not have to recalibrate your speedometer, unless you have changed the original tire size or the rear end gear ratio. Also, if using the Intellitronix GPS Sending Unit, (S9021 – not included) the speedometer does not need to be calibrated.
- Page 8 The odometer will continue to display the pulse reading for a few seconds. Once it reverts to the default mode, you have successfully calibrated your speedometer. DP10003 Intellitronix www.intellitronix.com...
-
Page 9: Technical Support
CHECK OUT THE SUPPORT PAGE AT www.intellitronix.com FOR QUICK ANSWERS (Q&A) TO YOUR QUESTIONS This product carries a limited Lifetime Warranty. This warranty is limited to replacement or repair of the unit at the discretion of Intellitronix. DP10003 Intellitronix www.intellitronix.com... - Page 10 RETURN POLICY PROCEDURES Return Policy Instructions 1. Download the Intellitronix Return/Repair Form and fill in the information on the form about the product. 2. Place the product being returned in the original packaging that it came in and include a copy of the completed Intellitronix Return/Repair Form.
Need help?
Do you have a question about the DP10003 and is the answer not in the manual?
Questions and answers