Table of Contents
Advertisement
Quick Links
Made in America
Thank you for purchasing this instrument from Intellitronix. We value our customers!
* Always disconnect the battery before attempting any electrical work on your vehicle.*
KIT COMPONENTS
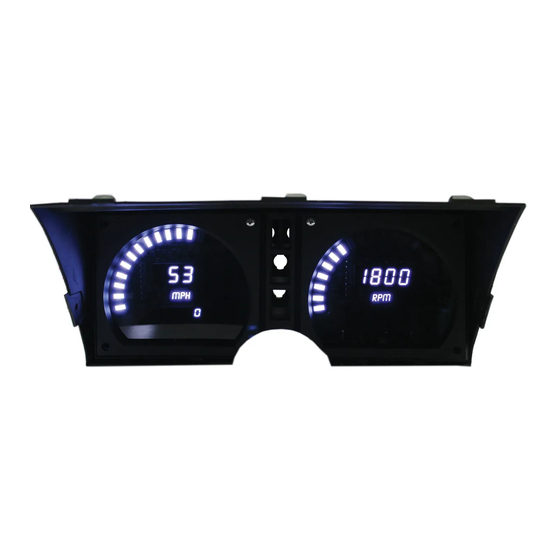
◊ Three (3) Digital Circuit Boards (speedometer, tachometer and 5-gauge cluster)
◊ Two (2) Smoked Acrylic Lenses (including horseshoe.)
* Peel off protective covering from both sides
◊ Two (2) Temperature Sending units (S8013)
◊ One (1) Oil Pressure Sending units (S8434)
◊ One (1) Universal Speedometer Sensor (S9013)
◊ One (1) Mounting Kit
* 6 6/32" screws, 6 nylon spacers, 6 c-brackets, and 6 flat nylon washers
INSTRUMENT INSTALLATION:
Tools needed:
Phillips (cross-head) screwdrivers
Tiny jewelers/electronics flat screwdrivers
Allen key drivers
Small sockets
Nylon spud wedges (small pry bar)
Miscellaneous: wire, wire nut/splices, and nylon zip ties
1 – DP2002
Installation GUIDE
Corvette Digital Dash Panel
Part Number: DP2002
Year Series: 1978 - 1982
Intellitronix
Lifetime Guarantee
(rev.10/2017)
www.intellitronix.com
Advertisement
Table of Contents

Related Manuals for Intellitronix DP2002B


Summary of Contents for Intellitronix DP2002B
- Page 1 Made in America Lifetime Guarantee Thank you for purchasing this instrument from Intellitronix. We value our customers! INSTALLATION GUIDE Corvette Digital Dash Panel Part Number: DP2002 Year Series: 1978 - 1982 * Always disconnect the battery before attempting any electrical work on your vehicle.* KIT COMPONENTS ◊...
- Page 2 (whether OEM or aftermarket) and replace them with your new Intellitronix digital gauge boards. Finally, you will reassemble the bezel/housing back into the dash/console. If you are not comfortable performing auto electric work, seek professional installation.
- Page 3 Tuck in the wire runs behind existing components to achieve a clean look. Secure the wires with zip ties at intervals. Make sure the new wiring doesn’t interfere with gas or brake pedals. The rest is up to you. 3 – DP2002 Intellitronix www.intellitronix.com (rev.10/2017)
- Page 4 ECU, the resistor in the adapter kit will help pull a stronger signal for the tachometer. If your engine is a 4 cylinder, please call Tech Support at Intellitronix, as you may need to send the gauge back to us to be reconfigured. There is no charge for this additional service.
- Page 5 Oil Temp – Orange/White Replace the existing oil temperature sending unit with the unit included. Do not use Teflon tape or other sealer on the new sending unit’s threads, to avoid inaccurate readings. Connect the orange/white wire to the sending unit. 5 – DP2002 Intellitronix www.intellitronix.com (rev.10/2017)
- Page 6 CALIBRATION Note: If you are using the Intellitronix GPS Sending Unit, (S9020 – not included) the speedometer does not need to be calibrated. The speedometer leaves the factory with a pre-set industry standard setting of 8,000 pulses per mile.
- Page 7 However, once it finishes scrolling one time, the memory is ready to record new data and will begin recording again once the vehicle starts to move. The highest speed measured over multiple runs will be retained in memory. # # # 7 – DP2002 Intellitronix www.intellitronix.com (rev.10/2017)
- Page 8 Made in America Lifetime Guarantee Technical Support Monday – Friday 9am to 5 pm EST (440) 210-7646 support@intellitronix.com This product carries a limited Lifetime Warranty. This warranty is limited to replacement or repair of the unit at the discretion of Intellitronix.
Need help?
Do you have a question about the DP2002B and is the answer not in the manual?
Questions and answers