Table of Contents
Advertisement
SM1102 English
7/2/04
INTRODUCTION . . . . . . . . . . . . . . . . . . . . . . . . . . . . . . . . . . . . . . . . . . . . . . .
INSTALLING THE BATTERIES . . . . . . . . . . . . . . . . . . . . . . . . . . . . . . . . . . . . .
REMOTE UNIT . . . . . . . . . . . . . . . . . . . . . . . . . . . . . . . . . . . . . . . . . . . . . . . .
MAIN UNIT . . . . . . . . . . . . . . . . . . . . . . . . . . . . . . . . . . . . . . . . . . . . . . . . . . .
TRANSMITTER(S) . . . . . . . . . . . . . . . . . . . . . . . . . . . . . . . . . . . . . . . . . . . . . .
CONFIGURING THE REMOTE TRANSMITTER(S) . . . . . . . . . . . . . . . . . . . . .
OPERATION . . . . . . . . . . . . . . . . . . . . . . . . . . . . . . . . . . . . . . . . . . . . . . . . . .
RECEPTION AT 434 MHz . . . . . . . . . . . . . . . . . . . . . . . . . . . . . . . . . . . . . . . .
SETTING THE CLOCK . . . . . . . . . . . . . . . . . . . . . . . . . . . . . . . . . . . . . . . . . .
SETTING THE ALARM FUNCTION . . . . . . . . . . . . . . . . . . . . . . . . . . . . . . . . .
SETTING CELSIUS OR FAHRENHEIT . . . . . . . . . . . . . . . . . . . . . . . . . . . . . . .
OUTSIDE TEMPERATURE . . . . . . . . . . . . . . . . . . . . . . . . . . . . . . . . . . . . . . .
FORECAST FUNCTION . . . . . . . . . . . . . . . . . . . . . . . . . . . . . . . . . . . . . . . . . .
TECHNICAL CHARACTERISTICS . . . . . . . . . . . . . . . . . . . . . . . . . . . . . . . . . .
WARRANTY . . . . . . . . . . . . . . . . . . . . . . . . . . . . . . . . . . . . . . . . . . . . . . . . . . .
SM1100 WEATHER STATION TROUBLESHOOTING GUIDE . . . . . . . . . . . . . .
Copyright © Lexibook 2002
4:21 PM
Page 1
SUMMARY
Page
3
3
4
4
4
5
5
5
6
7
7
7
9
9
10
11
1
Advertisement
Table of Contents

Related Manuals for LEXIBOOK SM1102


Summary of Contents for LEXIBOOK SM1102
-
Page 1: Table Of Contents
INSTALLING THE BATTERIES ........ -
Page 2: Sm1102 English 7/2/04 4:21 Pm
SM1102 English 7/2/04 4:21 PM Page 2 Copyright © Lexibook 2002... -
Page 3: Introduction
If this occurs, place the weather station flat on a table for ten minutes. This will allow the liquid crystals to fill up any empty spaces. -
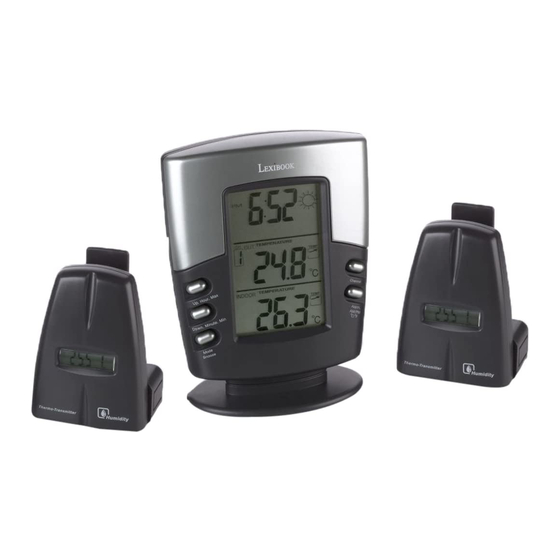
Page 4: Remote Unit
For this reason, it is not a good idea to install the transmitter on a metal surface or anywhere in the vicinity of a large metal surface. Before determining the position of the transmitter, ensure that the main unit can receive the signals sent by the transmitter. -
Page 5: Configuring The Remote Transmitter(S)
1. The transmitter housing has two buttons on the back. * RESET - used to initialise the transmitter codes. * SET - used to change the house code, which ranges from “1” to “15” and the telecode (1 to 4) associated with the transmitter. -
Page 6: Setting The Clock
23-30 m (in an open space). These figures may vary with the environment and the level of interference. 2. The main unit and the remote unit should be located a minimum of 2 metres away from any source of interference. -
Page 7: Setting The Alarm Function
2. Press the Hour button as many times as necessary to select the desired hour. 3. Press the Minute button as many times as necessary to select the desired minute. 4. Press the Alarm button to turn the alarm on or off. Its state is indicated by the AL symbol. - Page 8 Press the CHANNEL button to display the minimum temperature for the other remote transmitters. The daily minimum temperature reading is updated each day at midday. Press the Min button once to return to the current temperature.
-
Page 9: Forecast Function
Lexibook ® makes no guarantee as to the accuracy of these forecasts. The station can display a variety of symbols (clouds, sun, moon and stars, rain, snow) to indicate the short-term forecasts. TECHNICAL CHARACTERISTICS MAIN UNIT Supply: 2 “AA”... -
Page 10: Warranty
+/- 5% WARRANTY This product is covered by our two-year warranty*. To make use of the guarantee or the after-sales service, please contact your retailer and supply proof of purchase. Our guarantee covers material or installation-related defects attributable to the manufacturer,... -
Page 11: Sm1100 Weather Station Troubleshooting Guide
If this method does not work, set up the main unit closer to the sensor or alongside it and hold down the button for a further five seconds. - Page 12 This is a perfectly normal and acceptable phenomenon. The humidity sensors are accurate to about +/- 5%. For this reason, the display on the main unit and that on a remote sensor installed alongside it can vary by 10%.
Need help?
Do you have a question about the SM1102 and is the answer not in the manual?
Questions and answers