Table of Contents
Advertisement
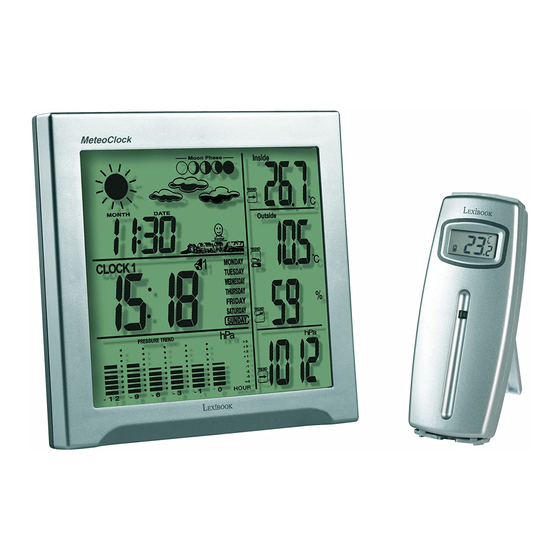
Wireless Weather Station with Weather Forecast
SM1600 + ASM20 - Instruction Manual
Congratulations on your purchase of this weather station, MeteoClock
and understand this manual so you can begin to enjoy the convenience and features this product has to offer.
What exactly is a Weather Station?
Lexibook
digital stations measure not only the time in progress – thanks to their built-in clock- but also the
actual and upcoming weather.
The MeteoClock SM1600 incorporates the following functions:
- Thermometer:
The temperature is displayed in real time to the nearest tenth of a degree Celsius. Thanks to its wireless
sensor, the station can detect from a distance the outdoor temperature or that of another room.
- Hygrometer:
Outdoor or indoor hygrometry is expressed in percentage of humidity in the ambient air. The ideal 'Comfort
Zone' for the human body ranges from 35 to 65% hygrometry for a given temperature between 18 and 24
- Barometer:
The station also monitors the atmospheric pressure in real time. It displays the weather forecast by means of
animated icons (sun, clouds, rain...) and for the next 8 to 12 hours.
And many extra features:
- Wide screen
- Large digital display
- Animated icons
- Extreme weather alerts
- Wall Mount Holder
- Detachable table stand
- Dual time
Copyright © Lexibook 2004
INTRODUCTION
SM1600. Please take the time to read
o
C.
1
Advertisement
Table of Contents

Subscribe to Our Youtube Channel
Related Manuals for LEXIBOOK MeteoClock SM1600


Summary of Contents for LEXIBOOK MeteoClock SM1600
- Page 1 Congratulations on your purchase of this weather station, MeteoClock SM1600. Please take the time to read and understand this manual so you can begin to enjoy the convenience and features this product has to offer. What exactly is a Weather Station? ...
- Page 2 Local temperature and humidity display open area Receives and monitors temperature and Battery type: 2 x AA size humidity from up to 3 remote sensors via RF Detachable cover with wall mount holder technology of 433MHz and stand. Maximum/minimum temperature records...
- Page 3 LAYOUT Unit layout MODE/SNOOZE: scrolls through Clock 1 & 2, Alarm 1 & 2, Date & Year, and Temperature Alarm (high & low) mode; snooze for alarm LCD display. HOUR/+/MAX: shows maximum temperature; adjusts clock, alarm, date & year and temperature alarm values.
-
Page 4: Getting Started
GETTING STARTED Battery installation 1 - Remove the battery cover. 2 - 2 AA size batteries for the receiver (SM1600). 3 - 2 AA size batteries for the remote sensor (ASM20). 4 - Insert the batteries between the terminals respec- ting the polarity indicated inside the compartment. - Page 5 Each receiver can receive up to 3 different remote channels. The preferred channel number (1, 2 or 3) for each individual remote sensor can be assigned. However, channel 1 is used for collecting data from outdoor and activating the weather forecast symbols.
- Page 6 To fix on a wall, make sure the stand is not pulled out and fix the holder on a hook or nail. To fix the stand on a shelf or table, simply pull it out and make sure it is well secu- red.
-
Page 7: Clock And Date Settings
RADIO CONTROL CLOCK 1 - The SM1600 is designed to automatically synchronize its calendar clock once it is brought within a range of 1500 km of the Frankfurt DCF77 radio signal. When the SM1600 is within this range, its radio-control mechanism will override all the manual settings. - Page 8 4 - Press MODE/SNOOZE to accept the time settings. Upon pressing MODE/SNOOZE, the month and date will flash. Press the Hour/+/Max Max key to set the month and the Minute/-/Min to set the date. Your weather station will automatically adjust the corresponding weekday. Press MODE/SNOOZE to confirm your date settings.
-
Page 9: Alarm Setting
- Press MODE/SNOOZE to snooze the alarm for 5 minutes. After that the alarm will sound again. c - Press ANY other key to turn the alarm sound off. If not manually interrupted, the alarm sound will automatically stop after one minute. -
Page 10: Moon Phase
Throughout the 28 days of the lunar month, the aspect of the moon changes. Indeed, the moon, being spherical, is always half lightened up by the sun. As the moon rotates around the Earth, the appearance of its lightened side changes continuously. This phenomenon creates moon phases. -
Page 11: Temperature & Humidity Display
Press HOUR/+/MAX in Clock1 mode to display maximum temperature and humidity. Note: Min/Max readings are automatically cleared daily at 00:00. Display HI & LO "Hi" and "Lo" displayed onscreen mean that the temperature or humidity is outside the range of specification. Inside /... -
Page 12: Temperature & Humidity Trend
The trend indicator shows the trend of temperature & humidity determined by the particular sensor in the past half hour interval. TEMPERATURE ALARM You can set high temperature or low temperature alarms for one local channel and for one remote channel. Local temperature alarm Scroll to local temperature alarm mode by using MODE/SNOOZE(Inside). -
Page 13: Weather Display
Animated weather forecast symbols This weather station is capable of detecting barometric pressure changes, and based on the data collected, can predict the weather for the next 12 to 24 hours. The effective range covers an area of 30 – 50km. - Page 14 - The snow symbol will flash to warn that it might snow. - Activated when the temperature of Channel 1 is between -1.9 °C & +2.9 °C. - The snow symbol will appear solid when the temperature of channel 1 falls below - 1.9 °C, and it is freezing.
- Page 15 12-24 hours as to allow time for operation at a constant altitude. PRESSURE HISTORICAL BAR GRAPH The bar graph lets you see the pressure trend over a period of 12 hours. The bar graph will show Pressure Trend (Default), Temperature and Remote Temperature by pressing ON/OFF/°C/°F at Clock1 mode.
- Page 16 COMFORT LEVEL ICON The comfort level will be established based on the data collected from inside temperature / humidity. The indicator below will display whether the level is comfortable, normal or uncomfortable. Comfort Level Description It shows that the current environment is within the ideal range for indoor temperature and relative humidity.
-
Page 17: Troubleshooting
TVs, computers, monitors, etc. The temperature measurement of Wait for about 1-2 minute to ensure the remote remote sensor and receiver does not sensor and receiver are in phase. Otherwise, match. re-synchronize receiver by holding CHANNEL for 3 seconds until a beep is heard. -
Page 18: Maintenance
In another room To order: www.lexibook.com MAINTENANCE In order to clean the unit, use only a soft cloth moistened with water; do not use any detergent product. Do not dismantle or drop the unit. Remove the batteries if the unit is not going to be used for an extended period of time. -
Page 19: Warranty
Our warranty covers material or installation-related defects attributable to the manufac- turer, with the exception of wear caused by failure to respect the instructions for use or any unautho- rised work on the equipment (such as dismantling, exposure to heat or damp, etc.).
Need help?
Do you have a question about the MeteoClock SM1600 and is the answer not in the manual?
Questions and answers