Table of Contents
Advertisement
Quick Links
SM1820GB
11/04/2005
Congratulations on your purchase of this weather station, MeteoClock
Please take the time to read and understand this manual so you can begin to enjoy the
convenience and features this product has to offer.
What exactly is a Weather Station?
®
Lexibook
digital stations measure not only the time in progress – thanks to their built-in clock- but also
the actual and upcoming weather.
The MeteoClock
®
SM1820 incorporates the following functions:
- Thermometer:
The temperature is displayed in real time to the nearest tenth of a degree Celsius. Thanks to its
wireless sensor, the weather station can give you the temperature reading outside or in another room.
- Hygrometer:
Outdoor or indoor hygrometry is expressed in percentage of humidity in the ambient air. The ideal
'Comfort Zone' for the human body ranges from 35 to 65% hygrometry for a given temperature
between 18 and 24
- Barometer:
The station also monitors the atmospheric pressure and, based on its pattern of evolution, displays a
weather forecast as a user-friendly icon: sun, clouds, rain... That's the weather to be expected in the
next 8 to 12 hours.
And many extra features:
- Animated icons
- Pivoting and rotating base
Copyright © Lexibook 2005
10:19
Page 1
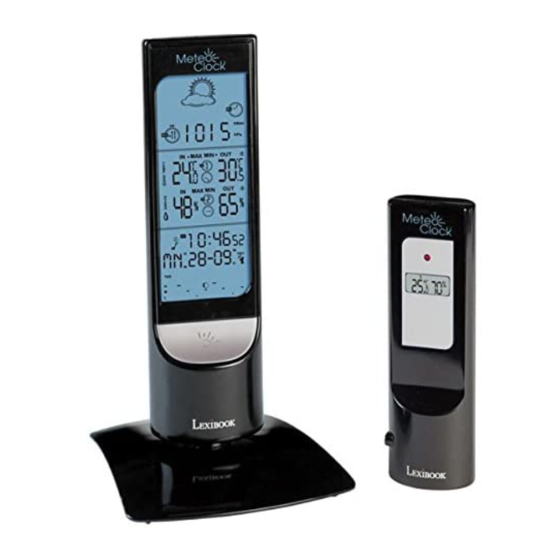
MeteoClock
"Elegance Evolution"
®
SM1820 + ASM30 - Instruction Manual
INTRODUCTION
o
C.
- Wall mounting stand
- Blue backlit LCD display
®
SM1820 "Elegance Evolution".
1
Advertisement
Table of Contents

Related Manuals for LEXIBOOK MeteoClock Elegance Evolution SM1820


Summary of Contents for LEXIBOOK MeteoClock Elegance Evolution SM1820
- Page 1 SM1820 incorporates the following functions: - Thermometer: The temperature is displayed in real time to the nearest tenth of a degree Celsius. Thanks to its wireless sensor, the weather station can give you the temperature reading outside or in another room.
-
Page 2: Main Features
Transmission range: up to 30 meters in open area. Receives and monitors temperature and humidity from up to 3 remote sensors via RF Battery type: 2 x AAA size technology of 433MHz (One Wireless Thermo Sensor Included). Temperature and humidity trend indicator. -
Page 3: Getting Started
A4 – Current barometric pressure A5 – Indoor Temperature A6 – Outdoor Max/Min temperature and humidity memory A7 – Remote sensor channel # (CH) & outdoor temperature trend A8 – Outdoor Temperature A9 – Indoor Humidity A10 – Indoor Max/Min temperature & humidity memory A11 –... - Page 4 12/24 display mode. Press and hold to adjust digits at a faster rate. B11 – - (Out °C/°F) : to adjust the alarm clock and the alert. Press and hold to adjust digits at a faster rate.
- Page 5 C4 – Outdoor humidity C5 – Automatic learn function icon D. Sensor Unit Function keys *** D1 – °C/°F button: to select °C or °F display. D2 – Channel selection switch: to set the sensor unit to channel 1, 2 or 3.
-
Page 6: Power Supply
SM1820GB 11/04/2005 10:19 Page 6 POWER SUPPLY Your Meteoclock works with 2 AA batteries for the main unit and 2 AAA for the remote sensor (all not included). Battery installation Main Unit Remote Sensor 1. Main Unit: Use your finger to lift the battery door located at the back of the main unit. - Page 7 10:19 Page 7 2. CH 123 will be displayed. Select a channel (1, 2 or 3) using the [D2] switch. The channel function allows the receiver to identify each remote sensor. The main unit can receive up to 3 different remote channels.
- Page 8 The remote sensor can also be wall-mounted. To do so, locate the wall-mounting hole at the back of the sensor (upper part) and fix it on a hook or nail.
-
Page 9: Clock And Alarm Settings
Time and Date Setting: 1. The setting sequence is displayed in the order: Hours © © Minutes © © Seconds © © Year © © Month/Day sequence © © Month © © Day © © Time Zone © © Day-of-week language. - Page 10 5. Use the [B10] and [B11] buttons to adjust the minutes then press [B4]. 6. Use the [B10] and [B11] buttons to turn the alarm ON and OFF and then press [B4] to confirm your alarm settings. When an alarm is activated, its icon ( and/or ) will be displayed below the time.
- Page 11 Animated Weather Forecast Symbols This weather station is capable of detecting barometric pressure changes, and based on the data collected, predicting the weather for the next 8 to 12 hours. There are 5 different weather forecast symbols [A1]. Note: The remote sensor set on Channel 1 is used to help displaying the weather forecast icons (as well as the trend indicator).
- Page 12 The barometric pressure [A4] can be measured in 3 different units: inHg (inches of mercury), mb (millibar) and hPa (hecto-Pascal). Inches of mercury are employed in the United States. Millibars and hecto-Pascal are equivalent. You can select the barometric pressure to be displayed in nHg or in mb / hPa.
- Page 13 1°C or higher than 34°C, the temperature alarm will ring and [A8] will blink. It will ring for a few seconds, stop, and ring a few seconds later until it is turned off.
- Page 14 00:00. Maximum/Minimum Indoor temperature and humidity readings: 1. Press [B3] once to see the maximum indoor temperature [A5] and humidity [A9]. “MAX” is shown on [A10]. 2. Press [B3] twice to see the minimum indoor temperature [A5] and humidity [A9]. “MIN” is shown on [A10].
- Page 15 Every 12 hours approximately, the oceans on each side of the planet rise slightly then fall back. This movement is called tides. It is the result of the gravitational pull of the moon and the sun and the rotations of the earth, moon and sun. Your weather station displays the tide status [A19] as follows:...
- Page 16 Press and hold [B2] to remove a channel manually. It will automatically search and register new channel again if a new channel is received. If no temperature is displayed on an existing channel (“ - - . –“ is displayed on the LCD), press and hold [B2] to cancel that channel and receive the channel again. Then, press [D3] on the corresponding sensor unit to transmit the signal to the main unit manually.
-
Page 17: Specifications
Resolution: 0.1°C MAINTENANCE In order to clean the unit, use only a soft cloth moistened with water; do not use any detergent product. Do not dismantle or drop the unit. Remove the batteries if the unit is not going to be used for an extended period of time. -
Page 18: Troubleshooting
Page 18 TROUBLESHOOTING Problem: Solution : The temperature measurements of Wait for about 1-2 minute to ensure the remote the remote sensor and receiver do sensor and receiver are in phase. Otherwise, re-synchronize receiver by holding CHN for 3 not match. -
Page 19: Warranty
Our warranty covers material or installation-related defects attributable to the manufacturer, with the exception of wear caused by failure to respect the instructions for use or any unauthorised work on the equipment (such as dismantling, exposure to heat or damp, etc.). -
Page 20: Declaration Of Conformity
EN301489-1-3. We hereby declare that the above named product is in conformity to all the essential requirements of R&TTE Directive 1999/5/EC of 09. March 1999.
Need help?
Do you have a question about the MeteoClock Elegance Evolution SM1820 and is the answer not in the manual?
Questions and answers