Table of Contents
Advertisement
Quick Links
Advertisement
Table of Contents

Related Manuals for THORLABS MCLS2-CUSTOM


Summary of Contents for THORLABS MCLS2-CUSTOM
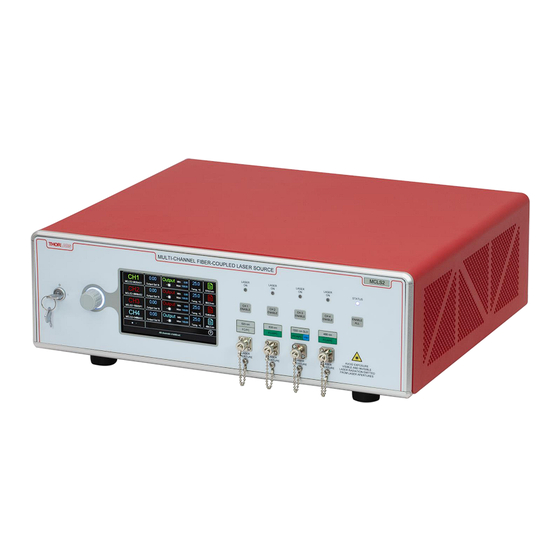
- Page 1 MCLS2-CUSTOM 4-Channel Laser/SLD Source User Guide...
-
Page 2: Table Of Contents
MCLS2-CUSTOM 4-Channel Laser/SLD Source Table of Contents Chapter 1 Introduction ....................... 1 1.4.1 Specifications ..............................2 1.4.2 Mechanical Drawings ............................3 Chapter 2 Safety ......................... 6 Chapter 3 Installation ....................... 10 3.2.1 Software Installation ............................12 Chapter 4 Operation ......................... 13 4.2.1... - Page 3 4.11.2 Software Requirements ............................ 25 4.11.3 Command Line Operation ..........................25 4.11.4 Keywords (Commands and Queries) ......................... 26 Chapter 5 Maintenance and Cleaning ..................28 Chapter 6 Troubleshooting and Repair ..................29 Chapter 7 Disposal ........................31 Chapter 8 Thorlabs Worldwide Contacts ................... 32...
-
Page 4: Chapter 1 Introduction
(SLD) sources. Each system is equipped with up to four fiber output light sources with wavelengths available from 406 nm to 2000 nm. The MCLS2-CUSTOM base is configured to accept a wide range of fiber pigtailed laser diodes and SLDs including sources with single mode, multimode, or PM fiber. -
Page 5: Specifications
While most output sources fall within the class 3B or lower laser ratings, the system was fully designed to meet class 4 laser requirements. The MCLS2-CUSTOM source is equipped with a remote interlock located on the rear panel that must be shorted for any laser or SLD output to be enabled. This can easily be configured to be triggered by doors to disable the lasers or SLDs in unsafe conditions. -
Page 6: Mechanical Drawings
MCLS2-CUSTOM 4-Channel Laser/SLD Source Chapter 1: Introduction System Power Supply Type Switch Mode AC/DC Input Voltage 85 – 264 VAC, 50 – 60 Hz Power Rating 130 VA IEC60127-2/3 Fuse Type (1.25 A, 250 V, Slow Blow Type 'T') Operating Temperature Range 20 to 30 °C... - Page 7 MCLS2-CUSTOM 4-Channel Laser/SLD Source Chapter 1: Introduction Components The tables below list the standard available system light sources. Available Laser Sources Typ. Monitor Fiber Laser Typ. λ Laser Power Power Photo- Fiber Connector Source Name (nm) Source Type (mW) (mW)
- Page 8 MCLS2-CUSTOM 4-Channel Laser/SLD Source Chapter 1: Introduction MCLS2-1310AS3 1310 100.0 130.0 Fabry-Perot SMF-28e+ FC/APC MCLS2-1550AP1 1550 25.0 40.0 Fabry-Perot PM1550 FC/APC PM MCLS2-1550AS1 1550 25.0 40.0 Fabry-Perot SMF-28-J9 FC/APC MCLS2-1550AS2 1550 48.0 50.0 Fabry-Perot SMF-28-J9 FC/PC Corning MCLS2-1550AP2 1550 80.0 100.0...
-
Page 9: Chapter 2 Safety
Laser Radiation Emitted from Apertures Warning If equipment is used in a manner not specified by Thorlabs, the protection provided by the equipment may be impaired. This unit must not be operated in explosive environments. Do not operate in wet or damp conditions. - Page 10 Class 4 lasers available in the MCLS2-CUSTOM may cause damage to the skin, and to the eye, even from the viewing of diffuse reflections. These hazards may also apply to indirect or non-specular reflections of the beam, even from apparently matte surfaces.
- Page 11 Mount the laser on a firm support to ensure that the beam travels along the intended path. Additionally, it is necessary to connect the fiber patch cable(s) you will be using to the MCLS2-CUSTOM fiber outputs ports before enabling the lasers, both for safety reasons and fiber care. Please see section 5.2 regarding cleaning of fiber tips in order to prevent fiber damage and system degradation.
- Page 12 MCLS2-CUSTOM 4-Channel Laser/SLD Source Chapter 2: Safety INVISIBLE LASER RADIATION INVISIBLE LASER RADIATION AVOID EXPOSURE TO BEAM AVOID EXPOSURE TO BEAM CLASS 3B LASER PRODUCT CLASS 3B LASER PRODUCT 785 nm <115 mW 808 nm <40 mW INVISIBLE LASER RADIATION...
-
Page 13: Chapter 3 Installation
MCLS2-CUSTOM 4-Channel Laser/SLD Source Chapter 3: Installation Resources Safety of laser products – Part 1: Equipment classification and requirements IEC 60825-1:2014+A11:2021 ISBN 978 0 539 21768 1 PERFORMANCE STANDARDS FOR LIGHT-EMITTING PRODUCTS 21 C.F.R. §1040 Laser Safety Guide Laser Institute of America ISBN 978-1-940168-03-6 www.lia.org/store/product/laser-safety-guide... - Page 14 MCLS2-CUSTOM 4-Channel Laser/SLD Source Chapter 3: Installation Installation Instructions Below is a short description of the outside of the MCLS2-CUSTOM 4-Channel Laser/SLD Source. Laser On indicator Laser Enable Button (5 places) (4 places) Four individual enable Indicates whether Steady - on...
-
Page 15: Software Installation
MCLS2-CUSTOM 4-Channel Laser/SLD Source Chapter 3: Installation The MCLS2-CUSTOM 4-Channel Laser/SLD Source is designed to operate from 85 to 264 VAC, and there is no need to make any adjustments as the switching power supply will determine the correct voltage automatically. -
Page 16: Chapter 4 Operation
Thorlabs Device Dynamic-Link Library (TLDeviceSDK.dll) and its dependency are required by the GUI application, or any other applications developed with the Thorlabs Device SDK. To make it convenient to run the executables without copying the DLLs, the full path to TLDeviceSDK.dll, C:\Program Files (x86)\Thorlabs\TL_Devices\TL_DEVICE_SDK\Bin is added to the Windows PATH environment variable. -
Page 17: Home Screens
4.2.1 Home Screens Figure 5 below shows the basic home screen when the MCLS2-CUSTOM Source is in a normal operating state. The Output and Temperature can be adjusted by tapping the desired parameter once to change it with the control knob or double tapping to bring up the keypad popup menu, see figure 6 below . -
Page 18: Adjusting The Parameters
MCLS2-CUSTOM 4-Channel Laser/SLD Source Chapter 4: Operation 4.2.2 Adjusting the Parameters When an adjustable value is double tapped, a popup keypad screen will appear allowing for direct adjustment of the value; see figure 6 below. While the parameter is selected, the control knob can be used to adjust the value even when the keypad popup is not selected. -
Page 19: Channel Settings Sub-Menu
MCLS2-CUSTOM 4-Channel Laser/SLD Source Chapter 4: Operation 4.2.4 Channel Settings Sub-Menu Clicking a button in the first column opens the channel sub-menu. The channel sub menu allows for adjustment of user preferences as listed below. • CH# Friendly Name: Tap to assign a friendly name to the channel. -
Page 20: Channel Output Options Sub-Menu
MCLS2-CUSTOM 4-Channel Laser/SLD Source Chapter 4: Operation 4.2.5 Channel Output Options Sub-Menu Clicking on the OUTPUT OPTIONS button, the third column in the home screen, opens the output options sub- menu. The Output Options sub menu allows for adjustment of source settings as listed below. - Page 21 MCLS2-CUSTOM 4-Channel Laser/SLD Source Chapter 4: Operation Turning the Source Off DO NOT turn the power key switch off until laser/SLD is disabled. Failing to disable all outputs first can damage the unit permanently. When completely powering down an enabled unit, first press and release the ENABLE ALL button (if all sources are enabled), or each of the individual ENABLE switches for the channels, and then turn the POWER key switch counterclockwise, which will turn OFF the entire unit.
- Page 22 MCLS2-CUSTOM 4-Channel Laser/SLD Source Chapter 4: Operation Modulating with an internal offset or Threshold Mode – Set the desired offset or select Threshold Mode. To calibrate your input, apply a DC voltage to the MOD IN and slowly increase until the system disables. This will be the max voltage allowable for that channel.
- Page 23 Delete: Deletes the selected profile The MCLS2-CUSTOM Source can save up to five profiles. To save a profile, tap the Profiles menu option, tap the Save Profile option, and select a profile to change. This will bring up a keyboard window to enter a new profile name.
-
Page 24: Display Menu
Dimming Timeout (s): This appears when the Enable Dimming Timeout checkbox is checked, it determines the amount of time the screen will be at the Brightness after turning on the MCLS2-CUSTOM or touching the screen. If further adjustments are made, the timer is reset. After the timeout, the screen will dim to the Dim Brightness described below. -
Page 25: Knob Menu
MCLS2-CUSTOM 4-Channel Laser/SLD Source Chapter 4: Operation 4.6.2 Knob Menu The Knob Menu is to setup user preferences with respect to the knob LEDS and the different adjustment options. The control knob located to the left of the display provides a color matched backlight that will default to white light to indicate the system is powered on. -
Page 26: About Tab
MCLS2-CUSTOM 4-Channel Laser/SLD Source Chapter 4: Operation Figure 15 General Menu – System Defaults Shown 4.6.4 About Tab The About Tab is an information tab that displays the company name, part name, system serial number, the firmware revisions, and populated light source names and serial numbers. There is no interactable content on this page. -
Page 27: Laser Apertures
ENABLE ALL tactile button. All units shipped from Thorlabs are configured with a shorting device installed in the Interlock connector. If you are not going to use this feature, then you can leave the shorting device installed and the unit will operate normally as described in the procedures above. -
Page 28: Gui Operation
The command language is described below. Prior to running the command line interface, the unit should be powered on, and a USB cable should be connected between the MCLS2-CUSTOM Source and the host. The terminal emulator should be set as follows: Rev. -
Page 29: Keywords (Commands And Queries)
MCLS2-CUSTOM 4-Channel Laser/SLD Source Chapter 4: Operation Terminal Emulator Settings Baud Rate 115.2 kb/s Data Bits Parity None Stop Bits Flow Control None If you are using a terminal program, be sure to check the option “Append line feeds to incoming line ends”, or a similar option, depending upon the program you are using. - Page 30 MCLS2-CUSTOM 4-Channel Laser/SLD Source Chapter 4: Operation DISPDBLTAPTIMEOUT? Get maximum ms between taps for double tap DISPDBLTAPTIMEOUT=n Set maximum ms between taps for double tap (n = [50..500]) DISPENABLEDIM? Get enabled state of display dimming DISPENABLEDIM=n Set enabled state of display dimming (n = [0=Off, 1=On])
-
Page 31: Chapter 5 Maintenance And Cleaning
SLD is enabled. Failure to follow these precautions may result in permanent damage to the unit. Thorlabs recommends using our FCC-7020 (pictured below) to clean the fiber tip of your FC/PC patch cord. To clean your connector: 1. -
Page 32: Chapter 6 Troubleshooting And Repair
Changing the Fuse The MCLS2-CUSTOM Source uses a 1.25 A, 250 VAC Schurter Inc. part number 0034.3118 glass cartridge fuse. Should the fuse blow and need to be replaced, the same fuse must be used. The fuse can be found in the tray below the AC mains plug. - Page 33 Chapter 6: Troubleshooting and Repair 2. Fuse(s) may be open. Refer to section 5.3 for information on replacing open fuses. If the problem persists, please return the unit to Thorlabs for evaluation. 1. Make sure that the AC Line Cord is properly plugged in and Key Switch is turned to “ON”...
-
Page 34: Chapter 7 Disposal
EC and are not dissembled or contaminated. Contact Thorlabs for more information. Waste treatment is your own responsibility. “End of life” units must be returned to Thorlabs or handed to a company specializing in waste recovery. Do not dispose of the unit in a litter bin or at a public waste disposal site. It is the user’s responsibility to delete all private data stored on the device prior to disposal. -
Page 35: Chapter 8 Thorlabs Worldwide Contacts
MCLS2-CUSTOM 4-Channel Laser/SLD Source Chapter 8: Thorlabs Worldwide Contacts Chapter 8 Thorlabs Worldwide Contacts For technical support or sales inquiries, please visit us at for our most up-to-date www.thorlabs.com/contact contact information. Corporate Headquarters Product Manufacturer Thorlabs, Inc. Thorlabs Inc. 43 Sparta Ave... - Page 37 www.thorlabs.com...
Need help?
Do you have a question about the MCLS2-CUSTOM and is the answer not in the manual?
Questions and answers