
Related Manuals for SteelMax D2 PRO


Summary of Contents for SteelMax D2 PRO
- Page 1 The tools of innovation. OPERATOR’S MANUAL DRILLING MACHINE WITH ELECTROMAGNETIC BASE D2 PRO 801 W. Mineral Ave. Suite 103 Littleton, CO 80120 303-690-9146, FAX 303 - 690 - 9172 www.steelmax.com sales@steelmax.com...
-
Page 2: Table Of Contents
Contents 1. GENERAL INFORMATION ....................3 1.1. Application ........................3 1.2. Technical data ......................3 1.3. Equipment included .....................4 1.4. Dimensions........................5 1.5. Design .........................6 2. SAFETY PRECAUTIONS ....................7 3. SYMBOLS ..........................9 4. STARTUP AND OPERATION ..................10 4.1. Installing the handles ....................10 4.2. Installing the tools ......................11 4.3. -
Page 3: General Information
1. GENERAL INFORMATION 1.1. Application The D2 PRO is a drilling machine designed to drill holes of diameters of up to 2 11/64″ (55 mm) by using annular cutters. The machine can also drill holes of diameters of up to 5/8″ (16 mm) by using twist drill bits. It also allows for machining holes of diameters of up to 2″... -
Page 4: Equipment Included
1 unit 8 5 mm hex wrench with a handle 1 unit 9 8 mm combination wrench 1 unit Operator’s manual 1 unit This document is protected by copyrights. Copying, using, or distributing without permission of Steelmax Tools is prohibited. -
Page 5: Dimensions
D2 PRO 1.4. Dimensions 13″ (331 mm) 10″ (254 mm) This document is protected by copyrights. Copying, using, or distributing without permission of Steelmax Tools is prohibited. -
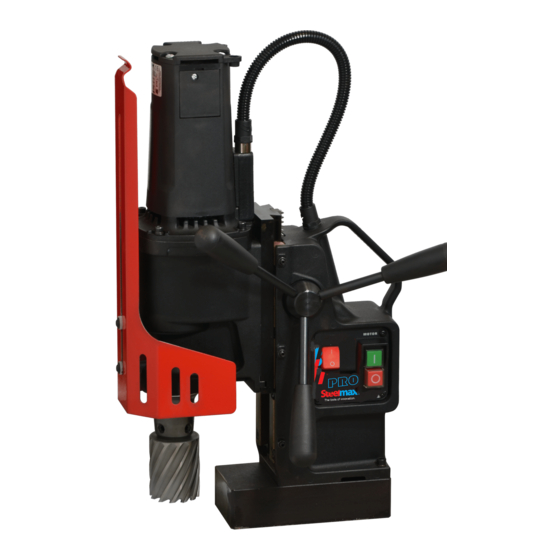
Page 6: Design
Feed shaft Gear switch Motor START Motor STOP Chip guard Electromagnetic base Spindle (MAGNET) switch with arbor Hole for a safety strap Electromagnetic base This document is protected by copyrights. Copying, using, or distributing without permission of Steelmax Tools is prohibited. -
Page 7: Safety Precautions
19. Do not drill/machine holes whose diameter or depth differ from those specified in the technical data. 20. Do not use in explosive environments or near flammable materials. This document is protected by copyrights. Copying, using, or distributing without permission of Steelmax Tools is prohibited. - Page 8 36. If you are not going to use the machine for an extended period, put anti-corrosion material on the steel parts. This document is protected by copyrights. Copying, using, or distributing without permission of Steelmax Tools is prohibited.
-
Page 9: Symbols
Before using the machine, read the description of the following symbols (Tab. 1). Wear eye protection Wear ear protection Refer to instruction manual Warning against electric voltage Tab. 1. Description of symbols This document is protected by copyrights. Copying, using, or distributing without permission of Steelmax Tools is prohibited. -
Page 10: Startup And Operation
To do this, continue in the sequence that follows. Make sure that the shaft is engaged with the rack (4). This document is protected by copyrights. Copying, using, or distributing without permission of Steelmax Tools is prohibited. -
Page 11: Installing The Tools
(4) so that the flat surfaces (5) align with the screws (6). Use the 5 mm hex wrench to tighten the screws. To remove the tool, loosen the screws (6) with the 5 mm hex wrench. This document is protected by copyrights. Copying, using, or distributing without permission of Steelmax Tools is prohibited. -
Page 12: Installing And Removing The Drilling Chuck (Option)
(5) align with the screws (6). Use the 5 mm hex wrench to tighten the screws. Put the twist drill bit into the chuck (7). To remove the chuck, loosen the screws (6) with the 5 mm hex wrench. This document is protected by copyrights. Copying, using, or distributing without permission of Steelmax Tools is prohibited. -
Page 13: Installing And Removing The Cooling System
4.4. Installing and removing the cooling system Put the bottle on the screws (1). Attach the hose to the fitting (2). To remove the bottle, continue in reverse sequence. This document is protected by copyrights. Copying, using, or distributing without permission of Steelmax Tools is prohibited. -
Page 14: Monitoring System Of The Clamping Force
If the machine comes loose from the work- piece and hangs on the strap, replace the strap. Do not put the strap into the buckle from the front. This document is protected by copyrights. Copying, using, or distributing without permission of Steelmax Tools is prohibited. - Page 15 The cooling system works by gravity. Thus, in the horizontal position, turn the bottle. In the inverted position, use coolants under pressure or in the form of spray or paste. This document is protected by copyrights. Copying, using, or distributing without permission of Steelmax Tools is prohibited.
-
Page 16: Drilling
(S355N), or 45 (C45), requires lower speeds. If the speed is too high or too low for the workpiece strength and the type/diameter of the tool, the tool will wear faster or be unable to drill the hole. This document is protected by copyrights. Copying, using, or distributing without permission of Steelmax Tools is prohibited. - Page 17 Next, turn off the motor and the base, and then unplug the power cord. Clean the machine and the tool, and then remove the machine from the work area. This document is protected by copyrights. Copying, using, or distributing without permission of Steelmax Tools is prohibited.
-
Page 18: Adjusting The Gibs
(3) so that they touch the gib. Move the motor up and down and adjust the screws (3) so that the travel is smooth. Next, tighten the screws (4) and then tighten the nuts (5). This document is protected by copyrights. Copying, using, or distributing without permission of Steelmax Tools is prohibited. -
Page 19: Replacing The Brushes
13/64″ (5 mm), replace the two brushes with new ones. Install in reverse sequence. Then, let the motor operate with no load for 20 minutes. This document is protected by copyrights. Copying, using, or distributing without permission of Steelmax Tools is prohibited. -
Page 20: Accessories
5.1. Pressure cooling system Capacity of 2 liters. Part number: UKL-0440-16-00-00-0 5.2. Drilling chuck 1/2″ 20 UNF x 1.5-13 mm Part number: UCW-000059 This document is protected by copyrights. Copying, using, or distributing without permission of Steelmax Tools is prohibited. -
Page 21: Drilling Chuck 1/2" 20 Unf X 3-16 Mm
5.4. Adapter 3/4″ x 1/2″ 20 UNF Part number: TRZ-000027 5.5. Pipe attachment DMP 251 For pipes with diameters of 3-10″ (80-250 mm). Part number: PDS-0110-03-00-01-0 This document is protected by copyrights. Copying, using, or distributing without permission of Steelmax Tools is prohibited. -
Page 22: Pipe Attachment Dmp 501
D2 PRO 5.6. Pipe attachment DMP 501 For pipes with diameters of 6-20″ (150-500 mm ). Part number: PDS-0111-03-00-01-0 This document is protected by copyrights. Copying, using, or distributing without permission of Steelmax Tools is prohibited. -
Page 23: Vacuum Pad
Allows you to clamp the machine to flat non-ferromagnetic surfaces. Part number (vacuum pad, supply hose): PDS-0587-00-00-00-0 Part number (vacuum pump with safety reservoir): AGR-0541-01-20-00-0 This document is protected by copyrights. Copying, using, or distributing without permission of Steelmax Tools is prohibited. -
Page 24: Ejector
D2 PRO 5.8. Ejector Allows the vacuum pad to be clamped to the surface by using compressed air source. Part number: ZSP-0587-11-00-00-0 This document is protected by copyrights. Copying, using, or distributing without permission of Steelmax Tools is prohibited. -
Page 25: Exploded Drawings And Parts
5 HEX WRENCH 8 COMBINATION WRENCH KLC-000003 KLC-000037 5 MM HEX WRENCH WITH HANDLE PAS-000008 SAFETY STRAP UKL-0716-04-00-00-0 COOLING SYSTEM *not shown in the drawing This document is protected by copyrights. Copying, using, or distributing without permission of Steelmax Tools is prohibited. - Page 26 HEX SOCKET HEAD CAP SCREW 6x25 Zn ELECTROMAGNETIC BASE ASSY PDS-0716-03-00-00-0 WZK-0242-04-00-00-0 REED WIRES SET FLT-0257-04-12-00-0 INTERFERENCE ELIMINATOR STR-0257-04-03-00-2 MODULE - 230V STR-0257-04-03-00-3 MODULE - 115V This document is protected by copyrights. Copying, using, or distributing without permission of Steelmax Tools is prohibited.
- Page 27 WKR-000077 HEX SOCKET SET SCREW WITH FLAT POINT M5X16 NKR-000016 HEX NUT M5 PNL-0741-03-00-00-0 CONTROL PANEL ASSY. 230V PNL-0741-03-00-00-1 CONTROL PANEL ASSY. 115V This document is protected by copyrights. Copying, using, or distributing without permission of Steelmax Tools is prohibited.
- Page 28 D2 PRO This document is protected by copyrights. Copying, using, or distributing without permission of Steelmax Tools is prohibited.
- Page 29 SEAL fi9,4x3 PDK-0220-00-05-00-0 WASHER 19x10x1,5 PRS-000009 EXTERNAL RETAINING RING 19W CROSS RECESSED OVAL PAN HEAD SCREW FOR WKR-000514 PLASTIC 4x25 PRP-000005 CABLE GLAND PG9 This document is protected by copyrights. Copying, using, or distributing without permission of Steelmax Tools is prohibited.
- Page 30 ROUND WASHER 5,3 PDK-000017 KLK-000005 SPRING DOWEL PIN 3x14 HEX SOCKET HEAD CAP SCREW M5x16 SRB-000083 SPRING WASHER 5,1 PDK-000045 SMR-000009 GREASE 0,39kg This document is protected by copyrights. Copying, using, or distributing without permission of Steelmax Tools is prohibited.
- Page 31 WRN-0684-99-02-00-1 ROTOR ASSY 120V LOZ-000095 BALL BEARING 7x22x7 OBD-0684-99-01-00-0 STATOR HOUSING ASSY – 230V OBD-0684-99-01-00-1 STATOR HOUSING ASSY – 115V WKL-000008 BEARING INSERT 22x9 This document is protected by copyrights. Copying, using, or distributing without permission of Steelmax Tools is prohibited.
- Page 32 BRUSH HOLDER 6.4x12.5 ASSY PLY-000066 PLATE 8x13 WKR-000359 SCREW Ph-TZ 3.5x13 SPR-000020 SPRING 6x0,25 OBD-0279-02-03-09-0 MOTOR COVER WKR-000081 SELF-TAPPING SCREW 4,8x19 PKR-0279-02-06-00-0 STATOR COVER This document is protected by copyrights. Copying, using, or distributing without permission of Steelmax Tools is prohibited.
- Page 33 D2 PRO WIRING DIAGRAM This document is protected by copyrights. Copying, using, or distributing without permission of Steelmax Tools is prohibited.
-
Page 34: Declaration Of Conformity
Person authorized to compile the technical file: Wiktor Marek Siergiej, ul. Elewatorska 23/1, 15-620 Białystok, Poland Białystok, 15 February 2022 ___________________________ Wiktor Marek Siergiej This document is protected by copyrights. Copying, using, or distributing without permission of Steelmax Tools is prohibited. -
Page 35: Environmental Protection
This document is protected by copyrights. Copying, using, or distributing without permission of Steelmax Tools is prohibited. -
Page 36: Warranty Card
9. WARRANTY CARD WARRANTY CARD No..... ……………………….. in the name of Manufacturer warrants the D2 Pro Drilling Ma- chine with Electromagnetic Base to be free of defects in material and workmanship under normal use for a period of 12 months from the date of sale.
Need help?
Do you have a question about the D2 PRO and is the answer not in the manual?
Questions and answers