Table of Contents
Advertisement
Quick Links
Download this manual
See also:
Operator's Manual
Advertisement
Table of Contents

Related Manuals for SteelMax D1 AUTO


Summary of Contents for SteelMax D1 AUTO
- Page 1 The tools of innovation. OPERATOR’S MANUAL DRILLING MACHINE WITH ELECTROMAGNETIC BASE 15335 E. Fremont Drive, Centennial, CO 80112 1– 87STEELMAX, FAX 303 – 690 – 9172 www.steelmax.com sales@steelmax.com...
-
Page 2: Table Of Contents
Contents 1. GENERAL INFORMATION ....................3 1.1. Application ......................... 3 1.2. Technical data......................3 1.3. Design ........................4 1.4. Equipment included ....................5 2. SAFETY PRECAUTIONS ....................6 3. STARTUP AND OPERATION ................... 8 3.1. Installing and operating the annular cutter ..............8 3.2. -
Page 3: General Information
D1 AUTO 1. GENERAL INFORMATION 1.1. Application The D1 AUTO is a drilling machine with electromagnetic base designed to drill holes with diameters of 12–36 mm (0.47–1.42’’) to the maximum depth of 51 mm (2’’) through the use of annular cutters. -
Page 4: Design
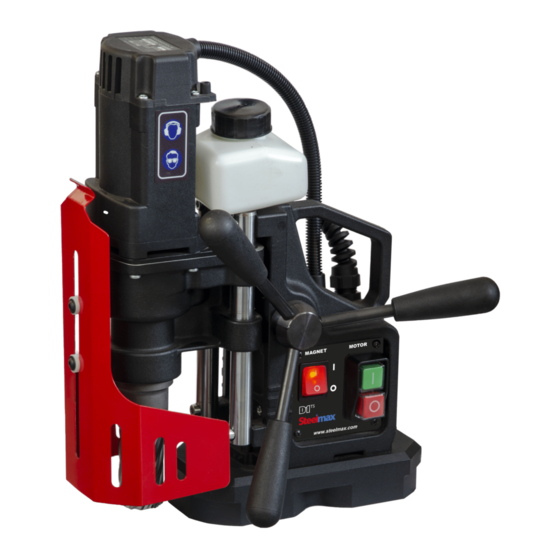
Cooling system bottle Carrying handle Spoke handle Control panel Bottle valve lever Opening for safety strap Chip guard Electromagnetic base Arbor Electromagnetic base Motor START button ON/OFF switch Motor STOP button Fig. 1. View of the D1 AUTO D1 AUTO Operator’s Manual... -
Page 5: Equipment Included
D1 AUTO 1.4. Equipment included The D1 AUTO is supplied in a metal box including the following elements. Drilling machine 1 unit Metal box 1 unit Spoke handle 2 units Cooling system bottle 1 unit Chip guard 1 unit Safety strap... -
Page 6: Safety Precautions
55 mm (2.17’’). 18. Never use machine near flammable liquids or gases, or in explosive environments. 19. Using the machine on surfaces that are rusty, covered with a thick paint layer, uneven, or not rigid is prohibited. D1 AUTO Operator’s Manual... - Page 7 31. Never leave the machine unattended during operation. 32. Remove from the worksite and store in a secure and dry location when not in use, previously removing the cutter and pilot pin from the arbor. D1 AUTO Operator’s Manual...
-
Page 8: Startup And Operation
(4) in such a way to align the flats 5 with the set screws 6. Finally, tighten both set screws with the 4 mm hex wrench. To remove the cutter, proceed in reverse order. Fig. 2. Installing the annular cutter D1 AUTO Operator’s Manual... - Page 9 Annular cutters are designed to make only through holes shown in Fig. 4. When drilling incomplete through holes the pilot pin must not be used. Incomplete through holes Complete through holes Fig. 4. Types of holes to make with annular cutters D1 AUTO Operator’s Manual...
-
Page 10: Installing And Removing The Cooling System Bottle
Fig. 5. Installing the cooling system bottle 3.3. Control system of the electromagnetic base holding force The D1 AUTO drilling machine incorporates a holding force control system to monitor the adhesion force of the electromagnetic base to the surface. The force value... -
Page 11: Preparing
Do not use pure water as the cutting fluid. However, using emulsions formed from mixing water and drilling oil is satisfactory. To check the operation of the cooling system, slightly loosen the bottle cap, open the D1 AUTO Operator’s Manual... - Page 12 Enter into manual feed mode by positioning the spoke handles as shown in Fig. 7a, and rotate them to the left to place the tip of the pilot pin above the drilling point. Fig. 7. Configuration of the spoke handles: manual feed (a), automatic feed (b) D1 AUTO Operator’s Manual...
-
Page 13: Drilling
Before inserting the drilling machine into the toolbox, remove the cooling system bottle, and then remove the cutter and pilot pin from the arbor using protective gloves. D1 AUTO Operator’s Manual... -
Page 14: Replacing The Motor Brushes
(4) and the brush (5). If the length of the brush is less than 5 mm (0.2’’), replace both brushes with new ones. To install brushes, proceed in reverse order. After the replacement, run the motor without load for 20 minutes. Fig. 8. Replacing the brushes D1 AUTO Operator’s Manual... -
Page 15: Wiring Diagram
D1 AUTO 4. WIRING DIAGRAM D1 AUTO Operator’s Manual... -
Page 16: Exploded Drawings And Parts List
D1 AUTO 5. EXPLODED DRAWINGS AND PARTS LIST ITEM PART NUMBER DESCRIPTION Q-TY SKR-0502-17-00-00-0 METAL BOX KLC-000036 4 MM HEX WRENCH WITH HANDLE PAS-000007 SAFETY STRAP 250 D1 AUTO Operator’s Manual... - Page 17 D1 AUTO D1 AUTO Operator’s Manual...
- Page 18 BALL BEARING 25x47x12 LOZ-000072 BALL BEARING 9x26x8 WYP-0139-00-02-00-1 PLUNGER SPR-0271-02-02-03-0 SPRING KRP-0272-02-02-01-0 SPINDLE BODY USZ-0279-02-01-06-0 SEAL PRS-000009 INTERNAL RETAINING RING 19w WKR-000059 HEX SOCKET SET SCREW WITH FLAT POINT M8x10 46* LOZ-000048 BALL BEARING 25x47x12 LST-0271-02-01-02-1 GEAR RACK D1 AUTO Operator’s Manual...
- Page 19 KLK-000005 SPRING DOWEL PIN 3x14 SLN-000056 MOTOREDUCER 12V PNK-000013 MAGNET SWITCH WLC-000007 SWITCH START-STOP 230V WLC-000005 SWITCH START-STOP 115V PWD-0277-09-04-00-0 PANEL PLATE WIRE – SMR-000001 GREASE 0.055 kg * before you order read the service manual D1 AUTO Operator’s Manual...
-
Page 20: Declaration Of Conformity
Elewatorska 23/1 15-620 Bialystok Poland declare with full responsibility that product: D1 AUTO Drilling Machine with Electromagnetic Base which the declaration applies to is in accordance with the following standards: • EN 60745-1 • EN 55014 • EN ISO 12100-1 •... -
Page 21: Quality Certificate
D1 AUTO 7. QUALITY CERTIFICATE Machine control card D1 AUTO Drilling Machine with Electromagnetic Base Serial number ........................ Spindle radial runout ...................... Slider to base travel perpendicularity ................Spindle axis to base perpendicularity ................Base holding force ......................≤ (surface with the minimum thickness of 22 mm and roughness R 1.25) -
Page 22: Warranty Card
WARRANTY CARD No.................. in the name of Manufacturer warrants the D1 AUTO Drilling Machine with Electromagnetic Base to be free of defects in material and workmanship under normal use for a period of 12 months from the date of sale.
Need help?
Do you have a question about the D1 AUTO and is the answer not in the manual?
Questions and answers