Advertisement
Quick Links
UNI VE RS AL S URF HOOKS
UN1 10 4B
INSTALLATION
GUIDE
F L AT L I N E VA N C O • S U P P O R T @ F L AT L I N EVA N C O . C O M • 8 8 8 - 6 6 7- 5 5 7 6
TOOLS REQUIRED
(NOT INCLUDED)
+
TAPE MEASURE
+
3/16" ALLEN WRENCH
+
3/8" WRENCH
+
9/16" WRENCH OR SOCKET
INSTALL INFO
TIME TO INSTALL THIS PRODUCT: 30 MINUTES
Additional help is suggested for a few of the install
steps.
BEFORE YOU START
Please inspect the product and packaging upon
delivery to ensure there are no issues and that all
parts and hardware are accounted for.
Contact us ASAP if anything is missing at:
support@flatlinevanco.com
0 1
Advertisement

Related Manuals for FVC UN1104B


Summary of Contents for FVC UN1104B
- Page 1 INSTALLATION GUIDE UNI VE RS AL S URF HOOKS UN1 10 4B TOOLS REQUIRED (NOT INCLUDED) TAPE MEASURE 3/16” ALLEN WRENCH 3/8” WRENCH 9/16” WRENCH OR SOCKET INSTALL INFO TIME TO INSTALL THIS PRODUCT: 30 MINUTES Additional help is suggested for a few of the install steps.
-
Page 2: Before You Start
BEFORE YOU START All Flatline Van Co products must be properly assembled and secured before attaching to your vehicle. Improper attachment could result in an automobile accident, and could cause serious bodily injury or death to you or to others involved. You are responsible for assembling and securing Flatline Van Co products to your vehicle, checking the mounting points and attachments prior to use, and regularly inspecting the products for wear and or damage. -
Page 3: Package Contents
PACKAGE CONTENTS PADDED SURF HOOK CLAMP BODY CLAMP BUSHING QTY: 2 QTY: 4 QTY: 4 QTY: 8 F L AT L I N E VA N C O • S U P P O R T @ F L AT L I N EVA N C O . C O M • 8 8 8 - 6 6 7- 5 5 7 6... - Page 4 HARDWARE 3/8-16 X 1.5 FLANGED HEX HEAD 3/8 SCREW FLAT WASHER 3/8-16 NYLON INSERT LOCKNUT 1/4-20 X 0.75 SOCKET HEAD SCREW SCREW QTY: 4 QTY: 8 QTY: 4 QTY: 8 5ML THREADLOCKER BOTTLE QTY: 1 F L AT L I N E VA N C O • S U P P O R T @ F L AT L I N EVA N C O . C O M • 8 8 8 - 6 6 7- 5 5 7 6...
- Page 5 TOOLS REQUIRED FOR THIS STEP: 1/4” WRENCH OR SOCKET STEP | 01 SURF HOOK ASSEMBLY 1.1 Determine Hook Folding Direction: Before starting assembly, determine your preferred folding direction of the hooks (FIG 1). 1.2 Loosen Top Brackets: Using a 1/4” Wrench, loosen the screws on the top brackets (FIG 2).
- Page 6 1/4” WRENCH OR SOCKET TOOLS REQUIRED FOR THIS STEP: 9/16” WRENCH OR SOCKET STEP | 01 SURF HOOK ASSEMBLY 1.3 Orient Pivot Points: If you would like the Surf Hooks to swing to the left, orient the Pivot Points as shown in FIG 3. If you would like them to swing to the right, orient them as shown in FIG 4.
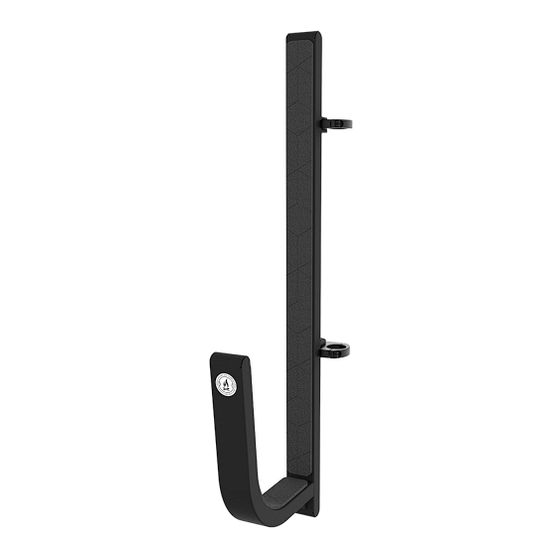
- Page 7 3/16” ALLEN WRENCH TOOLS REQUIRED FOR THIS STEP: STEP | 02 SURF HOOKS INSTALL 2.1 Determine Install Height on Surf Pole / Ladder: Decide the appropriate height for installation on the surf pole or ladder where you intend to mount the hooks (FIG 7). 2.2 Verify Folding Direction and Install Hooks: Confirm the folding direction of the hooks and install them at the predetermined height (FIG 8).
- Page 8 TOOLS REQUIRED FOR THIS STEP: STEP | 03 SECURING BOARDS 3.1 Board Clearance: When securing boards to the Surf Hook, always ensure that you leave enough room for the door to open and close freely (FIG 10). 3.2 Board Tie-Down: The Surf Hooks have built-in loops for running straps around your boards (FIG 11).
- Page 9 FVC (and see) from you! Head to the products and following along and we will make it right. FVC is product page and click “Leave a company of van and outdoor with your adventures. Tag us Review.”...
Need help?
Do you have a question about the UN1104B and is the answer not in the manual?
Questions and answers