Table of Contents
Advertisement
Quick Links
Download this manual
See also:
Setup Manual
Advertisement
Table of Contents

Related Manuals for CyberData VoIP Ceiling Speaker


Summary of Contents for CyberData VoIP Ceiling Speaker
- Page 1 VoIP Ceiling Speaker Operations Guide Part #010844 CyberData Corporation 2555 Garden Road Monterey, CA 93940 (831) 373-2601 930095H...
- Page 2 CyberData Corporation. This manual, and the products, software, firmware, and/or hardware described in this manual are the property of CyberData Corporation, provided under the terms of an agreement between CyberData Corporation and recipient of this manual, and their use is subject to that agreement and its terms.
-
Page 3: Revision History
Revision History Revision CyberData Corporation Date Released Description of Changes 11/08/2006 Adds Section 2.4, "Set up the 1/22/2007 Adds info about the RTFM Announcement feature in 4/12/2007 Changes the Authenticate ID and password character limit from 30 to 25 in Table 2-7. - Page 4 CyberData Corporation 930095H Operations Guide...
-
Page 5: Table Of Contents
1.2 Product Features ...2 1.3 Supported Protocols ...3 1.4 Supported SIP Servers ...3 1.5 Product Specifications ...3 Chapter 2 Installing the VoIP Ceiling Speaker 2.1 Parts List ...5 2.2 Speaker Setup ...6 2.2.1 Connect Power to the Speaker ...6 2.2.2 Confirm that the Speaker is Operational and Linked to the Network ...7 2.2.3 Confirm the IP Address, Test the Audio, and Check the Volume ...8... - Page 6 CyberData Corporation 930095H Operations Guide...
-
Page 7: Chapter 1 Product Overview
1 Product Overview The Voice-over-IP (VoIP) Ceiling Speaker uses a single cable to connect to existing LANs to broadcast digital audio over your public address system. The small footprint and low height makes this an ideal speaker to discreetly mount almost anywhere. -
Page 8: Product Features
Product Overview Product Features Figure 2 illustrates how the VoIP Ceiling Speakers are can be installed as part of a multicast public address system. 1.2 Product Features CyberData Corporation Figure 2. Public Address System—Multicast 930095H ● SIP compliant ● Multicast support ●... -
Page 9: Supported Protocols
Audio Encodings ● PCMU (G.711 mu-law) PCMA (G.711 A-law) Packet Time 20 ms 1.4 Supported SIP Servers The following link contains information on how to configure the speaker for the supported SIP servers: http://www.cyberdata.net/support/voip/ceilingspeaker.html 1.5 Product Specifications Category Sensitivity Output... - Page 10 Product Overview Product Specifications CyberData Corporation 930095H Operations Guide...
-
Page 11: Chapter 2 Installing The Voip Ceiling Speaker
Note The Template for Speaker and Screw Holes is located on the last page of the Installation Quick Reference Guide that is included in the packaging with each speaker. Quantity... -
Page 12: Speaker Setup
Figure 2-1. 802.3af Compliant Ethernet Hub CyberData Corporation Table 2-2. Factory Default Settings—Default of SIP Figure 2-2 illustrates how to connect the VoIP Ceiling Speaker to a 802.3af compliant (Figure 2-1) or a PoE Injector (Figure Non PoE Hub... -
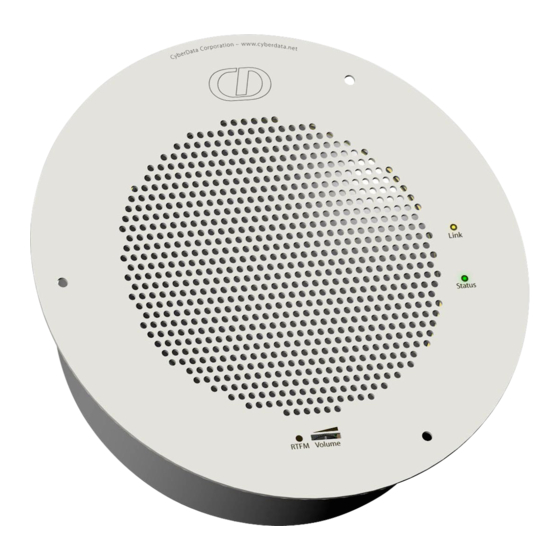
Page 13: Confirm That The Speaker Is Operational And Linked To The Network
2.2.2 Confirm that the Speaker is Operational and Linked to the Network After connecting the speaker to the 802.3af compliant ethernet hub, the LEDs on the speaker face confirm that the speaker is operational and linked to the network. 2.2.2.1 Status LED After supplying power to the speaker: 1. -
Page 14: Confirm The Ip Address, Test The Audio, And Check The Volume
Speaker Setup 2.2.3 Confirm the IP Address, Test the Audio, and Check the Volume When the speaker is operational and linked to the network, use the Reset Test Function Management (RTFM) switch IP Address, test that the audio is working, and check the volume. -
Page 15: Adjust The Volume
2.3 Configure the Speaker Parameters To configure the speaker online, use a standard web browser. Configure each speaker and verify its operation before you mount it. When you are ready to mount a speaker, refer to All speakers are initially configured with the following default IP settings: When configuring more than one speaker, attach the speakers to the network and configure one at a time to avoid IP address conflicts. -
Page 16: Log In To The Configuration Home Page
Default Gateway 2.3.1 Log in to the Configuration Home Page 1. Open your browser to the speaker IP address. For the initial configuration of the speaker, open your browser to the default IP address: http://192.168.3.10 Note Make sure that the PC is on the same IP network as the speaker. - Page 17 Link to the Network Setup web page. Link to the SIP Setup web page. Link to the MGROUPS Setup page. Link to the Upgrade Firmware web page. 930095H Installing the VoIP Ceiling Speaker Configure the Speaker Parameters Table 2-4. CyberData Corporation...
-
Page 18: Configure The Network Parameters
Installing the VoIP Ceiling Speaker Configure the Speaker Parameters 2.3.2 Configure the Network Parameters 1. Click the Network Setup button to open the Network Setup page 2. On the Network Setup page, enter values for the parameters indicated in Web Page Item... - Page 19 3. After changing the parameters, click Save Settings. This updates the changed parameters and reboots the speaker if appropriate. 4. Connect the speaker to the target network. 5. From a system on the same network as the speaker, open a browser with the new IP address of the speaker. Operations Guide Table 2-5.
-
Page 20: Set Up The Speaker
Installing the VoIP Ceiling Speaker Configure the Speaker Parameters 2.3.3 Set up the Speaker 1. Click the Speaker Setup button to open the Speaker Setup page. See 2. On the Speaker Setup page, enter values for the parameters indicated in Web Page Item... -
Page 21: Configure The Sip Parameters
Note For specific server configurations, go to the following URL: http://www.cyberdata.net/support/voip/ceilingspeaker.html Note If the speaker is set up for MGROUPS, the SIP settings will be grayed out. Operations Guide Table 2-6. Speaker Setup Parameters (continued) Description Enable/Disable the speaker tone (beep) and audio associated with the RTFM switch. - Page 22 Installing the VoIP Ceiling Speaker Configure the Speaker Parameters Figure 2-9. SIP Setup Page CyberData Corporation 930095H Operations Guide...
- Page 23 Enable/Disable SIP Registration. • Select Yes to automatically unregister the speaker when it is rebooted. • Select No to keep the speaker registered when it is rebooted. Enter the SIP Registration lease time in minutes (default 60 minutes). Click this button to save your configuration settings.
-
Page 24: Set Up The Mgroups
MGROUPS Setup provides the ability to join up to 10 Paging Zones. A Paging Zone can consist of one, or many, CyberData MGROUPS-enabled speakers. There is no limit to how many speakers can be in a given Paging Zone. Each MGROUP is defined by a multicast address and port number. Each MGROUP is also assigned a priority, allowing simultaneously arriving pages to be serviced based on importance. - Page 25 Link to the Network Setup page. Link to the Speaker Setup page. Link to the SIP Setup page. Link to the Upgrade Firmware page. Link to the Home page. 930095H Installing the VoIP Ceiling Speaker Set up the MGROUPS Table 2-8. Express”. CyberData Corporation...
-
Page 26: Upgrade The Firmware And Reboot The Speaker
1. Set up a TFTP server. If you do not already have a TFTP server running on your network, see a TFTP 2. Retrieve the latest speaker firmware from the CyberData website: http://www.cyberdata.net/support/voip/ceilingspeaker.html 3. Unzip the speaker version file. This file may contain the following: •... - Page 27 9. Click Upload File. Note This starts the upload process. Once the speaker has uploaded the file, the Uploading Firmware countdown page appears, indicating that the firmware is being written to flash. The speaker will automatically reboot when the upload is complete. When the countdown finishes, the Firmware Upgrade page will refresh.
-
Page 28: Reboot The Speaker
Web Page Item Application TFTP Server IP address New Filename 2.5.1 Reboot the Speaker To reboot a speaker, log in to the web page as instructed in Home Page". 1. Click Upgrade Firmware to open the Firmware Upgrade page CyberData Corporation Table 2-9. -
Page 29: Restore The Factory Default Settings
Each speaker is delivered with factory set default values for the parameters indicated in Use the RTFM switch on the speaker face to restore these parameters to the factory default settings. Note When you use the RTFM switch, the factory default settings are restored for only the parameters indicated in configuration will remain unchanged. - Page 30 To restore these parameters to the factory default settings: 1. Press and hold the RTFM switch for 20 seconds. 2. The speaker will beep after one second. Continue to hold the switch until the speaker beeps again after 20 seconds.
-
Page 31: Appendix A: Mounting The Speaker
Appendix A: Mounting the Speaker A.1 Mount the Speaker Before you mount the speaker, make sure that you have received all the parts for each speaker. Refer Table A-1 Table A-1. Drop Ceiling Mounting Components (Part of the Accessory Kit) Quantity Table A-2. - Page 32 Operational and Linked to the Network" 3. At this point: • For drop ceiling mounting, position the VoIP SPEAKER ASSEMBLY in the ceiling so that its screw holes align with those you prepared. • For drywall mounting, place the three PLASTIC RIBBED ANCHORS in the holes you prepared, and position the VoIP SPEAKER ASSEMBLY over them, aligning the screw holes in the assembly with the anchors.
- Page 33 For drop ceiling mounting, use the three 8-32 x 1 1/4" MOUNTING SCREWS, #8 NYLON THUMB NUTS, and #8 FENDER WASHERS to secure the speaker. • For drywall mounting, use the three #8 SHEET METAL SCREWS to secure the speaker. Operations Guide 930095H...
- Page 34 Mount the Speaker CyberData Corporation 930095H Operations Guide...
-
Page 35: Appendix B: Setting Up A Tftp Server
Appendix B: Setting up a TFTP Server B.1 Set up a TFTP Server Upgrading the VoIP Ceiling Speaker firmware requires a TFTP server on which you access the Web interface where you can upload the firmware files. B.1.1 In a LINUX Environment To set up a TFTP server on LINUX: 1. - Page 36 Set up a TFTP Server CyberData Corporation 930095H Operations Guide...
-
Page 37: Appendix C: Troubleshooting/Technical
Phone: 831-373-2601, Extension 136 Email: RMA@CyberData.net When returning a product to CyberData, an approved CyberData RMA number must be printed on the outside of the original shipping package. No product will be accepted for return without an approved RMA number. Send the product, in its original package, to the following address:... -
Page 38: Warranty
CyberData warrants its product against defects in material or workmanship for a period of two years from the date of purchase. Should the product fail within the warranty period, CyberData will repair or replace the product free of charge. This warranty includes all parts and labor. -
Page 39: Index
IP settings 9 network 12 SIP 15 using Web interface 9 configuration home page 10 confirming IP address 8 CyberData contact information, corporate, sales, tech support, service 31 default gateway 6, 10, 24 IP address 6, 9, 23 speaker settings 33... - Page 40 14 for SIP server login 17 login 10 restoring the default 6, 10, 23 plastic ribbed anchors 25, 26 PoE Injector 6 CyberData Corporation port local SIP 17 remote SIP 17 port baud rate 3 power requirement 3...
- Page 41 IP addressing 12 status LED 7, 26 subnet mask 6, 10, 12, 23 supported protocols 3 technical support, contact information 31 template for speaker and screw holes 25 testing audio 8 TFTP server 3, 29 unregister, from SIP server 17 user ID...
- Page 42 CyberData Corporation 930095H Operations Guide...
Need help?
Do you have a question about the VoIP Ceiling Speaker and is the answer not in the manual?
Questions and answers