Table of Contents
Advertisement
Quick Links
Advertisement
Table of Contents

Subscribe to Our Youtube Channel
Related Manuals for Insportline Air-Run T300


Summary of Contents for Insportline Air-Run T300
- Page 1 USER MANUAL – EN IN 20079 Treadmill inSPORTLine Air-Run T300...
-
Page 2: Table Of Contents
CONTENTS SAFETY INSTRUCTIONS ........................3 PRODUCT DESCRIPTION ........................4 ASSEMBLY ............................. 4 CONSOLE ............................... 7 TECHNICAL SPECIFICATIONS ......................7 MAINTENANCE AND STORAGE ......................8 SAFE EXERCISING ..........................9 GETTING START ............................ 9 IMPORTANT NOTICE ........................... 10 ISSUES AND SOLUTIONS ........................11 ENVIRONMENT PROTECTION ...................... -
Page 3: Safety Instructions
SAFETY INSTRUCTIONS • Read the manual carefully and keep it for the future references. • Move naturally, forward. Do not look on your feet. Only for one person can use the product on the same time. • Speed increase regularly, not immediately. •... -
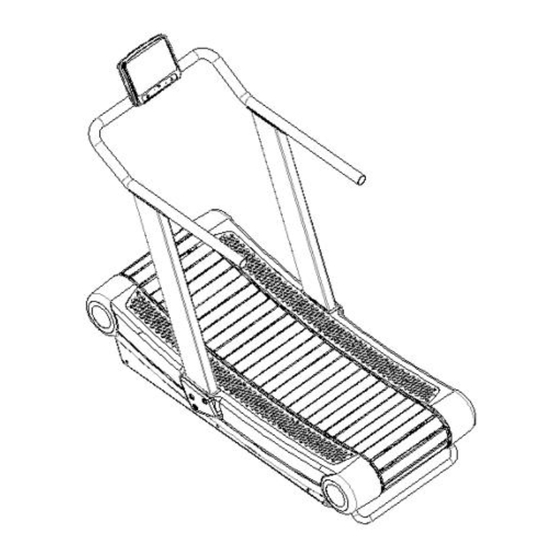
Page 4: Product Description
PRODUCT DESCRIPTION A. Console B. Treadmill belt C. Handlebars D. Side step ASSEMBLY STEP 1 Remove the side covers (1) and the treads (2) (Fig. 1) Pic. 1... - Page 5 STEP 2 Attach the left post with 3 M12 x 45 screws (4), 3 Ø12 washers (6) and 3 Ø12 spring washers (5), and then connect the cables from the left post to the main frame (Pic. 2). Pic. 2 STEP 3 Fasten the right post with 3 M12 x 45 screws (4), 3 Ø12 washers (6) and 3 Ø12 washers (5), and then connect the cable C (03) to the shaft D (Pic.
- Page 6 STEP 6 Attach the side treads (2) and side covers (1) (Pic. 1). Pic. 1 Grasp both handles and stand on the side steps. Stand firmly on the treadmill. First, hold the handles for extra safety. Then release the handles. Initially set the speed to 6-7 km / h and then increase the speed slowly.
-
Page 7: Console
CONSOLE BUTTONS MODE/RESET (selection, confirmation / reset) Switch between TIME, DISTANCE, CALORIES, PULSE 2. Confirm setting, selection 3. Hold for 2 seconds to reset the setting SET (settings) 1. Press to increase the value by 1, and hold for fast increase Setting TIME, DISTANCE,... -
Page 8: Maintenance And Storage
MOVING AND SETTING UP THE MACHINE There are two transport wheels on the front. To move the device, tilt the device slightly and move it. Due to the weight of the device, we recommend moving the device in more people. If movement by wheels is not possible, the unit must be raised completely. -
Page 9: Safe Exercising
DAILY • Before each use, make sure that no object in the area prevents the user from moving freely. • Before each use, check that the belt edges are properly locked and check for wear. • After each use, wipe away sweat and moisture. •... -
Page 10: Important Notice
EXERCISE Stand aside to learn how to operate the machine (adjusting the speed and inclination). Start exercising after you familiarize yourself with the functions. Walk 1 km in a constant tempo and record the time it takes, which may be about 15 - 25 minutes. Walk 1 km by 4.8 km/h (you need about 12 minutes). After successfully completing this exercise a few times you can adjust to a higher speed and inclination. -
Page 11: Issues And Solutions
ISSUES AND SOLUTIONS Error Cause Solution The display does Insufficient voltage Try the socket not start Damaged cables Contact supplier Poorly connected cables Check connection Disconnected cables Check connection Damaged power cord Contact supplier Excessive noise The device is not leveled Level the device Damaged bearings Contact supplier... -
Page 12: Diagram
DIAGRAM... -
Page 13: Parts List
PARTS LIST Name Specification Main frame Column L + R Rear stabilizer Handlebars Side cover L Side cover R Side step L Side step R Column end cap L Column end cap R Cover Leveling feet Transport wheels Screw M12x65 Ø12 Washer Screw... - Page 14 These Conditions of Warranty and Warranty Claims are an integral part of every Purchase Agreement made between the Seller and the Buyer. All Warranty Conditions are valid and binding, unless otherwise specified in the Purchase Agreement, in the Amendment to this Contract or in another written agreement.
- Page 15 26847264 VAT ID: CZ26847264 Phone: +420 556 300 970 E-mail: eshop@insportline.cz reklamace@insportline.cz servis@insportline.cz Web: www.inSPORTline.cz inSPORTline s.r.o. Headquaters, warranty & service center: Električná 6471, Trenčín 911 01, SK CRN: 36311723 VAT ID: SK2020177082 Phone: +421(0)326 526 701 E-mail: objednavky@insportline.cz reklamacie@insportline.cz servis@insportline.cz...
Need help?
Do you have a question about the Air-Run T300 and is the answer not in the manual?
Questions and answers