Table of Contents
Advertisement
Quick Links
Advertisement
Table of Contents

Related Manuals for Insportline Tongu


Summary of Contents for Insportline Tongu
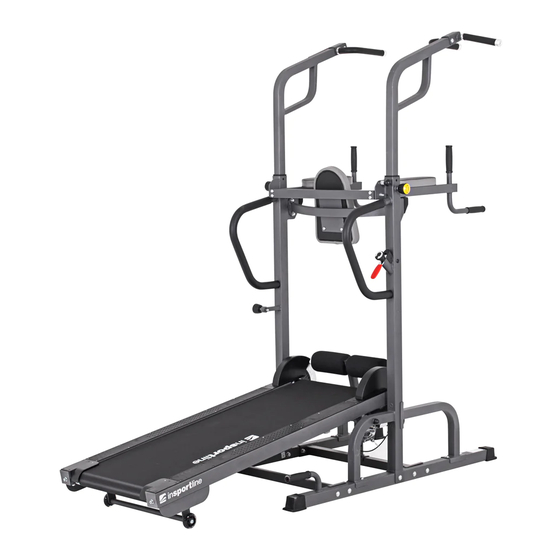
- Page 1 USER MANUAL – EN IN 19985 Walking treadmill with pull-up bar inSPORTline Tongu...
-
Page 2: Table Of Contents
CONTENTS SAFETY INSTRUCTIONS ........................3 PRODUCT DESCRIPTION ........................4 ASSEMBLY ............................. 5 SAFE EXERCISING ..........................9 GETTING START ..........................10 PULL UP EXERCISES .......................... 10 WARM – UP EXERCISE ........................11 IMPORTANT NOTICE ........................... 12 ENVIRONMENT PROTECTION ......................14 PARTS LIST ............................14 TERMS AND CONDITIONS OF WARRANTY, WARRANTY CLAIMS .......... -
Page 3: Safety Instructions
SAFETY INSTRUCTIONS • Keep the manual for the future references. • Always clip the safety key to your clothes or belt before starting exercising. • Move naturally, forward. Do not look on your feet. Only for one person can use the product on the same time. -
Page 4: Product Description
PRODUCT DESCRIPTION 1. Handlebars 2. Posts 3. Running belt 4. Side footrest 5. End caps 6. Belt centering screws 7. Transport wheels 8. Pull up grips 9. Bottom frame 10. Sit up roller 11. Backrest 12. Parallel grips 13. Grips 14. -
Page 5: Assembly
ASSEMBLY STEP 1 Connect the bottom frame (1) with support rods (2) and 8 screws (1), 16 washers (2) and 8 nuts (3). STEP 2 Attach the main frame (3) to the bottom frame (1) with 2 screws (1), 4 washers (2), 2 nuts (3). Then attach the main frame arm to the lower frame using 2 screws (4) and 2 washers (5). - Page 6 STEP 3 Attach the front supports (4) to the main and bottom frame with 8 screws (1) and 8 washers (2). STEP 4 Attach the metal rod (6) to the post and then attach the parallel bars (5) to the metal rods (6) and secure with 2 screws (1), 2 washers (2) and 2 nuts (3).
- Page 7 STEP 5 Attach the handles (8) to the support rods (9) with 4 screws (1) and 4 washers (1). Remove the hand screws (3) on both sides and attach the support bars (9) to the appropriate position. The height of both bars must be the same. Install the hand screws (3). STEP 6 Fasten the fastening bar (10) with 4 screws (1), 8 washers (2) and 4 nuts (3).
- Page 8 STEP 7 Attach the backrest (11) with 4 screws (1) Attach the elbow rest (12) with the screws (2). STEP 8 Attach the handles (13) with 2 screws (1), 2 washers (2) and 2 end pieces (14).
-
Page 9: Safe Exercising
STEP 9 Fasten the seat support A with 1 screws (1), 2 washers (2). Then attach the armrest B with the hand screw (4). SAFE EXERCISING Please consult your doctor before starting any exercise program. They can recommend the frequency, intensity and duration of the exercise based on your age and health condition. -
Page 10: Getting Start
GETTING START PREPARATION If you are more than 45 years old or have health problems and this is your first time using a treadmill, please consult your doctor before exercising. Before you use the motorized treadmill, please stand aside and learn how to use it, e.g. how to start, stop and adjust the speed. -
Page 11: Warm - Up Exercise
When exercising on pull up bar you work with your own weight and has lower risk of injury. Of course, assuming you practice the right technique. These exercises increase the overall body strength. Exercising involve a large amount of muscle in the upper half of the body. Incorrect technique involves biceps and shoulders, thus keeping your back muscles unused. -
Page 12: Important Notice
Calves and Achilles tendon stretches Support yourself with two hands on a wall or a tree with one leg stretched behind you. Keep the leg straight and the heel on the ground. Keep the position for 10 - 15 seconds. Repeat 3 times for each leg. - Page 13 MAINTENANCE CLEANING Regularly clean the belt and treadmill from dust and dirt with a damp cloth and a small amount of non- aggressive detergent. Always clean the machine from sweat after use. LUBRICATION Check the belt regularly for lubrication. If necessary, lubricate the belt. It is recommended to monitor the lubricant level every month.
-
Page 14: Environment Protection
ENVIRONMENT PROTECTION After the product lifespan expired or if the possible repairing is uneconomic, dispose it according to the local laws and environmentally friendly in the nearest scrapyard. By proper disposal you will protect the environment and natural sources. Moreover, you can help protect human health. If you are not sure in correct disposing, ask local authorities to avoid law violation or sanctions. -
Page 15: Terms And Conditions Of Warranty, Warranty Claims
M10 – 10 pcs M8 – 6 pcs Safety pin – 1 pcs Ø10 – 32 pcs Ø8 – 20 pcs Lubrication oil – 1 pcs Allen key – 4, 6 mm Screwdriver – 1 pcs Wrench 17/19 – 1 pcs Name Qty. - Page 16 “The Buyer who is not the End Customer” is a Businessman that buys Goods or uses services for the purpose of using the Goods or services for his own business activities. The Buyer conforms to the General Purchase Agreement and business conditions. These Conditions of Warranty and Warranty Claims are an integral part of every Purchase Agreement made between the Seller and the Buyer.
- Page 17 26847264 VAT ID: CZ26847264 Phone: +420 556 300 970 E-mail: eshop@insportline.cz reklamace@insportline.cz servis@insportline.cz Web: www.inSPORTline.cz inSPORTline s.r.o. Headquaters, warranty & service center: Električná 6471, Trenčín 911 01, SK CRN: 36311723 VAT ID: SK2020177082 Phone: +421(0)326 526 701 E-mail: objednavky@insportline.cz reklamacie@insportline.cz servis@insportline.cz...
Need help?
Do you have a question about the Tongu and is the answer not in the manual?
Questions and answers