
Related Manuals for Advantech RSB-3810


Summary of Contents for Advantech RSB-3810
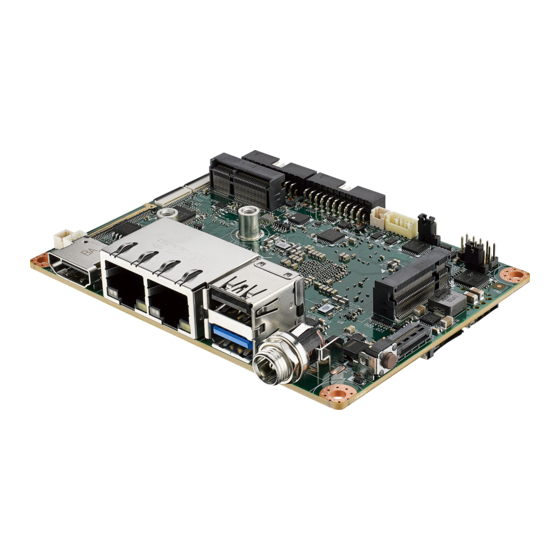
- Page 1 User Manual RSB-3810 MediaTek Genio 1200 Cortex A78 & A55 2.5" SBC with UIO40-Express...
- Page 2 No part of this manual may be reproduced, copied, translated, or transmitted in any form or by any means without the prior written permission of Advantech Co., Ltd. The information provided in this manual is intended to be accurate and reliable.
- Page 3 Consult the dealer or an experienced radio/TV technician for assistance. Technical Support and Assistance Visit the Advantech website at www.advantech.com/support to obtain the latest product information. Contact your distributor, sales representative, or Advantech's customer service center for technical support if you need additional assistance. Please have the following information ready before calling: –...
- Page 4 Packing List Before installation, ensure that the following items have been shipped: RSB-3810 SBC with Heat Sink Ordering Information Part No. Description RSB-3810CO-FCA1E 2.5" UIO SBC MediaTek Genio 1200, 8GB, 0~60 °C (32~140 °F) RSB-3810WO-FCA1E 2.5" UIO SBC MediaTek Genio 1200, 8GB, -40~85 °C (-40~158 °F)
- Page 5 The equipment has been dropped and damaged. – The equipment has obvious signs of breakage. DISCLAIMER: This set of instructions is given according to IEC 704-1. Advantech disclaims all responsibility for the accuracy of any statements contained herein. Safety Precaution – Static Electricity Follow these simple precautions to protect yourself from harm and the products from damage.
- Page 6 RSB-3810 User Manual...
-
Page 7: Table Of Contents
Table 2.26:USB 1 (USB 3.2 Gen 1 on TOP + USB 2.0 on BOT) 25 Table 2.27:DL_KEY(Download Key) ..........25 LED ........................26 Table 2.28:LED ..................26 Quick Start Guide ....................26 2.6.1 Debug Port Connection and Setting ..........26 Table 2.29:Debug Port Connection ..........26 RSB-3810 User Manual... - Page 8 Table 3.5: UIO-4034 ................42 3.15.4 UIO-4036 ....................42 Table 3.6: UIO-4036 ................42 3.15.5 UIO-4038 ....................42 Table 3.7: UIO-4038 ................42 3.15.6 UIO-4040 ....................42 Table 3.8: UIO-4040 ................42 3.16 PyeIQ Test ......................43 RSB-3810 User Manual viii...
- Page 9 Recovery by SD Card ................48 Chapter Advantech Services ......RISC Design-in Services ................50 Contact Information ..................53 Table 6.1: Contact Information ............53 Global Service Policy ..................54 5.3.1 Warranty Policy ................... 54 5.3.2 Repair Process ..................54 RSB-3810 User Manual...
- Page 10 RSB-3810 User Manual...
-
Page 11: Chapter 1 General Information
Chapter General Information This chapter details background information on the RSB-3810. Sections include: Introduction Specification... -
Page 12: Introduction
Introduction Advantech’s RSB-3810 is powered by MediaTek Genio 1200 Processor — Cortex® - A78 & A55 based SoC integrated with NPU (Neural Processing Unit). It is capable of providing outstanding Edge AI inference at 4.8 TOPS and delivers excellent perfor- mance to Object Detection and Image Segmentation applications. -
Page 13: Mechanical Specifications
Storage Humidity: 60 °C/140 °F @ 95% RH non-condensing Block Diagram USB3.0 RTL8135 USB3.0 USB3.0 RTL8135 USB3.0 USB3.0 USB3.0 USB3.0 Micro PCIe3. USB2.0 USB2. MT636 USB2.0 USB2.0 HDMI SPIA 2-Lane eDP to LVDS SEIK I2C1 4-Lane MIPI-CSI I2C4 HDMI I2C3 UART UART UART RSB-3810 User Manual... - Page 14 RSB-3810 User Manual...
-
Page 15: Chapter 2 Hardware Installation
Chapter Hardware Installation This chapter details mechanical and connector information. Sections include: Jumper Information Connector Information Mechanical Drawing Quick Start Guide... -
Page 16: Jumper And Connector Locations
MIPI-CSI #2 MIC IN M.2 2230 E-Key UIO40-Express LVDS M.2 3052 B-Dey HDMI 2.0 2x Gb# USB 3.0 12V DC-IN HDMI RX RESET USB 2.0 Figure 2.1 Nano SIM MIPI-CSI #0 Micro SD LVDS CH1 Figure 2.2 RSB-3810 User Manual... -
Page 17: Board Dimensions
A pair of needle-nose pliers may be helpful when working with jumpers. If you have any doubts about the best hardware configuration for your application, contact your local distributor or sales representative before making any changes. Generally, only a standard cable is required to make most connections. RSB-3810 User Manual... -
Page 18: Jumper List
PIN HEADER 3x1P 2.0mm 180D(M) DIP 2000-13 WS Setting Function (1_2) 5V (Default) (2_3) 2.3.3.2 VDD0 Table 2.3: VDD0 BLP2 Backlight Power Select for LVDS1 Part Number 1653003101 Description PIN HEADER 3x1P 2.0mm 180D(M) DIP 2000-13 WS Setting Function (1_2) 3V (Default) (2_3) RSB-3810 User Manual... -
Page 19: Connectors
M.2 Key B CONN. Reset Button SD Slot SIM Slot UIO1 UIO40-Express Pin Header 1 UIO2 UIO40-Express Pin Header 2 USB1 USB CONN. (USB 3.2 Gen 1 on TOP + USB 2.0 on BOT DL_KEY Download Key RSB-3810 User Manual... -
Page 20: Connector Settings
Table 2.5: BAT (RTC Battery CONN.) Pin Name Pin Name +COIN_RTC 2.4.2.2 BL0(LVDS Backlight 0) RSB-3810 supports 1 LVDS Backlight CONN. for each channel. The pin definition for the 1st channel is demonstrated below: Table 2.6: BL1 (LVDS Backlight 1) Pin Name Pin Name +12V... - Page 21 2.4.2.4 CSI0 (MIPI-CSI Camera Input 0) RSB-3810 supports 2 x 4-Lane MIPI-CSI Camera Input CONNs, CSI1 is for MIPI- CSI1. Their pin definitions are demonstrated below: Table 2.8: CSI0 (MIPI-CSI Camera Input 0) Pin Name Pin Name CSI0D_L0N CSI0B_L0P CSI0A_L2N...
- Page 22 2.4.2.5 CSI1 (MIPI-CSI Camera Input 1) RSB-3810 supports 2 x 4-Lane MIPI-CSI Camera Input CONNs, CSI2 is for MIPI- CSI2. The pin definitions are demonstrated below: Table 2.9: CSI1 (MIPI-CSI Camera Input 1) Pin Name Pin Name CSI0D_L0N CSI0D_L0P CSI0C_L2N...
- Page 23 2.4.2.6 CSI1 (MIPI-CSI Camera Input 1) RSB-3810 supports 2 x 4-Lane MIPI-CSI Camera Input CONNs, CSI2 is for MIPI- CSI2. The pin definitions are demonstrated below: Table 2.10: CSI2 (MIPI-CSI Camera Input 2) Pin Name Pin Name CSI1B_L0N_T0B CSI1B_L0P_T0A CSI1A_L2N_T1C...
- Page 24 DCIN/ DCIN1 (12V DC Power Input by DC Jack/ by Pin Header) The power input for RSB-3810 is 12V. We designed the DC Jack and 2 x pin type Pin Header co-layout. The default SKU is a lockable DC Jack.
- Page 25 Table 2.13: HDMI (HDMI CONN.) Pin Name Pin Name HDMI_TD2+ HDMI_TD2- HDMI_TD1+ HDMI_TD1- HDMI_TD0+ HDMI_TD0- HDMI_CLK+ HDMI_CLK- HDMI_CEC HDMI_Utility/ eARC+ HDMI_DDC_SCL HDMI_DDC_SDA HDMI_HPD/ eARC- 2.4.2.9 LAN (Ethernet eth0+eth1) LAN1 supports 10M/100M/1G. RSB-3810 User Manual...
- Page 26 GBE1_MDI3+ GBE1_MDI3- LAN1_ACT# AVDD33_LAN1 LAN1_EEDO_1000# LAN1_EESK_100# GBE_MDI0+ GBE_MDI0- GBE_MDI1+ GBE_MDI1- GBE_MDI2+ GBE_MDI2- GBE_MDI3+ GBE_MDI3- LAN_ACT# AVDD33_LAN1 LAN_EEDO_1000# LAN_EESK_100# 2.4.2.10 LOUT (Line Out Pin Header) Table 2.15: LOUT (Line Out Pin Header) Pin Name Pin Name LINEOUT_L LINEOUT_R RSB-3810 User Manual...
- Page 27 2.4.2.11 LVDS0 (LVDS channel 0) RSB-3810 supports one single channel LVDS @LVDS0, one 4-Lane MIPI-DSI @LVDS1, and can be configured as 1 dual channel LVDS. Table 2.16: LVDS0 (LVDS channel 0) Pin Name Pin Name LVDS0_D3- LVDS0_D3+ LVDS0_D2- LVDS0_D2+ LVDS0_D1-...
- Page 28 Table 2.16: LVDS0 (LVDS channel 0) VDD_LVDS VDD_LVDS VDD_LVDS Pull-down 4.7K LVDS_CTRL 2.4.2.12 LVDS1 (LVDS channel 1) Table 2.17: LVDS1 (LVDS channel 1) Pin Name Pin Name LVDS1_D3- LVDS1_D3+ LVDS1_D2- LVDS1_D2+ LVDS1_D1- LVDS1_D1+ LVDS1_D0- LVDS1_D0+ LVDS1_CLK+ LVDS1_CLK- LVDS_DDC_SCL RSB-3810 User Manual...
- Page 29 VDD_LVDS VDD_LVDS Pull-down 4.7K LVDS_CTRL 2.4.2.13 M2 (M.2 Key E CONN.) RSB-3810 supports 1 x M.2 Key E CONN. for extension. It has the following inter- faces: USB/PCIe/SDIO/UART/I2S. Table 2.18: M2 (M.2 Key E CONN.) Pin Name Pin Name +3.3V USB_M2E_DP +3.3V...
- Page 30 Table 2.18: M2 (M.2 Key E CONN.) PCIEG3_LN0_TXP PCIEG3_LN0_TXN PCIEG3_LN0_RXP PCIEG3_LN0_RXN PCIEG3_CLK_P PCIEG3_CLK_N PCIE_CLKREQ_N M2_RESET#_3V3 PCIE_WAKE_N M2_W_DIS2#_3V3 M2_W_DIS1#_3V3 +3.3V +3.3V 2.4.2.14 MIC (MIC In Pin Header) Table 2.19: MIC (MIC In Pin Header) Description Description MIC_IN RSB-3810 User Manual...
- Page 31 2.4.2.15 M2B (M.2 KeyB CONN.) RSB-3810 supports 1 x full size Mini-PCIe CONN. for extension via USB interface. Table 2.20: M2B (M.2 keyB CONN.) Pin Name Pin Name +3.8V +3.8V FCPO# USB_HUB3_DP W_DISABLE1# USB_HUB3_DN +1.8V W_DISABLE2# USB_HUB3_SSRX_P UIM_RESET RSB-3810 User Manual...
- Page 32 Table 2.20: M2B (M.2 keyB CONN.) USB_HUB3_SSTX_N UIM_CLK UIM_DATA USB_HUB3_SSTX_N +VUIM_PWR USB_HUB3_SSTX_P SIM_DETECT M2B_RESET# +3.8V +3.8V +3.8V 2.4.2.16 RST (Reset Button) Table 2.21: RST (Reset Button) Description Description RESET_IN# RSB-3810 User Manual...
- Page 33 2.4.2.17 SD (SD Slot) RSB-3810 supports 1 x Micro SD Slot. Table 2.22: SD (SD Slot) Pin Name Pin Name SDCARD_DAT2 SDCARD_DAT3 SDCARD_CMD +3.3V SDCARD_CLK SDCARD_DAT0 SDCARD_DAT1 +VDD_SD2 2.4.2.18 SIM (SIM Slot) RSB-3810 supports 1 x Nano SIM Slot. Table 2.23: SIM (SIM Slot)
- Page 34 2.4.2.19 UIO1 (UIO40-Express Pin Header 1) RSB-3810 supports I/O extension via UIO40-Express standard. The UIO1 connector pinout is demonstrated below: Table 2.24: UIO1 (UIO40-Express Pin Header 1) Pin Name Pin Name 5V_USB USB1_UIO_D- USB2_UIO_D+ USB1_UIO_D+ USB2_UIO_D- 5V_USB USB_HUB2_SSTX- UIO_GPIO2 USB_HUB2_SSTX+...
- Page 35 Table 2.26: USB 1 (USB 3.2 Gen 1 on TOP + USB 2.0 on BOT) Pin Name Pin Name VBUS_USB0 USB0_D- USB0_D+ SSUSB0_RXN SSUSB0_RXP SSUSB0_TXP SSUSB0_TXN VBUS_USB0 USB3_D- USB3_D+ 2.4.2.22 DL_KEY(Download Key) Table 2.27: DL_KEY(Download Key) Description Description KPCOL0 RSB-3810 User Manual...
-
Page 36: Led
2.6.1 Debug Port Connection and Setting RSB-3810 debug port is shared with COM1. Please connect the debug console cable 1700034345-01 & 1700019474. Then connect the USB-to-RS232 Cable to your PC terminal. Connect the cable to COM1 pin header to the nearby the HDMI connector. - Page 37 Figure 2.4 Connect a Display: RSB-3810’s default display interface is HDMI. When you use HDMI display as an example, please connect the HDMI display cable to RSB-3810’s HDMI con- nector as shown in Figure 2.24. Figure 2.5 Connect the Power Source: RSB-3810’s power input is 12VDC.
- Page 38 BOT side of the board will light up to indicate that the board has booted up nor- mally. (Figure 2.26) Figure 2.7 After booting, the display boot screen is shown in Figure 2.27. The debug win- dow is shown in Figure 2.28. Figure 2.8 RSB-3810 User Manual...
- Page 39 Figure 2.9 RSB-3810 User Manual...
- Page 40 RSB-3810 User Manual...
-
Page 41: Software Functionality
Chapter Software Functionality This chapter details the software function on the RSB-3810. -
Page 42: Display
When the HDMI Cable is connected, the default Weston UI(1920x1080) will be dis- played on the screen. 3.1.1.1 HDMI2.0 TX Step 1: Setting-->Storage Step 2: Play a video 3.1.1.2 HDMI2.0 RX Step 1: Connect RX to PC Step 2: # setenforce 0 Step 3: Open RXVideo_2021_9_1.apk. RSB-3810 User Manual... -
Page 43: Lvds
LVDS. Connect the Backlight cable to BL1. Step 2: Connect another 12V adapter to the DC-Jack on the backlight cable. Step 3: Power on RSB-3810 and the extra 12V adapter. Step 4: Press enter after boot. The system will stop at u-boot as demonstrated below, enter the command in red and press enter. -
Page 44: Test Wi-Fi With Ewm-W174M201E Module (Pcie Interface)
Test Bluetooth with EWM-W174M201E Module (USB Interface) Step 1: Open Android Setting. Step 2: Click Connected devices. Step 3: Click Connection preferences. Step 4: Click Bluetooth. Step 5: On and Pair new device Step 6: Available devices RSB-3810 User Manual... -
Page 45: Serial Port
Adam-4520 RX- <-->RSB-3810 COM1 DB9 Pin 1, Adam-4520 RX+ <-->RSB-3810 COM1 DB9 Pin 2, Adam-4520 TX- <-->RSB-3810 COM1 DB9 Pin 4, Adam-4520 TX+ <--> RSB-3810 COM1 DB9 Pin 3 # echo 328 > /sys/class/gpio/export # echo 327 > /sys/class/gpio/export# echo out # out > /sys/class/ gpio/gpio328/direction # echo out >... -
Page 46: Usb
Step 1: Set system time to current, then write to RTC console:/ # date 113009362023 && hwclock -w && date Step 2: Set one incorrect time, then read time from RTC to verify console:/ # date 113009362023 && hwclock -r RSB-3810 User Manual... -
Page 47: Emmc/Sd/Spi Flash
Device Routes eMMC: /dev/mmcblk2 SD: /dev/ mmcblk1p1 3.8.1.1 Test (eg. emmc) Step 1: Open Android Setting. Step 2: Click Storage Ethernet Step 1: Check the Ethernet device Step 2: Connect the cable and ping test (eg. Eth0) RSB-3810 User Manual... -
Page 48: Gpio
# cat /sys/class/gpio/gpio2/value 3.11 Watchdog 3.11.1 Internal Watchdog Step 1: System will reboot after 60 sec. androidboot.bootreason=HW_reboot # stop watchdogd Step 2: System will reboot after 60 sec. androidboot.bootreason=HW_reboot # stop watchdogd && echo 1 > /dev/watchdog RSB-3810 User Manual... -
Page 49: External Watchdog
MIPI-CSI2 (Tested with OV5640 + mini-SAS to MIPI-CSI Cable) Step 1Remove the CSI-0 and CSI-1 camera first Step 2: Use Android camera app to test Step 3: Take pictures Step 4: Video recording Step 5: Check photo RSB-3810 User Manual... -
Page 50: Tpm
3.13 Please use tpm_test.bin to test. # eltt2 -cgv 3.14 3.14.1 LED ON/OFF test LED Status: Detect gpio signal LED ON: echo 255 > /sys/class/leds/user/brightness LED OFF: echo 0 > /sys/class/leds/user/brightness RSB-3810 User Manual... -
Page 51: Uio Extension Boards
# echo "Serial Port Test" > /dev/ttyS1 # microcom -s 921600 -X /dev/ttyS1 USB disk write/read/verify pattern # ifconfig Ethernet # ping 8.8.8.8 # echo -n $'\x06\x05\x04\x03\x02\x01' > /data/test1 # dd if=/data/test1 of=/sys/bus/i2c/devices/3-0050/eeprom EEPROM # dd if=/sys/bus/i2c/devices/3-0050/eeprom of=/data/test2 conv=fsync RSB-3810 User Manual... -
Page 52: Uio-4034
# echo -n $'\x06\x05\x04\x03\x02\x01' > /data/test1 # dd if=/data/test1 of=/sys/bus/i2c/devices/3-0050/eeprom EEPROM # dd if=/sys/bus/i2c/devices/3-0050/eeprom of=/data/test2 conv=fsync 3.15.6 UIO-4040 Table 3.8: UIO-4040 # SSD disk write/read/verify pattern # echo -n $'\x06\x05\x04\x03\x02\x01' > /data/test1 # dd if=/data/test1 of=/sys/bus/i2c/devices/3-0050/eeprom EEPROM # dd if=/sys/bus/i2c/devices/3-0050/eeprom of=/data/test2 conv=fsync RSB-3810 User Manual... -
Page 53: Pyeiq Test
Python classes allowing the user to run Machine Learning applications in a simplified and efficient way without spending time on cross-compilations, deploy- ments, or reading extensive guides. For more examples and how to run PyeIQ demos on RSB-3810, please refer to the below page: http://ess-wiki.advantech.com.tw/view/AIMLinux/AddOn/Edge_AI 3.16.1... - Page 54 RSB-3810 User Manual...
- Page 56 RSB-3810 User Manual...
-
Page 57: Chapter 4 System Recovery
Chapter System Recovery This chapter details system recov- ery for a damaged Linux OS. -
Page 58: System Recovery
Insert the USB disk and SD card then boot the whole system from the SD card by changing SW1 to 1-2 ON, 3-4 OFF. Enter USB disk folder and make a bootable emmc. # cd /run/media/sda1/ # cd 3720A1AIM30LIVA0070_iMX8MP_flash_tool/mk_inand/ # sudo ./mksd-linux.sh /dev/mmcblk2 RSB-3810 User Manual... -
Page 59: Advantech Services
Chapter Advantech Services This chapter outlines Advantech’s Design-In services, technical sup- port, and warranty policy for RSB- 3720. -
Page 60: Risc Design-In Services
RISC Design-in Services Advantech’s RISC Design-In Services help customers reduce the time and work required to design new carrier boards. We handle the complexities of technical research, greatly minimizing the development risks associated with carrier boards. Easy Development Advantech offers support firmware, root file systems, board support packages, and other development tools that help customers easily develop unique carrier boards and differentiate their embedded products and applications. - Page 61 R&D costs and hardware investment. By virtue of a cooperative relationship with leading original manufacturers of CPUs and chipsets — such as ARM, TI, and NXP — Advantech helps solve communication and technical support difficulties. This can reduce the uncertainties in product devel-...
- Page 62 I/O and perfor- mance. Advantech also offers software evaluation and peripheral module recommen- dations (such as Wi-Fi, 3G, and BT). At this stage, Advantech seeks to resolve customer concerns. Product evaluation with a focus on performance and specifica- tion is vital during the planning period.
-
Page 63: Contact Information
Korea (Toll Free) 080-363-9494 080-363-9495 Taiwan (Toll Free) 0800-777-111 Russia (Toll Free) 8-800-555-01-50 Alternatively, you can contact the Advantech service team via our website. http://www.advantech.com.tw/contact/default.aspx?page=contact_form2&sub- ject=Technical+Support Our technical support engineers will provide a quick response to your queries. RSB-3810 User Manual... -
Page 64: Global Service Policy
The DOA cross-shipment excludes any shipping damage, customized and/or build- to-order products. For products that are not DOA, the return fee to an authorized Advantech repair facil- ity will be at the customer’s expense. The shipping fee for reconstructed products from Advantech back to the customer will be at Advantech’s expense. - Page 65 “Attn. RMA Service Department”. All products must be returned in properly packed ESD material or anti-static bags. Advantech reserves the right to return unrepaired items at the customer's cost if inap- propriately packed. Door-to-Door transportation, such as speed post, is recommended for delivery. Oth- erwise, the sender should bear additional charges such as clearance fees if air cargo shipment methods are used.
- Page 66 The product is sent for updates, upgrades, or tests at the request of the cus- tomer who is without warranty. If a product has been repaired by Advantech, and within three months after such a repair the product requires another repair for the same problem, Advantech will con- duct the repair free of charge.
- Page 67 No part of this publication may be reproduced in any form or by any means, such as electronically, by photocopying, recording, or otherwise, without prior written permission from the publisher. All brand and product names are trademarks or registered trademarks of their respective companies. © Advantech Co., Ltd. 2023 RSB-3810 User Manual...
Need help?
Do you have a question about the RSB-3810 and is the answer not in the manual?
Questions and answers