Advertisement
Available languages
Available languages
Quick Links
IN-DASH INSTALLATION KIT FOR
1974-2002 FORD/CHRYSLER/LINCOLN
MERCURY AND JEEP VEHICLES
CHRYSLER
1995-00
CIRRUS ..............................5
1993-97
CONCORDE .......................6
1980-83
CORDOBA ..........................6
1975-79
CORDOBA ..........................6
1983-84
E CLASS .............................7
1990-93
FIFTH AVENUE ...................7
1979-89
FIFTH AVENUE ...................8
1990-93
IMPERIAL ...........................7
1979-89
IMPERIAL ...........................7
1984-86
LASER ................................8
1984-88
LE BARON ..........................7
1982-83
LE BARON ..........................8
1977-81
LE BARON ..........................8
1987-93
LE BARON "COUPE" .........9
1990-95
LE BARON GTC ..................9
1985-89
LE BARON GTS ..................9
1989-94
LE BARON LANDAU .........10
1994-97
LHS ...................................10
1994-96
NEW YORKER ..................10
1988-93
NEW YORKER ....................7
1984-87
NEW YORKER ....................7
1979-83
NEW YORKER ....................7
1975-78
NEW YORKER ..................10
1979-81
NEWPORT ..........................7
1975-78
NEWPORT ........................10
1995-00
SEBRING ..........................11
1996-00
SEBRING "JXI"
CONVERTIBLE ...................5
1996-00
TOWN & COUNTRY .........11
1994-95
TOWN & COUNTRY .........11
1991-93
TOWN & COUNTRY .........12
1990
TOWN & COUNTRY .........12
DODGE
1979-82
024 ....................................12
1982-83
400 ......................................8
1983-88
600 ES ................................7
1985-89
ARIES..................................7
1981-84
ARIES..................................8
1976-80
ASPEN ..............................13
1995-00
AVENGER .........................11
1996-00
CARAVAN .........................11
1994-95
CARAVAN .........................12
1991-93
CARAVAN .........................12
1984-90
CARAVAN .........................16
1979-87
CHARGER ........................12
1974-78
CHARGER ........................13
1997-00
DAKOTA ...........................13
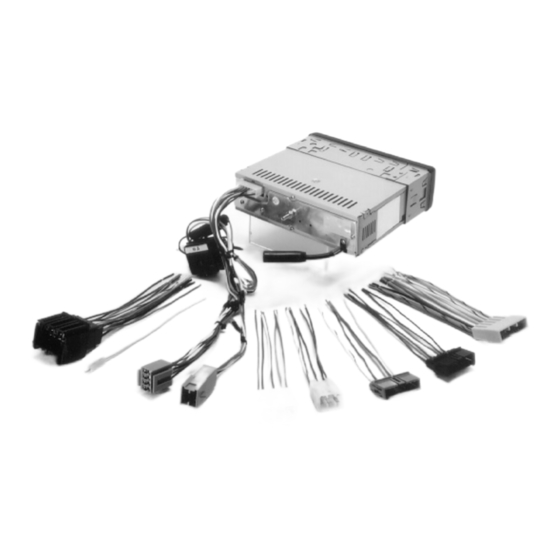
CAR STEREO CONNECTORS
PROVIDE EASY CONNECTION OF YOUR CAR
STEREO TO FACTORY WIRING HARNESS.
FD021
1982-Up Ford, Lincoln,
Mercury vehicles
Non Premium/JBL Sound
CR012
1984-Up Chrysler
vehicles
This instruction booklet is based on carefully documented data and research of automobile dash disassembly, wire harness/
codes and information pertaining to installation of this kit (FCJ2076) in 1974-2002 Ford, Chrysler, Lincoln, Mercury and
Jeep Vehicles. Scosche Industries, Inc. cannot be held responsible for discrepancies/inconsistencies that may occur due
to the automobile manufacturing changes or options, or damage that may occur in the automobile during the installation of
components while using this booklet.
If you have any further questions, call our toll free technical help line at:
© 2008 SCOSCHE INDUSTRIES, INC.
DODGE (cont'd)
1987-96
DAKOTA ............................14
1990-93
DAYTONA .........................14
1984-89
DAYTONA ...........................8
1977-89
DIPLOMAT ..........................8
1998-00
DURANGO .......................13
1988-93
DYNASTY ...........................7
1993-00
INTREPID ...........................6
1985-89
LANCER .............................9
1978-79
MAGNUM XE ....................13
1980-83
MIRADA ..............................6
1974-78
MONACO ..........................13
1995-99
NEON ...............................14
1978-90
OMNI ................................12
1981-93
PICKUP ............................15
1974-80
PICKUP ............................15
1998-01
RAM ..................................15
1994-97
RAM ..................................16
1981-93
RAMCHARGER ................15
1974-80
RAMCHARGER ................15
1982-84
RAMPAGE ........................12
1975-79
ROYAL MONACO .............13
1987-94
SHADOW ..........................16
1989-95
SPIRIT ..............................16
1995-01
STRATUS ...........................5
1979-81
ST. REGIS ...........................7
1978-02
VAN ...................................17
EAGLE
1993-97
VISION ................................6
FORD
1985-91
AEROSTAR ......................17
1987-91
BRONCO FULL SIZE .......18
1980-86
BRONCO-PICKUP ...........17
1983-88
BRONCO II .......................18
1983-89
CROWN VICTORIA ..........19
1975-91
E150/E250/E350 VAN .......18
1984-90
ESCORT ...........................19
1984-88
EXP...................................19
1987-91
F-SERIES PICKUP ...........18
1983-85
LTD ...................................19
1985-86
MUSTANG ........................20
1983-88
RANGER ..........................18
1986-89
TAURUS ............................20
1984-87
TEMPO .............................20
1980-88
THUNDERBIRD ................21
1975-91
VAN, E150/E250/E350 .....18
IM01A
1990-Up lmport,
Jeep, Mitsubishi
vehicles
MA01
1988-90 Mercury
Tracer
LIABILITY DISCLAIMER
FCJ2076
JEEP
1997-01
CHEROKEE ......................21
1984-96
CHEROKEE ......................21
1985-92
COMMANCHE ..................21
1996-98
GRAND CHEROKEE ........22
1993-95
GRAND CHEROKEE ........22
1992
GRAND WAGONEER .......22
1984-91
GRAND WAGONEER .......21
1997-02
WRANGLER .....................22
1984-95
WRANGLER .....................22
LINCOLN
1983-87
CONTINENTAL .................23
1984-89
CONTINENTAL
MARK VII LSC ..................23
1984-89
TOWN CAR ......................23
MERCURY
1985-86
CAPRI ..............................20
1983-88
COUGAR ..........................21
1980-82
COUGAR XR-7 .................21
1983-89
GRAND MARQUIS ...........19
1984-87
LYNX .................................19
1984-88
MARQUIS .........................19
1986-89
SABLE ..............................24
1984-87
TOPAZ ..............................20
1988-90
TRACER ...........................24
PLYMOUTH
1989-95
ACCLAIM ..........................24
1996-00
BREEZE .............................5
1975-79
FURY ..................................6
1978-89
GRAN FURY .......................8
1975-77
GRAN FURY .....................10
1978-90
HORIZON .........................12
1995-99
NEON ...............................14
1981-89
RELIANT .............................7
1983-90
SCAMP .............................12
1987-94
SUNDANCE ......................16
1979-82
TC3 ...................................12
1981-93
TRAILDUSTER .................15
1974-80
TRAILDUSTER .................15
1983-87
TURISMO .........................12
1978-83
VAN ...................................17
1976-80
VOLARE ...........................13
1996-00
VOYAGER .........................11
1994-95
VOYAGER .........................11
1991-93
VOYAGER .........................12
1984-90
VOYAGER .........................12
1-800-621-3695x3
SI 5/08 - FCJ2076 (3000500)
Advertisement

Related Manuals for Scosche FCJ2076


Summary of Contents for Scosche FCJ2076
- Page 1 This instruction booklet is based on carefully documented data and research of automobile dash disassembly, wire harness/ codes and information pertaining to installation of this kit (FCJ2076) in 1974-2002 Ford, Chrysler, Lincoln, Mercury and Jeep Vehicles. Scosche Industries, Inc. cannot be held responsible for discrepancies/inconsistencies that may occur due to the automobile manufacturing changes or options, or damage that may occur in the automobile during the installation of components while using this booklet.
-
Page 2: Parts List
QUICK START GUIDE INTRODUCTION This premium installation kit is for 1974-2002 Ford/Chrysler/Lincoln/Mercury & Jeep Vehicles. Included are all the parts you need to mount your car stereo or CD player into your vehicle’s dash. Refer to the individual instruction in this manual to remove your vehicle’s factory radio and assemble the kit. PRELIMINARY BEFORE BEGINNING - Read QUICK START GUIDE PAGES 2-4 CAUTION: DISCONNECT YOUR VEHICLE’S NEGATIVE BATTERY TERMINAL... - Page 3 QUICK START GUIDE ASSEMBLING THE KIT (cont’d) #1550 PANEL PICK YOUR VEHICLE Locate your vehicle on the front cover of this instruction. REMOVE FACTORY STEREO Use the step’s provided in the manual to remove factory stereo. KIT/PANEL ASSEMBLY ATTACHING THE BRACKET(S) FORD/LINCOLN/MERCURY: Some installations require that you attach specifc bracket(s).
-
Page 4: Stereo Connection
USE THE APPROPRIATE SCOSCHE WIRING CONNECTOR BELOW Wire up your new aftermarket stereo to the Scosche wiring connector and install the Scosche kit and new stereo assembly in your vehicle. Follow the dash disassembly for your specif c vehicle in reverse order to reassemble your dash. - Page 5 FACTORY WIRING CODES NOTE: The following connectors are available to easily plug your aftermarket stereo into the factory harness: PART# DESCRIPTION PART# DESCRIPTION IM01 1990-2002 Universal import CR012 1984-2002 Chrysler Vehicles vehicles FD021 1986-2002 Ford, Lincoln, Mercury MA01 1988-90 Mercury Tracer Vehicles Non Premium/ JBL Sound •...
- Page 6 1993-97 Chrysler Concorde Read pages 2-4 for kit assembly. 1993-00 Dodge Intrepid 1993-97 Eagle Vision RADIO REMOVAL: 1. Pull the radio trim bezel out to release the snap clips, and remove the bezel. 2. Extract the two bolts securing the radio, pull the radio from the cavity, unplug all connectors and remove the radio.
- Page 7 1983-84 Chrysler E Class Read pages 2-4 1984-88 Chrysler Le Baron for kit assembly. 1984-87 Chrysler New Yorker 1983-88 Dodge 600 ES 1985-89 Dodge Aries 1983-88 Dodge 600 ES 1981-89 Plymouth Reliant RADIO REMOVAL: 1. Remove nine securing screws from the top and bottom of the radio trim panel. Remove the panel by pulling it down and out.
- Page 8 1984-86 Chrysler Laser Read pages 2-4 Read pages 2-4 for kit assembly. for kit assembly. 1984-89 Dodge Daytona RADIO REMOVAL: 1. Remove one screw from each side of the ashtray. 2. Pull off the trim panel. 3. Remove two screws securing the radio to the dash. Pull the radio out. 4.
- Page 9 1987-93 Chrysler Le Baron “Coupe” Read pages 2-4 Read pages 2-4 for kit assembly. for kit assembly. RADIO REMOVAL: 1. Remove two screws, one from each lower corner of the radio/console trim panel. 2. Gently snap off the trim panel. 3.
- Page 10 1989-94 Chrysler Le Baron Landau Read pages 2-4 Read pages 2-4 for kit assembly. for kit assembly. RADIO REMOVAL: 1. Starting from the bottom, gently pry outward on the radio trim bezel to release the two spring clips on the bottom and three across the top. 2.
- Page 11 1995-00 Chrysler Sebring Read pages 2-4 1995-00 Dodge Avenger for kit assembly. RADIO REMOVAL: USE THIS BRACKET (TOP) 1. Carefully pry out on radio/AC control Usar este trim bezel to release the snap clips. braquete #2190 PANEL Remove the bezel. (Superior) 2.
- Page 12 1991-93 Chrysler Town & Country Read pages 2-4 1991-93 Dodge Caravan for kit assembly. 1991-93 Plymouth Voyager RADIO REMOVAL: 1. Remove the cigarette lighter. 2. Using a panel removal tool, carefully pry outward to release the clips securing the dash bezel and remove the bezel. 3.
- Page 13 1976-80 Dodge Aspen Read pages 2-4 1976-80 Plymouth Volare for kit assembly. RADIO REMOVAL: 1. Remove four screws from the bottom of the dash panel. Carefully pull the top portion of the panel out and remove the radio. 2. Remove two screws securing the radio to the dash and pull the radio out. 3.
- Page 14 1987-96 Dodge Dakota Read pages 2-4 for kit assembly. RADIO REMOVAL: 1. Remove eight screws from the dash trim panel. 2. Remove two screws from the underside of the steering column trim, and remove the rim. 3. Remove two screws from the radio mounting bracket, disconnect power antenna, speaker leads, and all other electrical connections, and remove the radio.
- Page 15 1981-93 Dodge Pickup, Ramcharger Read pages 2-4 1981-93 Plymouth Trailduster for kit assembly. RADIO REMOVAL: 1. Remove fve screws from the edge of the dash panel. 2. Remove one screw from the dash panel above the radio. 3. Carefully pull out the bottom of the panel to release the panel clips and remove the panel. 4.
- Page 16 1994-97 Dodge Ram Read pages 2-4 RADIO REMOVAL: for kit assembly. 1. Remove two screws securing the dash panel inside the glove box. 2. Remove four screws from the bottom edge of the dash panel and one on the left side of the panel. 3.
- Page 17 1978-02 Dodge Van Read pages 2-4 for kit assembly. 1978-83 Plymouth Van RADIO REMOVAL: 1. Remove the ashtray from the dash, extract the two screws securing the ashtray bracket to the dash and remove the bracket. 2. Open up the cup holder and extract the two screws securing it to the dash. 3.
- Page 18 1983-88 Ford Bronco II 1983-88 Ford Ranger Read pages 2-4 for kit assembly. RADIO REMOVAL: 1. Remove the knobs from the radio. 2. Remove four screws from the top leading edge of the instrument cluster trim panel. Carefully pry the top edge loose. 3.
- Page 19 1984-90 Ford Escort Read pages 2-4 1984-88 Ford EXP for kit assembly. 1984-87 Mercury Lynx RADIO REMOVAL: 1. Remove six screws from the radio trim panel. Remove the panel. 2. Remove four screws securing the radio/bracket assembly. 3. Pull the radio out of the cavity, and disconnect the antenna and all speaker and electrical connections.
- Page 20 1986-89 Ford Taurus Read pages 2-4 for kit assembly. RADIO REMOVAL: 1. Remove two screws from the bottom of the radio trim panel. 2. Carefully pry on the edges of the trim panel to release the plastic clips and pull the panel away from the dash. USE THIS BRACKET 3.
- Page 21 1980-88 Ford Thunderbird Read pages 2-4 for kit assembly. NOTE: INSTALLATION OF 1983-88 Mercury Cougar A DIN UNIT MAY REQUIRE DASH MODIFICATIONS. RADIO REMOVAL: NOTA: La instalación de 1. Remove two screws from the pocket between una unidad DIN puede requerir modif car el the ashtray and radio trim.
- Page 22 1996-98 Jeep Grand Cherokee Read pages 2-4 RADIO REMOVAL: for kit assembly. 1. Extract fve screws from along top of dash instrument bezel. 2. Carefully pop out wood grain trim panel around A/C heater control. REMOVE 3. Carefully pop out wood USE THESE SUPPORT ALIGNMENT grain trim panel around...
- Page 23 1983-87 Lincoln Continental Read pages 2-4 RADIO REMOVAL: for kit assembly. 1. Remove two screws from below the radio. 2. Open the ashtray and remove the two outside screws. Carefully pull the radio trim panel off. 3. Remove four screws securing the radio bracket to the dash.
- Page 24 Read pages 2-4 1986-89 Mercury Sable for kit assembly. RADIO REMOVAL: 1. Carefully pull on the edges of the radio trim panel to release the plastic USE THIS BRACKET clips, and remove the trim panel. Usar este 2. Remove four screws which secure braquete the radio to the dashboard, slide the radio out of the dash, disconnect the...
Need help?
Do you have a question about the FCJ2076 and is the answer not in the manual?
Questions and answers