Advertisement
Quick Links
Programming Guide
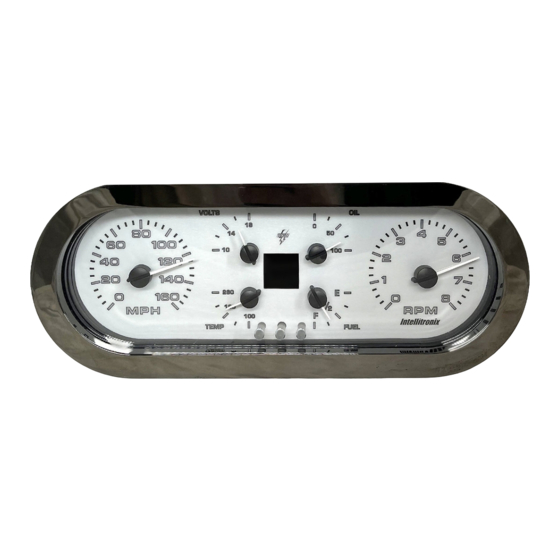
Aurora Programmable Dashboard
The Dashboard Layout
There are three push buttons at the bottom center of the dashboard.
In normal operation:
At startup, the display's home screen defaults to a
gear indicator. If a gear indicator kit is not installed
or not set up, it defaults to the speed display.
It also shows the clock, odometer/trip meter, turn
signals, high beam, brake, and check engine 'lights'.
The home screen may also be configured to be a
digital display of any of the unit's analog gauges.
Page: 1 of 11
© 2023 Intellitronix / Intellitronix.com
All rights reserved.
Part Number: AUR1001
Please note that due to continuing improvements, the actual product may differ slightly from the photos.
Left Button
•
The right button will briefly display the maximum tach reading.
•
The left button will briefly display the maximum
speed, 0-60 time, and ¼ mile time (if available).
•
The middle button, pressed once, resets the trip meter to zero.
Aurora Programmable Dashboard
Screen
Display
Middle Button
Programming Guide
Right Button
Gear
Speed
AUR1001-PG
Software Level: 3.4
Revision: 2023.12.03A
Advertisement

Related Manuals for Intellitronix Aurora


Summary of Contents for Intellitronix Aurora
- Page 1 The home screen may also be configured to be a digital display of any of the unit’s analog gauges. Page: 1 of 11 Aurora Programmable Dashboard AUR1001-PG © 2023 Intellitronix / Intellitronix.com Programming Guide Software Level: 3.4 All rights reserved. Revision: 2023.12.03A...
-
Page 2: Configuring The Dashboard
Set Odometer Temperature Needle Changer Fuel Custom Dash Gear Setup (only if gear kit installed) Text Color Cylinders Dash Color MPH Calibration Brightness Page: 2 of 11 Aurora Programmable Dashboard AUR1001-PG © 2023 Intellitronix / Intellitronix.com Programming Guide All rights reserved. - Page 3 Pressing the middle (UP ARROW) or left (DOWN ARROW) buttons adjusts the displayed voltage. • Pressing the right button (ENTER) saves the setting. Page: 3 of 11 Aurora Programmable Dashboard AUR1001-PG © 2023 Intellitronix / Intellitronix.com Programming Guide All rights reserved.
- Page 4 Examples of ‘standard’ common ranges include, but are not limited to: Ford/Chry/Dodge E= 73 F= 10 E= 10 F= 180 Universal E= 240 F= 33 Page: 4 of 11 Aurora Programmable Dashboard AUR1001-PG © 2023 Intellitronix / Intellitronix.com Programming Guide All rights reserved.
- Page 5 When you’re finished, select ‘Exit’ to save your settings. The ‘Custom’ range requires you to define Empty and Full values. ¼, ½, and ¾ values are optional. Page: 5 of 11 Aurora Programmable Dashboard AUR1001-PG © 2023 Intellitronix / Intellitronix.com Programming Guide All rights reserved.
- Page 6 All gears are now saved and you can shift gears to test the display. If you made any mistakes, you can reprogram any or all of the gears. Page: 6 of 11 Aurora Programmable Dashboard AUR1001-PG © 2023 Intellitronix / Intellitronix.com Programming Guide All rights reserved.
- Page 7 (ENTER) and drive one measured mile. • At the end of the measured mile, press the right button (ENTER). The speedometer is now calibrated. Page: 7 of 11 Aurora Programmable Dashboard AUR1001-PG © 2023 Intellitronix / Intellitronix.com Programming Guide All rights reserved.
-
Page 8: Set Clock
• Pressing the right button (ENTER) saves the setting. • Continue through the remaining positions; to finish press (ENTER) twice. Page: 8 of 11 Aurora Programmable Dashboard AUR1001-PG © 2023 Intellitronix / Intellitronix.com Programming Guide All rights reserved. - Page 9 Pressing the (ENTER) button at the ‘EXIT’ menu item exits that menu. Pressing (ENTER) on ‘Exit Needles’ saves all your changes and shows the left/right arrows again. Page: 9 of 11 Aurora Programmable Dashboard AUR1001-PG © 2023 Intellitronix / Intellitronix.com Programming Guide All rights reserved.
-
Page 10: Text Color
Pressing the middle (UP ARROW) or left (DOWN ARROW) buttons cycles through the available text colors. • Pressing the right button (ENTER) selects and saves the color. Page: 10 of 11 Aurora Programmable Dashboard AUR1001-PG © 2023 Intellitronix / Intellitronix.com Programming Guide All rights reserved. - Page 11 Pressing the middle (UP ARROW) or left (DOWN ARROW) buttons cycles through the brightness levels. • Pressing the right button (ENTER) saves the setting. Page: 11 of 11 Aurora Programmable Dashboard AUR1001-PG © 2023 Intellitronix / Intellitronix.com Programming Guide All rights reserved.
Need help?
Do you have a question about the Aurora and is the answer not in the manual?
Questions and answers