Advertisement
Quick Links
Made in America
Thank you for purchasing this dash panel from Intellitronix. We value our customers!
INSTALLATION GUIDE
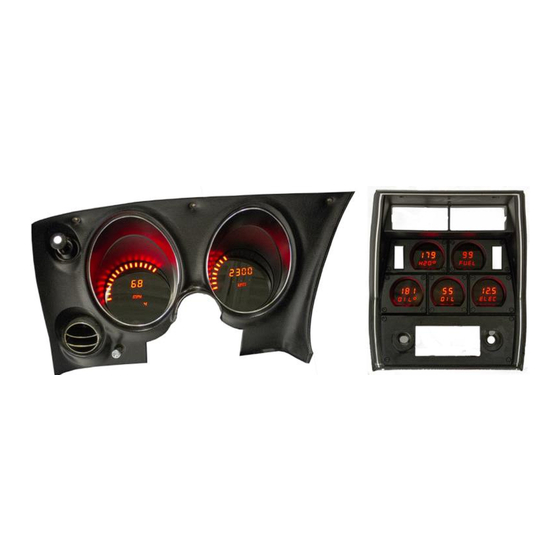
Corvette Digital Dash Panel
Part Number: DP2001
Year Series: 1968 – 1977
* Always disconnect the battery before attempting any electrical work on your vehicle.*
*Power up the unit before installing to ensure everything is working properly*
KIT COMPONENTS
Three (3) Digital Circuit Boards (speedometer, tachometer and 5-gauge cluster)
Three (3) Smoked Acrylic Lenses
* Peel off protective covering from both sides of each lens
Two (2) Temperature Sending Units (S8013) Water temp with bushing, oil temp with bushing
One (1) Pressure Sending Unit (S8868) 1/8" NPT 0-100 PSI Oil Pressure
One (1) Universal Speedometer Sensor (S9013) 7/8" NPT Industry Standard threads
One (1) Mounting Kit
Six (6) #6-32 x 1" pan head screws
Six (6) #6 x 3/8" nylon spacers
MOUNTING INSTRUCTIONS
1. Remove the factory gauges from the existing instrument cluster and insert the three new digital
panels.
2. Insert the wires for both the speedometer and tachometer gauges.
3. Mount the gauges into the housing using the hardware provided.
4. Wire the gauges and sending units into their designated areas as instructed below.
5. Remove the protective paper coating from both sides of the acrylic lens.
6. Remove protective coating from both sides of the Plexiglas lens.
7. Reuse the original housing and bezel screws to attach the new panels to the original dash bezel.
DP2001
1 |
Intellitronix
Lifetime Guarantee
rev.01/26/2024
www.intellitronix.com
Advertisement

Related Manuals for Intellitronix DP2001


Summary of Contents for Intellitronix DP2001
- Page 1 Made in America Lifetime Guarantee Thank you for purchasing this dash panel from Intellitronix. We value our customers! INSTALLATION GUIDE Corvette Digital Dash Panel Part Number: DP2001 Year Series: 1968 – 1977 * Always disconnect the battery before attempting any electrical work on your vehicle.*...
-
Page 2: Wiring Instructions
The Orange wire will be wired to the S terminal on the sending unit. This gauge is incompatible with other sending units. Orange/Black – Oil Pressure Ground Connect to the G terminal on sender DP2001 Intellitronix www.intellitronix.com rev.01/26/2024... - Page 3 Note: If doing a LS engine swap, pick up the tach signal wire from the ECM/ECU and then set the tach switch to 4-cylinders. You may also need to order the Intellitronix LS Engine Swap Adapter Kit – for Series 1, 2 and 3 engines. The part number is 8014LS. The resistor in the adapter kit will help pull a stronger signal for the tachometer.
- Page 4 Vehicle vin or Model and year and Consult your factory Pinout Chart. Speedometer - White (Intellitronix Speed Sender to replace factory cable drive) - Disconnect the mechanical speedometer cable from the transmission and insert the new electronic sensor into the transmission.
- Page 5 To enter calibration: When the display is scrolling through the function menu you will press the button briefly one time when ‘CAL’ is being displayed. ‘8000’ will appear in the odometer, this indicates the factory settings, when the button is pressed, this will change to ‘0’. When the ‘0’ is DP2001 Intellitronix www.intellitronix.com...
- Page 6 The odometer will continue to display the pulse reading for a few seconds. Once it reverts to the default mode, you have successfully calibrated your speedometer. DP2001 Intellitronix www.intellitronix.com...
Need help?
Do you have a question about the DP2001 and is the answer not in the manual?
Questions and answers