
Related Manuals for Light Sky Lotus mini


Summary of Contents for Light Sky Lotus mini
- Page 1 Lotus mini Lotus E-mail: Address: No. 43, Yunfeng Road, Xiuquan Street, Huadu District, Guangzhou, China...
-
Page 2: Table Of Contents
Contents 1. Safety information...........................2 2. Technical information........................4 3. Attachment and body size......................5 4. Installation and connecting......................7 5. Control panel...........................10 6. Menu setting..........................11 7. Channel function.........................12 8. Circuit connecting diagram......................13 9. Cleaning and maintenances.......................14 10.Troubeshooting..........................15 11.Duty exonerative and copyright protection............15 Congratulations on choosing our company product! We thank you for your custom. ◆Please note that this product, as all the others in the rich my company range, has been designed and made with total quality to ensure excellent performance and best meet your expectations and requirements. -
Page 3: Safety Information
SAFETY INFORMATION ■This lighting fixture is for professional use only - it is not for household use; Make sure all parts for fixing the projector are in a good state of repair. Make sure the point of anchorage is stable before positioning the projector. The safety chain must be prgperly hooked onto the fitting and secured to the framework. - Page 4 60℃ The maximun temperature that can be reached on the external surface of the fitting, in a thermally steady state,is 60℃about。 Avoid contact bypersons and materials. Allow the fixture to cool for at least 5 minutes before handling. ■The light source The light source in this fixture shall be replaced by the manufacturer or its service agent or similar qualification.
-
Page 5: Technical Information
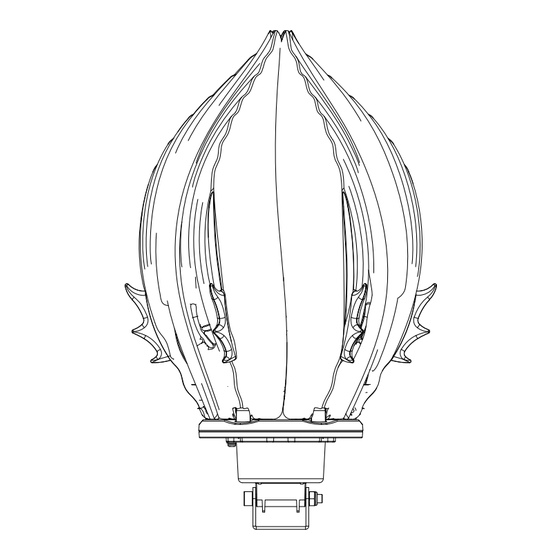
- In conformity with the European Union Low Voltage Directive 2014/35/EU and Electomagnetic compatibility - Executive standard:GB 7000.1-2015 \GB7000.217 - 2008 ● Light size: - Lotus mini:Open size:Φ192X190MM,Closed size:Φ407X190MM - Lotus:Open size:Φ225X358MM,Closed size:Φ570X232MM - Control box:330X158X72MM ● Carton packing size and weight - 241X241X277MM(Lotus mini single pack) N.W.: 0.7Kg ,G.W.:1.5Kg... -
Page 6: Attachment And Body Size
ATTACHMENT AND BODY SIZE 12 core connection cable power cord DMX CABLE 1.5m×1 3m×1 2m×4 Lotus mini Body Size---Fig 2... - Page 7 Lotus...
-
Page 8: Installation And Connecting
INSTALLATION AND CONNECTING Installing the projector- Fig. 3 The projector can be installed on the floor resting by means of brackets, on a truss or on the ceiling or wall. WARNING:with the exception of when the projector is positioned on the floor, the safety rope must be fitted. This must be securely fixed to the support structure of the projector and then connected to the fixing point at the centre of the base. - Page 9 12 core connection cable 2m×4 POWER IN Please note that when the lotus lamp is powered on, do not plug and unplug the cable interface between the controller and the lotus lamp, so as not to damage the lotus lamp。 Power cord color numbers and power connections are listed in the table below: Wire Color Wire Color...
- Page 10 PIN3 PIN2...
-
Page 11: Control Panel
C O N T RO L PA N E L Mode : Esc Up arrowhead : page up Down arrowhead : page down Enter : OK or Enter page MODE DOWN ENTER ① ② ③ ④ ◎The control box has a total of 4 display panels, each display panel corresponds to a lotus lamp, and each lotus lamp can be set with different address codes. -
Page 12: Menu Setting
M E N U S E T T I N G Main menu I Menu II Menu III Menu Address → 1-512 Dimmer → 0 - 255 Strobe → 0 - 255 → 0 - 255 Green → 0 - 255 Manual Control →... -
Page 13: Channel Function
CHANNEL FUNCTION Channel( 9CH) Percentage Channel Function Note 0 - 255 0-100 Dimmer 0 - 255 0-100 Strobe 0 - 255 0-100 0 - 255 0-100 Green 0 - 255 0-100 Blue 0 - 255 0-100 White 0 - 255 0-100 Color Mac. -
Page 14: Circuit Connecting Diagram
Circuit connecting diagram -13-... -
Page 15: Cleaning And Maintenances
CLEANING AND MAINTENANCES/清洁与保养 CLEANING AND MAINTENANCES ■1.In order to ensure the fixture could work normally. It should be kept clean always . The lotus petals should also be regularly cleaned to maintain an optimum light output. Do not use any type of solvent on lens. It will damage the fixture. ■2.Suggestion: The continue usage of the light don't exceed 4 hours. -
Page 16: Troubeshooting
TROUBESHOOTING It is recommended some solution for some normal trouble shooting. Any inextricability problems should always be handling by the professional person. Disconnect the power supply before maintenance the fixture. ■ LED off : ◎ Please check if install the suitable voltage ◎...
Need help?
Do you have a question about the Lotus mini and is the answer not in the manual?
Questions and answers