Table of Contents
Advertisement
Available languages
Available languages
Quick Links
Advertisement
Table of Contents

Related Manuals for RainPoint ITV205


Summary of Contents for RainPoint ITV205
- Page 1 Save the user manual for future reference. If you have any questions, please contact us to get support. 2-Zone Water Timer Model NO.: ITV205 Free Hotline WhatsApp +1 626-780-5952 US: +1 833-381-5659 (EN) DE:+49 800-182-0576 (DE, EN) Email UK: +44 800-808-5337(EN)
- Page 2 WARM TIPS PLEASE READ BEFORE USING Don't use the water timer when the temperature is below 37°F (3℃), and please store the timer indoors to avoid potential freezing damage. The filter traps dirt particles, preventing them from entering the timer and causing clogging. Please clean the filter regularly and replace it if worn.
-
Page 3: Product Overview
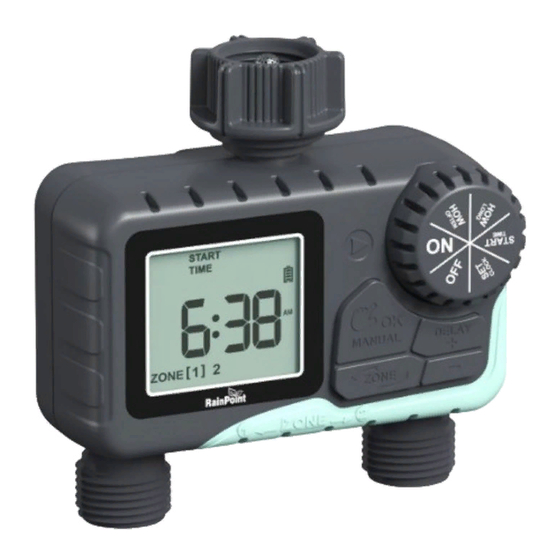
PRODUCT OVERVIEW AT A GLANCE FILTER HOSE TAP CONNECTION OK/MANUAL BUTTON DIAL BIG LCD DELAY/+ SCREEN BUTTON - BUTTON ZONE 1 ZONE 2 ZONE SWITCH BUTTON DIAL: The dial to customize your watering schedule; Save changes (settings). ZONE SWITCH BUTTON: Switch between ZONE 1 and ZONE 2. OK/ MANUAL BUTTON: Confirm to go to next/previous step or manual watering mode. -
Page 4: Specification
DIAL POSITION FUNCTION Timer waters according to your customized schedule for both zones Turn off all watering SPECIFICATION Working Water Pressure 0.5 bar-8 bar (7 psi-116 psi) Max Flow Rate 10 Gal/Min (35L/Min) Waterproof Level IP54 Working Temperature 37.4℉-122℉ (3℃-50℃) Working Voltage DC2.3V~DC3.3V Watering Frequency... -
Page 5: Product Installation
PRODUCT INSTALLATION INSTALLING THE BATTERIES 1) Remove the battery compartment cover on the back of the timer. 2) Insert 2 new AAA (1.5V) alkaline batteries (not included). 3) Put the battery compartment cover back on the timer and press firmly to make sure it is completely sealed. -
Page 6: Installing The Timer
INSTALLING THE TIMER 1) Turn off the garden faucet. 2) Wrap Teflon Tape around the faucet threads. 3) Screw the timer to the garden faucet and make the display is as vertical as possible to the ground to prevent rainwater from accumulating and leaking into the interior. - Page 7 If not, please repeat the step 2-5 several times or contact RAINPOINT support team immediately. Note: When testing, please keep away from the water timer outlet to avoid being splashed and wet.
-
Page 8: Programming The Timer
PROGRAMMING THE TIMER STEP 0: UNDERSTANDING ZONES This is a two-zone timer that allows you to water two different areas from the same faucet. Each zone can be programmed with independent start time, duration and frequency. Note: Dual zones operating simultaneously have lower water pressure than single zone because the water pressure is divided between the two zones. -
Page 9: Start Time
STEP 2: START TIME 1) Turn dial to "START TIME". 2) Use "+" and "-" buttons to set your start time. 3) Use "OK" button to switch time ( Hours or Minutes). 4) Turn the dial clockwise to save the changes in this STEP and go to the next STEP. -
Page 10: How Often
STEP 4: HOW OFTEN 1) Turn dial to "HOW OFTEN". 2) Use "+" and "-" buttons, to set your watering frequency. You can choose to water every 1 to 12 hours, or every 1 to 7 days. (NOTE: 1 is every day2 is every other day, etc.) 3) Turn the dial clockwise to save the changes in this STEP and go to the next STEP. -
Page 11: Automatic Watering
STEP 5: AUTOMATIC WATERING 1) Turn dial to "ON". 2) The LCD screen will display the current time and the next watering start time in Zone 1, and then display the current time and the next watering start time in Zone 2. NOTE: The automatic watering program will only run when the dial is in the ON position. - Page 12 NOTE: 1) Turning the dial and not in the ON state. It will stop all watering plans and will not start automatically. The automatic watering plans will only be executed when the dial is in the ON state. 2) Turn the dial and then back to ON. If the current real-time time has exceeded the set START TIME, all watering plans for the day will be skipped, and the automatic watering program will start watering at the frequency you set from...
-
Page 13: Additional Functions
ADDITIONAL FUNCTIONS RAIN DELAY MODE Turn the dial to "ON", Press the "+" or "-" Press the "OK" press and hold the button to adjust the button to start "DELAY" button delay watering time rain delay Rain delay allows you to postpone watering on both zones for a set period of time without interrupting your set watering schedule. - Page 14 MANUAL/HAND WATERING Turn the dial to Press the "ZONE" Press the "+" or "-" Press the "OK" "ON", press and button to select button to adjust button to start hold the the zone to be the manual manual "MANUAL" button watered watering time watering...
-
Page 15: Off Mode
USE ONLY ONE OF THE ZONES lf you want to use only ZONE 1 and close ZONE 2, please set it up as follows. 1) Turn the dial to "HOW LONG" and press "ZONE" to select ZONE 2. 2) Press the "+" or "-" button to adjust the Hour until the screen displays "00:00". -
Page 16: Battery Status
BATTERY STATUS Battery Status will be displayed as following: Full Low Power Note: When the low battery indicator appears, the valve will close automatically to avoid leakage. Please replace the battery to recovery. TROUBLESHOOTING lssue Possible Cause Advice The water inlet 1) No filter or not 1) Add filter and make leakage... - Page 17 lssue Possible Cause Advice Short battery 1) Mixed use of old and 1) Use brand new life new batteries. alkaline batteries. 2) Used the carbon 2) Rechargeable batteries or batteries and carbon rechargeable batteries have a short batteries. and unstable battery life, please use the alkaline batteries instead of them.
- Page 18 lssue Possible Cause Advice LCD display 1) The LCD temporarily 1) Avoid long-term became blank does not display exposure under the under long-term sunlight. exposure. 2) Replace with new 2) The battery is dead, alkaline batteries. it shuts down automatically. lf you have further questions, please visit the following link: Email: service@rainpointonline.com WhatsApp: +1 626-780-5952...
- Page 19 CLEANING YOUR TIMER After a period of use, impurities or dirt in the water may accumulate in the timer. Therefore, the timer should be cleaned regularly to ensure its proper operation. Please follow these steps to clean the timer. 1) Turn off the garden faucet and remove the timer. Check whether the filter at the timer water inlet has accumulated impurities.
- Page 20 WARNINGS 1) For outdoor use only. Placing the timer in the sheltered outdoors will prolong its lifetime. 2) To avoid damage, please tighten it without using tools. 3) The filter should be placed horizontally in the water inlet to prevent leakage.
-
Page 21: Warranty
To place a warranty request, please email us with your order ID at service@rainpointonline.com and will respond within 24 hours. CUSTOMER SERVICE Still have trouble with setup, please search for "RainPoint" on YouTube for installation videos! If the user manual doesn't have what you're looking for or you need other help, please contact us before returning the product to the store and let us know the LOT NO. - Page 22 Guarde el manual del usuario para futuras consultas. Si tiene alguna duda, póngase en contacto con nosotros para obtener asistencia. 2-Zone Water Timer Model NO.: ITV205 Free Hotline WhatsApp +1 626-780-5952 US: +1 833-381-5659 (EN) DE:+49 800-182-0576 (DE, EN) Email UK: +44 800-808-5337(EN) service@rainpointonline.com...
- Page 23 CONSEJOS PARA EL USO EN CALIENTE No utilice el temporizador de riego cuando la temperatura sea inferior a 37°F(3°C), y por favor guarde el temporizador en el interior para evitar posibles daños por congelación. El filtro atrapa las partículas de suciedad, evitando que entren en el temporizador y causen atascos.
- Page 24 RESUMEN DE PRODUCTOS DE UN VISTAZO FILTRO CONEXIÓN DEL GRIFO BOTÓN DE LA MANGUERA OK/MANUAL DIAL GRAN BOTÓN PANTALLA LCD DELAY/+ - BOTÓN ZONA 1 ZONA 2 BOTÓN DE CAMBIO DE ZONA DIAL: El dial para personalizar su programa de riego; Guardar cambios (ajustes).
-
Page 25: Especificaciones
DIAL POSICIÓN FUNCIÓN El programador riega según ENCENDIDO su programación personalizada para ambas zonas Apague todo el riego ESPECIFICACIONES Presión de trabajo del agua 0,5 bar-8 bar (7 psi-116 psi) Caudal máximo 10 Gal/Min (35L/Min) Nivel de estanqueidad IP54 Temperatura de trabajo 37.4℉-122℉... -
Page 26: Instalación Del Producto
INSTALACIÓN DEL PRODUCTO INSTALACIÓN DE LAS PILAS 1) Retire la tapa del compartimento de las pilas situado en la parte posterior del programador. 2) Inserte 2 pilas alcalinas AAA (1,5 V) nuevas (no incluidas). 3) Vuelva a colocar la tapa del comparti mento de las pilas en el temporizador y presione firmemente para asegurarse de que está... - Page 27 INSTALACIÓN DEL TEMPORIZADOR 1) Cierre el grifo del jardín. 2) Enrolle cinta de teflón alrededor de las roscas del grifo. 3) Atornille el programador al grifo del jardín y asegúrese de que la pantalla esté lo más vertical posible con respecto al suelo para evitar que el agua de lluvia se acumule y se filtre en el interior.
- Page 28 ¡utilícelas con confianza! Si no, se recomienda repetir los pasos 2-5 varias veces o contacto con el equipo de soporte RAINPOINT de inmediato. Nota: Es importante mantenerse alejado de la salida del temporizador durante la prueba para evitar salpicaduras y mojarse.
-
Page 29: Programación Del Temporizador
PROGRAMACIÓN DEL TEMPORIZADOR PASO 0: ENTENDER LAS ZONAS Este es un programador de dos zonas que le permite regar dos áreas diferentes desde el mismo grifo. Cada zona puede programarse con hora de inicio, duración y frecuencia independientes. Nota: Las zonas dobles que funcionan simultáneamente tienen menor presión de agua que las zonas simples debido a que la presión de agua se divide entre las dos zonas. -
Page 30: Hora De Inicio
PASO 2: HORA DE INICIO 1) Gire el dial hasta la posición "START TIME". 2) Utilice los botones "+" y "-" para ajustar la hora de inicio. 3) Utilice el botón "OK" para cambiar la hora ( Horas o Minutos). 4) Gire el dial en el sentido de las agujas del reloj para guardar los cambios en este PASO y pasar al siguiente PASO. - Page 31 PASO 4: FRECUENCIA 1) Gire el dial hasta la posición "HOW OFTEN". 2) Utilice los botones "+" y "-" para ajustar la frecuencia de riego. Puede elegir regar cada 1 a 12 horas, o cada 1 a 7 días. (NOTA: 1 es cada día2 es cada dos días,etc.) 3) Gire el dial en el sentido de las agujas del reloj para guardar los cambios en este PASO y pasar al siguiente PASO.
- Page 32 PASO 5: RIEGO AUTOMÁTICO 1) Gire el dial hasta la posición "ON". 2) La pantalla LCD mostrará la hora actual y la próxima hora de inicio del riego en la Zona 1, y luego mostrará la hora actual y la próxima hora de inicio del riego en la Zona 2.
- Page 33 NOTA: 1) Girando el dial y no en el estado ON. Detendrá todos los planes de riego y no se iniciará automáticamente. Los planes de riego automático sólo se ejecutarán cuando el dial esté en estado ON. 2) Girar el dial y volver a ON. Si la hora actual en tiempo real ha superado la HORA DE INICIO ajustada, se omitirán todos los planes de riego del día y el programa de riego automático comenzará...
-
Page 34: Funciones Adicionales
FUNCIONES ADICIONALES MODO DE RETARDO POR LLUVIA Gire el dial hasta la Pulse los botones "+" o"-" Pulse el botón "OK" posición "ON", mantenga para ajustar el tiempo de para iniciar pulsado el botón "DELAY". riego retardado. el retraso por lluvia El retraso por lluvia le permite posponer el riego en ambas zonas durante un periodo de tiempo determinado sin interrumpir el programa de riego establecido. -
Page 35: Riego Manual
RIEGO MANUAL Gire el dial hasta Pulse el botón Pulse el botón Pulse el botón "OK" "ON", pulse y "ZONE" "+" o "-" para para iniciar el mantenga pulsado para seleccionar ajustar el tiempo riego manual el botón "MANUAL". la zona a regar de riego manual Esta función le permite regar manualmente sin interrumpir el programa de riego establecido.Para acceder a esta función, siga los pasos que se... -
Page 36: Modo Apagado
UTILIZAR SÓLO UNA DE LAS ZONAS Si desea utilizar sólo la ZONA 1 y cerrar la ZONA 2, configúrela de la siguiente manera. 1) Gire el dial hasta "HOW LONG" y pulse "ZONA" para seleccionar la ZONA 2. 2) Pulse el botón "+" o "-" para ajustar la Hora hasta que en la pantalla aparezca "00:00". -
Page 37: Solución De Problemas
ESTADO DE LA BATERÍA El estado de la batería se mostrará de la siguiente manera: Llena Baja Nota: Cuando aparezca el indicador de batería baja, la válvula se cerrará automáticamente para evitar fugas. Por favor reemplace la batería para recuperarse. SOLUCIÓN DE PROBLEMAS Problema Posible causa... - Page 38 lssue Possible Cause Advice 1) El mismo proced 1) El dial/válvula está Problemas imiento anterior. atascado. con el dial o 2) Gire el dial hasta la 2) Se ha pulsado el botón posición OFF para accidentalmente el comprobar si la botón OK mientras válvula puede se colocaban las...
- Page 39 lssue Possible Cause Advice El tempori- 1) El dial gira a la 1) Gire el dial a la zador no riega posición OFF. posición ON. 2) El grifo no está 2) Después de terminar abierto. todos los ajustes, 3) La pila está agotada, abra el grifo.
- Page 40 LIMPIEZA DEL PROGRAMADOR Después de un período de uso, las impurezas o la suciedad del agua pueden acumularse en el temporizador. Por lo tanto, el temporizador debe limpiarse regularmente para garantizar su correcto funcionamiento. Siga los siguientes pasos para limpiar el programador. 1) Cierre el grifo del jardín y retire el temporizador.
- Page 41 ADVERTENCIAS 1) Sólo para uso en exteriores. Colocar el temporizador en un lugar protegido al aire libre prolongará su vida útil. 2) Para evitar daños, apriételo sin utilizar herramientas. 3) El filtro debe colocarse horizontalmente en la entrada de agua para evitar fugas.
-
Page 42: Servicio De Atención Al Cliente
GARANTÍA RainPoint ofrece una garantía de 1 año contra defectos de fabricación en materiales y mano de obra a partir de la fecha de compra. Durante el periodo de garantía, RainPoint sustituirá gratuitamente el producto que se considere defectuoso en condiciones razonables de uso y mantenimiento, según determine RainPoint. - Page 43 EC REP NAME: VIAJE ELECTRONIC COMPANY LIMITED ADDRESS: E588, 13 ADELAIDE ROAD, DUBLIN, D02 P950, IRELAND Email: VIAJEELE@outlook.com UK REP NAME: SUJE ELECTRONIC COMPANY LIMITED ADDRESS: S211 92a Bury Old Road, Manchester, England, M45 6TQ EMAIL: SUJEELECTRONIC@outlook.com Manufacturer/Hersteller/Fabricant/Fabricant/Fabricante: FUJIAN BALDR TECHNOLOGY CO.,LTD ADDRESS/DIRECCIÓN: Floor 3, Building 2, No.71 Yangqi Road, Fuwan Industrial Area Cangshan District, Fuzhou, China.
- Page 44 Scan the QR code to get fast support Need Help? Please contact us US toll free: +1 833-381-5659 (Mon-Fri: 9:30 AM-5:30 PM PST) DE toll free: +49 800-182-0576 (Mon-Fri: 9:00 AM-5:00 PM CET) UK toll free: +44 800-808-5337 (Mon-Fri: 9:00 AM-5:00 PM CET) Email: service@rainpointonline.com WhatsApp: +1 626-780-5952...
Need help?
Do you have a question about the ITV205 and is the answer not in the manual?
Questions and answers