RainPoint ITV517 User Manual
Multi-programming digital water timer
Hide thumbs
Also See for ITV517:
- User manual (46 pages) ,
- User manual (46 pages) ,
- User manual (46 pages)
Advertisement
Available languages
Available languages
Quick Links
USER MANUAL
Save the user manual for future reference
If you have any questions, please contact us to get support
Multi-Programming
Digital Water Timer
Model: ITV517
Email
service@rainpointus.com
Website
www.rainpointonline.com
WhatsApp
+1 626-780-5952
Free Hotline
US: +1 833-381-5659 (EN)
EU: +44 800-808-5337 (EN DE)
Advertisement

Related Manuals for RainPoint ITV517


Summary of Contents for RainPoint ITV517
- Page 1 USER MANUAL Multi-Programming Digital Water Timer Model: ITV517 Email service@rainpointus.com Website www.rainpointonline.com WhatsApp +1 626-780-5952 Free Hotline US: +1 833-381-5659 (EN) EU: +44 800-808-5337 (EN DE) Save the user manual for future reference If you have any questions, please contact us to get support...
- Page 2 What in the box A. ITV517P Multi-Programming Digital Water Timer B. User Manual C. Installation Guide D. Teflon Sealing Tape - 001 -...
-
Page 3: Important! Please Read
IMPORTANT! PLEASE READ! PLEASE ACTIVATE THE VALVE BEFORE USE IF YOU ARE USING IT FOR THE FIRST TIME OR AFTER A PERIOD OF IDLENESS TO ENSURE YOU CAN USE IT PROPERLY: TURN TO DIAL TO ON, PRESS AND HOLD OK BUTTON FOR 5S ENTER MANUAL MODE,THEN RE-PRESS OK BUTTON TWICE TO ACTIVE AND CLOSE THE VALVE,REPEAT THE ABOVE 3-5 TIMES.(EXPLANATION:IN MOST CASES,THE VALVE IS ACTIVATED,BUT DUE TO EXTERNAL FORCES... -
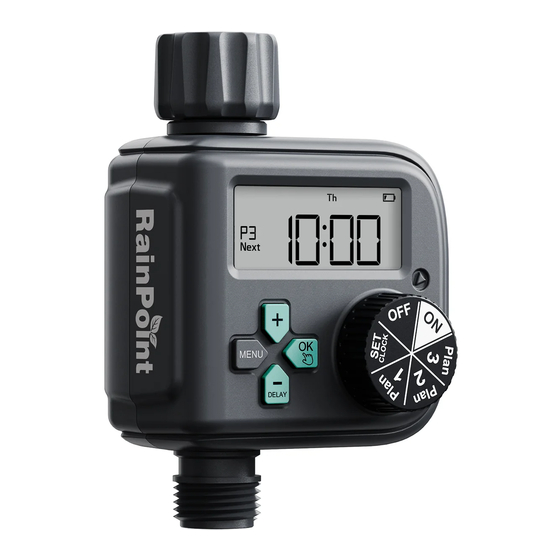
Page 4: Product Overview
PRODUCT OVERVIEW BEFORE START FILTER HOSE TAP CONNECTION BIG LCD SCREEN + BUTTON MENU BUTTON DIAL DELAY/- BUTTON OK/MANUAL BUTTON OUTLET DIAL: Rotate to customize your watering schedule OK/MANUAL Button: Confirm setup or water manually DELAY/- Button: Adjust time and system setup or delay watering program + Button: Adjust time and system setup MENU Button: Switch functions in plan setting, and review the set... -
Page 5: Specification
DIAL POSITION FUNCTION SET CLOCK Set the current time Go to the Irrigation Plan I PLAN 1 settings PLAN 2 Go to the Irrigation Plan 2 settings PLAN 3 Go to the Irrigation Plan 3 settings Run the timer based on the setting Turn off the valve and all schedules... -
Page 6: Product Installation
PRODUCT INSTALLATION INSTALLING THE BATTERY 1) Remove the battery tray on the back of the timer. 2) Insert two new AAA (1.5V) alkaline batteries (not included). 3) Firmly reinstall the battery tray back into the timer. Note: · Firmly restore the battery tray to ensure water resistance. ·... -
Page 7: Installing The Timer
INSTALLING THE TIMER 1) Attach the timer to an outdoor hose faucet. 2) Please turn on the tap after programming the timer. Note: · Please try to use it vertically. · When programming the timer please turn off tap to avoid getting wet. ·... -
Page 8: Product Settings
PRODUCT SETTINGS STEP 1: SET CLOCK 1) Turn the dial to SET CLOCK. 2) Use the "+" and "-" buttons to set the weekday and time , press "OK" button to save. 3) Long press the "+" and "-" buttons can be set quickly. 4) Default 24-hour system, long press "OK"... - Page 9 STEP 2: PLAN 1/2/3 1) Turn the dial to PLAN 1/2/3 to set the schedule for each of them. 2) Use the "MENU" button to switch the setting of Start Time, How Long and How Often. 3) Use the "+" and "-" buttons to set the watering schedule. Press "OK" button to confirm and save settings.
-
Page 10: Start Time
STEP 3: START TIME 1) Turn the dial to any plan, and it will start setting from Start Time. Press the "+" and "-" buttons to set the hour while it's blinking, press the "OK" button to confirm, and go to set minutes. 2) After the minute setting finishes, press "OK"... - Page 11 STEP 4: HOW LONG 1) Press "MENU" button to switch setting to How Long. Use "+" and "-" buttons to set the hour while it's blinking, press the "OK" button to confirm, and go to set the minute. 2) After the minute setting finishes, press "OK" to confirm, and everything stops blinking, which means it is confirmed.
-
Page 12: How Often
STEP 5: HOW OFTEN Press "MENU" button to switch setting to How Long. Before setting, please choose a frequency mode you prefer first between Every Mode and Weekday Mode. Use "+" and "-" buttons to switch selection and press "OK" to select setting. - 011 -... - Page 13 Every Mode: To run the watering plan in an interval of every exact day, like every one day or every two days. In Every mode, use "+" and "-"buttons to set from every 6 hours to every 7 days, and press "OK" to confirm. At this time, ONLY press the "+" or "-" buttons can resume settings.
- Page 14 Weekday Mode: To run the watering plan on the specific weekdays, like Monday, Wednesday and Friday. In Weekday mode, use "+" and "-" buttons to move the option box and press "OK" button to confirm selection. When all preferred option selected, leave the box blinking for 5 sec and the whole setting will confirmed automatically.
-
Page 15: Off Mode
OFF MODE 1) Turn the dial to OFF if you want to stop the watering plans for an extended period, and your settings will be saved. 2) The timer will not water automatically while in OFF mode. 3) To start running water again, turn the dial back to ON to resume your programmed watering schedule. - Page 16 ON MODE 1) Turn the dial to ON to run the set plans automatically. 2) The LCD screen will show the clock time and next coming plan time. 3) Using "MENU" button to check "Start Time", "How Long", "How Often" in the order of the Plan1/2/3.
-
Page 17: Additional Features
ADDITIONAL FEATURES RAIN DELAY WATERING Rain delay allows you to postpone watering for a set period of time, and it doesn’t interrupt your original schedule. To access the rain delay, follow the steps below. 1) Keep the dial in the "ON" position, press the "DELAY/-" button for 3-5s enter the delay watering mode. - Page 18 MANUAL/HAND WATERING This feature allows you to water without interrupting your set watering schedule. To access this feature, please follow the steps below. 1) Keep the dial in the "ON" position, and hold the " " button for 3-5s to enter watering manually mode. 2) The default manual watering duration is 10 minutes, you can press button "+"...
-
Page 19: Battery Status
BATTERY STATUS Battery Status will be displayed as following: Low Power Note: When the low battery indicator appears on display. The valve will close automatically to avoid leakage. Please replace the battery in time in case of interrupting the normal operation. TROUBLE SHOOTING Possible Factors Solution may help... - Page 20 Check if filter washer is clean and undamaged. Faucet connection is hand tight. If your Rainpoint product does not operate properly after trying the troubleshooting steps, please contact us by phone or email :1-833-381-5659 (EN)(MON-FRI 9:30 AM-5:30 PM PST) EU: +44 800-808-5337 (EN DE)(MON-FRI 9:00 AM-5:00 PM CET) Email: service@rainpointus.com...
- Page 21 WARNINGS 1) Intended for outdoor use only, put in the sheltered outdoor will prolong the product lifetime. 2) Using tools to tighten your timer is too tight, easy to damage, to avoid damaging the timer, please tighten it with your hand instead of a tool.
-
Page 22: Warranty
To place a warranty request, please email your order ID to service@rainpointus.com and we'll respond within 24 hours. CUSTOMER SERVICE Still have trouble with setup, please search for “RainPoint” on YouTube for installation videos! If the user manual doesn't have what you're looking for or you need some help, please prepare the LOT NO. -
Page 23: Manual Del Usuario
MANUAL DEL USUARIO Temporizador digital de agua de programación múltiple Model: ITV517 Email service@rainpointus.com Website www.rainpointonline.com WhatsApp +1 626-780-5952 Línea Directa Gratuita US: +1 833-381-5659 (EN) EU: +44 800-808-5337 (EN DE) Conserve el manual del usuario para futuras referencias Si tiene alguna pregunta, por favor comuníquese con nosotros... - Page 24 Contenido de la Caja A. Temporizador digital de agua de programación múltiple ITV517P B. Manual del Usuario C. Guía de Instalación D. Cinta de sellado de teflón - 085 -...
- Page 25 ¡IMPORTANTE! ¡POR FAVOR, LEA! ACTIVE LA VÁLVULA ANTES DE USARLA SI LA ESTÁ UTILIZANDO POR PRIMERA VEZ O DESPUÉS DE UN PERÍODO DE INACTIVIDAD PARA ASEGURARSE DE QUE PUEDE USARSE CORRECTAMENTE: GIRE EL DIAL A “ON” , LUEGO PRESIONE Y MANTENGA EL BOTÓN “OK”...
-
Page 26: Descripción Del Producto
DESCRIPCIÓN DEL PRODUCTO ANTES DE EMPEZAR FILTRO CONEXIÓN DE MANGUERA DEL GRIFO AMPLIA PANTALLA BOTÓN + BOTÓN MENÚ DIAL DELAY / BOTÓN - BOTÓN OK / MANUAL SALIDA DIAL: Gire para personalizar su programa de riego BOTÓN OK / MANUAL: Confirme la configuración o riegue manualmente DELAY / BOTÓN -: Ajuste el tiempo y la configuración del sistema o el modo de riego retardado... - Page 27 POSICIÓN DEL DIAL FUNCIÓN SET CLOCK Establece la hora actual Ir a la configuración del PLAN 1 Plan de Riego 1 PLAN 2 Ir a la configuración del Plan de Riego 2 PLAN 3 Ir a la configuración del Plan de Riego 3 Ejecuta el temporizador según la configuración Apaga la válvula y todos...
-
Page 28: Instalación Del Producto
INSTALACIÓN DEL PRODUCTO INSTALACIÓN DE LAS BATERÍAS 1) Retire la tapa del compartimiento de las pilas en la parte posterior del temporizador. 2) Inserte 2 pilas alcalinas AAA (1,5 V) nuevas (no incluidas). 3) Vuelva a colocar firmemente la bandeja de las baterías en el temporizador. - Page 29 INSTALACIÓN DEL TEMPORIZADOR 1) Conecte el temporizador a un grifo exterior. 2) Abra el grifo después de programar el temporizador. Importante: · Trate de usarlo en posición vertical. · Al programar el temporizador, cierre el grifo para evitar mojarse. · No utilice herramientas en el temporizador. Sólo apriete a mano. ·...
- Page 30 CONFIGURACIÓN DEL PRODUCTO PASO 1: ESTABLEZCA LA HORA 1) Gire el dial a "SET CLOCK". 2) Use los botones "+" y "-" para establecer el día de la semana y la hora, presione el botón "OK" para guardar. 3) Mantenga presionados los botones "+" y "-" para cambiar los valores rápidamente.
- Page 31 PASO 2: PLAN 1/2/3 1) Gire el dial a PLAN 1/2/3 para configurar cada uno de ellos. 2) Utilice el botón "MENÚ" para cambiar los valores de la hora de inicio, la duración y la frecuencia. 3) Utilice los botones "+" y "-" para establecer el horario de riego. Presione el botón "OK"...
- Page 32 PASO 3: ESTABLEZCA LA HORA DE INICIO 1) Gire el dial a cualquier plan y comenzará a configurarse desde la hora de inicio. Presione los botones "+" y "-" para establecer la hora mientras parpadean los valores. Presione el botón "OK" para confirmar e ir a configurar los minutos.
- Page 33 PASO 4: ESTABLEZCA LA DURACIÓN 1) Presione el botón "MENÚ" para cambiar la configuración a How Long. Presione los botones "+" y "-" para establecer la hora mientras parpadean los valores. Presione el botón "OK" para confirmar e ir a configurar los minutos.
- Page 34 PASO 5: ESTABLEZCA LA FRECUENCIA Presione el botón "MENÚ" para cambiar la configuración a How Often. Antes de iniciar la configuración, primero elija el modo de frecuencia que prefiera entre el Modo Every y el Modo Día de la Semana. Use los botones "+"...
- Page 35 TModo Every: Para ejecutar el plan de riego en un intervalo de tiempo exacto, como "cada día" o "cada dos días".En el Modo Every, use los botones "+" y "-" para configurar el intervalo de tiempo desde cada 6 horas hasta cada 7 días y presione "OK" para confirmar. SÓLO en este momento presione los botones "+"...
- Page 36 Modo Día de la Semana: Para ejecutar el plan de riego en días específicos de la semana, como lunes, miércoles y viernes. En el modo Día de la Semana, use los botones "+" y "-" para mover el cuadro de opción y presione el botón "OK"...
-
Page 37: Modo Apagado
MODO APAGADO 1) Gire el dial a OFF si desea detener los planes de riego durante un período prolongado (sus configuraciones quedarán guardadas). 2) El temporizador no regará automáticamente mientras esté en modo apagado. 3) Para reiniciar el riego automático, gire el dial "ON", esto reanudará su programa de riego. -
Page 38: Modo Automático
MODO AUTOMÁTICO 1) Gire el dial a ON para ejecutar automáticamente los planes establecidos. 2) La pantalla LCD mostrará la hora actual y la hora del próximo plan. 3) Use el botón" MENÚ " para revisar la hora de inicio, la duración y la frecuencia de los Planes 1/2/3. -
Page 39: Características Adicionales
CARACTERÍSTICAS ADICIONALES MODO DE RIEGO RETARDADO El riego retardado le permite posponer el riego durante un período de tiempo determinado sin interrumpir su programa original.Para acceder al modo de riego retardado, siga los pasos descritos a continuación. 1) Mantenga el dial en "ON" luego presione y mantenga el botón "DELAY/-"... - Page 40 RIEGO MANUAL O A MANO Esta función le permite regar manualmente sin interrumpir su programa de riego establecido. Para acceder a esta función, siga los pasos descritos a continuación. 1) Con el dial en la posición "ON" mantenga presionado el botón " "...
-
Page 41: Solución De Problemas
ESTADO DE LA BATERÍA El estado de la batería se mostrará de la siguiente manera: Batería baja Importante: Cuando aparece el indicador de batería baja, la válvula se cerrará automáticamente para evitar fugas. Reemplace la batería a tiempo en caso de interrumpirse la operación normal. SOLUCIÓN DE PROBLEMAS Posible Solución Problema... - Page 42 Si su producto RainPoint no funciona correctamente después de intentar los pasos de la tabla de solución de problemas, contáctenos por teléfono o correo electrónico: EEUU: 1-833-381-5659 (inglés) (LUN - VIE 9:30 AM - 5:30 PM PST) UE: +44 800-808-5337 (inglés - alemán)
- Page 43 ADVERTENCIAS 1) Destinado sólo para uso al aire libre, poner en el exterior protegido será prolongará la vida útil del producto. 2) El uso de herramientas para apretar su temporizador es demasiado apretado, fácil de dañar, para para evitar dañar el temporizador, por favor apriételo con la mano en lugar de con la mano.
-
Page 44: Servicio De Atención Al Cliente
GARANTÍA Rainpoint ofrece una garantía de 1 año contra defectos de fabricación defectos de fabricación en materiales y mano de obra a partir de la fecha de compra. Durante el período de garantía, sustituiremos gratuitamente el producto defectuoso en condiciones razonables de uso y servicio, según lo determine por RainPoint. - Page 45 - 106 -...
- Page 46 Scan the QR code to get fast support Need Help? Please contact us US Free Hotline: +1 833-381-5659 (MON-FRI: 09:30 AM-5:30 PM PST) EU Free Hotline: +44 800-808-5337 (EN,DE) (MON-FRI 9:00 AM-5:00 PM CET) Email: service@rainpointus.com Website: www.rainpointonline.com - 107 -...
Need help?
Do you have a question about the ITV517 and is the answer not in the manual?
Questions and answers