RainPoint ITV101P - Digital Sprinkler Timer Manual
- User manual (36 pages) ,
- Quick start manual (2 pages) ,
- User manual (24 pages)
Advertisement
WARM TIPS

Don't use the water timer when the temperature is below 37℉(3℃), and please store the timer indoors to avoid potential freezing damage.

The filter traps dirt particles, preventing them from entering the timer and causing clogging. Please clean the filter regularly and replace it if worn.

To ensure a longer lifespan, please use 2 new AA alkaline batteries (not included). Don't mix new and old alkaline, standard (carbon-zinc), or rechargeable batteries.

Please activate the water timer before first use or after a period of inactivity
(Refer to ACTIVATE THE TIMER BEFORE USE).

Only use with clean cold water.
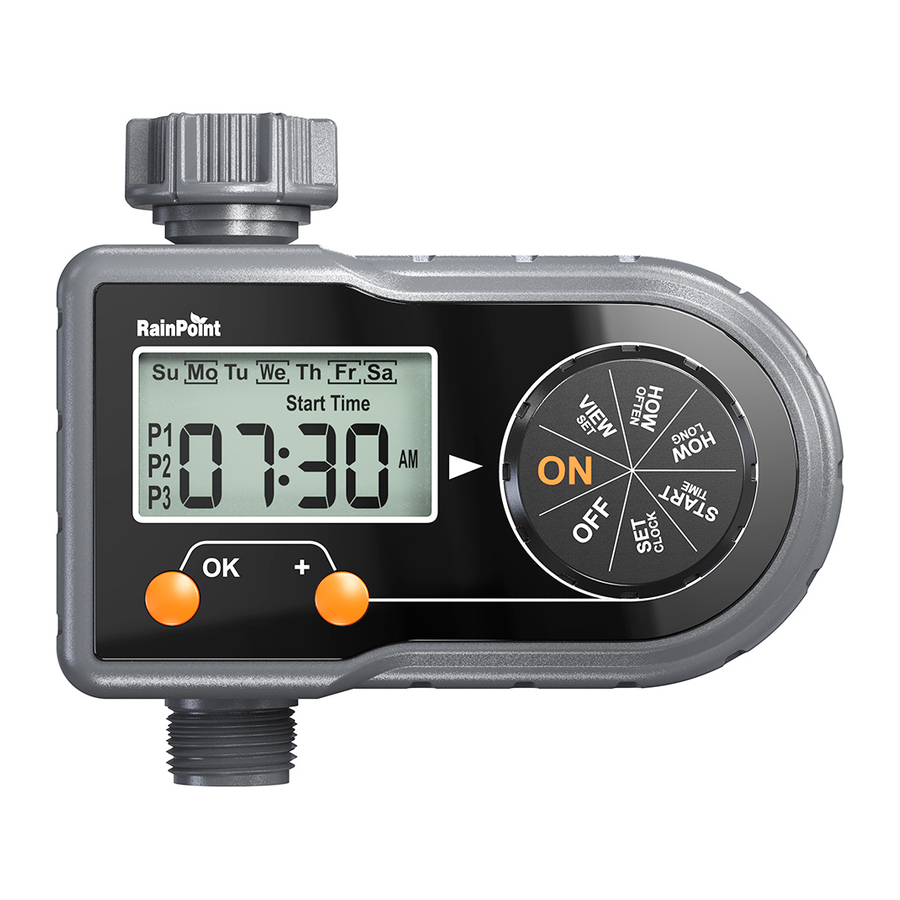
PRODUCT OVERVIEW
At A GLANCE

| BUTTON | FUNCTION |
| DIAL | Rotate the dial to set your watering schedule. |
| OK /MANUAL BUTTON | Use "OK" to confirm the time. When the dial is turned to "ON", press and hold "MANUAL" to water manually. |
| + /DELAY BUTTON | Use "+" to adjust the time. When the dial is turned to "ON", press and hold "DELAY" to activate Rain Delay. |
| SPECIFICATION | |
| Min/Max Operating Pressure Max Flow Rate | 0.5bar-8bar (7.25 psi-116 psi) 10 Gal/Min (35L/Min) |
| Working Temperature | 37.4℉-122.4℉( 3℃-50℃ ) |
| Waterproof | IP54 |
| Power By Thread | 2 AA (1.5V) alkaline batteries (not included) NH(US) for 3/4" faucet / hose |
| BSP(EU) for 3/4" or 1" faucet / hose | |
| Watering Times Per Day | 1 to 3 times a day (Up to 3 watering plans a day) |
| Watering Days | Monday to Sunday OR Every 2/3/4/5/6 days |
| Watering Duration | From 1 minute to 3 hours 59 minutes (4 hours) |
| Manual Watering Time | 1 minute to 8 hours, default 10 minutes |
| Rain Delay Time | 24h, 48h, 72h, default 24 hours |

| LCD ICON FUNCTION | |
 | Low battery indicator |
 | Flashing during watering |
 | The selected day of the week |
| Every _ Days | Interval watering days |
| Next | The time left to the next watering |
| Start Time | The start time of watering |
| P1/P2/P3 | Watering plans for one day |

| DIAL POSITION FUNCTION | |
| SET CLOCK | Set your local current time |
| START TIME | Set the start watering time (Every watering plan has its own start time) |
| HOW LONG | Set watering duration from 1 minute to 3 hours 59 minutes. (Every watering plan has its own watering duration) |
| HOW OFTEN | Set watering frequency of the week or every few days (3 watering plans share 1 watering frequency) |
| VIEW SET | View all your settings of 3 plans |
| ON | ① Start automatic watering based on your programs. ② When the dial is in the ON position, hold "+/DELAY" button to enter delay mode. |
| OFF | Turn off all watering programs and shut off the valve. |
PRODUCT INSTALLATION
INSTALLING THE BATTERIES
- Remove the battery tray on the back of the timer.
- Insert 2 new AA (1.5V) alkaline batteries (not included).
- Put the battery tray back on the timer and press firmly to make sure it is completely sealed.

Note:
- Install the battery tray securely after installing the battery to ensure waterproofing.
- When the timer is not used for a long time, please remove the batteries and dispose of them properly.
- Replace batteries when the low battery indicator
![]() appears on display. After you done it, please remember to reset your watering plans.
appears on display. After you done it, please remember to reset your watering plans. - Don't dispose of batteries in fire. Batteries may explode or leak.
- To ensure a longer lifespan, please use 2 new AA alkaline batteries (not included). Don't mix new and old alkaline, standard (carbon-zinc), or rechargeable batteries.


BATTERY STATUS
Battery Status will be displayed as following:
Full Power ![]()
Low Power ![]()
Note:
When the low battery indicator ![]() appears on display, the valve will close automatically to avoid leakage. Please replace the battery in time in case of interrupting the normal operation.
appears on display, the valve will close automatically to avoid leakage. Please replace the battery in time in case of interrupting the normal operation.
INSTALLING THE TIMER
- Turn off the garden faucet.
- Wrap Teflon Tape around the faucet threads.
- Screw the timer to the garden faucet and make the display as vertical as possible to the ground to prevent rainwater from accumulating and leaking into the interior.
- Wrap Teflon Tape around the threads of the timer outlet.

- Screw the garden hose to the timer outlet.
- Turn on the faucet after programming the timer.


Tips: If the connection between the timer and the faucet or hose is not tight or leaking, wrap more Teflon Tape(thread seal tape) to make them tight.
Note:
 Please do not use tools, only install the timer by hand.
 When expecting freezing temperatures, timers should be removed from the hose faucet and stored indoors to avoid potential freeze damage.
 Please install the filter properly and keep it clean as follows.

ACTIVATE THE TIMER BEFORE USE
Please activate the device before using it for the first time or after a period of inactivity.

Activation Steps:
- Keep the garden faucet turned off.
- Turn the timer dial to "ON".
- Press and hold the "MANUAL" button for 3-5s to enter Manual Watering Mode.
- When the screen is flashing, press the "OK" button twice, and the screen will stop flashing.
- Wait about 5 seconds or until you hear a "click" and the valve in the timer opens, then turn the dial to "OFF" to close the valve.
- Repeat the step 2-5 for 3-5 times.
- Test: Turn on the faucet a little bit, and then repeat the step 2-5 to check if the water flow out or shut off as expected.
If yes, the timer valve is normal, please use it with confidence!
If not, please repeat the above steps several times or contact RAINPOINT support team immediately.
Note:
When testing, please keep away from the water timer outlet to avoid being splashed and wet.
PROGRAMMING YOUR TIMER

STEP 1: SET CLOCK
- Turn dial to "SET CLOCK".
- "
![]() " flashing: Use the "+" button to select the day of the week, then press "OK" to confirm.
" flashing: Use the "+" button to select the day of the week, then press "OK" to confirm. - "
![]() " flashing: Use the "+" button to set hour and press "OK" to confirm. Press and hold the "OK" button to switch the time display in 12-hour or 24-hour mode.
" flashing: Use the "+" button to set hour and press "OK" to confirm. Press and hold the "OK" button to switch the time display in 12-hour or 24-hour mode. - 12-hour mode: with "AM" or "PM"
![]()
- 24-hour mode: without "AM" or "PM"
![]()
- 12-hour mode: with "AM" or "PM"
- "
![]() " flashing: Use the "+" button to set minute and press "OK" to confirm.
" flashing: Use the "+" button to set minute and press "OK" to confirm. - Turn the dial clockwise to save the changes in this STEP and go to next STEP.
 " flashing: Use the "+" button to select the day of the week, then press "OK" to confirm.


Tips:
- Press and hold the "+" button can increase the time quickly.
- When the setup of this STEP is finished, please turn the dial to save the changes instead of press the "OK" button. If you press the "OK" button after setting, it will return to the previous setting instead of saving it.

STEP 2: START TIME
- Turn dial to "START TIME".
- Use the "+" button to set the start time and press the "OK" button to confirm.
(If you choose 12-hour mode, please note AM and PM) - After confirming this plan, press the "OK" button again to switch to the next plan.
- Turn the dial clockwise to save the changes in this STEP and go to next STEP.
Tips:
- Press and hold the "+" button can increase the time quickly.
- If you want to turn off a certain plan, please adjust the start time to "23: xx" (24-hour mode) or "11: xx" PM (12-hour mode) when setting the plan. Then press the "+" button again, and "OFF" will appear on the screen, indicating that the plan has been closed.
- If you want to cancel the "OFF" plan, press the "+" button again on the plan to set its start time.
- When the setup of this STEP is finished, please turn the dial to save the changes instead of press the "OK" button. If you press the "OK" button after setting, it will return to the previous setting instead of saving it.

STEP 3: HOW LONG
- Turn dial to "HOW LONG". (
![]() will display on the screen.)
will display on the screen.) - Use the "+" button to set the watering duration and press the "OK" button to confirm.(The watering duration is from 1 minute to 3 hours 59 minutes)
- After confirming this plan, press the "OK" button again to switch to the next plan.
- Turn the dial clockwise to save the changes in this STEP and go to next STEP.
Tips:
- Press and hold the "+" button can increase the time quickly.
- If you want to turn off a certain plan, please adjust the watering duration to "00 H 00 M" when setting the plan, and "OFF" will appear on the screen, indicating that the plan has been closed.
- If you want to cancel the "OFF" plan, press the "+" button again on the plan to set its watering duration.
- When the setup of this STEP is finished, please turn the dial to save the changes instead of press the "OK" button. If you press the "OK" button after setting, it will return to the previous setting instead of saving it.

STEP 4: HOW OFTEN
- Turn the dial to "HOW OFTEN".
- There are 2 setting modes for watering frequency.
- Day of the Week Mode
(Watering plans will run every Sunday, Wednesday, Thursday, and Friday)

- Every 2/3/4/5/6 Days Mode
(Watering plans will run every 2 days)

Examples of watering frequency of every 2 day, every 3 days and every 5 days:

- Day of the Week Mode
- Set the Day of the Week Mode
- Use the "+" button to select the day of the week, press "OK" to confirm.
![]() means the "Sunday" has been selected. Press "OK" again can cancel the selection.
means the "Sunday" has been selected. Press "OK" again can cancel the selection.- Turn the dial clockwise to save the changes in this STEP and go to next STEP.
- Set the Every 2/3/4/5/6 Days Mode
- Use the "+" button to select "Int", press "OK" to confirm, then you will enter the Every 2/3/4/5/6 Days Mode.
- Use the"+" button to select water every 2/3/4/5/6 days, press "OK" to confirm.
- Turn the dial clockwise to save the changes in this STEP and go to next STEP.


 means the "Sunday" has been selected. Press "OK" again can cancel the selection.
Tips:
- How to return to the Day of the Week Mode?
- On the Every 2/3/4/5/6 Days Mode, press the "OK" button twice.
- Then the "day of the week" will reappear and flash, and the below "Every" will disappear.
- How to set the water timer to water every day?
If you want to run the watering plans every day, please select every day from Monday to Sunday in the Day of the Week Mode.
![]()
(Watering plans will run every day) - You can only choose one of the two watering frequency modes. Once one of the two is confirmed, the other will be eliminated.
- The 3 watering plans will use the same watering frequency.
- When the setup of this STEP is finished, please turn the dial to save the changes instead of press the "OK" button. If you press the "OK" button after setting, it will return to the previous setting instead of saving it.

STEP 5: VIEW SET
- Turn the dial to "VIEW SET".
- Press "OK" button to check the START TIME, HOW LONG and HOW OFTEN settings of the 3 watering plans.


STEP 6: ATUO WATERING
- Turn the dial to "ON".
(All watering plans being set will run automatically) 2) During watering:- Display the remaining watering time and
![]() will flash.
will flash. - Press the "+" button, and then the current day and time will be displayed.

- Display the remaining watering time and
- When not watering:
- If there is no watering plans being set, it will only display the current day and time.
- If there are plans being set but not running yet, it will display the current day and time, and followed by how much time is left to the next watering plan.


There is no watering plans being set, which means the start time or watering duration of all 3 watering plans are truned off. To turn off a certain plan, please turn off the start time or watering duration of that plan.
(About how to turn off the start time or watering duration, please refer to the section [STEP 2: START TIME] and [STEP 3: HOW LONG] of Chapter [PROGRAMMING YOUR TIMER])
ADDITIONAL FEATURES
MANUAL / HAND WATERING

This feature allows you to water without interrupting your set watering schedule. Please follow the steps below to start manual watering.
- Turn the dial to "ON".
- Press and hold the "MANUAL" button for 3-5s to enter the Manual Watering Mode.
- Press the "+" buttons to adjust the hours from 0 to 8, press "OK" button to confirm.
- Press the "+" buttons to adjust the minutes from 0 to 59.
- Press the "OK" button to confirm and the screen stops flashing, then the timer valve will open and start manual watering after 5 seconds.
If you want to reset it, please press the "OK" button again within the 5 seconds and the "hour" will be flashing again, then you can reset the manual watering time.
Tips: How to stop the manual watering?
- Method 1: Press and hold the "MANUAL" button for 3-5s to exit the manual watering and restore the original watering program.
- Method 2: Turn the dial to "OFF" to stop. And please remember to turn the dial to "ON" again to restore the original watering program.
PRODUCT FEATURES
RAIN DELAY WATERING

Rain delay allows you to postpone watering for a set period of time, and it will not interrupt your original schedule.
To access the rain delay, follow the steps below.
- Turn the dial to "ON".
- Press and hold the "DELAY" button for 3-5s to start the delay watering function.
- Press the "+" button to select delay time from 24H, 48H, and 72H(default 24 hours).
- Press the "OK" button to run the delay function after selecting the delay time, and all watering plans will be skipped during this period.
- To remove rain delay, please trun the dial to "ON" and hold the "DELAY" button for 3-5s again to resume your programmed watering schedule.
Note:
Please remember to press the "OK" button after selecting the rain delay time to start the rain delay program. Otherwise, the rain delay setting will automatically exit after the screen flashes for 3-5s
OFF MODE
- If you wish to stop all 3 watering plans for an extended period, turn the dial to "OFF". (Your settings will be saved)
- The timer will not run automatically while in OFF mode. (The screen will display OFF )
- To start watering again, turn the dial back to "ON" to resume your programmed watering schedule.
TROUBLESHOOTING
| Problem | Possible Cause | Possible Solution |
| The water inlet leakage |
|
|
| The water won't stop/flow out |
|
|
| No response for manual/rain delay function |
|
|
| Short battery life |
|
|
| Low water pressure |
|
|
| LCD screen does not display |
|
|
CLEANING YOUR TIMER
After a period of use, impurities or dirt in the water may accumulate in the timer. Therefore, the timer should be cleaned regularly to ensure its proper operation.
Please follow these steps to clean the timer.
- Turn off the garden faucet and remove the timer. Check whether the filter at the timer water inlet has accumulated impurities.
- If the filter is dirty, please take it out of the timer and rinse it with running water.

- Turn on the Manual Watering Mode of the timer to open the valve and check whether the water pipe of the timer is blocked. If it is blocked, please clean it gently with a small cleaning brush.


- For outdoor use only. Placing the timer in the sheltered outdoors will prolong its lifetime.
- To avoid damage, please tighten it without using tools.
- The filter should be placed horizontally in the water inlet to prevent leakage.
- When low power, please replace the batteries to avoid the interruption of normal operation; when replacing the batteries, please make sure that the battery tray is dry.
- When the timer is not in use, please remove the batteries and store it indoors.
- Don't use the timer under the temperature more than 120℉(50℃), or less than 38℉(3℃).
- Don't subject the product to extreme force and shock.
- Severe electrical shock could result if water is sprayed into outlets or sources of electrical current. Never immerse the product in water.

This product is MADE IN CHINA and conforms to the national standards of the United States, Britain, Germany and France. Please use this product correctly. If it needs to be discarded, please properly dispose according to the national requirements. Please protect the environment.
FOR ANY PROBLEMS DURING USE, PLEASE CONTACT US:
Web: www.rainpointonline.com
Email: service@rainpointus.com
WhatsApp: +1 626-780-5952
US Free Hotline(English): +1 833-381-5659(MON-FRI 9:30 AM-5:30 PM PST)
EU Free Hotline(English Deutsch): +44 800-808-5337(MON-FRI 9:00 AM-5:00 PM CET )
NAME:VIAJE ELECTRONIC COMPANY LIMITED
ADDRESS:E588, 13 ADELAIDE ROAD, DUBLIN, D02 P950, IRELAND
Email: VIAJEELE@outlook.com

Documents / Resources
References
Download manual
Here you can download full pdf version of manual, it may contain additional safety instructions, warranty information, FCC rules, etc.
Advertisement


Need help?
Do you have a question about the ITV101P and is the answer not in the manual?
Questions and answers