RainPoint ITV517 User Manual
Multi-programming digital water timer
Hide thumbs
Also See for ITV517:
- User manual (46 pages) ,
- User manual (47 pages) ,
- User manual (46 pages)
Table of Contents
Advertisement
Available languages
Available languages
Quick Links
USER MANUAL
Save the user manual for future reference
If you have any questions, please contact us to get support
Multi-Programming
Digital Water Timer
Model: ITV517
Email
service@rainpointus.com
Website
www.rainpointonline.com
WhatsApp
+1 626-780-5952
Free Hotline
US: +1 833-381-5659 (EN)
EU: +44 800-808-5337 (EN DE)
Advertisement
Table of Contents

Subscribe to Our Youtube Channel
Related Manuals for RainPoint ITV517


Summary of Contents for RainPoint ITV517
- Page 1 USER MANUAL Multi-Programming Digital Water Timer Model: ITV517 Email service@rainpointus.com Website www.rainpointonline.com WhatsApp +1 626-780-5952 Free Hotline US: +1 833-381-5659 (EN) EU: +44 800-808-5337 (EN DE) Save the user manual for future reference If you have any questions, please contact us to get support...
- Page 2 What in the box A. ITV517P Multi-Programming Digital Water Timer B. User Manual C. Installation Guide D. Teflon Sealing Tape - 001 -...
-
Page 3: Important! Please Read
IMPORTANT! PLEASE READ! PLEASE ACTIVATE THE VALVE BEFORE USE IF YOU ARE USING IT FOR THE FIRST TIME OR AFTER A PERIOD OF IDLENESS TO ENSURE YOU CAN USE IT PROPERLY: TURN TO DIAL TO ON, PRESS AND HOLD OK BUTTON FOR 5S ENTER MANUAL MODE,THEN RE-PRESS OK BUTTON TWICE TO ACTIVE AND CLOSE THE VALVE,REPEAT THE ABOVE 3-5 TIMES.(EXPLANATION:IN MOST CASES,THE VALVE IS ACTIVATED,BUT DUE TO EXTERNAL FORCES... -
Page 4: Product Overview
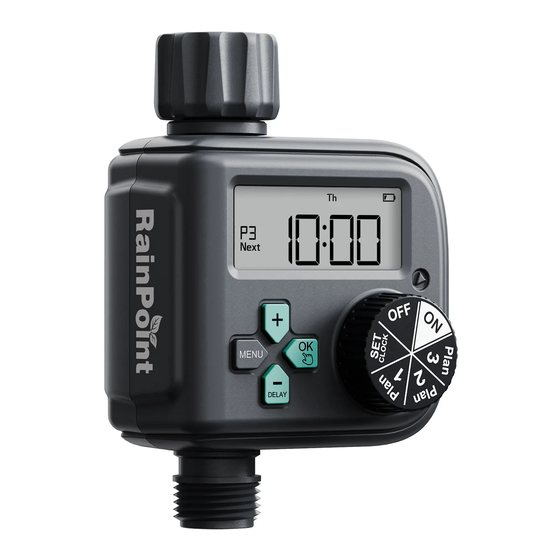
PRODUCT OVERVIEW BEFORE START FILTER HOSE TAP CONNECTION BIG LCD SCREEN + BUTTON MENU BUTTON DIAL DELAY/- BUTTON OK/MANUAL BUTTON OUTLET DIAL: Rotate to customize your watering schedule OK/MANUAL Button: Confirm setup or water manually DELAY/- Button: Adjust time and system setup or delay watering program + Button: Adjust time and system setup MENU Button: Switch functions in plan setting, and review the set... -
Page 5: Specification
DIAL POSITION FUNCTION SET CLOCK Set the current time Go to the Irrigation Plan I PLAN 1 settings PLAN 2 Go to the Irrigation Plan 2 settings PLAN 3 Go to the Irrigation Plan 3 settings Run the timer based on the setting Turn off the valve and all schedules... -
Page 6: Product Installation
PRODUCT INSTALLATION INSTALLING THE BATTERY 1) Remove the battery tray on the back of the timer. 2) Insert two new AAA (1.5V) alkaline batteries (not included). 3) Firmly reinstall the battery tray back into the timer. Note: · Firmly restore the battery tray to ensure water resistance. ·... -
Page 7: Installing The Timer
INSTALLING THE TIMER 1) Attach the timer to an outdoor hose faucet. 2) Please turn on the tap after programming the timer. Note: · Please try to use it vertically. · When programming the timer please turn off tap to avoid getting wet. ·... -
Page 8: Product Settings
PRODUCT SETTINGS STEP 1: SET CLOCK 1) Turn the dial to SET CLOCK. 2) Use the "+" and "-" buttons to set the weekday and time , press "OK" button to save. 3) Long press the "+" and "-" buttons can be set quickly. 4) Default 24-hour system, long press "OK"... - Page 9 STEP 2: PLAN 1/2/3 1) Turn the dial to PLAN 1/2/3 to set the schedule for each of them. 2) Use the "MENU" button to switch the setting of Start Time, How Long and How Often. 3) Use the "+" and "-" buttons to set the watering schedule. Press "OK" button to confirm and save settings.
-
Page 10: Start Time
STEP 3: START TIME 1) Turn the dial to any plan, and it will start setting from Start Time. Press the "+" and "-" buttons to set the hour while it's blinking, press the "OK" button to confirm, and go to set minutes. 2) After the minute setting finishes, press "OK"... - Page 11 STEP 4: HOW LONG 1) Press "MENU" button to switch setting to How Long. Use "+" and "-" buttons to set the hour while it's blinking, press the "OK" button to confirm, and go to set the minute. 2) After the minute setting finishes, press "OK" to confirm, and everything stops blinking, which means it is confirmed.
-
Page 12: How Often
STEP 5: HOW OFTEN Press "MENU" button to switch setting to How Long. Before setting, please choose a frequency mode you prefer first between Every Mode and Weekday Mode. Use "+" and "-" buttons to switch selection and press "OK" to select setting. - 011 -... - Page 13 Every Mode: To run the watering plan in an interval of every exact day, like every one day or every two days. In Every mode, use "+" and "-"buttons to set from every 6 hours to every 7 days, and press "OK" to confirm. At this time, ONLY press the "+" or "-" buttons can resume settings.
- Page 14 Weekday Mode: To run the watering plan on the specific weekdays, like Monday, Wednesday and Friday. In Weekday mode, use "+" and "-" buttons to move the option box and press "OK" button to confirm selection. When all preferred option selected, leave the box blinking for 5 sec and the whole setting will confirmed automatically.
-
Page 15: Off Mode
OFF MODE 1) Turn the dial to OFF if you want to stop the watering plans for an extended period, and your settings will be saved. 2) The timer will not water automatically while in OFF mode. 3) To start running water again, turn the dial back to ON to resume your programmed watering schedule. - Page 16 ON MODE 1) Turn the dial to ON to run the set plans automatically. 2) The LCD screen will show the clock time and next coming plan time. 3) Using "MENU" button to check "Start Time", "How Long", "How Often" in the order of the Plan1/2/3.
-
Page 17: Additional Features
ADDITIONAL FEATURES RAIN DELAY WATERING Rain delay allows you to postpone watering for a set period of time, and it doesn’t interrupt your original schedule. To access the rain delay, follow the steps below. 1) Keep the dial in the "ON" position, press the "DELAY/-" button for 3-5s enter the delay watering mode. - Page 18 MANUAL/HAND WATERING This feature allows you to water without interrupting your set watering schedule. To access this feature, please follow the steps below. 1) Keep the dial in the "ON" position, and hold the " " button for 3-5s to enter watering manually mode. 2) The default manual watering duration is 10 minutes, you can press button "+"...
-
Page 19: Battery Status
BATTERY STATUS Battery Status will be displayed as following: Low Power Note: When the low battery indicator appears on display. The valve will close automatically to avoid leakage. Please replace the battery in time in case of interrupting the normal operation. TROUBLE SHOOTING Possible Factors Solution may help... - Page 20 Check if filter washer is clean and undamaged. Faucet connection is hand tight. If your Rainpoint product does not operate properly after trying the troubleshooting steps, please contact us by phone or email :1-833-381-5659 (EN)(MON-FRI 9:30 AM-5:30 PM PST) EU: +44 800-808-5337 (EN DE)(MON-FRI 9:00 AM-5:00 PM CET) Email: service@rainpointus.com...
- Page 21 WARNINGS 1) Intended for outdoor use only, put in the sheltered outdoor will prolong the product lifetime. 2) Using tools to tighten your timer is too tight, easy to damage, to avoid damaging the timer, please tighten it with your hand instead of a tool.
-
Page 22: Warranty
To place a warranty request, please email your order ID to service@rainpointus.com and we'll respond within 24 hours. CUSTOMER SERVICE Still have trouble with setup, please search for “RainPoint” on YouTube for installation videos! If the user manual doesn't have what you're looking for or you need some help, please prepare the LOT NO. - Page 23 BENUTZERHANDBUCH Multi-Programmierung Digitale Bewässerungsuhr Model: ITV517 Email service@rainpointus.com Webseite www.rainpointonline.com WhatsApp +1 626-780-5952 Kostenlos Hotline UNS: +1 833-381-5659 (EN) EU: +44 800-808-5337 (EN DE) Bewahren Sie das Benutzerhandbuch zum späteren Nachschlagen auf Wenn Sie Fragen haben, kontaktieren Sie uns bitte,...
- Page 24 Was ist dabei A. ITV517P Multi-Digitale Bewässerungsuhr B. Benutzerhandbuch C. Installationsleitfaden D. Teflon-Dichtungsband - 022 -...
- Page 25 WICHTIG! BITTE LESEN! BITTE AKTIVIEREN SIE DAS VENTIL VOR DEM GEBRAUCH, WENN SIE ES VERWENDEN ZUM ERSTEN MAL ODER NACH EINER ZEIT DER NICHTBETRIEBNAHME, UM SICHERZUSTELLEN, DASS SIE ES ORD- N U N G S G E M Ä S S V E RW E N D E N KÖ N N E N : D R E H E N S I E D E N WÄHLSCHALTER AUF EIN, DRÜCKEN UND HALTEN SIE DIE OK-TASTE FÜR 5 SEKUNDEN GEDRÜCKT IN DEN MANUELLEN MODUS, DANN DRÜCKEN SIE DIE OK-TASTE ZWEIMAL, UM AKTIV ZU AKTIVIEREN...
-
Page 26: Produkt Überblick
PRODUKT ÜBERBLICK VORANFANG FILTER SCHLAUCHKLOPFEN VERBINDUNG GROSSLCD BILDSCHIRM +KNOPF SPEISEKART- WÄHLEN EKNOPF VERZÖGERUNG/- KNOPF MANUELKNOPF AUSLAUF WÄHLEN: Drehen, um Ihren Bewässerungsplan anzupassen OK/MANUAL-Taste: Setup bestätigen oder manuell bewässern DELAY/- Taste: Zeit und System-Setup anpassen oder Bewässerungsprogramm verzögern +-Taste: Zeit und System-Setup anpassen MENÜButton: Schalten Sie die Funktionen in der Planeinstellung um und überprüfen Sie die eingestellten Details in der Position ON - 024 -... -
Page 27: Spezifikation
WÄHLEN POSITIONSFUNKTIONN UHR EINSTELLEN Stellen Sie die aktuelle Uhrzeit ein PLAN 1 Gehen Sie zum Bewässerungsplan 1 PLAN 2 Gehen Sie zum Bewässerungsplan 2 PLAN 3 Gehen Sie zum Bewässerungsplan 3 Führen Sie den Timer aus Schalten Sie das Ventil und alle Zeitpläne aus SPEZIFIKATION Min./Max. - Page 28 PRODUKT INSTALLATION INSTALLIEREN DER BATTERIE 1) Entfernen Sie das Batteriefach auf der Rückseite des Timers. 2) Setzen Sie zwei neue AAA (1,5 V) Alkaline ein (Batterien nicht enthalten). 3) Setzen Sie den Akku wieder fest ein Fach zurück in den Timer. Notiz: ·...
- Page 29 INSTALLIEREN DER TIMER 1) Befestigen Sie die Zeitschaltuhr an einem Außenschlauchhahn. 2) Bitte schalten Sie den ein. Tippen Sie nach dem Programmieren des Timers auf . Notiz: · Bitte versuchen Sie es vertikal zu verwenden. · Schalten Sie beim Programmieren des Timers den Wasserhahn aus, um nicht nass zu werden.
- Page 30 PRODUKT DIE EINSTELLUNGEN SCHRITT 1: EINSTELLENUHR 1) Drehen Sie die Wählscheibe auf UHR EINSTELLEN. 2) Verwenden Sie die Tasten "+" und "-" , um den Wochentag und die Uhrzeit einzustellen, und drücken Sie die Taste "OK" , um zu speichern. 3) Drücken Sie lange auf "+"...
- Page 31 SCHRITT 2: PLANEN1/2/3 1) Drehen Sie die Wählscheibe auf PLAN 1/2/3, um den Zeitplan für jeden von ihnen festzulegen. 2) Verwenden Sie die "MENU"-Taste, um die Einstellung von Startzeit, Wie lange und Wie oft umzuschalten. 3) Verwenden Sie die Tasten "+" und "-", um den Bewässerungszeitplan einzustellen.
- Page 32 SCHRITT 3: ANFANGZEIT 1) Drehen Sie den Drehregler auf jeden Plan, und die Einstellung beginnt mit der Startzeit. Drücken Sie die Tasten "+" und "-", um die Stunde einzustellen, während sie blinkt, drücken Sie die Taste "OK", um zu bestätigen, und gehen Sie zum Einstellen der Minuten.
- Page 33 SCHRITT 4: WIELANG 1) Drücken Sie die "MENU"-Taste um Einstellung auf Wie lange umschalten. Verwenden Sie die Tasten "+" und "-", um die Stunde einzustellen, während sie blinkt, drücken Sie die Taste "OK", um zu bestätigen, und gehen Sie zur Einstellung der Minute. 2) Nachdem die Minuteneinstellung beendet ist, drücken Sie zur Bestätigung "OK", und alles hört auf zu blinken, was bedeutet, dass es bestätigt ist.
- Page 34 SCHRITT 5: WIEHÄUFIG Drücken Sie die "MENU"-Taste, um die Einstellung auf Wie lange umzuschalten. Vor dem Einstellen, Bitte wählen Sie zuerst einen Frequenzmodus, den Sie bevorzugen, zwischen Every Mode und Weekday Mode. Verwenden Sie die Tasten "+" und "-", um die Auswahl zu ändern, und drücken Sie "OK", um die Einstellung auszuwählen.
- Page 35 Jeder Modus: Um den Bewässerungsplan in einem tagesgenauen Intervall auszuführen, wie jeden Tag oder alle zwei Tage. Verwenden Sie in jedem Modus "+" und "-" Tasten zum Einstellen von alle 6 Stunden auf alle7 Tage, und drücken Sie "OK" zur Bestätigung. Drücken Sie zu diesem Zeitpunkt NUR die "+"...
- Page 36 Wochentagsmodus: Um den Bewässerungsplan an bestimmten Wochentagen auszuführen, wie Montag, Mittwoch und Freitag. Verwenden Sie im Wochentagsmodus "+" und "-" Schaltflächen, um das Optionsfeld zu verschieben und drücke "OK" sondern Ton, um die Auswahl zu bestätigen. Wenn alle bevorzugten Optionen ausgewählt sind, lassen Sie das Kästchen 5 Sekunden lang blinken und die gesamte Einstellung wird automatisch bestätigt.
- Page 37 AUS MODUS 1) Wenn Sie die Bewässerungspläne für längere Zeit aussetzen möchten, drehen Sie den Drehregler auf AUS, und Ihre Einstellungen werden gespeichert. 2) Der Timer bewässert im AUS-Modus nicht automatisch. 3) Um das Wasser wieder laufen zu lassen, drehen Sie den Drehschalter wieder auf ON, um mit Ihrem programmierten Bewässerungsplan fortzufahren.
- Page 38 AN MODUS 1) Drehen Sie den Drehregler auf ON, um die eingestellten Pläne automatisch auszuführen. 2) Der LCD-Bildschirm zeigt die Uhrzeit und die nächste kommende Planzeit an. 3) Verwenden Sie die "MENU" -Taste, um "Startzeit", "Wie lange", "Wie Häufig" in der Reihenfolge des Plans 1/2/3. - 036 -...
- Page 39 ZUSÄTZLICH MERKMALE REGENBEWÄSSERUNG VERZÖGERN Regen Verzögerung ermöglicht es Ihnen, die Bewässerung um einen Satz pro zu verschieben Zeit, und es unterbricht nicht Ihren ursprünglichen Zeitplan.Führen Sie die folgenden Schritte aus, um auf die Regenverzögerung zuzugreifen. 1) Halten Sie den Wahlschalter in der „ON“-Position, drücken Sie die "DELAY/-"-Taste für3-5 Sekunden wechseln Sie in den Verzögerungsbewässerungsmodus.
- Page 40 MANUELL/HAND BEWÄSSERUNG Mit dieser Funktion können Sie bewässern, ohne Ihren festgelegten Bewässerungsplan zu unterbrechen.Um auf diese Funktion zuzugreifen, führen Sie bitte die folgenden Schritte aus. 1) Halten Sie Stellen Sie den Wahlschalter auf "ON" und halten Sie die " "Taste für 3-5 Sekunden, um in den manuellen Bewässerungsmodus zu gelangen.
- Page 41 BATTERIESTATUS Der Batteriestatus wird wie folgt angezeigt: Niedriger Power sind Notiz: Wenn die Anzeige für schwache Batterieerscheint on-Anzeige. Das Ventil schließt automatisch, um ein Auslaufen zu vermeiden. Bitte tauschen Sie die Batterie rechtzeitig aus, falls der normale Betrieb unterbrochen wird. ÄRGER SCHIESSEN Mögliche Faktoren Problem...
- Page 42 Wasserhahnanschluss ist handfest. Wenn Ihr RainPoint Produkt auch nach obigen Ratschlägen nicht ordnungsgemäß funktioniert, kontaktieren Sie uns bitte per Telefon oder Email: US: +1-833-381-5659 (EN) (Montag – Freitag 9:30 – 17:30 PST) EU: +44 800-808-5337 (EN, DE) (Montag – Freitag 9:00 – 17:00 CET) Email: service@rainpointus.com...
- Page 43 WARNUNGEN 1) Nur für den Gebrauch im Freien bestimmt, ein geschützter Standort im Freien die Lebensdauer des Produkts verlängern. 2) Die Verwendung von Werkzeugen zum Anziehen der Zeitschaltuhr ist zu fest und kann leicht beschädigt werden. um eine Beschädigung der Zeitschaltuhr zu vermeiden, ziehen Sie sie bitte mit der Hand mit der Hand statt mit einem Werkzeug.
-
Page 44: Garantie
KUNDENDIENST Wenn Sie immer noch Probleme mit der Einrichtung haben, suchen Sie bitte auf YouTube nach "RainPoint", um Installationsvideos zu finden! Wenn die Bedienungsanleitung nicht das enthält, wonach Sie suchen, oder Sie Hilfe benötigen Hilfe benötigen, halten Sie bitte die LOT-NR. - Page 45 Scan the QR code to get fast support Need Help? Please contact us US Free Hotline: +1 833-381-5659 (MON-FRI: 09:30 AM-5:30 PM PST) EU Free Hotline: +44 800-808-5337 (EN,DE) (MON-FRI 9:00 AM-5:00 PM CET) Email: service@rainpointus.com Website: www.rainpointonline.com - 107 -...
Need help?
Do you have a question about the ITV517 and is the answer not in the manual?
Questions and answers