RainPoint ITV517 User Manual
Multi-programming digital water timer
Hide thumbs
Also See for ITV517:
- User manual (46 pages) ,
- User manual (47 pages) ,
- User manual (46 pages)
Table of Contents
Advertisement
Available languages
Available languages
USER MANUAL
Save the user manual for future reference
If you have any questions, please contact us to get support
Multi-Programming
Digital Water Timer
Model: ITV517
Email
service@rainpointus.com
Website
www.rainpointonline.com
WhatsApp
+1 626-780-5952
Free Hotline
US: +1 833-381-5659 (EN)
EU: +44 800-808-5337 (EN DE)
Advertisement
Table of Contents

Related Manuals for RainPoint ITV517


Summary of Contents for RainPoint ITV517
- Page 1 USER MANUAL Multi-Programming Digital Water Timer Model: ITV517 Email service@rainpointus.com Website www.rainpointonline.com WhatsApp +1 626-780-5952 Free Hotline US: +1 833-381-5659 (EN) EU: +44 800-808-5337 (EN DE) Save the user manual for future reference If you have any questions, please contact us to get support...
- Page 2 What in the box A. ITV517P Multi-Programming Digital Water Timer B. User Manual C. Installation Guide D. Teflon Sealing Tape - 001 -...
-
Page 3: Important! Please Read
IMPORTANT! PLEASE READ! PLEASE ACTIVATE THE VALVE BEFORE USE IF YOU ARE USING IT FOR THE FIRST TIME OR AFTER A PERIOD OF IDLENESS TO ENSURE YOU CAN USE IT PROPERLY: TURN TO DIAL TO ON, PRESS AND HOLD OK BUTTON FOR 5S ENTER MANUAL MODE,THEN RE-PRESS OK BUTTON TWICE TO ACTIVE AND CLOSE THE VALVE,REPEAT THE ABOVE 3-5 TIMES.(EXPLANATION:IN MOST CASES,THE VALVE IS ACTIVATED,BUT DUE TO EXTERNAL FORCES... -
Page 4: Product Overview
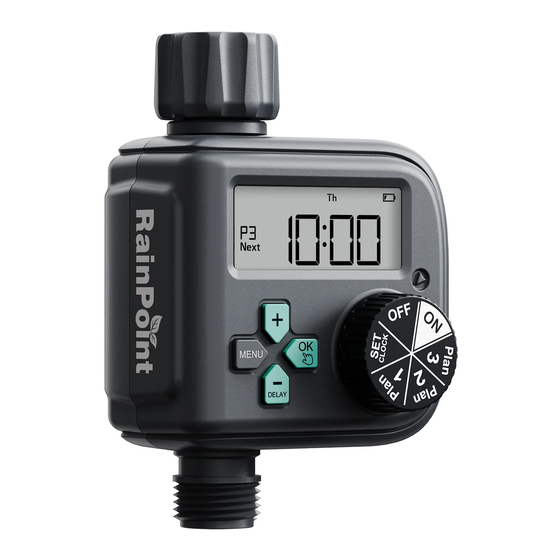
PRODUCT OVERVIEW BEFORE START FILTER HOSE TAP CONNECTION BIG LCD SCREEN + BUTTON MENU BUTTON DIAL DELAY/- BUTTON OK/MANUAL BUTTON OUTLET DIAL: Rotate to customize your watering schedule OK/MANUAL Button: Confirm setup or water manually DELAY/- Button: Adjust time and system setup or delay watering program + Button: Adjust time and system setup MENU Button: Switch functions in plan setting, and review the set... -
Page 5: Specification
DIAL POSITION FUNCTION SET CLOCK Set the current time Go to the Irrigation Plan I PLAN 1 settings PLAN 2 Go to the Irrigation Plan 2 settings PLAN 3 Go to the Irrigation Plan 3 settings Run the timer based on the setting Turn off the valve and all schedules... -
Page 6: Product Installation
PRODUCT INSTALLATION INSTALLING THE BATTERY 1) Remove the battery tray on the back of the timer. 2) Insert two new AAA (1.5V) alkaline batteries (not included). 3) Firmly reinstall the battery tray back into the timer. Note: · Firmly restore the battery tray to ensure water resistance. ·... -
Page 7: Installing The Timer
INSTALLING THE TIMER 1) Attach the timer to an outdoor hose faucet. 2) Please turn on the tap after programming the timer. Note: · Please try to use it vertically. · When programming the timer please turn off tap to avoid getting wet. ·... -
Page 8: Product Settings
PRODUCT SETTINGS STEP 1: SET CLOCK 1) Turn the dial to SET CLOCK. 2) Use the "+" and "-" buttons to set the weekday and time , press "OK" button to save. 3) Long press the "+" and "-" buttons can be set quickly. 4) Default 24-hour system, long press "OK"... - Page 9 STEP 2: PLAN 1/2/3 1) Turn the dial to PLAN 1/2/3 to set the schedule for each of them. 2) Use the "MENU" button to switch the setting of Start Time, How Long and How Often. 3) Use the "+" and "-" buttons to set the watering schedule. Press "OK" button to confirm and save settings.
-
Page 10: Start Time
STEP 3: START TIME 1) Turn the dial to any plan, and it will start setting from Start Time. Press the "+" and "-" buttons to set the hour while it's blinking, press the "OK" button to confirm, and go to set minutes. 2) After the minute setting finishes, press "OK"... - Page 11 STEP 4: HOW LONG 1) Press "MENU" button to switch setting to How Long. Use "+" and "-" buttons to set the hour while it's blinking, press the "OK" button to confirm, and go to set the minute. 2) After the minute setting finishes, press "OK" to confirm, and everything stops blinking, which means it is confirmed.
-
Page 12: How Often
STEP 5: HOW OFTEN Press "MENU" button to switch setting to How Long. Before setting, please choose a frequency mode you prefer first between Every Mode and Weekday Mode. Use "+" and "-" buttons to switch selection and press "OK" to select setting. - 011 -... - Page 13 Every Mode: To run the watering plan in an interval of every exact day, like every one day or every two days. In Every mode, use "+" and "-"buttons to set from every 6 hours to every 7 days, and press "OK" to confirm. At this time, ONLY press the "+" or "-" buttons can resume settings.
- Page 14 Weekday Mode: To run the watering plan on the specific weekdays, like Monday, Wednesday and Friday. In Weekday mode, use "+" and "-" buttons to move the option box and press "OK" button to confirm selection. When all preferred option selected, leave the box blinking for 5 sec and the whole setting will confirmed automatically.
-
Page 15: Off Mode
OFF MODE 1) Turn the dial to OFF if you want to stop the watering plans for an extended period, and your settings will be saved. 2) The timer will not water automatically while in OFF mode. 3) To start running water again, turn the dial back to ON to resume your programmed watering schedule. - Page 16 ON MODE 1) Turn the dial to ON to run the set plans automatically. 2) The LCD screen will show the clock time and next coming plan time. 3) Using "MENU" button to check "Start Time", "How Long", "How Often" in the order of the Plan1/2/3.
-
Page 17: Additional Features
ADDITIONAL FEATURES RAIN DELAY WATERING Rain delay allows you to postpone watering for a set period of time, and it doesn’t interrupt your original schedule. To access the rain delay, follow the steps below. 1) Keep the dial in the "ON" position, press the "DELAY/-" button for 3-5s enter the delay watering mode. - Page 18 MANUAL/HAND WATERING This feature allows you to water without interrupting your set watering schedule. To access this feature, please follow the steps below. 1) Keep the dial in the "ON" position, and hold the " " button for 3-5s to enter watering manually mode. 2) The default manual watering duration is 10 minutes, you can press button "+"...
-
Page 19: Battery Status
BATTERY STATUS Battery Status will be displayed as following: Low Power Note: When the low battery indicator appears on display. The valve will close automatically to avoid leakage. Please replace the battery in time in case of interrupting the normal operation. TROUBLE SHOOTING Possible Factors Solution may help... - Page 20 Check if filter washer is clean and undamaged. Faucet connection is hand tight. If your Rainpoint product does not operate properly after trying the troubleshooting steps, please contact us by phone or email :1-833-381-5659 (EN)(MON-FRI 9:30 AM-5:30 PM PST) EU: +44 800-808-5337 (EN DE)(MON-FRI 9:00 AM-5:00 PM CET) Email: service@rainpointus.com...
- Page 21 WARNINGS 1) Intended for outdoor use only, put in the sheltered outdoor will prolong the product lifetime. 2) Using tools to tighten your timer is too tight, easy to damage, to avoid damaging the timer, please tighten it with your hand instead of a tool.
-
Page 22: Warranty
To place a warranty request, please email your order ID to service@rainpointus.com and we'll respond within 24 hours. CUSTOMER SERVICE Still have trouble with setup, please search for “RainPoint” on YouTube for installation videos! If the user manual doesn't have what you're looking for or you need some help, please prepare the LOT NO. -
Page 23: Manuel D'utilisation
MANUEL D’UTILISATION Minuterie d’eau numérique Multiprogrammation Model: ITV517 Email service@rainpointus.com Site web www.rainpointonline.com WhatsApp +1 626-780-5952 Ligne d'assistance téléphonique gratuite US: +1 833-381-5659 (EN) EU: +44 800-808-5337 (EN DE) Conservez le manuel d'utilisation pour vous y référer ultérieurement. Si vous avez des questions, veuillez nous contacter pour obtenir de l'aide. -
Page 24: Contenu De La Boite
CONTENU DE LA BOITE A. ITV517P Minuterie d’eau numérique multiprogrammation B. Manuel d’utilisation C. Guide d'installation D. Ruban d'étanchéité en téflon - 043 -... - Page 25 IMPORTANT ! LISEZ S’IL VOUS PLAIT ! VEUILLEZ ACTIVER LA VALVE AVANT DE L'UTILISER SI VOUS L'UTILI- SEZ POUR LA PREMIÈRE FOIS OU APRÈS UNE PÉRIODE D'INACTIVI- TÉ POUR VOUS ASSURER QUE VOUS POUVEZ L'UTILISER CON- VENABLEMENT : TOURNEZ LE CADRAN SUR ON, APPUYEZ SUR LE BOUTON OK ET MAINTENEZ-LE ENFONCÉ...
-
Page 26: Vue D'ensemble Du Produit
VUE D'ENSEMBLE DU PRODUIT AVANT DEMARRAGE FILTRE CONNEXION TUYAU D’ ARROSAGE LARGE ÉCRAN LCD BOUTON + BOUTON MENU CADRAN RETARDER / BOUTON - OK/BOUTON MANUEL SORTIE CADRAN : Tournez le cadran pour personnaliser votre programme d'arrosage OK/ Bouton MANUEL : Confirmez la configuration ou l'arrosage manuellement RETARDER/ Bouton - : Réglez l'heure et la configuration du système ou retarder le programme d'arrosage... -
Page 27: Caractéristiques Techniques
FONCTIONS DU CADRAN Régler l’horloge Réglez l'heure actuelle Allez aux paramètres du PLAN 1 Plan d'Irrigation 1 PLAN 2 Allez aux paramètres du Plan d'Irrigation 2 PLAN 3 Allez aux paramètres du Plan d'Irrigation 3 Lancez la minuterie en fonction du réglage Fermez la valve et tous les programmes CARACTÉRISTIQUES TECHNIQUES... -
Page 28: Installation Du Produit
INSTALLATION DU PRODUIT INSTALLATION DE LA PILE 1) Retirez le couvercle du compartiment à piles situé à l'arrière de la minuterie. 2) Insérez deux nouvelles piles alcalines AAA (1,5V) (non fournies). 3) Remettez le couvercle du compartiment à piles sur la minuterie. Note: ·... - Page 29 INSTALLATION DE LA MINUTERIE 1) Fixez le minuteur à un robinet extérieur. 2) Rassurez-vous d’ouvrir le robinet après avoir programmé la minuterie. Note: · Utilisez le minuteur verticalement. · Lorsque vous le programmez, fermez le robinet pour éviter de vous mouiller.
- Page 30 RÉGLAGES DU PRODUIT Régler de l’horloge Etape 1 : 1) Tournez le cadran sur SET CLOCK . 2) Utilisez les boutons "+" et "-" pour régler le jour de la semaine et l'heure, puis appuyez sur le bouton "OK" pour enregistrer. 3) Une pression longue sur les boutons "+"...
- Page 31 Etape 2 : PLAN 1/2/3 1) Tournez le cadran sur PLAN 1/2/3 pour régler la programmation de chacun d'eux. 2) Utilisez le bouton "MENU" pour changer le réglage de l'heure de démarrage, de la durée et de la fréquence. 3) Utilisez les boutons "+" et "-" pour régler le programme d'arrosage. Appuyez sur le bouton "OK"...
-
Page 32: Heure De Démarrage
Etape 3 : HEURE DE DÉMARRAGE 1) Positionnez le cadran sur n'importe quel plan, et le réglage commencera à partir de Start Time. Appuyez sur les boutons "+" et "-" pour régler l'heure pendant qu'elle clignote, appuyez sur le bouton "OK" pour confirmer, puis passez au réglage des minutes. 2) Une fois le réglage des minutes terminé, appuyez sur "OK"... - Page 33 La durée Etape 4 : 1) Appuyez sur le bouton "MENU" pour passer au réglage de la durée (How Long). Utilisez les boutons "+" et "-" pour régler l'heure pendant qu'elle clignote, appuyez sur le bouton "OK" pour confirmer, puis passez au réglage des minutes. 2) Une fois le réglage des minutes terminé, appuyez sur "OK"...
- Page 34 Etape 5 : À QUELLE FRÉQUENCE Appuyez sur le bouton "MENU" pour passer au réglage de la durée (How Long). Avant de procéder au réglage, choisissez d'abord le mode de fréquence que vous désirez entre le mode Tous les jours (Every Mode) et le mode Semaine (Weekday Mode).
- Page 35 TMode tous les jours (Every mode) : Pour activer le programme d'arrosage à un intervalle de chaque jour précis, comme tous les jours ou tous les deux jours. En mode tous les jours, utilisez les boutons "+" et "-" pour régler de toutes les 6 heures à tous les 7 jours, puis appuyez sur "OK"...
- Page 36 Mode Jour de la semaine (Weekday Mode) : Pour exécuter le programme d'arrosage sur des jours de semaine spécifiques, comme le lundi, le mercredi et le vendredi. En mode Jour de la semaine, utilisez les boutons "+" et "-" pour déplacer la fenêtre d'option et appuyez sur le bouton "OK"...
-
Page 37: Mode Off/ Arrêt
MODE OFF/ ARRÊT 1) Réglez le cadran sur OFF si vous voulez arrêter les plannings d'arrosage pendant une période prolongée, et vos réglages seront sauvegardés. 2) La minuterie n'arrose pas automatiquement lorsqu'elle est en mode OFF. 3) Pour recommencer à faire couler l'eau, ramenez le cadran sur ON pour reprendre votre programme d'arrosage. - Page 38 MODE ON/MARCHE 1) Positionnez le cadran sur ON pour exécuter les plannings automatiquement. 2) L'écran LCD affichera l'heure indiquée sur l'horloge et la prochaine heure programmée. 3) A l'aide de la touche "MENU", cochez "Start Time", "How Long", "How Often" dans l'ordre des plans 1/2/3. - 057 -...
-
Page 39: Fonctionnalités Supplémentaires
FONCTIONNALITÉS SUPPLÉMENTAIRES MODE DIFFÉRÉ DE PLUIE L’arrosage différé vous permet de reporter l'arrosage pendant une période déterminée, et il n'interrompt pas votre programme d'arrosage initial. Pour accéder au mode pluie différé, suivez les étapes ci-dessous. 1) Maintenez le cadran sur la position "ON", appuyez sur le bouton "DELAY/-"... -
Page 40: Arrosage Manuel
ARROSAGE MANUEL Cette fonction vous permet d'arroser sans interrompre votre programme d'arrosage. Pour y accéder, veuillez suivre les étapes ci-dessous. 1) Maintenez le cadran sur la position "ON" et appuyez sur le bouton " " pendant 3 à 5 secondes pour passer en mode arrosage manuel. -
Page 41: Dépannage
STATUT DES PILES L'état des piles s'affiche de la manière suivante : Pile faible Note: Lorsque l'indicateur de pile faible apparaît sur l'écran. La valve se ferme automatiquement pour éviter les fuites. Remplacez la pile à temps en cas d'interruption du fonctionnement normal. DÉPANNAGE Problèmes Causes possibles... - Page 42 Le raccord du robinet est serré à la main. Si votre produit Rainpoint ne fonctionne pas correctement après avoir essayé les étapes de dépannage, veuillez nous contacter par téléphone ou par e-mail : US: 1-833-381-5659 (FR)(LUN-VEN 9H30-17h30 PST) UE : +44 800-808-5337 (EN DE)( LUN-VEN 9H30-17h00 HNEC) Email : service@rainpointus.com...
- Page 43 AVERTISSEMENTS 1) Destiné à être utilisé à l'extérieur uniquement, le fait de le placer à l'abri à l'extérieur prolongera la durée de vie du produit. prolongera la durée de vie du produit. 2) L'utilisation d'outils pour serrer votre minuterie est trop serrée, facile à endommager.
-
Page 44: Garantie
GARANTIE Rainpoint offre une garantie sans souci d'un an contre les défauts de fabrication, de matériel et de main d'œuvre à partir de la date d'achat. contre les défauts de fabrication et de main d'œuvre à partir de la date d'achat.Au cours de la période de garantie, nous remplacerons... - Page 45 Scan the QR code to get fast support Need Help? Please contact us US Free Hotline: +1 833-381-5659 (MON-FRI: 09:30 AM-5:30 PM PST) EU Free Hotline: +44 800-808-5337 (EN,DE) (MON-FRI 9:00 AM-5:00 PM CET) Email: service@rainpointus.com Website: www.rainpointonline.com - 107 -...
Need help?
Do you have a question about the ITV517 and is the answer not in the manual?
Questions and answers